Posts : 2631 Join date : 2011-11-26 Age : 83 Location : Thaxted, Essex
Subject: Steam Tug Furie Thu Nov 27, 2014 5:59 pm
As I said when finishing my Pilot Boat, the next model would be a kit! So, forgetting the small Fireboat for the Grandson, here is my next project. This is Deans Marine's kit. It is not what I intended to build, but I managed to buy this at a good price on ebay. It came complete. I think, apart from the instructions. Now Deans instructions are not usually very good, but there are some details I can't decipher from the plan, so I have had to buy the instructions. Whilst waiting for them to arrive, I started today by cleaning up the hull. This looks to be pretty good. No serious blemishes, just a few mold lines. and it needed the top edges cleaning up. Next job is to wash it and give it a light sanding with 1200 grade wet & dry.
Barrie
davidjt Forum Sponsor
Posts : 534 Join date : 2013-01-08 Age : 72 Location : n wales coast
As it says in the photo, its in museum in the Netherlands and I believe is still sailing. Not having any interest in naval vessels, I tend to gravitate to tugs
Barrie
barriew Captain (moderator)
Posts : 2631 Join date : 2011-11-26 Age : 83 Location : Thaxted, Essex
The instructions arrived from Deans today. They are for a later version of the kit with some laser cut items, mine are all printed. Not a problem. Its the position of deck beams and such info that I really wanted. I built a stand today - no other progress, except I sorted out the components for a coupling and washed the hull with meths ready for soapy water tomorrow
Barrie
troutrunner Master
Posts : 573 Join date : 2014-01-23 Location : Lincolnshire UK
Subject: Re: Steam Tug Furie Sat Nov 29, 2014 10:34 am
Yes we will Barrie.
barriew Captain (moderator)
Posts : 2631 Join date : 2011-11-26 Age : 83 Location : Thaxted, Essex
Subject: Re: Steam Tug Furie Sat Nov 29, 2014 1:22 pm
OK, I decided that the meths would have removed any wax, so I could postpone the wash and sand until I'm ready for painting. I would have to do that anyway so save effort Instead I varnished the underside of the stand ready to stain the top when its dry. I fixed the skeg. This is held on with two brass bolts. They were liberally coated with grease before setting them in resin. This means that I can remove them in order to fit the rudder, and in future remove the rudder so that I can remove the propshaft. The propshaft has also been installed and sealed in place. I drilled out the various portholes and freeing ports, then remembered that I hadn't smoothed the inside of the gunwales with filler So I put some masking tape over the holes and smoothed on the filler. I will have to re-cut the openings after I've sanded the gunwales. That's it until Monday - maiden voyage of the little Fire Boat tomorrow.
Barrie
barriew Captain (moderator)
Posts : 2631 Join date : 2011-11-26 Age : 83 Location : Thaxted, Essex
Today I sanded down the filler I had applied to the gunwales - its difficult to tell if I've got them smooth enough until they are painted. I also opened out all the freeing ports and the portholes - 14 portholes There are still some other openings to file out, but these were the important ones. After lots of filing, I started making the rudder. There was no material for the shaft and bearing tube in the kit (Its not mentioned on the parts list), but I had some rod and tube of appropriate dimensions. From experience I know that the blade can slip on the shaft if you are not careful, so I soldered some thin rod to the shaft to give a positive bond with the blade. Once the glue had dried hard, then there will be quite a bit of sanding required. I will try to simulate the bands on the original using some micro strip, with glue dots for rivets. I also removed the bolts holding the skeg to the hull ready for fitting the rudder - they came out cleanly
Barrie
barriew Captain (moderator)
Posts : 2631 Join date : 2011-11-26 Age : 83 Location : Thaxted, Essex
Not a lot of progress today - sickness in the family restricted my workshop time I did manage to shape the rudder blade, and also made the rear deck support fit. I need this in place so that I can align the supports for the rest of the deck which I think is the next job, although maybe I should fix the rudder bearing tube first. I was able to remove the skeg today, so the grease worked
I think I have made a slight mistake - there are a lot of portholes in the hull, and I assumed that the fittings were for those. In fact these are intended for some of the hatches I really ned to use the supplied fittings on the hull, as some of my holes are not as round as they might be , and I need them to make them look neat. Another problem is that these are not supplied with glazing, and the suggestion is to fill with clear resin. Which means I have to paint the hull before I do that, and once the deck is on, I wont have access to the rear of the holes It looks as though I will be painting the hull pretty soon.
Barrie
barriew Captain (moderator)
Posts : 2631 Join date : 2011-11-26 Age : 83 Location : Thaxted, Essex
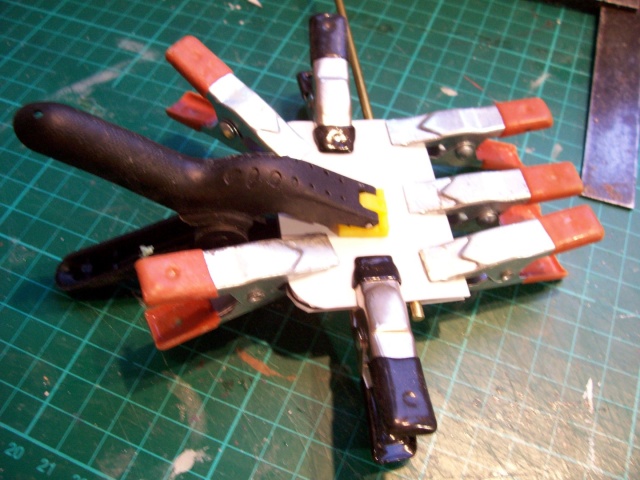
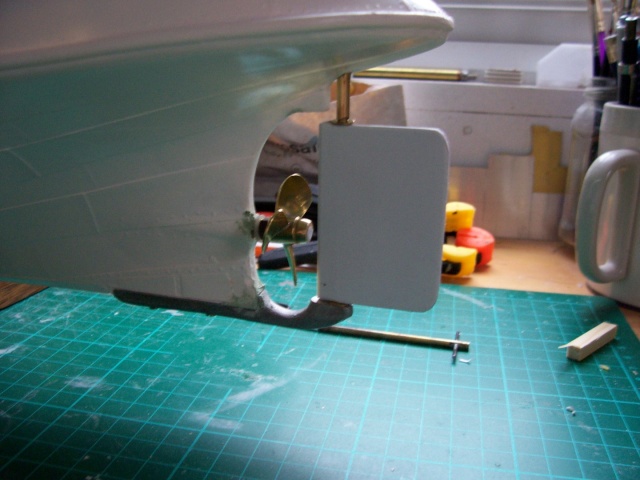
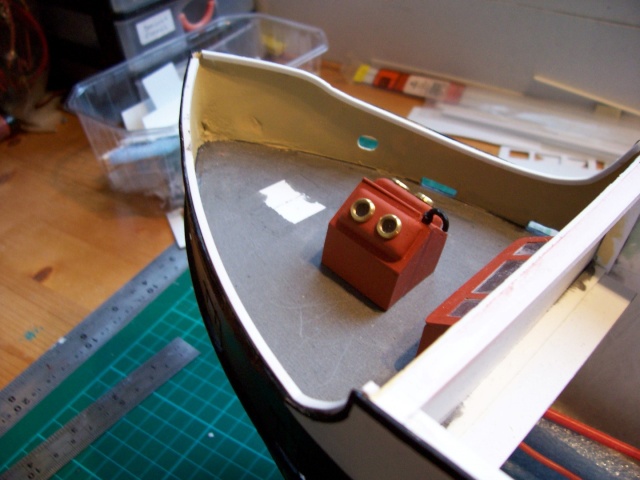
This has not been a good week! However I did manage a reasonable spell in the workshop today, and polished off a couple of jobs I have been working on for a day or two. Firstly the rudder. When I fitted it into the hull with the prop I found that the rudder fouled the prop, so I had to remove about 5mm from the back of the rudder, I also chopped a few mm off the prop. There is now good clearance. I have now fixed the rudder bearing in place with superglue - I still need to reinforce that joint. The tiller arm supplied was too big, so I have gone to my usual home made one created from a pin from a 13 amp plug and some brass strip. I spent a lot of time getting this to clear the deck, and also working out how I was going to operate it. My current plan is to mount the servo towards the centre of the boat, at the back of the motor mounting plate, and use a 'snake' to connect it to the rudder. Although this is a roomy hull, there is quite limited access. The motor mounting plate is now fixed with a fibre glass reinforced resin paste, as is the bulkhead at the rear of the plate. I have drilled a hole in the bulkhead which will allow me to remove the prop shaft without disturbing the rudder. The motor mount is only tacked with CA. I fitted two screw eyes so that I can use a plastic tie to hold the motor.
Barrie
The new rudder
Guest Guest
Subject: Re: Steam Tug Furie Sat Dec 06, 2014 12:10 am
Looking good Barrie
barriew Captain (moderator)
Posts : 2631 Join date : 2011-11-26 Age : 83 Location : Thaxted, Essex
Subject: Re: Steam Tug Furie Sat Dec 06, 2014 3:08 pm
I had quite a good session this morning - progress is being made
I have fitted the deck bearers to the stern and bow, including some cross beams. The instructions were confusing in this area (surprise!!). The pictures show balsa and ramin. This is supplied, but so is a sheet of plastic card (only 1mm) and the instructions refer to plastic So I did my own thing and bought some 6 x 3 mm plastic strip. I did use the ramin for the cross beams. I was going to double up the plastic, but don't thinks its necessary.
I fixed the servo mount and servo in position, and was going to fasten down the motor, but I have hit a snag. I planned to use cable ties, but the ones I need for the length are are too wide to go through the screw eyes Unless I have another idea, it will have to be silicone sealer to hold it in place.
As access is so tight, the speed controller, receiver etc will go forward under the wheelhouse. I intend using a 12 volt SLA which will go as far forward as possible. I will hide the switch under one of the forward deck structures.
I can't stick down the rear deck until I get a fitting to connect the snake to the servo, but I probably can do the forward deck. I will tackle all the portholes next, before moving on to the centre section deck.
Barrie
troutrunner Master
Posts : 573 Join date : 2014-01-23 Location : Lincolnshire UK
Subject: Re: Steam Tug Furie Sat Dec 06, 2014 5:18 pm
Coming along nicely Barrie
barriew Captain (moderator)
Posts : 2631 Join date : 2011-11-26 Age : 83 Location : Thaxted, Essex
The portholes are now installed in the hull. Since I took the photo I have applied filler to make good my inaccurate holes. I have also strengthened the deck supports by applying filler under them. They were fixed with super glue, so I though a bit of additional support was needed.
I was going to wire up the switch today, but on checking my stock I didn't have a suitable one for the space available so eBay to the rescue again I am also waiting for an ESC. Tomorrow I am going to investigate what is required to complete the bows - I know there are some hawse pipes to fit, and a winch kit to build. I need to check how to fit the pipes before I fix the deck.
Barrie
barriew Captain (moderator)
Posts : 2631 Join date : 2011-11-26 Age : 83 Location : Thaxted, Essex
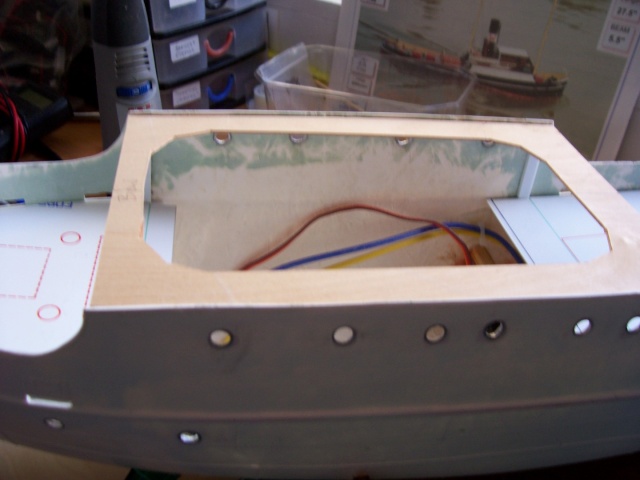
Today I fitted the supports for the bridge deck. Having got those in place, I think I can now paint the hull before I start fixing the decks. I have been trying to understand Deans' instructions for the bridge deck. As usual there is more than one set! None of them are really clear. There are actually three layers - a ply under layer, a base layer of plastic card and a top layer with printed planking which doesn't cover the whole of the base layer. As you will see, what starts as a decent access hole, is diminished considerably in the base layer (not shown), and gets really small in the top layer. I think I can just about manage with this, but it would be nice to have a better access. I have been trying to see if I could make the plastic layers removable, but there are davits and the support for the rear mast, and I don't think the plastic is rigid enough to allow for their removal. I am certainly going to try to use real wood for the planks.
Posts : 2631 Join date : 2011-11-26 Age : 83 Location : Thaxted, Essex
Subject: Re: Steam Tug Furie Sun Dec 14, 2014 11:41 am
Over the last few days I've been fiddling about a bit doing small jobs which don't warrant photos. Both foredeck and main deck now fit and are ready for fixing when the hull is painted. I fitted bearers for an equipment shelf under the bridge deck to take the ESC and Rx. The switch is wired and fitted to the foredeck where it will live under one of the structures. I have made a battery holder from expanded polystyrene. I made it so it will take either a 6 or 12 volt SLA. Not sure which will be best. I've also finished opening the hawse holes fore and aft, and also the anchor openings. I have linked the latter with a bit of heat shrink tubing - couldn't think of anything else! - and applied liberal amounts of silicone sealant behind them. I have a couple of suitable anchors. The one supplied is the wrong type according to photos of the real Furie. I have completed the link from servo to rudder using the 'snake'. This just needs the outer sheath gluing to the sub deck in a couple of places. Finally, I have been spending a lot of time trying to understand how to make and fit the Bridge deck to allow the best access. I still haven't decided. I now need to paint the hull, but the weather is not conducive to using rattle cans. I will have to do it in my workshop, which I do not like. I have a large box which I use for a spray booth, but its not ideal and this hull is quite large for the box.
Barrie
barriew Captain (moderator)
Posts : 2631 Join date : 2011-11-26 Age : 83 Location : Thaxted, Essex
Subject: Re: Steam Tug Furie Sun Dec 28, 2014 1:01 pm
Well - two weeks later and I have finally managed to get some more done on Furie. What with my illness, my wife's illness, Christmas etc, I managed to miss the reasonably mild weather we had over a week ago, and had to do the spraying indoors
Still, I can now hopefully make some more progress. The hull was given one coat of plastic primer, and I have also hand painted the white flashes at the top of the hull under the bridge and at the bows. These will need further coats. I have also given the insides of the bulwarks one coat of paint to help me see if more filling is required.
Next job is to start hand painting the hull. I need to get the hull all painted so that I can fill the portholes with clear resin before I can fit the decks as once they are in place I wont have access.
Barrie
Guest Guest
Subject: Re: Steam Tug Furie Sun Dec 28, 2014 9:48 pm
barriew Captain (moderator)
Posts : 2631 Join date : 2011-11-26 Age : 83 Location : Thaxted, Essex
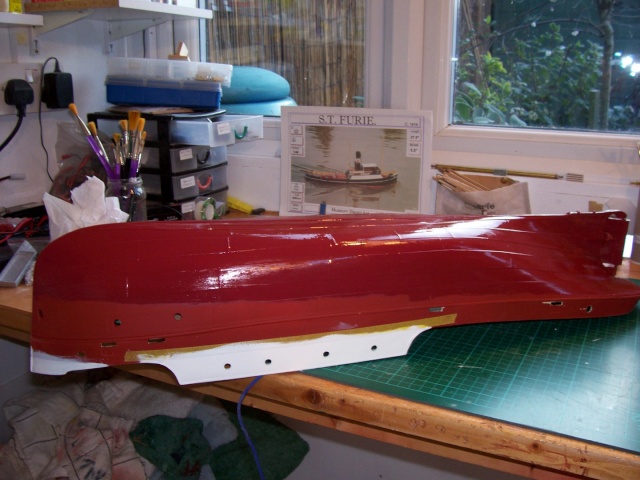
One coat of paint applied to the underwater hull. It looks gloss because its still wet The white parts have had their second coat. Progress is slow because of the speed at which paint dries in the current cold weather I will give the underwater area a second coat tomorrow, then I will need to mark an accurate waterline before painting the upper hull. I always find this tricky, especially with a hull of this shape.
Barrie
barriew Captain (moderator)
Posts : 2631 Join date : 2011-11-26 Age : 83 Location : Thaxted, Essex
Subject: Re: Steam Tug Furie Fri Jan 02, 2015 7:17 am
The hull has now had its second coat, and yesterday I tried to mark the water line only to find that the hull does not match the drawing - surprise I will have another try, but it looks like the bath and some talcum powder to get a line. I always find it difficult to mark the water line especially with the cut away stern of steam tugs.
Barrie
barriew Captain (moderator)
Posts : 2631 Join date : 2011-11-26 Age : 83 Location : Thaxted, Essex
Just the right size - its just short of a metre long. About 20 litres of water is enough to float the current model. It allows all round visibility which makes it much easier to get the waterline and ballast right.
My wife has already got her eyes on it to store the Christmas Tree, which is probably OK, as I only need it two or three times a year, so can easily unload the tree when I need a test tank
I did try the talc method, but it wasn't very successful, so I made a few strategic pencil marks which I will use as the basis for the water line. There is a problem with the hull, I think it has deformed during storage, so the water line will not be 'scale'.
Barrie
barriew Captain (moderator)
Posts : 2631 Join date : 2011-11-26 Age : 83 Location : Thaxted, Essex
Subject: Re: Steam Tug Furie Sat Jan 03, 2015 2:10 pm
This is the result of my water line work. Its not very good - you can see a problem on this side, and the other side doesn't match - it will have to be adjusted when the paint is dry.
Barrie
troutrunner Master
Posts : 573 Join date : 2014-01-23 Location : Lincolnshire UK
Subject: Re: Steam Tug Furie Sat Jan 03, 2015 4:43 pm
I'm sure you'll sort it Barrie, good to see more paint
barriew Captain (moderator)
Posts : 2631 Join date : 2011-11-26 Age : 83 Location : Thaxted, Essex
Subject: Re: Steam Tug Furie Sun Jan 04, 2015 5:53 pm
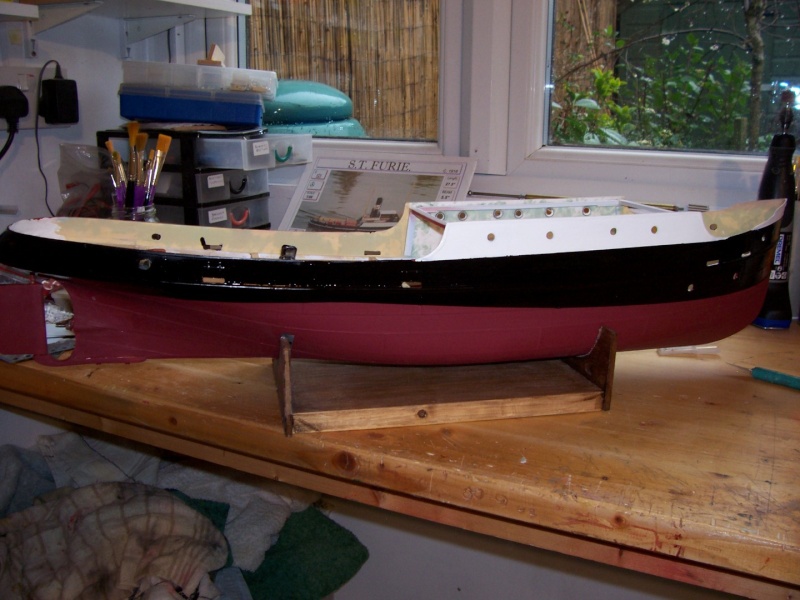
After a bit of measuring this morning, the waterline is looking a lot better, and is equal on both sides Just one or two blemishes to touch up, and some of the underwater colour to apply to the other side. As you will see, I took the opportunity to paint the black edges to the white panels, so I should soon be able to tackle the portholes. I brought it indoors to help the paint to harden - its too cold in the workshop.
The 'snake' has also been glued to the deck supports and now works smoothly - a lot easier than trying to fit such a long rigid rod.
Barrie
Guest Guest
Subject: Re: Steam Tug Furie Sun Jan 04, 2015 10:59 pm
davidjt Forum Sponsor
Posts : 534 Join date : 2013-01-08 Age : 72 Location : n wales coast
looking good now I thought you said this would be a slow build you are as fast as me but it looks like it has been a nice build apart from bad instructions that you have with it.
17:39:08
david
barriew Captain (moderator)
Posts : 2631 Join date : 2011-11-26 Age : 83 Location : Thaxted, Essex
Thanks David. It looks as though I am moving quickly because I have painted the hull, but that's only because I need to glaze the portholes before I fit the decks. There is still a lot to do, and problems to solve.
Over the last couple of days I have finished the painting, and some punches I ordered arrived today, so I hope to be able to start on the glazing tomorrow.
Barrie
barriew Captain (moderator)
Posts : 2631 Join date : 2011-11-26 Age : 83 Location : Thaxted, Essex
Portholes now glazed. The punches were the wrong size - my error in measuring. What I did was follow Dean's instructions and stick tape over the back of the fitting, then fill the hole with Clear Epoxy glue.
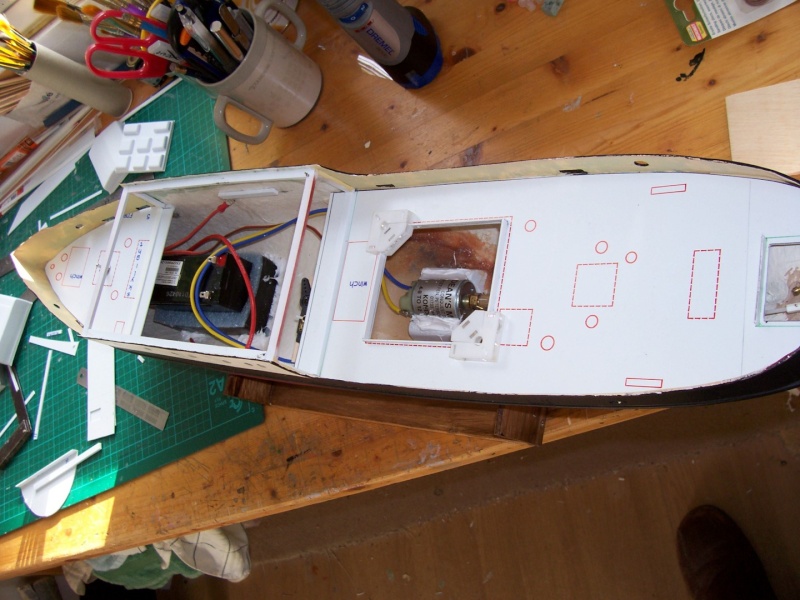
Today I have fitted the fore and main decks. I have also fixed the battery holder - i used silicone sealant so it will come out if needed. The coaming round the main hatch is fitted. That hatch is an ABS moulding which I am not too happy with. I need to find some photos of the real tug to see if that hatch is as rounded as the moulding. If not, then I will scratch build. In any case the moulding will need strengthening - its quite flimsy.
Next job is to fill the deck edges and build some of the various deck items.
Barrie
barriew Captain (moderator)
Posts : 2631 Join date : 2011-11-26 Age : 83 Location : Thaxted, Essex
Subject: Re: Steam Tug Furie Sat Jan 10, 2015 3:06 pm
The deck edges have now been filled and sanded down, also some uneven parts of the bulwarks shown up by the paint I applied for the purpose. I spent some time this morning looking out pictures of the full size Furie, and found that the main structure on the deck is built with square edges, so I have built one from plasticard. The part which sits on it and the opening frames are rounded in the full size, so I will be using the supplied mouldings. I have built the platform for the rear of the main deck, but see from this mornings searches, that it should be a grating. I'm not sure if I know how to create that, so it may have to stay solid.
Barrie
Guest Guest
Subject: Re: Steam Tug Furie Sat Jan 10, 2015 11:15 pm
Don't debase you're self Barrie you are doing a great in adverse circumstances welldone
barriew Captain (moderator)
Posts : 2631 Join date : 2011-11-26 Age : 83 Location : Thaxted, Essex
I finished the engine room hatch today - just a sliding hatch cover to add I think, I started on a fanlight, but when almost complete I found it was too big I will scratch build another the correct size. I thibnk I may have found the solution to the rear grating. I can get a suitable sized grating kit - the question is will I be able to cut the semi-circle shape without destroying it I think the first thing to do is try to make a suitable frame to hold the grating.
Barrie
barriew Captain (moderator)
Posts : 2631 Join date : 2011-11-26 Age : 83 Location : Thaxted, Essex
First job today was to try making the frame for the rear rope deck. I used two layers of 1.5 mm lime which I soaked in boiling water, then bent round my marked pattern, and held with modelling pins. I then cut two straight pieces to close the frame. These were glued together with aliphatic, and to the curved pieces with super glue. I may try to pin this joint when the glues has set. I didn't glue the curved pieces together, but did dribble a little super glue into the joint. I think it will hold - tomorrow will tell In any case I have ordered the bits to make the grating
I have made two more of the structures on the aft deck, and fitted the sliding hatch to the main engine room cover. The parts for both of these were the wrong size, so I had to scratch build
Barrie
Guest Guest
Subject: Re: Steam Tug Furie Wed Jan 14, 2015 2:23 am
barriew Captain (moderator)
Posts : 2631 Join date : 2011-11-26 Age : 83 Location : Thaxted, Essex
The frame for the Rope Deck grating is holding I have fitted some plastic card round the gunwales to provide a platform to rest it on. I have also completed all the main deck structures ready for painting. I have started building the Main winch, but need to paint the frame before finally assembling it.
Barrie
barriew Captain (moderator)
Posts : 2631 Join date : 2011-11-26 Age : 83 Location : Thaxted, Essex
The grating kit arrived today so I made it up and cut it to shape. I used a very fine piercing saw blade to cut the curve. So far I haven't glued the grating - I'm not sure if its necessary. I dispensed with the frame I had made as it was much too heavy. All I have done is put one strip of wood across the straight side. I still have to work out how to ensure it doesn't slide about. I'm thinking of some brass rods to hold it against the stern gunwale.
I have started building the structures for the fore deck - again they don't match the plan or the marks on the deck
In response to your issue in fixing the grating down you may consider a strip of wood in front of where the grating sits on its flat leading edge mounted to the deck and sides, this will not only lock it in place, it will allow it to be popped up and removed as and when needed but also stop any ingress of water finding its way into the rudder slot.
_________________ I'm Not Anti-Social, I'm Anti-Stupid.
barriew Captain (moderator)
Posts : 2631 Join date : 2011-11-26 Age : 83 Location : Thaxted, Essex
I have now finished making all the deck structures - there is still one more to make but I don't know where it is supposed to fit It doesn't show on the plans or any of the photos that I have. They have all been sprayed with primer ready for painting. I have also given the grating one coat of varnish/stain, and started painting the main deck. I am using metallic grey and should really have given it a grey undercoat, but when I opened the tin it was empty So I will have to use two or three coats of the metallic grey. On the fore deck I have built a coaming round the switch which will be covered by one of the fanlights.
I really now need my new Speed Controller so I can finish wiring up before I tackle the bridge deck. I decided to try a Microgyro ESC as I had read good reports, but getting hold of one is very difficult. It must be over a month ago that I contacted the owner. I wanted a 15 amp one which he said was a new design for 2015. About 10 days ago I contacted him again and he said he was having problems with the new design, but could supply a 40 amp version in 72 hours. I paid the difference and I'm still waiting. Another mail is going off after I post this message.
Barrie
Guest Guest
Subject: Re: Steam Tug Furie Sat Jan 17, 2015 1:07 am
barriew Captain (moderator)
Posts : 2631 Join date : 2011-11-26 Age : 83 Location : Thaxted, Essex
All the items for the main and fore decks have now been painted and are ready for fixing, although I do need to add some extra detail to some of the items. I just have the anchor winch to tackle. The decks have had two or three coats of dark grey metallic, and the insides of the bulwarks are also painted. My ESC arrived yesterday and has been wired up and works, although it seems that my 12 volt SLA will not hold a full charge. - I may have to buy another. I think that my next job will be to fit and paint the bulwark supports after I have fitted some 2 mm square strip round the top of them. I am still debating how best to tackle the bridge deck - I don't understand the instructions, and also I want to maintain the maximum access.
Barrie
PS Roadrunner - you're not the only one with a slightly rusty steel square
Posts : 2631 Join date : 2011-11-26 Age : 83 Location : Thaxted, Essex
Subject: Re: Steam Tug Furie Sat Jan 24, 2015 3:33 pm
The 2 mm strip is fitted, but still needs some work before I start on the supports. I have been waylaid building the anchor winch for the fore deck - what a load of rubbish I have put it together in a fashion, but it is the worst white metal kit I have aver come across. Luckily it wont be too obvious, and when painted will just about do.
Barrie
barriew Captain (moderator)
Posts : 2631 Join date : 2011-11-26 Age : 83 Location : Thaxted, Essex
I finished sanding the strip round the after deck and have painted it. Still need to do the fore deck which is a more complicated shape. I had some trouble with the plastic cracking on the bits I have done, so need to rethink how I can bend it to fit. As part of the painting, I tidied up the freeing ports and re-painted the hull above the moulding. The next session I will start on the supports, and try to finalise the fitting of the grating.
Barrie
Guest Guest
Subject: Re: Steam Tug Furie Tue Jan 27, 2015 12:55 am
barriew Captain (moderator)
Posts : 2631 Join date : 2011-11-26 Age : 83 Location : Thaxted, Essex
Today I cleaned up the gunwale supports and started painting them - I think they will require one more coat. I managed the fit the capping rail to the fore deck area. Next job will be to fill and sand when the glue has dried completely. I did better than expected with this - only one crack. I wonder if the superglue makes the plastic brittle? I also note are area that needs filling The grating is now fixed in place. The two supports at the front have pegs which locate in holes in the deck - a little fiddly to get in place, but hopefully wont be removed too often. I decided I didn't like the paint on the anchor winch, so have used some brighter green. I will paint the gears etc black.
Barrie
gribeauval Master
Posts : 499 Join date : 2011-06-11 Age : 73 Location : West Yorkshire
The grating kit came from Cornwall Model Boats - I think it is made by the Polish firm who make a lot of brass fittings. Modelling Timbers also list these, except they were out of stock of this size. This one is 3 mm holes and 107 mm x 107 mm. I only used about half of it.
Barrie
gribeauval Master
Posts : 499 Join date : 2011-06-11 Age : 73 Location : West Yorkshire


")