TheRcModelBoatForum.com
Please login using your username and password to use the forum.

If you do not have an account please register to participate, it’s free!
TheRcModelBoatForum.com
Would you like to react to this message? Create an account in a few clicks or log in to continue.


https://www.thercmodelboatforum.com/
 
HomeHome  PortalPortal  Latest imagesLatest images  RegisterRegister  Log inLog in  


 MY NEW PROJECT...or two.

Go down 
+6
davidjt
barriew
Tug--Kenny
TonyW
phil winks
Footski
10 posters
Go to page : Previous  1, 2, 3, 4, 5 ... 9, 10, 11  Next
AuthorMessage
Guest
Guest


MY NEW PROJECT...or two. - Page 4 Empty
PostSubject: Re: MY NEW PROJECT...or two.   MY NEW PROJECT...or two. - Page 4 EmptySun Dec 16, 2012 10:24 pm

And finally today I decided to change some of the poses of my lifeboat figures from standing to sitting so that they will fit into the thwartes of pulling/motor sailing lifeboats for the earlier cork jacketed men..there would be more seated than standing chappies, so decided to change two of them.....
murderously I chopped their legs off at the bum and the knees, and then using stainless wire I reset them into seated members of my next crew.
Once the glue has set hard ann the gaps will be filled in with milliput as when I made them in the original set..that's the next step.

MY NEW PROJECT...or two. - Page 4 001_co10

MY NEW PROJECT...or two. - Page 4 002_co10

MY NEW PROJECT...or two. - Page 4 003_co10

MY NEW PROJECT...or two. - Page 4 004_co10

MY NEW PROJECT...or two. - Page 4 005_co11

MY NEW PROJECT...or two. - Page 4 006_co11

MY NEW PROJECT...or two. - Page 4 006_co12

MY NEW PROJECT...or two. - Page 4 007_co10

MY NEW PROJECT...or two. - Page 4 008_co10

MY NEW PROJECT...or two. - Page 4 009_co10
Back to top Go down
Guest
Guest


MY NEW PROJECT...or two. - Page 4 Empty
PostSubject: Re: MY NEW PROJECT...or two.   MY NEW PROJECT...or two. - Page 4 EmptyMon Dec 17, 2012 2:17 am

Looking good Neil. Very Happy Very Happy Very Happy Very Happy
Back to top Go down
Guest
Guest


MY NEW PROJECT...or two. - Page 4 Empty
PostSubject: Re: MY NEW PROJECT...or two.   MY NEW PROJECT...or two. - Page 4 EmptyMon Dec 17, 2012 9:30 am

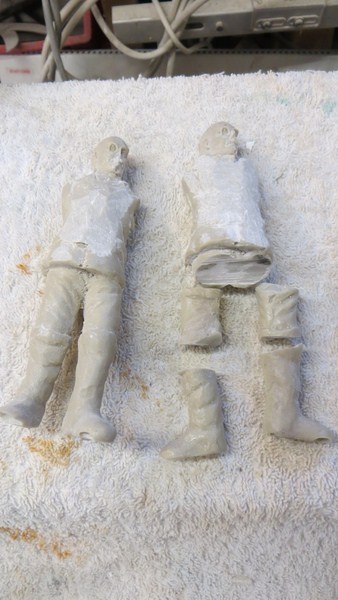
Looking like a lot of milliput will be needed, lol
Back to top Go down
Guest
Guest


MY NEW PROJECT...or two. - Page 4 Empty
PostSubject: Re: MY NEW PROJECT...or two.   MY NEW PROJECT...or two. - Page 4 EmptyMon Dec 17, 2012 12:43 pm

the second boat, being a pulling / sailor has no motor or prop shaft so the rear skeg was a solid piece of ply. set into the tunnel the same way with pins to align and set with 2 part epoxy, the tunnel was filled as much as possible with pieces of pine, and then filled with polyester filler.
it will need some sanding off ( an understatement) to get it to fair in to the rest of the hull and the lines of a sailing boat, but this isn't new on one of my builds so will just have to get the sanders out.lol

MY NEW PROJECT...or two. - Page 4 001_co11

MY NEW PROJECT...or two. - Page 4 002_co11

MY NEW PROJECT...or two. - Page 4 003_co11

MY NEW PROJECT...or two. - Page 4 004_co11
Back to top Go down
Footski
Master
Master
Footski


Posts : 548
Join date : 2011-06-11
Age : 66
Location : Malaga, Spain

MY NEW PROJECT...or two. - Page 4 Empty
PostSubject: Re: MY NEW PROJECT...or two.   MY NEW PROJECT...or two. - Page 4 EmptyMon Dec 17, 2012 1:21 pm

Oh the joy of sanding! Twisted Evil Twisted Evil
Back to top Go down
Guest
Guest


MY NEW PROJECT...or two. - Page 4 Empty
PostSubject: Re: MY NEW PROJECT...or two.   MY NEW PROJECT...or two. - Page 4 EmptyMon Dec 17, 2012 3:48 pm

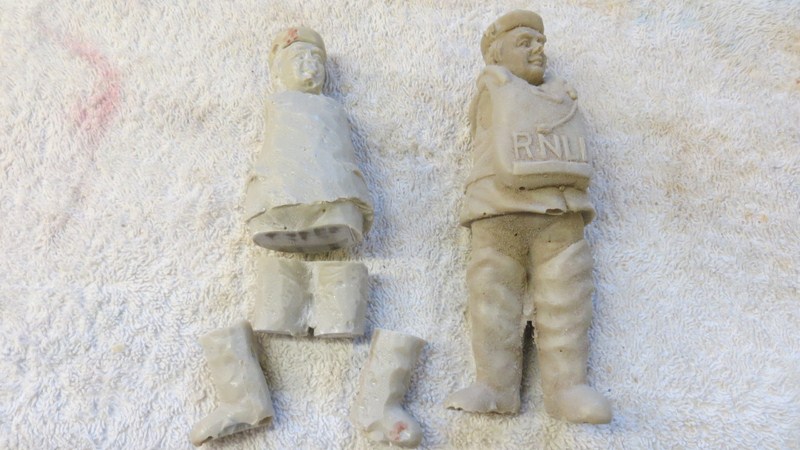
It's the joys of seeing something take shape out of mess, lol
Back to top Go down
Guest
Guest


MY NEW PROJECT...or two. - Page 4 Empty
PostSubject: Re: MY NEW PROJECT...or two.   MY NEW PROJECT...or two. - Page 4 EmptyMon Dec 17, 2012 10:05 pm

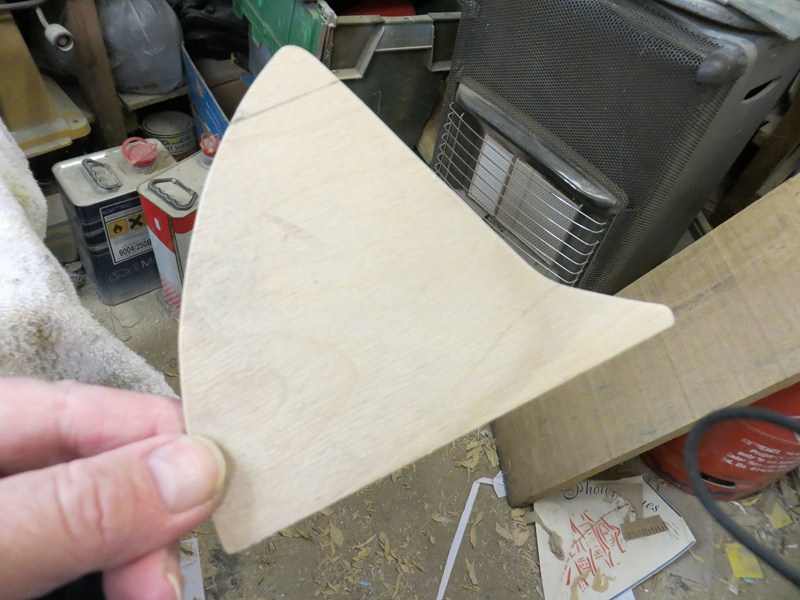
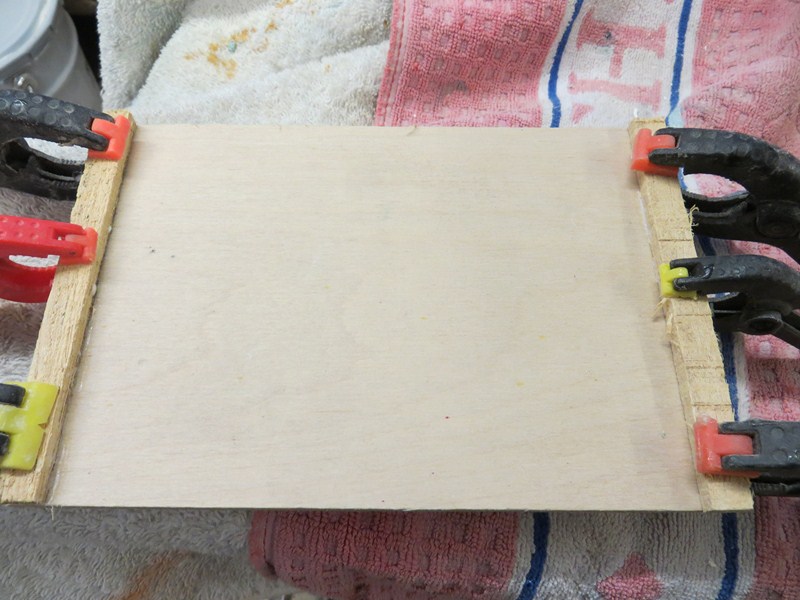
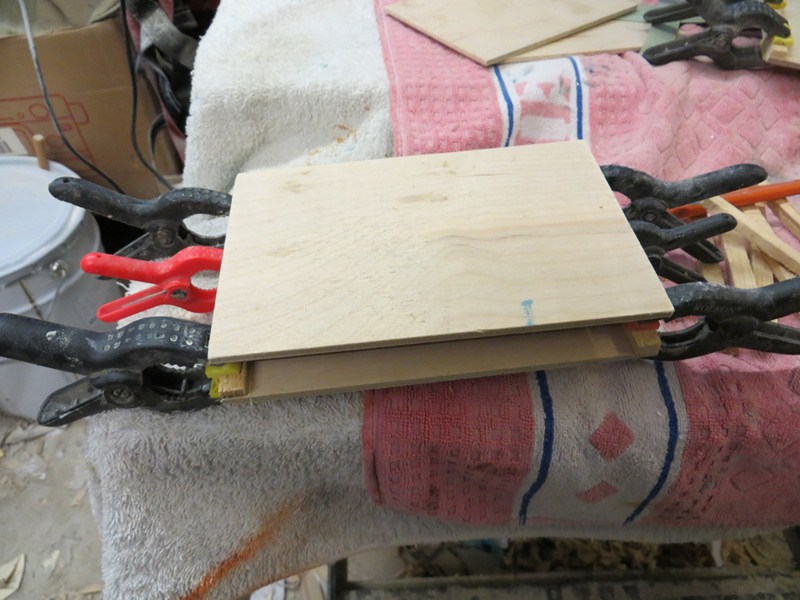
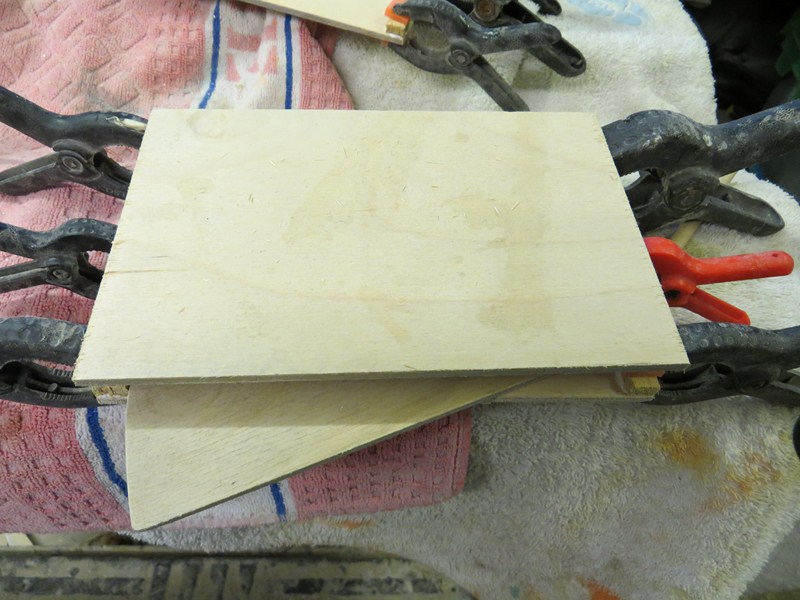
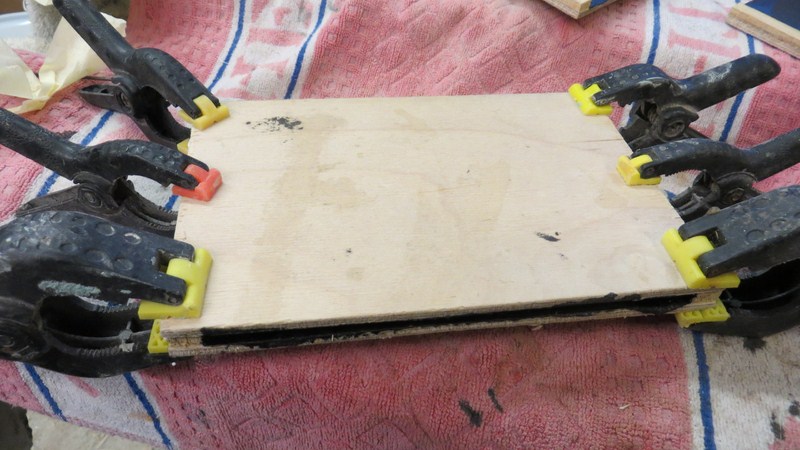
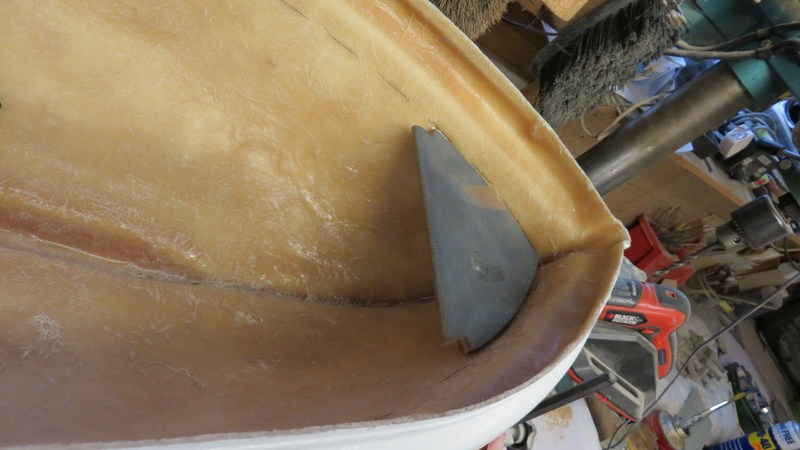
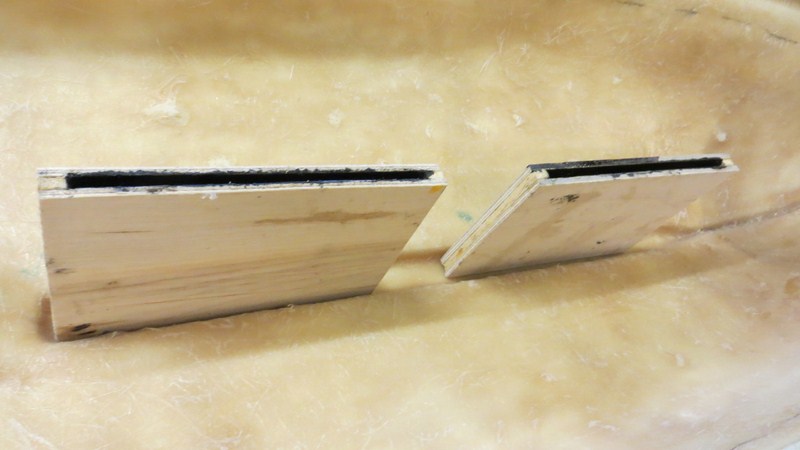
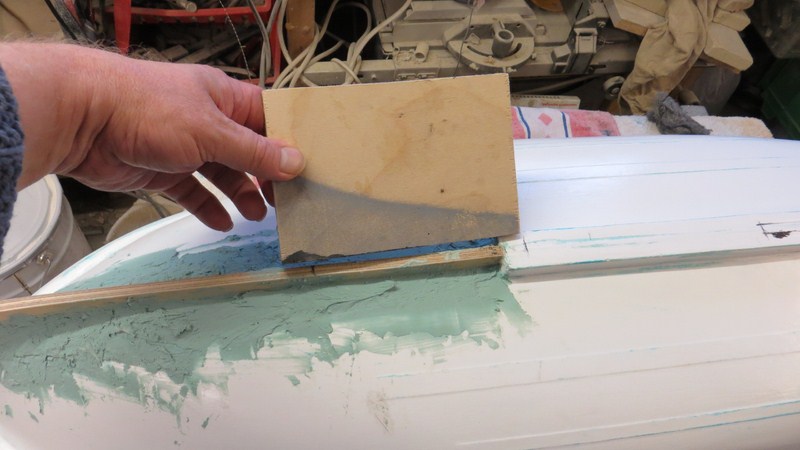
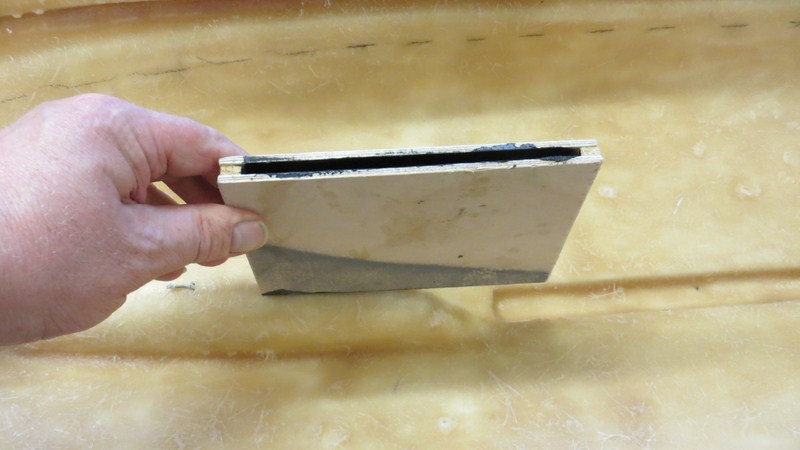
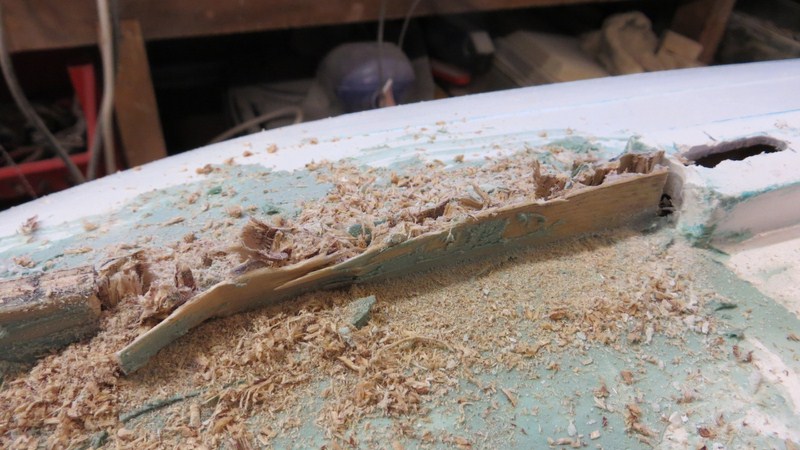
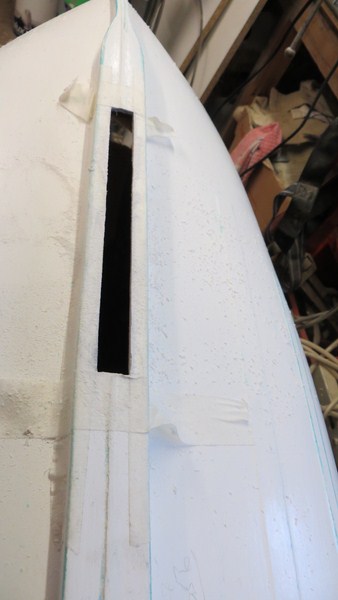
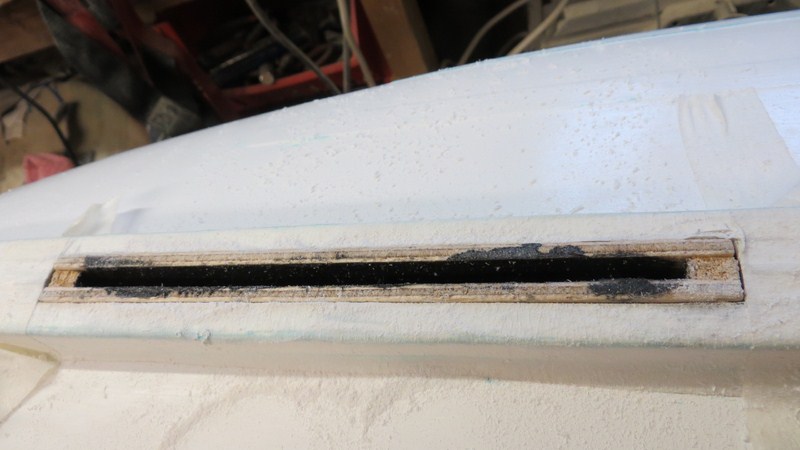
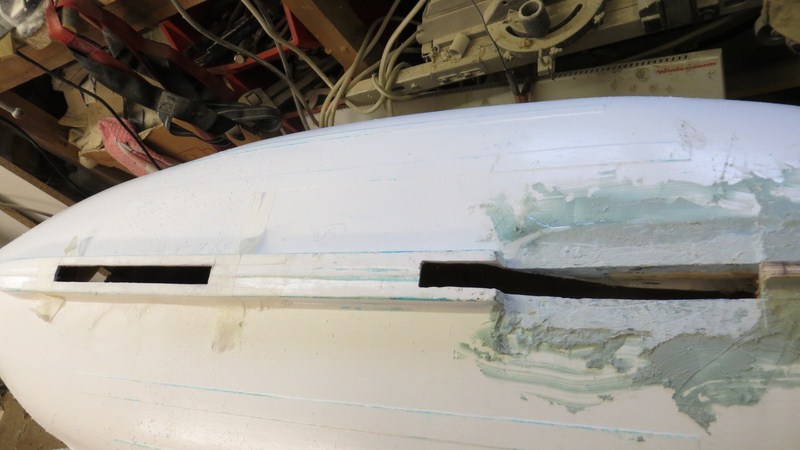
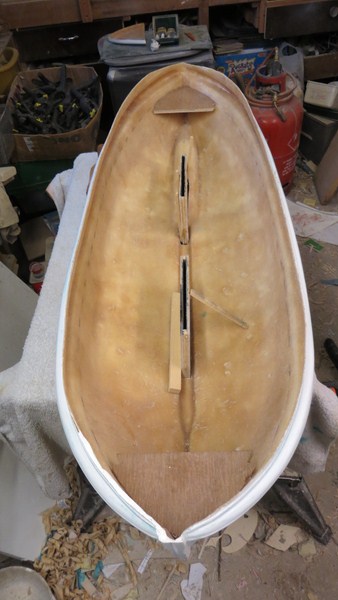
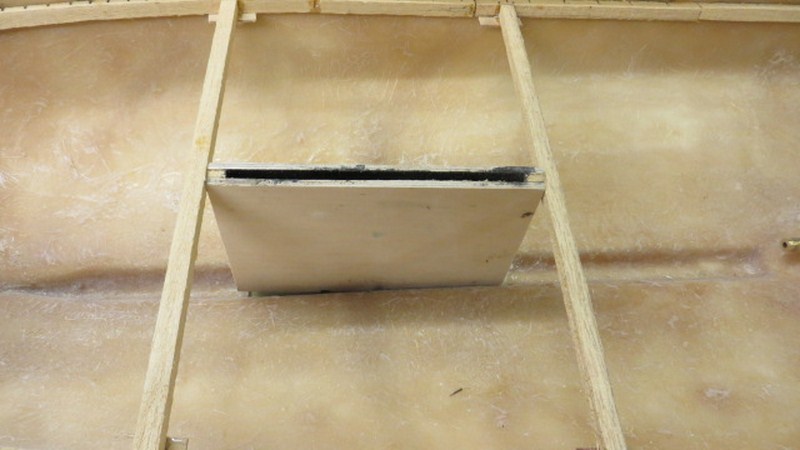
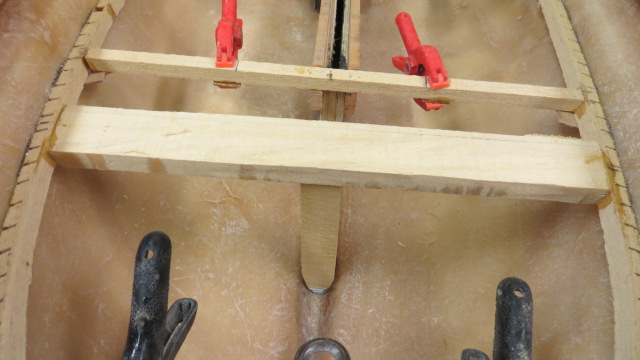
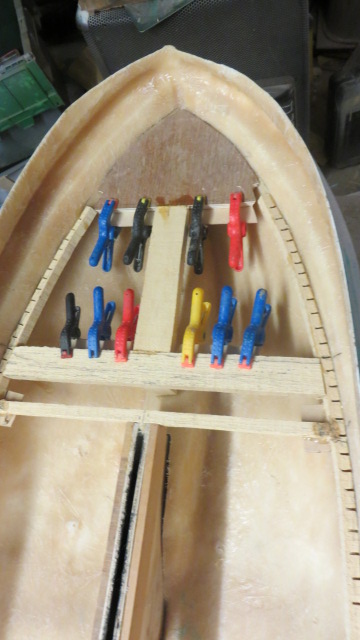
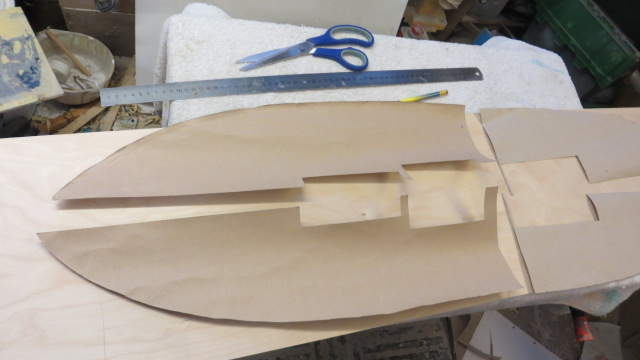
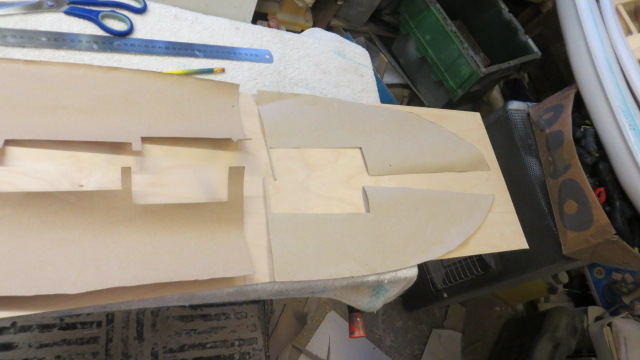
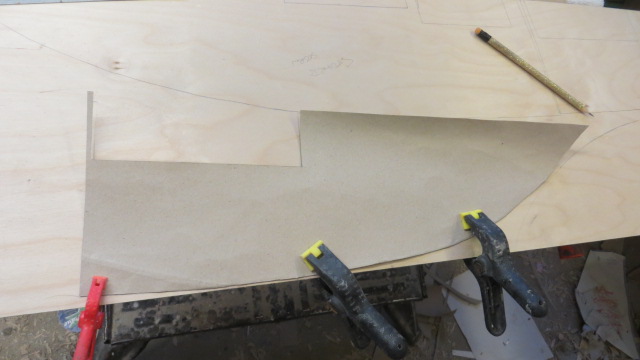
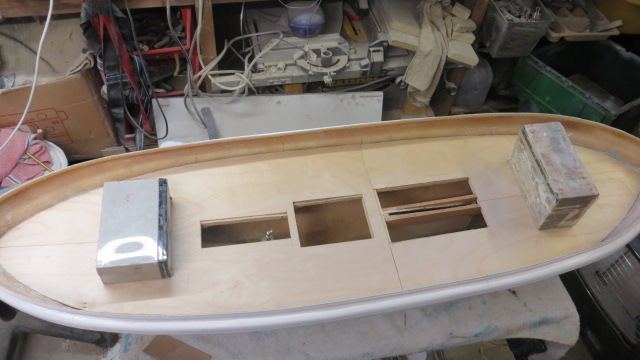
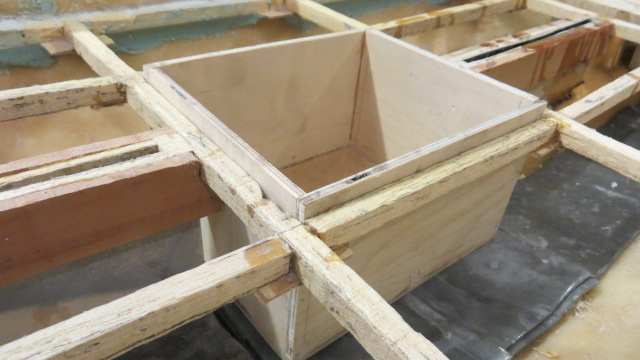
But before I get down to the messy job of sanding that pile down I decided to cut and trim the front top box of the saling boat.
Unfortunately as I don't have plans for this boat, I had to revert to using the small plans in my book Let Not the Deep for measurements.
Both plans in the book ( which I showed early in the build log) show the sailor and the motor sailor at exactly the same size, and so by scaling the box on the motorsailor from the small plans, and the measurements I have from the 1:12 scale plans, I was able with dividers able to take measurements quite accurately from the sailor, and able to cutthe fore end box top to the right size.
the last picture shows the difference in the shape of the motor sailer and the sailor bow end box tops
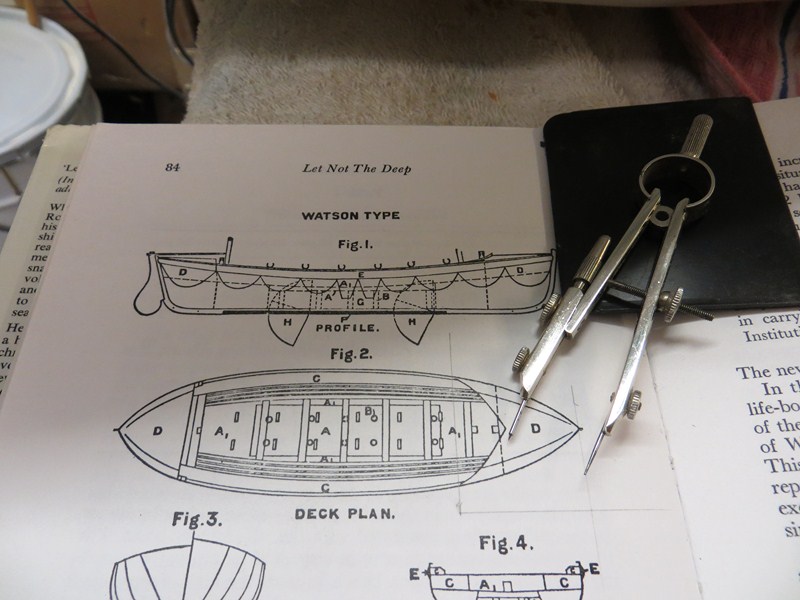
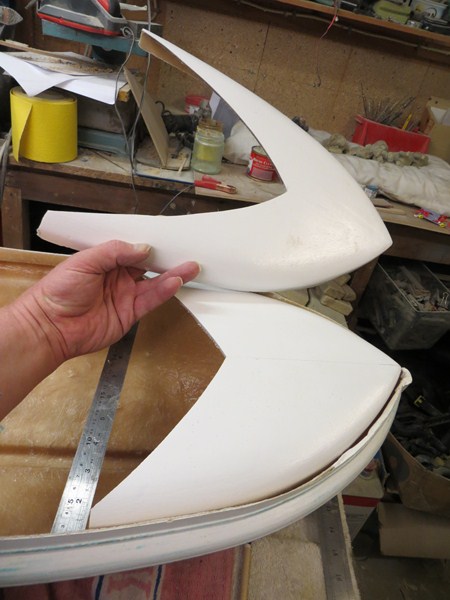
MY NEW PROJECT...or two. - Page 4 005_co12

MY NEW PROJECT...or two. - Page 4 006_co13

MY NEW PROJECT...or two. - Page 4 007_co11

MY NEW PROJECT...or two. - Page 4 008_co11

MY NEW PROJECT...or two. - Page 4 009_co11
Back to top Go down
Guest
Guest


MY NEW PROJECT...or two. - Page 4 Empty
PostSubject: Re: MY NEW PROJECT...or two.   MY NEW PROJECT...or two. - Page 4 EmptyMon Dec 17, 2012 10:06 pm

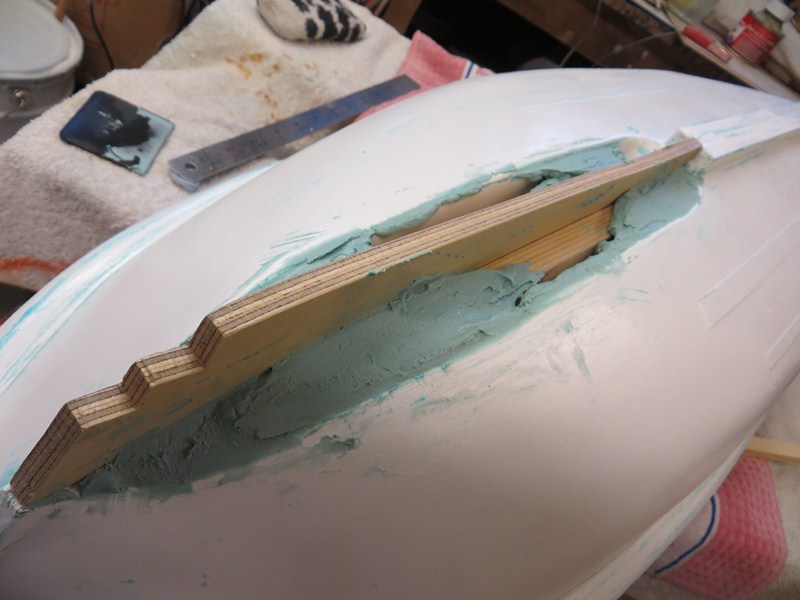
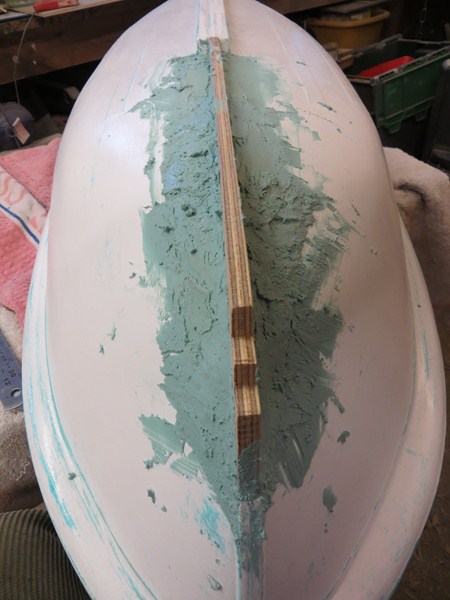
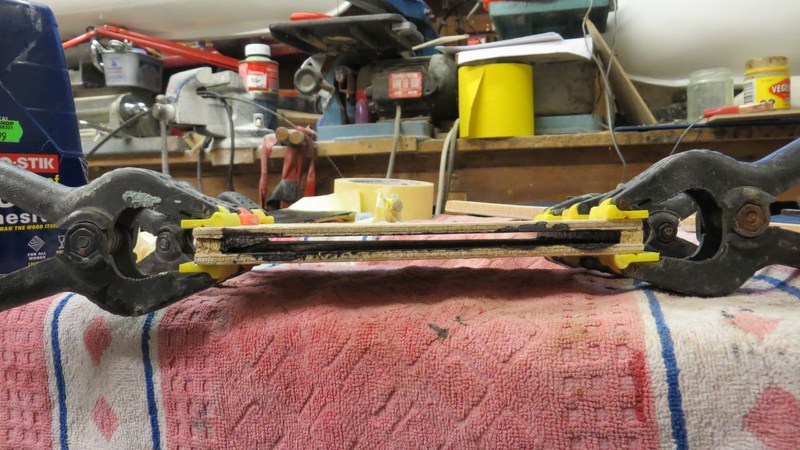
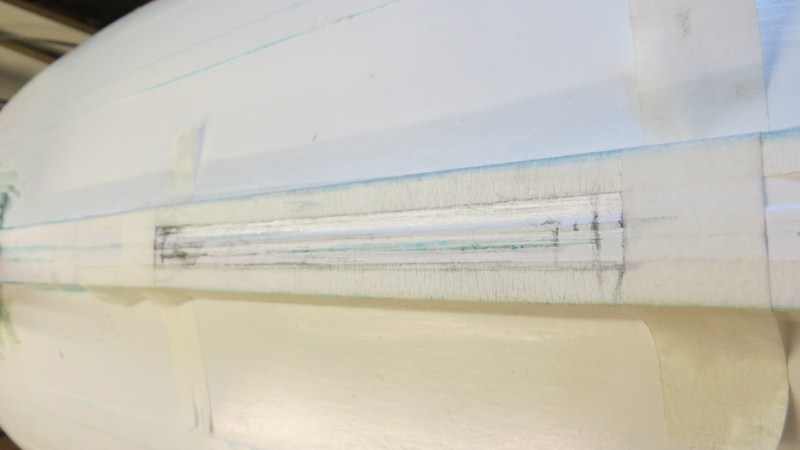
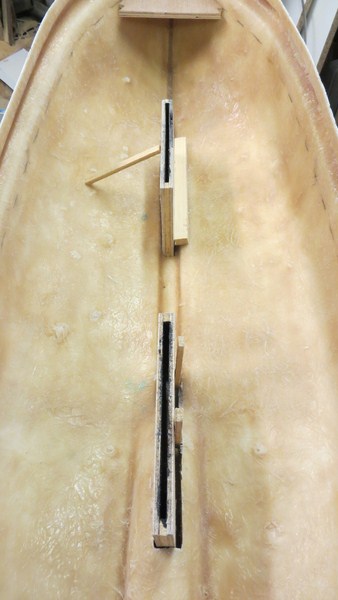
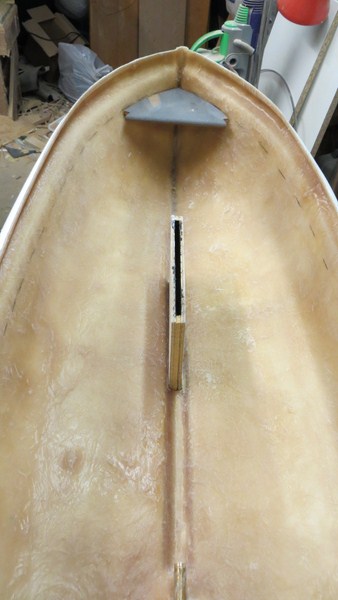
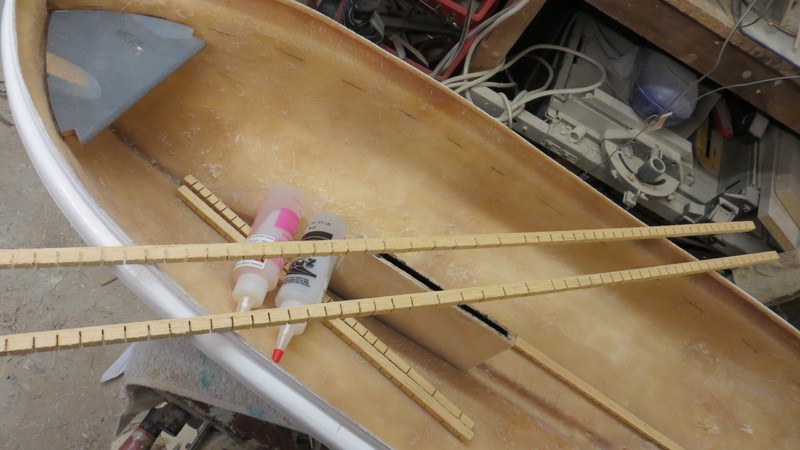
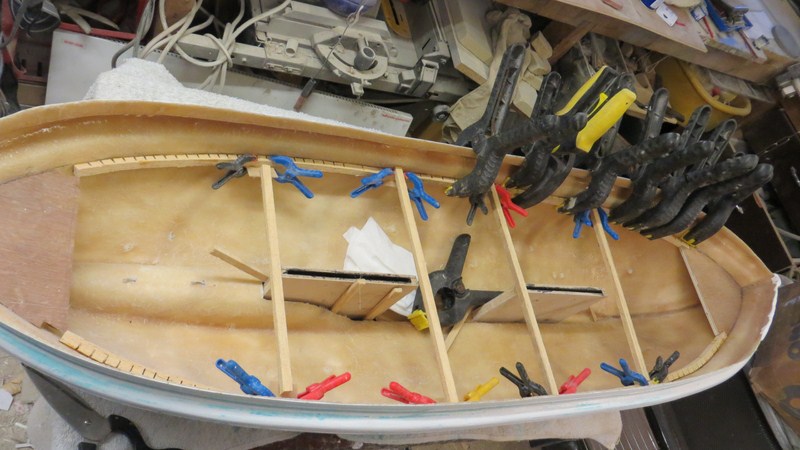
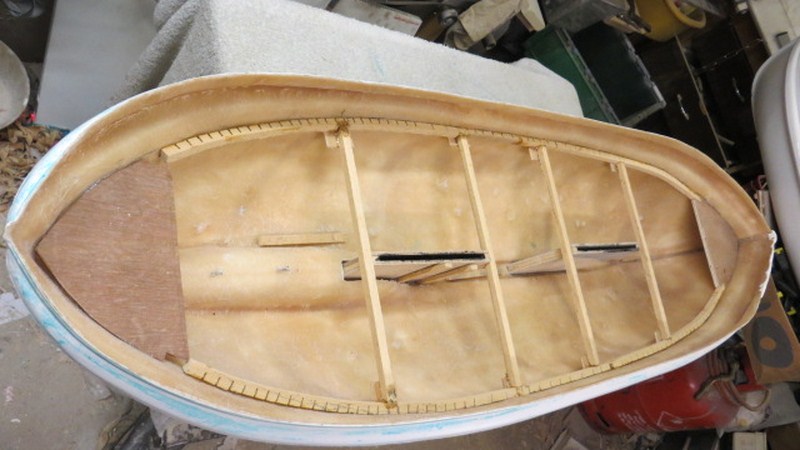
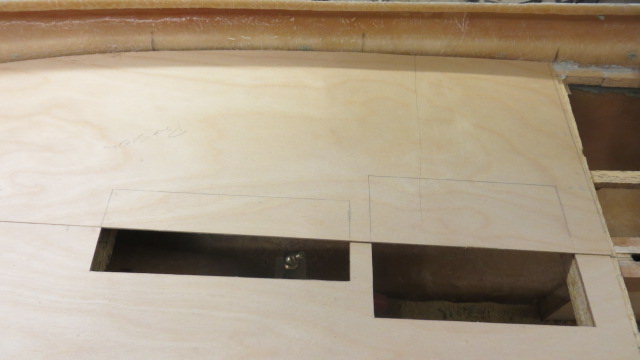
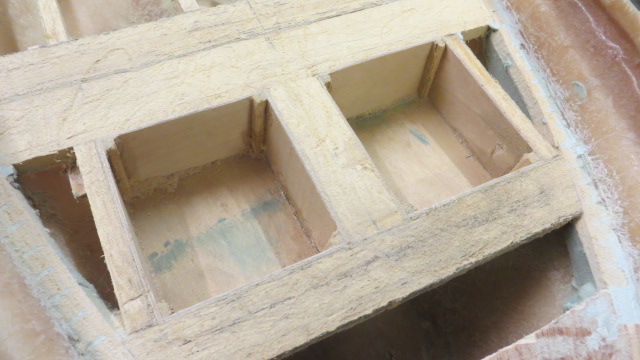
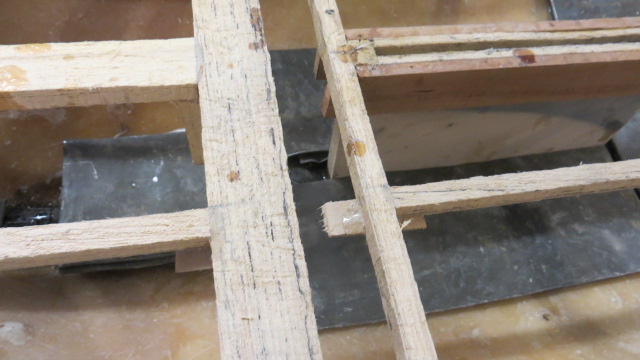
Finally today, I marked the line for the main decks in both boats which runs parallel to the bulwark tops on the boats.
To mark these parallel, I cut a piece of timber ( part of an old venetian blind) at the correct depth, allowing for the thickness of the ply deck above the wooden stringers, and by placing it with one edge on the top of the bulwark, I marked the underside at the bottom of the spacer, and next is fitting the deck supports.
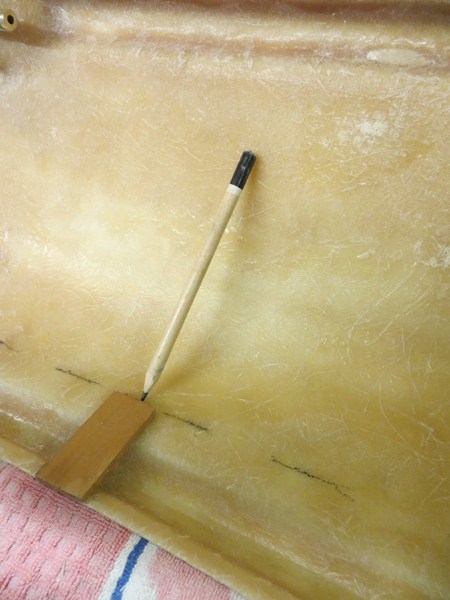
MY NEW PROJECT...or two. - Page 4 010_co11

MY NEW PROJECT...or two. - Page 4 011_co11
Back to top Go down
Guest
Guest


MY NEW PROJECT...or two. - Page 4 Empty
PostSubject: Re: MY NEW PROJECT...or two.   MY NEW PROJECT...or two. - Page 4 EmptyWed Dec 19, 2012 1:32 pm

these old lifeboats all ( I think and from what I can see from drawings/plans ) had a drop keel when sailing to stop them side skipping when under close sail and my two boats are no exception. The motor sailor has one keel and the pulling/sailor has two.
I have made enclosed boxes just as on the real boats which fit into the keel and up to the deck level, and have made the drop keel which I will eventually be casting in white metal to give some weight to it.
The ply boxes will be embedded in polyester filler and then resin, but as they are open to the water I will firstly paint them on the inside with water proof out door paint before gluing the second side of the box on. the deck will then fit around these boxes and made water proof.

MY NEW PROJECT...or two. - Page 4 005_co13

MY NEW PROJECT...or two. - Page 4 001_co12

MY NEW PROJECT...or two. - Page 4 004_co12

MY NEW PROJECT...or two. - Page 4 002_co12

MY NEW PROJECT...or two. - Page 4 006_co14
Back to top Go down
Guest
Guest


MY NEW PROJECT...or two. - Page 4 Empty
PostSubject: Re: MY NEW PROJECT...or two.   MY NEW PROJECT...or two. - Page 4 EmptyFri Dec 21, 2012 7:06 pm

Even though it's christmas and the kids are on holiday the work goes on..............but at a slower rate.
over the past few days I've been giving the inside faces of my drop keel boxes coats of exterior varnish, a coat of black paint and then, after masking the edges to be glued, a coat of vaseline mixed with carbon powder both as a lubricant for the keel and also a final barrier for the water that will flow inside it when the boat is placed on the water.
Once all this was done I stripped off the masking tape and glued the boxes together, to leave to set for a day otr two.

MY NEW PROJECT...or two. - Page 4 001_co13

MY NEW PROJECT...or two. - Page 4 002_co13

MY NEW PROJECT...or two. - Page 4 003_co12

MY NEW PROJECT...or two. - Page 4 004_co13

MY NEW PROJECT...or two. - Page 4 005_co14
Back to top Go down
Guest
Guest


MY NEW PROJECT...or two. - Page 4 Empty
PostSubject: Re: MY NEW PROJECT...or two.   MY NEW PROJECT...or two. - Page 4 EmptySat Dec 22, 2012 2:58 pm

first job today was to put in the triangular gussets at the bow and stern on each boat to support the deck ends.........it's amazing the ways and methods that you can think of to utilise to glue a piece in place when you want to get on with something else and need to leave something to set, lol

The drop keel boxes have set and I have now placed them in situ in the boats as well.

This is where they will lie, and once I have cut the holes in to the grp keel moulding they will be glued in place, and then packed around the base with a mixture of lead shot and resin that will go to making up the ballast for the boat.
They will also eventually be held at the top where they penetrate the deck line with 10mm square stringers before the deck is built around them.

MY NEW PROJECT...or two. - Page 4 004_co14

MY NEW PROJECT...or two. - Page 4 003_co13

MY NEW PROJECT...or two. - Page 4 002_co14

MY NEW PROJECT...or two. - Page 4 001_co14

MY NEW PROJECT...or two. - Page 4 005_co15

MY NEW PROJECT...or two. - Page 4 006_co15

MY NEW PROJECT...or two. - Page 4 007_co12

MY NEW PROJECT...or two. - Page 4 008_co12
Back to top Go down
Guest
Guest


MY NEW PROJECT...or two. - Page 4 Empty
PostSubject: Re: MY NEW PROJECT...or two.   MY NEW PROJECT...or two. - Page 4 EmptySun Dec 23, 2012 7:23 pm

I was going to call it a day until after christmas with the build, but something was nagging in my head all last night about the aft drop keel and the box possitioning in the sailing model.


I'm glad I did...........as when I measured it up this morning horror of horrors I found that the box was almost completely slap bang over the wooden keel insert that I had buried in filler a week or so ago.........expletives flew and the air was blue..........but I couldn't leave it at that, and so had to start a butchery job...........and it's at times like this that I am glad I have always, when money was there, to invest in decent and abundant tools.


Today I had to rely upon my drill with serrated shanked bits, my power carving chisel and the "beast".my sonic sander file with saw and tungston tipped sander......all great tools and invaluable for "butchery"


I started drilling with a long shanked pilot dril bit, enlarging with the serrated edged drill bits, and finally cutting out the area with the sonic sander and chisel......it actually made short work of the job, and I was able to get the "ballast weights" glued to the keel box and dry fit before packing up for Christmas holls and relaxing, knowing that the other keel box fitting will go very easily compared with this little job.

MY NEW PROJECT...or two. - Page 4 011_co12

MY NEW PROJECT...or two. - Page 4 009_co12

MY NEW PROJECT...or two. - Page 4 007_co13

MY NEW PROJECT...or two. - Page 4 001_co15

MY NEW PROJECT...or two. - Page 4 002_co15

MY NEW PROJECT...or two. - Page 4 003_co14

MY NEW PROJECT...or two. - Page 4 004_co15

MY NEW PROJECT...or two. - Page 4 005_co16

MY NEW PROJECT...or two. - Page 4 006_co16

MY NEW PROJECT...or two. - Page 4 008_co13

MY NEW PROJECT...or two. - Page 4 010_co12

MY NEW PROJECT...or two. - Page 4 012_co11

MY NEW PROJECT...or two. - Page 4 01210

MY NEW PROJECT...or two. - Page 4 013_co11

MY NEW PROJECT...or two. - Page 4 014_co11

MY NEW PROJECT...or two. - Page 4 015_co11

MY NEW PROJECT...or two. - Page 4 016_co11

MY NEW PROJECT...or two. - Page 4 017_co11
Back to top Go down
Guest
Guest


MY NEW PROJECT...or two. - Page 4 Empty
PostSubject: Re: MY NEW PROJECT...or two.   MY NEW PROJECT...or two. - Page 4 EmptyFri Dec 28, 2012 2:23 pm

Well, Christmas is over, the wife and kids are out shopping and I have been left peacefully on my own....so back to the workshop before anyone gets any crazy ideas of going somewhere else, lol.
Decided to fit the second of the two keel boxes to the pulling sailor.
Marked out, the size of the box was marked and masked off before drilling all round, and then reaming out with the side of the drill bit, before filing the sides straight.
Once fitted I found that the two boxes lay inside the boat like the preverbial banana which would have made sailing both strange and temperamental, not to say extremely challenging and odd.
So I then had to trim the holes and cut them to align the two boxes in a straight line astern.

MY NEW PROJECT...or two. - Page 4 001_co16

MY NEW PROJECT...or two. - Page 4 002_co16

MY NEW PROJECT...or two. - Page 4 003_co15

MY NEW PROJECT...or two. - Page 4 004_co16

MY NEW PROJECT...or two. - Page 4 005_co18

MY NEW PROJECT...or two. - Page 4 007_co14

MY NEW PROJECT...or two. - Page 4 006_co17

MY NEW PROJECT...or two. - Page 4 008_co14

MY NEW PROJECT...or two. - Page 4 009_co13

MY NEW PROJECT...or two. - Page 4 010_co13
Back to top Go down
Guest
Guest


MY NEW PROJECT...or two. - Page 4 Empty
PostSubject: Re: MY NEW PROJECT...or two.   MY NEW PROJECT...or two. - Page 4 EmptyFri Dec 28, 2012 7:30 pm

It was far easier placing the single keel box into the motor sailor, as it only had to line up fore and aft with the stem and stern post.


Also cut from Obeche plank are the longitudinal stringers to support the deck at bulwarks. they have been cut half through on the band saw to aid bending around the sbow and stern of the boat without needing to steam or soak the timber.

MY NEW PROJECT...or two. - Page 4 011_co13

MY NEW PROJECT...or two. - Page 4 012_co12

MY NEW PROJECT...or two. - Page 4 013_co12

MY NEW PROJECT...or two. - Page 4 014_co12

MY NEW PROJECT...or two. - Page 4 015_co12
Back to top Go down
Guest
Guest


MY NEW PROJECT...or two. - Page 4 Empty
PostSubject: Re: MY NEW PROJECT...or two.   MY NEW PROJECT...or two. - Page 4 EmptySat Dec 29, 2012 9:54 pm

today spent time inserting and gluing the longitudinal 10 x 10mm square section obeche to the correct line, marked earlier for the deck supports at the bulwark edge.
These (as said earlier in a post) have been cut through halfway to aid bending. No shaping was done to allow the top edge to lay flat as this will be done with a sander once all beams are set in and glued.
I also glued in the gussets made from 1.8mm ply to these longitudinal stringers to support the first of the crooss beams which will be the front and rear supports for the keel boxes and will be glued in before the boxes are set in so that perfect central measurement can be found for the boxes to stand vertical.
these will be glued tomorrow, hopefully.

MY NEW PROJECT...or two. - Page 4 001_co17

MY NEW PROJECT...or two. - Page 4 002_co17

MY NEW PROJECT...or two. - Page 4 003_co16

MY NEW PROJECT...or two. - Page 4 005_co19

MY NEW PROJECT...or two. - Page 4 006_co18

MY NEW PROJECT...or two. - Page 4 007_co15

MY NEW PROJECT...or two. - Page 4 012_co13
Back to top Go down
Footski
Master
Master
Footski


Posts : 548
Join date : 2011-06-11
Age : 66
Location : Malaga, Spain

MY NEW PROJECT...or two. - Page 4 Empty
PostSubject: Re: MY NEW PROJECT...or two.   MY NEW PROJECT...or two. - Page 4 EmptySun Dec 30, 2012 8:10 am

My this is good!
Back to top Go down
Guest
Guest


MY NEW PROJECT...or two. - Page 4 Empty
PostSubject: Re: MY NEW PROJECT...or two.   MY NEW PROJECT...or two. - Page 4 EmptySun Dec 30, 2012 2:40 pm

Don't kmow about good, barrie....it's bl***y complicated getting everything aligned up and glued in the correct sequence, lol
Back to top Go down
Guest
Guest


MY NEW PROJECT...or two. - Page 4 Empty
PostSubject: Re: MY NEW PROJECT...or two.   MY NEW PROJECT...or two. - Page 4 EmptyMon Dec 31, 2012 6:30 pm

all cross members now glued in with support gussets attached.
I used two part epoxy and spring clamps to hold in place. I'll then set the keel boxes in place now that I have the cross bearers to link them too.
I'll also be adding further cross members to both boats, but don't know where yet as I have to make my mind up on engine and servo placings before I proceed. But they will be needed to support the decks.


MY NEW PROJECT...or two. - Page 4 001_co18

MY NEW PROJECT...or two. - Page 4 002_co18


MY NEW PROJECT...or two. - Page 4 003_co17

MY NEW PROJECT...or two. - Page 4 004_co17


MY NEW PROJECT...or two. - Page 4 005_co20

MY NEW PROJECT...or two. - Page 4 006_co19
Back to top Go down
phil winks
Master
Master
phil winks


Posts : 583
Join date : 2011-06-12
Age : 68
Location : Taunton

MY NEW PROJECT...or two. - Page 4 Empty
PostSubject: Re: MY NEW PROJECT...or two.   MY NEW PROJECT...or two. - Page 4 EmptyMon Dec 31, 2012 7:13 pm

all looking real good Neil but now its time to kick back and prepare for the upcoming new year. all the best for 2013 for you your family and all those watching this thread


cheers cheers cheers bom bom drunken drunken drunken drunken drunken drunken Sleep
Back to top Go down
Guest
Guest


MY NEW PROJECT...or two. - Page 4 Empty
PostSubject: Re: MY NEW PROJECT...or two.   MY NEW PROJECT...or two. - Page 4 EmptyMon Dec 31, 2012 9:29 pm

and to you and all, phill....all the best for 2013.............now, where's the red wine, drunkendrunkendrunken
Back to top Go down
phil winks
Master
Master
phil winks


Posts : 583
Join date : 2011-06-12
Age : 68
Location : Taunton

MY NEW PROJECT...or two. - Page 4 Empty
PostSubject: Re: MY NEW PROJECT...or two.   MY NEW PROJECT...or two. - Page 4 EmptyMon Dec 31, 2012 10:07 pm

half drunk already Neil lol!
Back to top Go down
Footski
Master
Master
Footski


Posts : 548
Join date : 2011-06-11
Age : 66
Location : Malaga, Spain

MY NEW PROJECT...or two. - Page 4 Empty
PostSubject: Re: MY NEW PROJECT...or two.   MY NEW PROJECT...or two. - Page 4 EmptyTue Jan 01, 2013 8:52 am

New Year is no excuse to stop working! Hope yu all had a great time?
Back to top Go down
Guest
Guest


MY NEW PROJECT...or two. - Page 4 Empty
PostSubject: Re: MY NEW PROJECT...or two.   MY NEW PROJECT...or two. - Page 4 EmptyTue Jan 01, 2013 9:27 pm

And a Happy new year to you all, and hope you have many of them.
I have been working on the boat today, and done quite a bit, although it doesn't look like it.

First started off by cutting some Cherry wood for the side supports to the Keel boxes and then gluing them to the sides of the boxes, aligning them up centrally on the cross beams and gluing to those, so that the top of the side supports are flush with the cross beams and NOT the keel boxes, as the deck will glue to these and not the tops of the boxes.

Once they have set I will be able to mix some lead shot with resin and pour into the keel recess which will set the bottoms of the boxes permenantly, and also act as ballast.
Finally to do with this matter I have masked the underside of the keel with masking tape so that when the resin is poured it doesn't leak out of the gaps at the base.

MY NEW PROJECT...or two. - Page 4 002_co19

MY NEW PROJECT...or two. - Page 4 003_co18

MY NEW PROJECT...or two. - Page 4 004_co18

MY NEW PROJECT...or two. - Page 4 005_co21

MY NEW PROJECT...or two. - Page 4 006_co20

MY NEW PROJECT...or two. - Page 4 007_co16

MY NEW PROJECT...or two. - Page 4 008_co15

MY NEW PROJECT...or two. - Page 4 010_co14
Back to top Go down
Footski
Master
Master
Footski


Posts : 548
Join date : 2011-06-11
Age : 66
Location : Malaga, Spain

MY NEW PROJECT...or two. - Page 4 Empty
PostSubject: Re: MY NEW PROJECT...or two.   MY NEW PROJECT...or two. - Page 4 EmptyWed Jan 02, 2013 8:00 am

Dedication....If I had tried going in the work shop on New Years day, I reckon the dinner would have gone in the cat!!!
Back to top Go down
Guest
Guest


MY NEW PROJECT...or two. - Page 4 Empty
PostSubject: Re: MY NEW PROJECT...or two.   MY NEW PROJECT...or two. - Page 4 EmptyWed Jan 02, 2013 10:09 am

lol!lol!lol!lol!

THE IMPORTANCE OF PLANNING!!!

I like to tell my "stories" warts and all, and if I encounter a problem or make a mistake, then i'll tell it like it is...........awoke this morning in a sweat!!..had I dropped a big one!!!
Spot the "not so deliberate" mistake...............and this was a big mistake, because I just blundered on without forward thinking or planning.


MY NEW PROJECT...or two. - Page 4 001_co19


MY NEW PROJECT...or two. - Page 4 002_co20
Back to top Go down
Footski
Master
Master
Footski


Posts : 548
Join date : 2011-06-11
Age : 66
Location : Malaga, Spain

MY NEW PROJECT...or two. - Page 4 Empty
PostSubject: Re: MY NEW PROJECT...or two.   MY NEW PROJECT...or two. - Page 4 EmptyWed Jan 02, 2013 10:45 am

Oh dear......erm any chance of using a very short rod and a smaller motor? Sad Sad If not, drill a hole through the keel section,whatever that is called, lining it up with the shaft and fit the rod in that way.
Back to top Go down
Guest
Guest


MY NEW PROJECT...or two. - Page 4 Empty
PostSubject: Re: MY NEW PROJECT...or two.   MY NEW PROJECT...or two. - Page 4 EmptyWed Jan 02, 2013 10:50 am

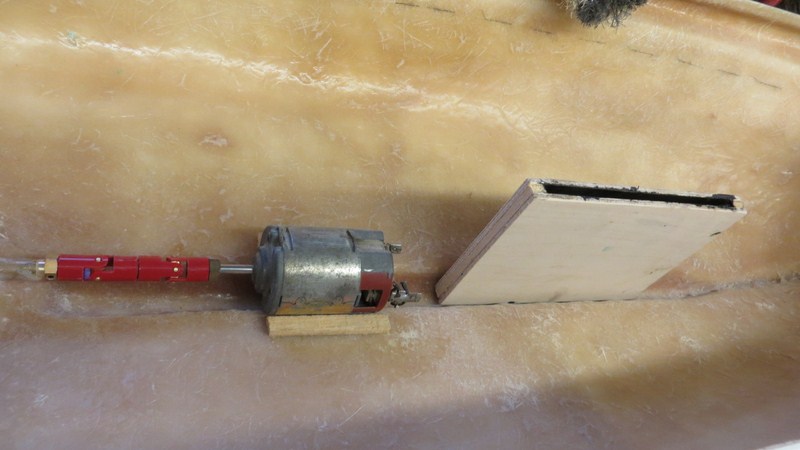
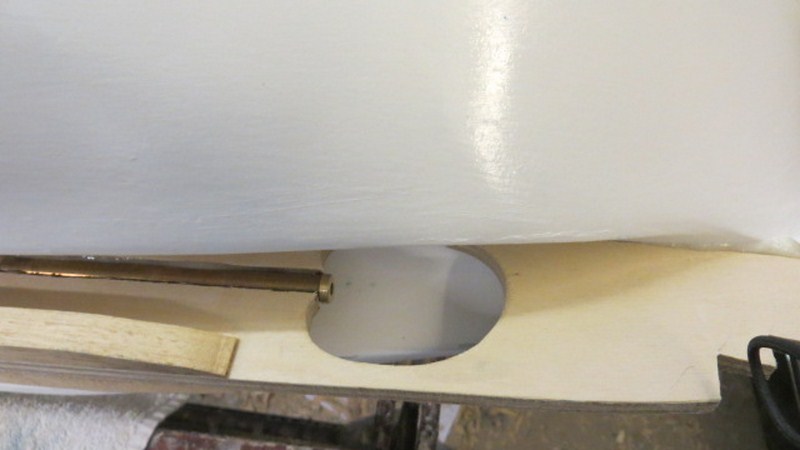
Ummm flex shaft with the motor mounted beside the Boxing????????????????
D,
Back to top Go down
Guest
Guest


MY NEW PROJECT...or two. - Page 4 Empty
PostSubject: Re: MY NEW PROJECT...or two.   MY NEW PROJECT...or two. - Page 4 EmptyWed Jan 02, 2013 12:29 pm

Well..........luckily, guys..............................

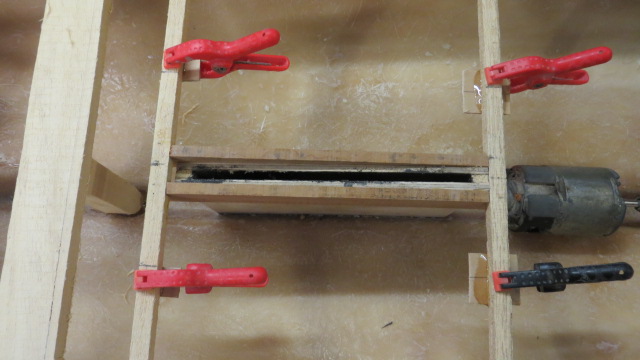
and it is pure luck, had the box been any further back I wouldn't have done........the prop shaft flexes just enough, and being stainless steel it doesn't bend........just flexes.......it goes in with a push........I am so lucky or else I'd have had to think of something else for the box..................but it means that for the first time in my building life I'm going to have to put a grease/oil tube on the prop tube...............off round to Rods in a minute or two to see what he has in the way of grease nipples and how to fix 'em in.
Back to top Go down
Guest
Guest


MY NEW PROJECT...or two. - Page 4 Empty
PostSubject: Re: MY NEW PROJECT...or two.   MY NEW PROJECT...or two. - Page 4 EmptyWed Jan 02, 2013 12:38 pm

Very Happy Very Happy Very Happy
Back to top Go down
Guest
Guest


MY NEW PROJECT...or two. - Page 4 Empty
PostSubject: Re: MY NEW PROJECT...or two.   MY NEW PROJECT...or two. - Page 4 EmptyWed Jan 02, 2013 6:36 pm

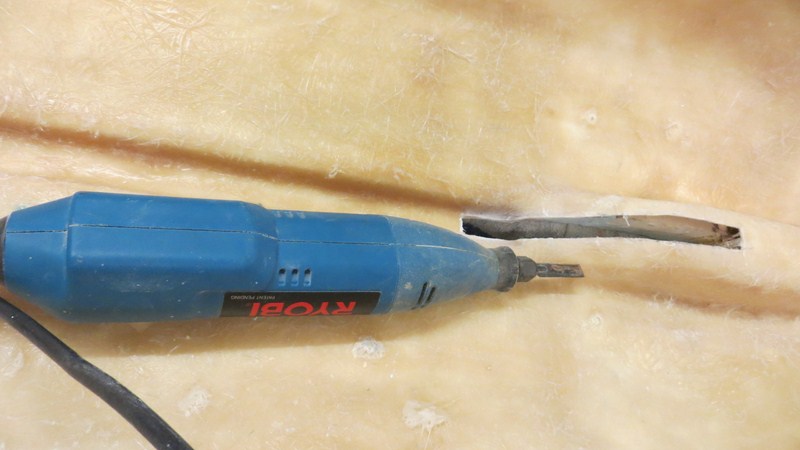
The Problem has been rectified, and all thanks and ideas go to my mate Rod (trawlerman) as to how to do the job, 'cos I was floundering.
Take one block of nylon that my friend Andy (tatooed) from RCMB gave me some time ago, and drill it for the prop shaft to pass through and a piece of tubing at right angles.

shape the nylon block to fit onto the prop tube and up tp the hull.

Take one grease nipple supplied by Rod, and thread it onto a piece of Alluminium tube.

Put some filler on the bottom of the block and some 2 part epoxy onto the prop tube and place the nylon block onto the shaft to glue and set in place.

Drill a hole into the prop tube by drilling centrally down the hole in the nylon block.

Glue the alli tube containing the grease nipple into the hole....voila'

Grease the tube with my old mix of graphite powder and vaseline and insert the prop shaft, placeing a nut at each end once in situ ready for the propellor and motor.

Thank goodness for good friends................but I won't publish the reply that Rod gave me as a solution before he gave me the grease nipple.

neil.
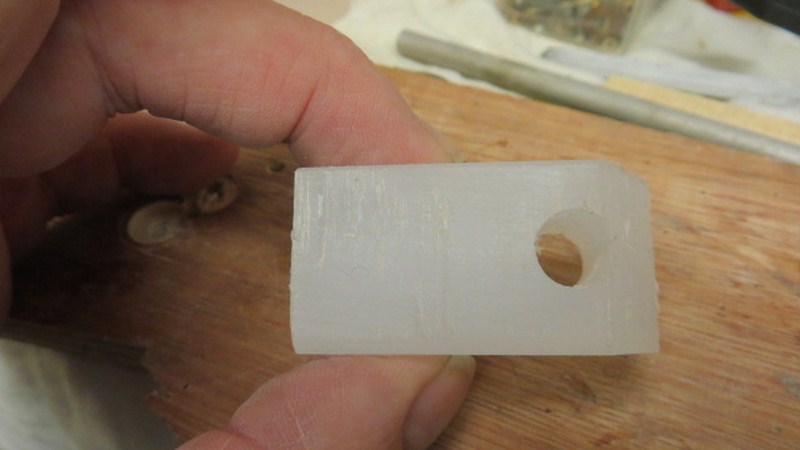
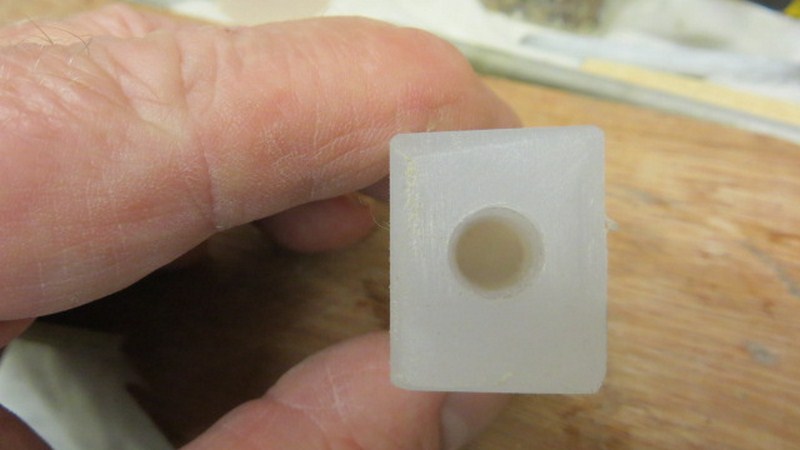
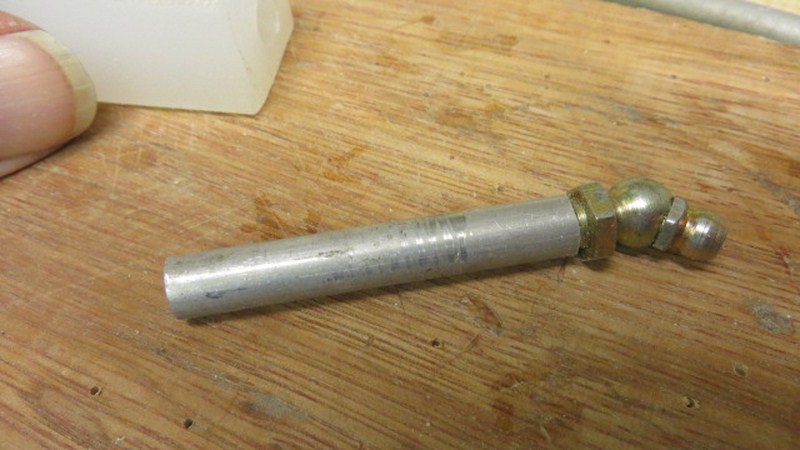
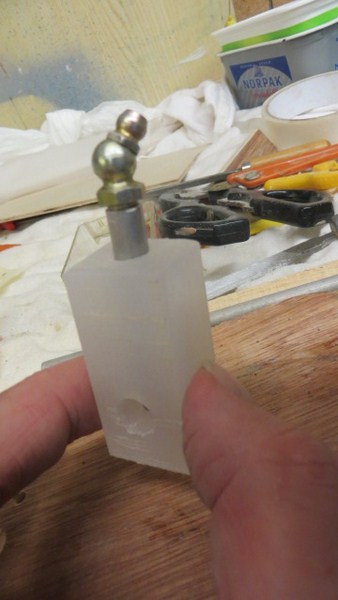
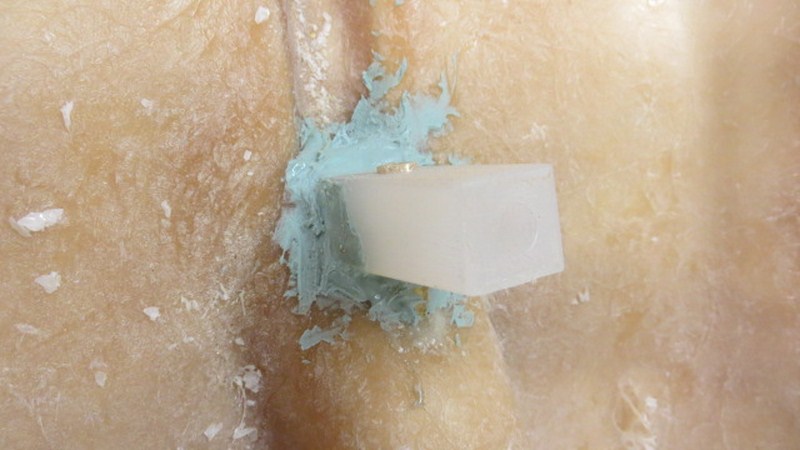
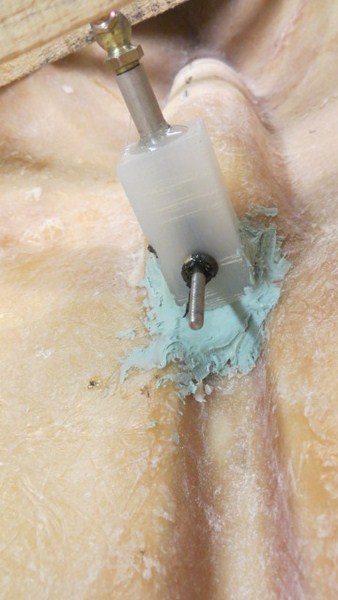
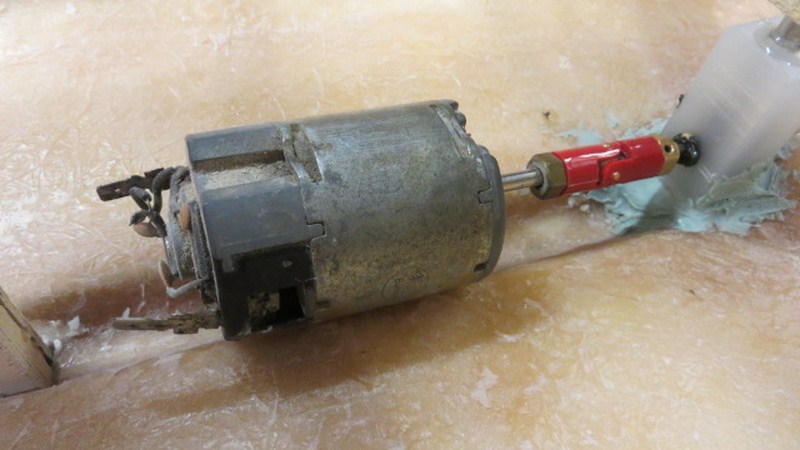


MY NEW PROJECT...or two. - Page 4 003_co19

MY NEW PROJECT...or two. - Page 4 004_co19

MY NEW PROJECT...or two. - Page 4 005_co22

MY NEW PROJECT...or two. - Page 4 006_co21

MY NEW PROJECT...or two. - Page 4 010_co15

MY NEW PROJECT...or two. - Page 4 011_co14

MY NEW PROJECT...or two. - Page 4 012_co14

MY NEW PROJECT...or two. - Page 4 014_co13

MY NEW PROJECT...or two. - Page 4 016_co12

MY NEW PROJECT...or two. - Page 4 013_co13
Back to top Go down
Footski
Master
Master
Footski


Posts : 548
Join date : 2011-06-11
Age : 66
Location : Malaga, Spain

MY NEW PROJECT...or two. - Page 4 Empty
PostSubject: Re: MY NEW PROJECT...or two.   MY NEW PROJECT...or two. - Page 4 EmptyWed Jan 02, 2013 7:59 pm

Brilliant....
Back to top Go down
Guest
Guest


MY NEW PROJECT...or two. - Page 4 Empty
PostSubject: Re: MY NEW PROJECT...or two.   MY NEW PROJECT...or two. - Page 4 EmptyWed Jan 02, 2013 8:29 pm

cheers Barrie............but it was all trawlerman's idea.

neil.
Back to top Go down
Guest
Guest


MY NEW PROJECT...or two. - Page 4 Empty
PostSubject: Re: MY NEW PROJECT...or two.   MY NEW PROJECT...or two. - Page 4 EmptyFri Jan 04, 2013 10:10 pm

Not a day goes by when there's not trauma or drama in my life........I think I attract it........
yesterday I nearly had a "spitit of Extacy" motiff on the bonnet of my car when a woman stepped out from between two cars and ended up sitting on my bonnet she was so close........hurt my back and neck in the emergency stop......so sat last night making the costumes on my little figures as I couldn't walk.......will post some shots of those when the milliput has set rock hard.

Today, just going into Asda at Fleetwood, and an elderly gent falls in front of me....so I and another guy helped him to his feet and he had a peti't mal...a seizure and his legs went from under him..............so we sat him down and I called the ambulance.......we kept him calm while the first responder arrived, and then left as he took over as the First aider from asda and he looked after him.
Poor old guy was still in intensive care late this arvo when I enquired..........so shaken up again today..........so decided to wash my mind of it all and do some modelling.
got down to making supports for the two mast tabernackles on each boat.......nice stout cross members with a vertical support from the keel to the support.
also glued some tabs for the longitudinal supports for the deck ...they will be fitted tomorrow some time.

MY NEW PROJECT...or two. - Page 4 00110

MY NEW PROJECT...or two. - Page 4 00210

MY NEW PROJECT...or two. - Page 4 00310

MY NEW PROJECT...or two. - Page 4 00410

MY NEW PROJECT...or two. - Page 4 00510

MY NEW PROJECT...or two. - Page 4 00610

MY NEW PROJECT...or two. - Page 4 00710

MY NEW PROJECT...or two. - Page 4 00810

MY NEW PROJECT...or two. - Page 4 00910

MY NEW PROJECT...or two. - Page 4 01010
Back to top Go down
Footski
Master
Master
Footski


Posts : 548
Join date : 2011-06-11
Age : 66
Location : Malaga, Spain

MY NEW PROJECT...or two. - Page 4 Empty
PostSubject: Re: MY NEW PROJECT...or two.   MY NEW PROJECT...or two. - Page 4 EmptySat Jan 05, 2013 8:25 am

Blimey Neil, I live a very quiet,boring kind of life out here in the sun......nothing exciting happens here.....mind you, not much modelling gets done either! Sad
Back to top Go down
Guest
Guest


MY NEW PROJECT...or two. - Page 4 Empty
PostSubject: Re: MY NEW PROJECT...or two.   MY NEW PROJECT...or two. - Page 4 EmptySat Jan 05, 2013 6:43 pm

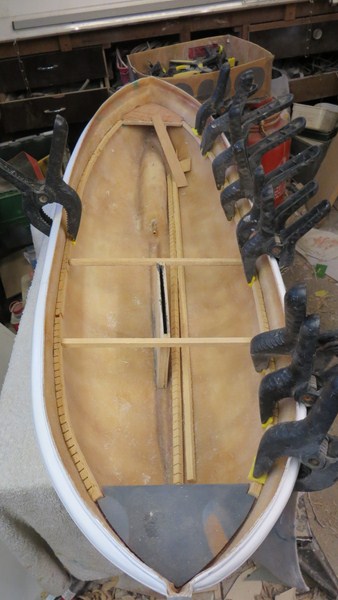
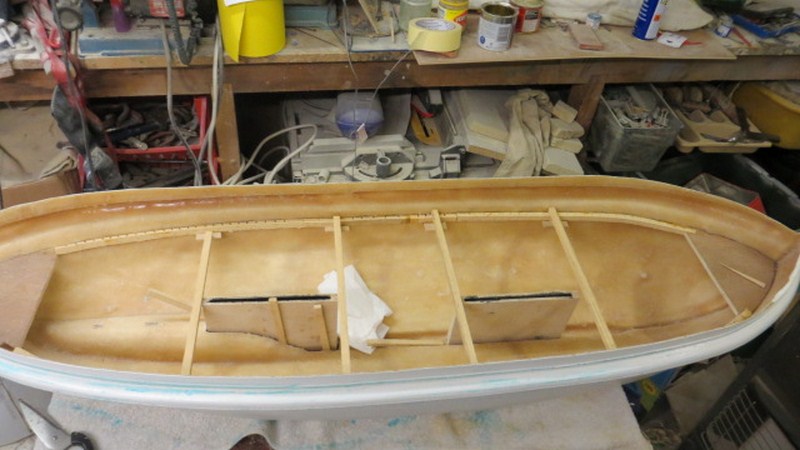
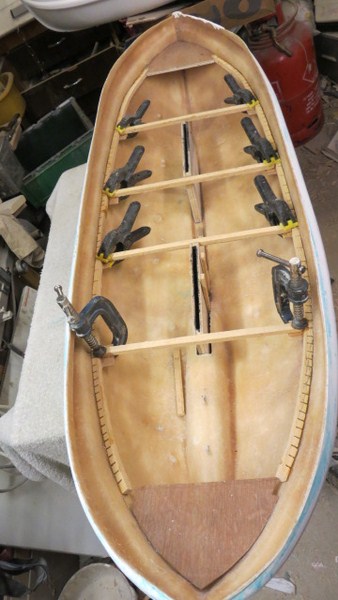
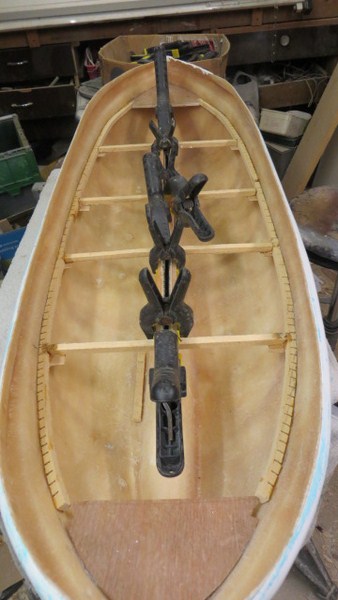
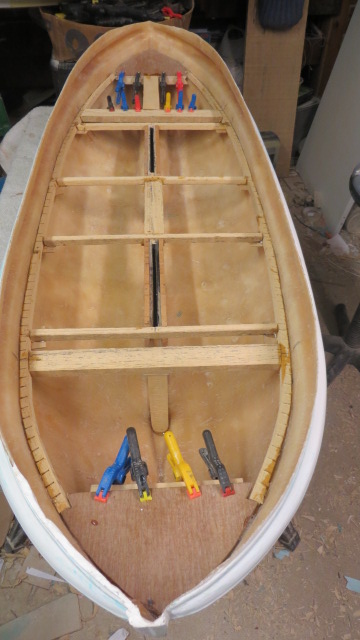
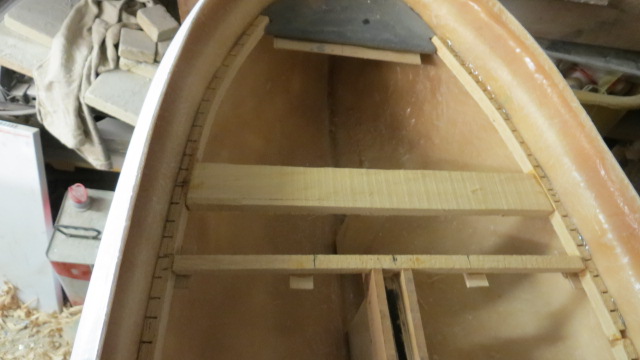
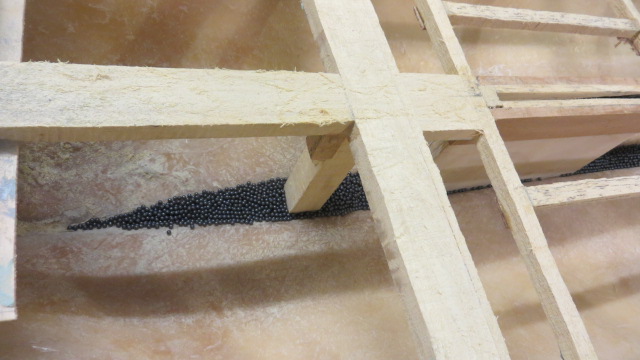
Barrie, my wife describes me as a disater already happened......don't know what she means really...............


Well , no one can accuse me of not building a boat to last, and take knocks.

There's nothing worse than picking a boat up that feels flimsy and falls apart on you for lack of a "bit" of strengthening.

Both boats have now had all their beams put in to take the decks....the only process to do now is to put a fillet of polyester filler into the boat between the hull and the bottom edge of the beams around the bulwark, and pour polyester resin and lead shot into the keel groove to set in place the keel boxes and the ballast.........that will be done tomorrow and sand the beams level to take the decks.

these boats won't fall apart in a hurry.

neil
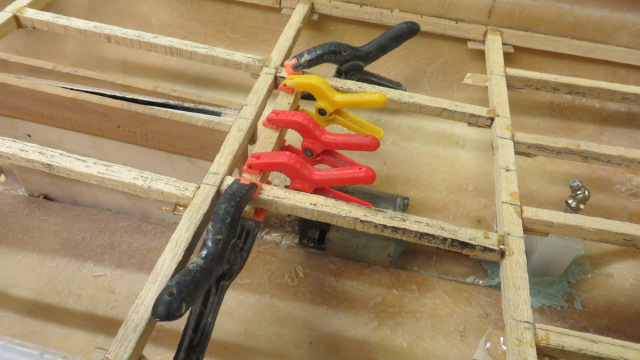
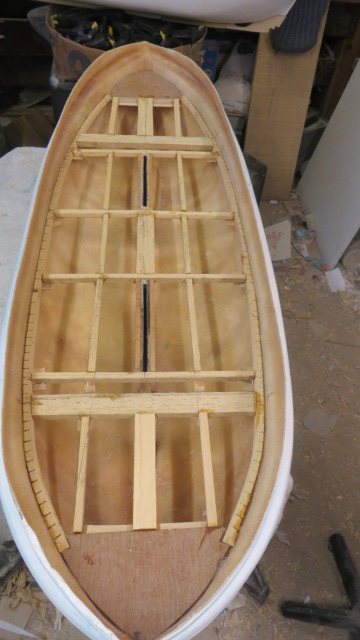
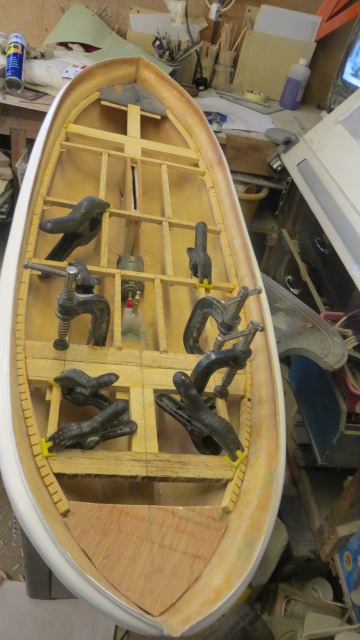
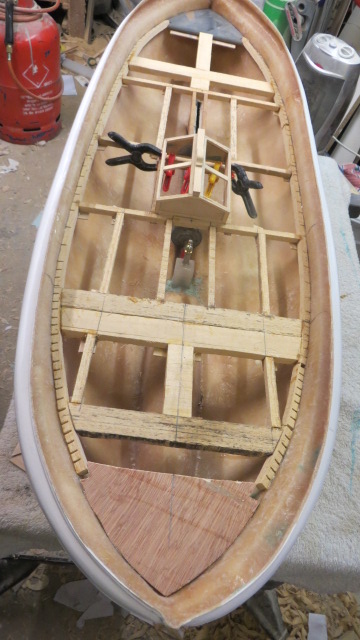
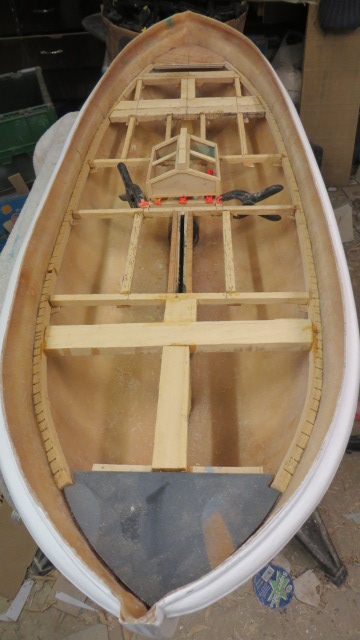


MY NEW PROJECT...or two. - Page 4 00612


MY NEW PROJECT...or two. - Page 4 00512


MY NEW PROJECT...or two. - Page 4 00112


MY NEW PROJECT...or two. - Page 4 00213


MY NEW PROJECT...or two. - Page 4 00312


MY NEW PROJECT...or two. - Page 4 00412
Back to top Go down
Guest
Guest


MY NEW PROJECT...or two. - Page 4 Empty
PostSubject: Re: MY NEW PROJECT...or two.   MY NEW PROJECT...or two. - Page 4 EmptySun Jan 06, 2013 1:35 pm

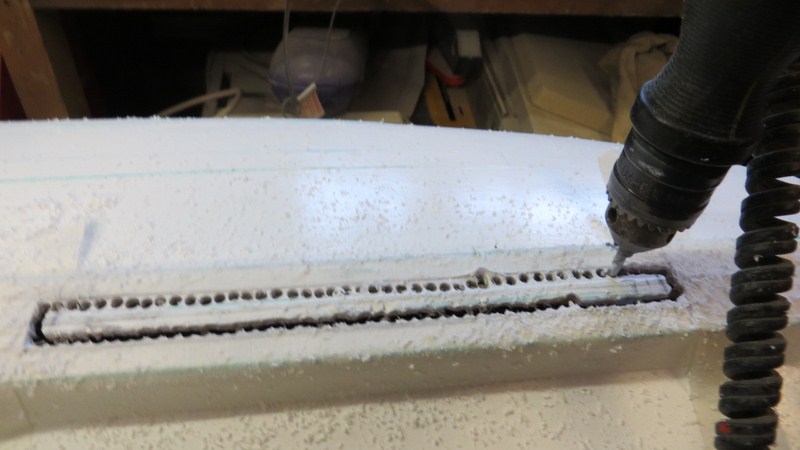
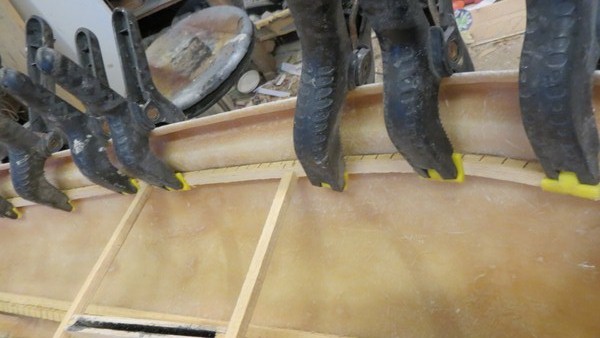
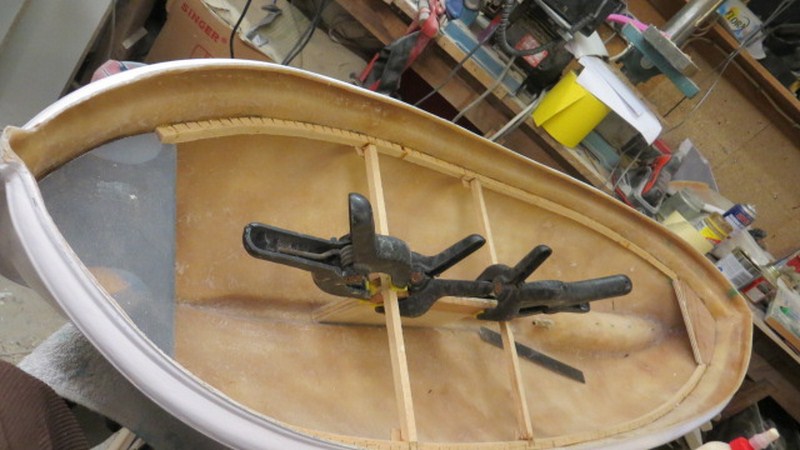
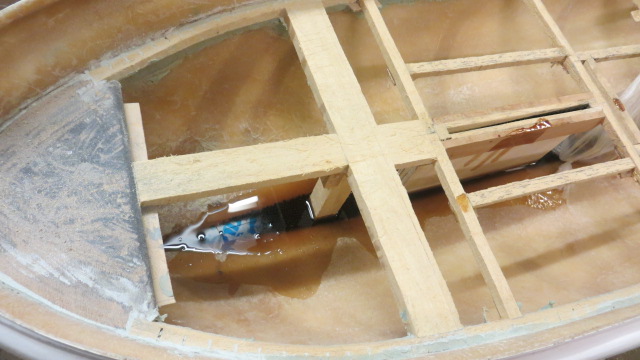
applied the filler to the underside of the beams this morning..........messy and not pretty.....at the ends where I couldn't get underneath to apply the filler i put it in from the top..........
the boat will now be waterproof, at least from the top and deck, once the deck has gone on..............it's also incredibly strong and rigid now.

the tops of the beams will be sanded down to remove excess and messy filler before the deck is placed onto the boat and glued sometime this week.
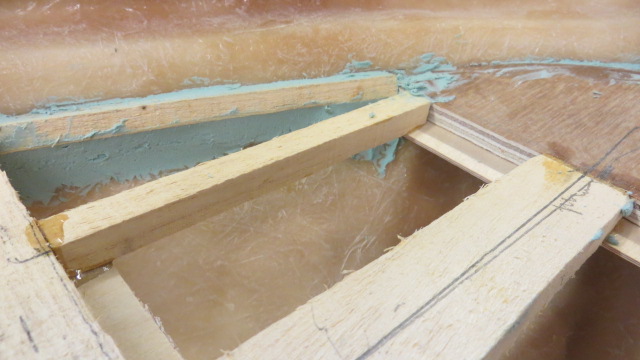
MY NEW PROJECT...or two. - Page 4 00214


MY NEW PROJECT...or two. - Page 4 00313


MY NEW PROJECT...or two. - Page 4 00413
Back to top Go down
Guest
Guest


MY NEW PROJECT...or two. - Page 4 Empty
PostSubject: Re: MY NEW PROJECT...or two.   MY NEW PROJECT...or two. - Page 4 EmptySun Jan 06, 2013 10:45 pm

Oooooh I wish I could still work as fast as you Neil.
Looking Goooood.
Damien.
Back to top Go down
Guest
Guest


MY NEW PROJECT...or two. - Page 4 Empty
PostSubject: Re: MY NEW PROJECT...or two.   MY NEW PROJECT...or two. - Page 4 EmptyMon Jan 07, 2013 7:45 am

thanks Damien........however the hard part starts now........this is the finish I have to achieve..........uummmmmmm😕 confused confused


this is the interior of the fully restored pulling lifeboat William Rilety of Leaminton built 1904

MY NEW PROJECT...or two. - Page 4 04210
Back to top Go down
Guest
Guest


MY NEW PROJECT...or two. - Page 4 Empty
PostSubject: Re: MY NEW PROJECT...or two.   MY NEW PROJECT...or two. - Page 4 EmptyMon Jan 07, 2013 8:37 am

Where the hell will you get a scale folding ladder? lol! lol! lol!
Back to top Go down
Footski
Master
Master
Footski


Posts : 548
Join date : 2011-06-11
Age : 66
Location : Malaga, Spain

MY NEW PROJECT...or two. - Page 4 Empty
PostSubject: Re: MY NEW PROJECT...or two.   MY NEW PROJECT...or two. - Page 4 EmptyMon Jan 07, 2013 11:09 am

Damien wrote:
Where the hell will you get a scale folding ladder? lol! lol! lol!


He he he... Razz Razz Razz Razz
Back to top Go down
Guest
Guest


MY NEW PROJECT...or two. - Page 4 Empty
PostSubject: Re: MY NEW PROJECT...or two.   MY NEW PROJECT...or two. - Page 4 EmptyMon Jan 07, 2013 4:41 pm

affraidaffraidaffraidaffraid


lol!


Beams sanded level, the templates for the decks have been made and the decks cut out and dry fitted....

Now this has so far been the easy job....what I have to achieve next is this type of finish as appears on the restored pulling lifeboat , RNLB William Riley of Leamington and Birmingham........... from now on, not so easy!!! +

MY NEW PROJECT...or two. - Page 4 00113

MY NEW PROJECT...or two. - Page 4 00215

MY NEW PROJECT...or two. - Page 4 00314

MY NEW PROJECT...or two. - Page 4 00414

MY NEW PROJECT...or two. - Page 4 00513

MY NEW PROJECT...or two. - Page 4 00613

MY NEW PROJECT...or two. - Page 4 00711

MY NEW PROJECT...or two. - Page 4 00811

MY NEW PROJECT...or two. - Page 4 00911

MY NEW PROJECT...or two. - Page 4 031_co10

MY NEW PROJECT...or two. - Page 4 037_co10


MY NEW PROJECT...or two. - Page 4 039_co10
Back to top Go down
Footski
Master
Master
Footski


Posts : 548
Join date : 2011-06-11
Age : 66
Location : Malaga, Spain

MY NEW PROJECT...or two. - Page 4 Empty
PostSubject: Re: MY NEW PROJECT...or two.   MY NEW PROJECT...or two. - Page 4 EmptyMon Jan 07, 2013 6:10 pm

Now this should be interesting. Rather you than me Neil...
Back to top Go down
Guest
Guest


MY NEW PROJECT...or two. - Page 4 Empty
PostSubject: Re: MY NEW PROJECT...or two.   MY NEW PROJECT...or two. - Page 4 EmptyTue Jan 08, 2013 8:41 am

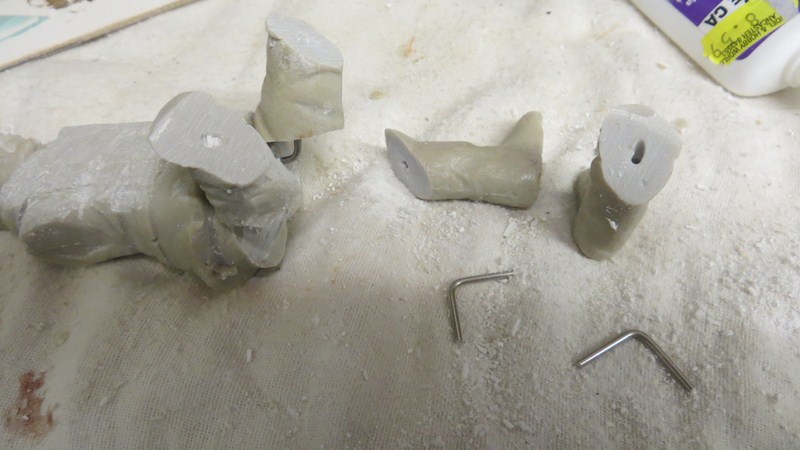
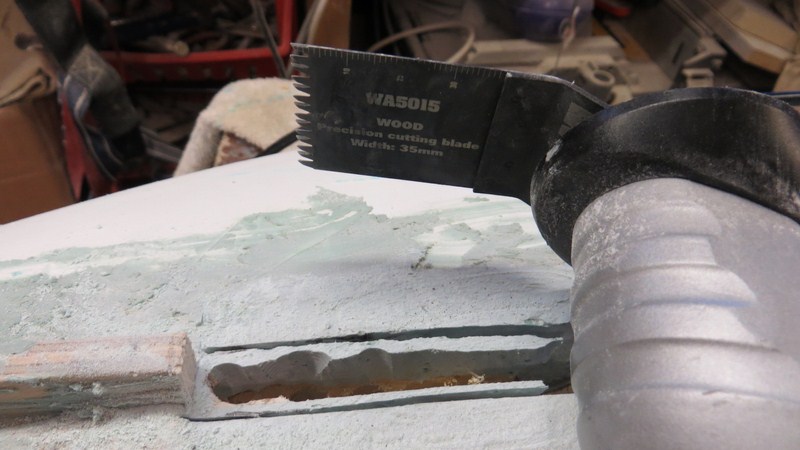
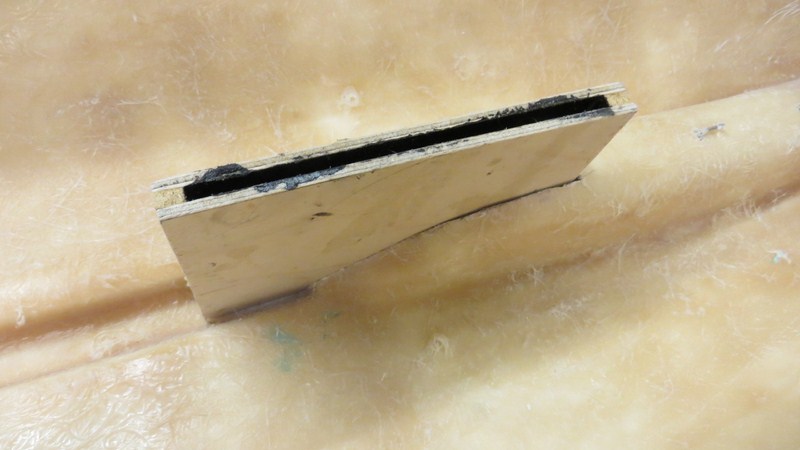
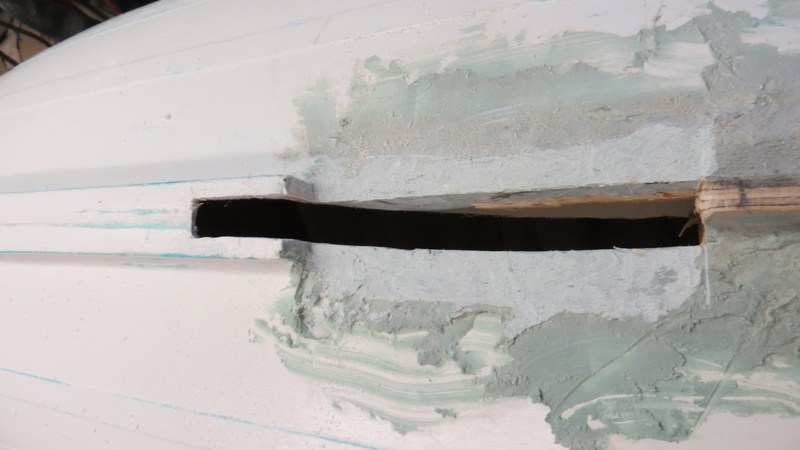
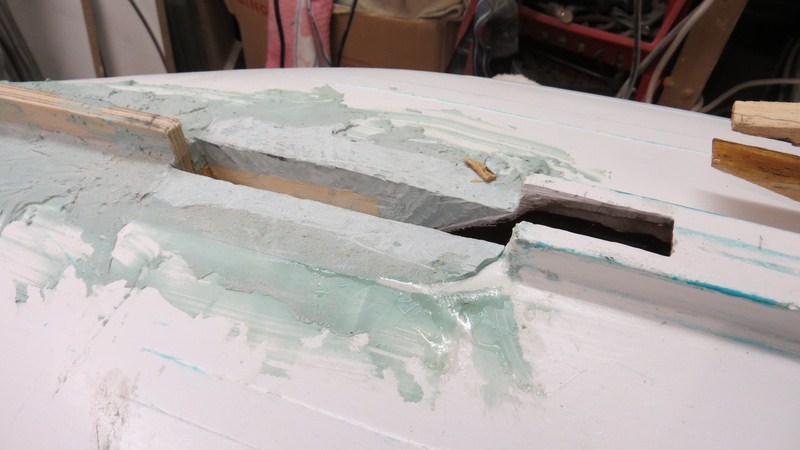
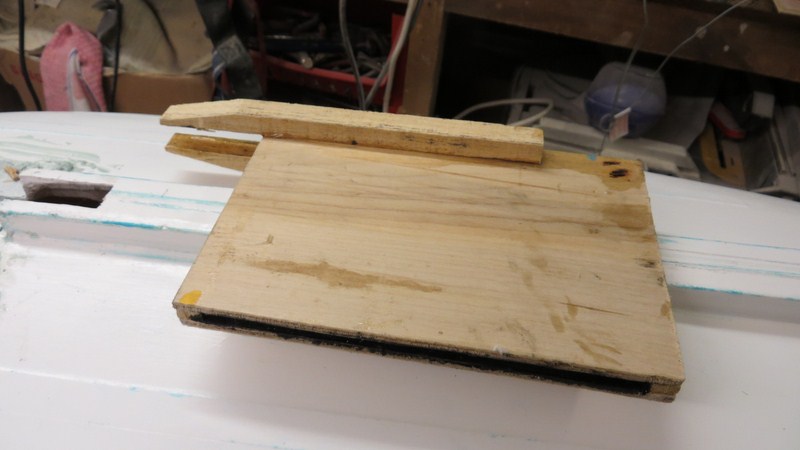
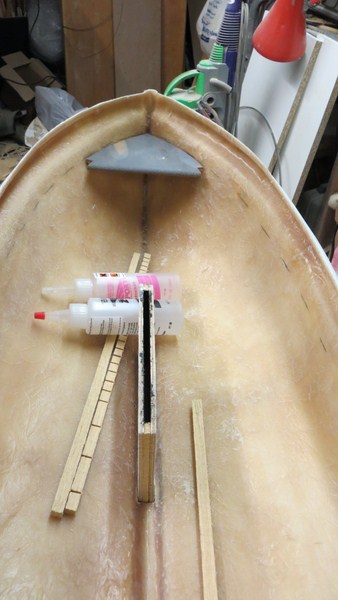
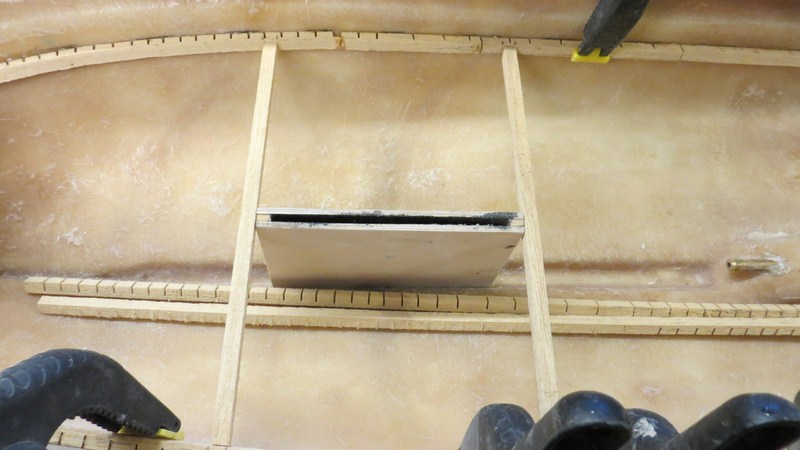
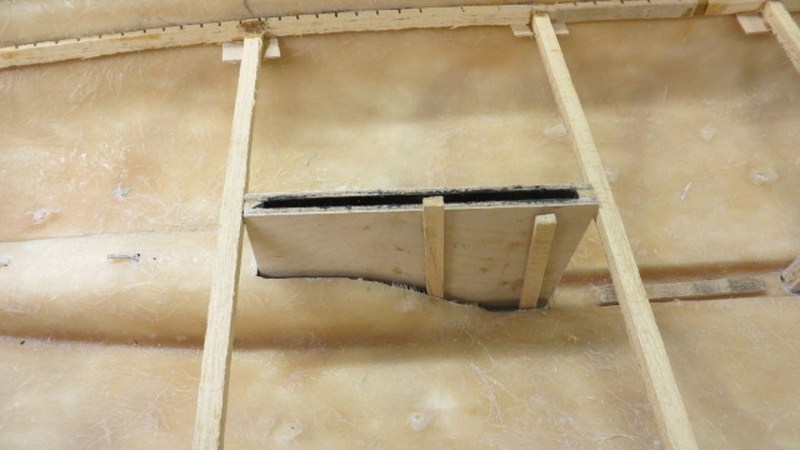
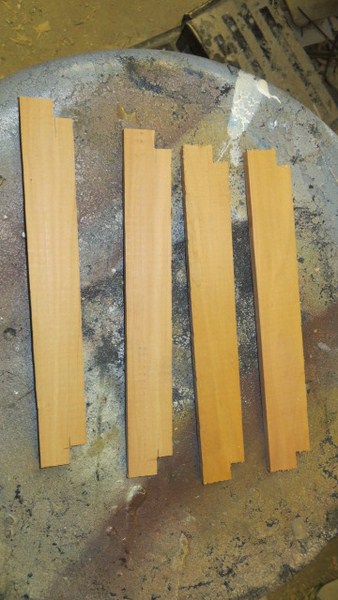
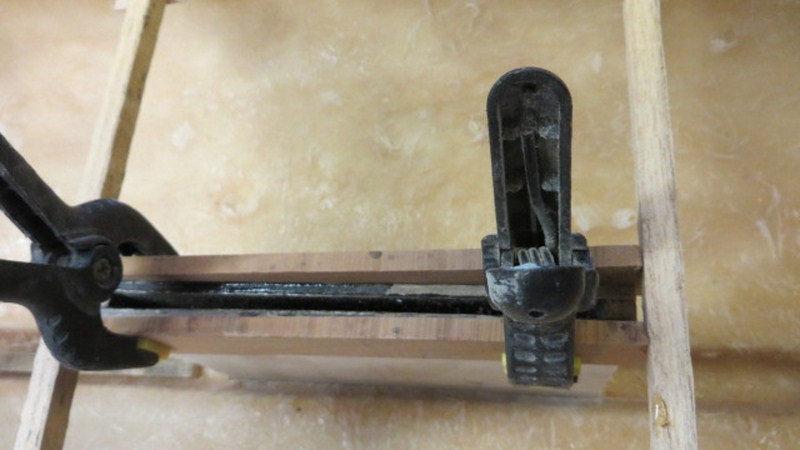
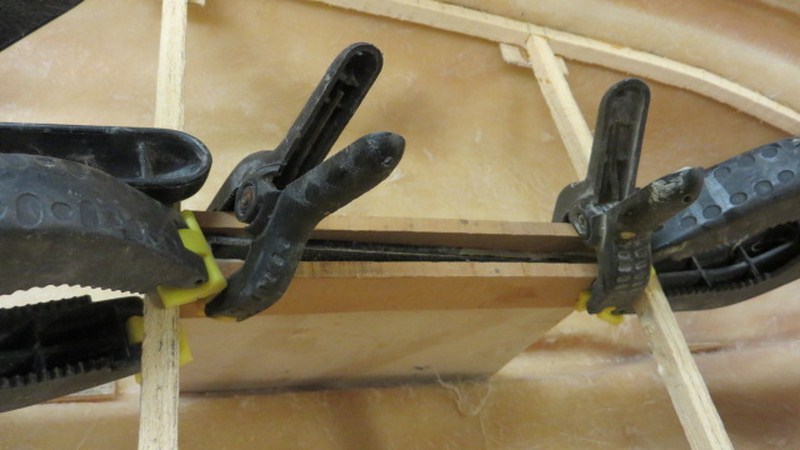
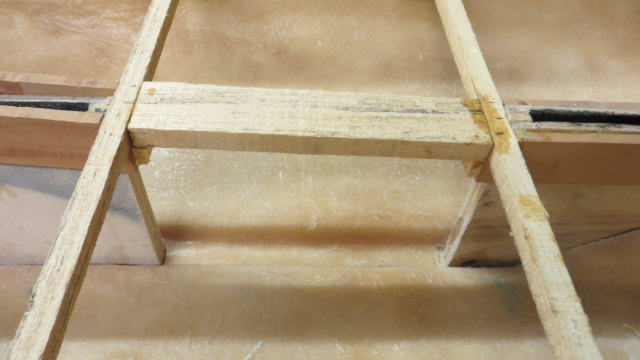
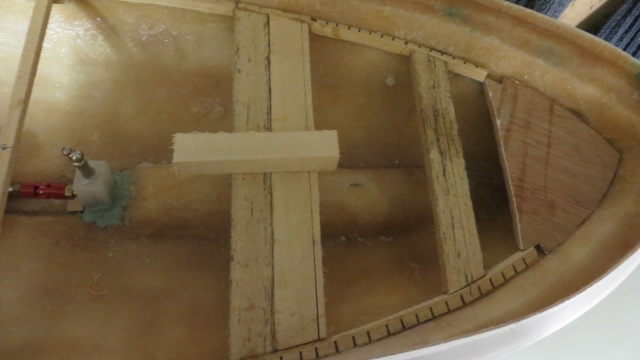
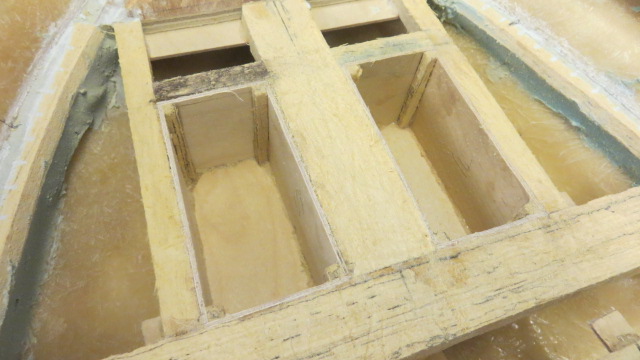
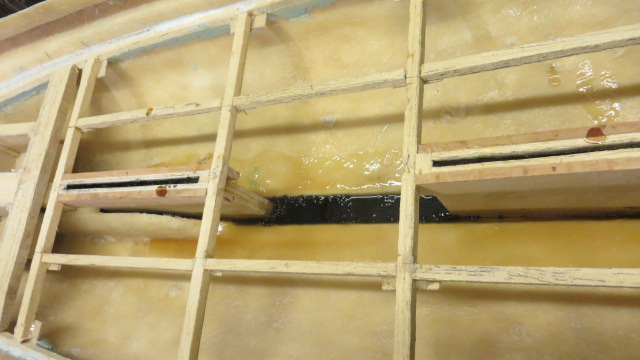
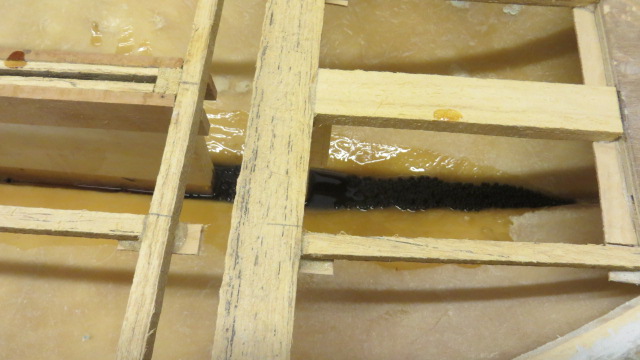
I could think of other words, barrie, other than interesting, lol.......not really printable though, lol


As the old proverb says.......necessity is the mother of invention....and yesterday I was filling in the upper pieces of the forward keel box to make it totally watertight.

it needed some little blocks inserting at front and back and some side pieces....the blocks were clamped easily with small spring clamps.....but the sides were more diificult as there was only a 4mm gap to get into..........so I made some wooden wedges and drove them in with a small pin hammer to hold tight.........it worked..........the simplest of ideas are sometimes the best.
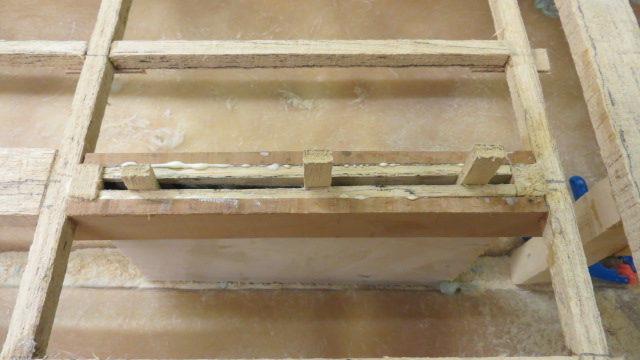

MY NEW PROJECT...or two. - Page 4 007_co17


MY NEW PROJECT...or two. - Page 4 01011
Back to top Go down
Guest
Guest


MY NEW PROJECT...or two. - Page 4 Empty
PostSubject: Re: MY NEW PROJECT...or two.   MY NEW PROJECT...or two. - Page 4 EmptyWed Jan 09, 2013 9:41 pm

have spent the last two days, ( I know it don't look much and I didn't start till after lunch yesterday ) making the boxes for the radio receiver/battery packs and the servos for the sails....the first stage was to put the boxes into the frame work of the boats.................two in the motor sailer and three in the sailing boat.

I have not yet decised whether to have these boats just as free sailors without servo winches,and am leaning that way for an uncomplicated life, but if I decide to have sail winches later I have the space for them to sit in without disturbing the decking later.

the second job was to put some initial ballast into the bottom keel skegs of the two boats and get the ballast as low as possible.
In this way I used lead shot and covered it with polyester resin.....this also sealed the bottoms of the Keel boxes from the outside water ingress.

the plastic bag is actually wrapped around the motor to be used and the motor was pressed down into the resin to make a "seat" for it to fit into in the correct possition for driving the boat.

MY NEW PROJECT...or two. - Page 4 00712

MY NEW PROJECT...or two. - Page 4 00812

MY NEW PROJECT...or two. - Page 4 00912

MY NEW PROJECT...or two. - Page 4 01012

MY NEW PROJECT...or two. - Page 4 00114

MY NEW PROJECT...or two. - Page 4 00216

MY NEW PROJECT...or two. - Page 4 00315

MY NEW PROJECT...or two. - Page 4 00415

MY NEW PROJECT...or two. - Page 4 00514

MY NEW PROJECT...or two. - Page 4 00614
Back to top Go down
Footski
Master
Master
Footski


Posts : 548
Join date : 2011-06-11
Age : 66
Location : Malaga, Spain

MY NEW PROJECT...or two. - Page 4 Empty
PostSubject: Re: MY NEW PROJECT...or two.   MY NEW PROJECT...or two. - Page 4 EmptyThu Jan 10, 2013 7:49 am

Great work. I always mount my motors in resin and then use rubber bands to hold it in place. Never had any trouble with them either....
Back to top Go down
Guest
Guest


MY NEW PROJECT...or two. - Page 4 Empty
PostSubject: Re: MY NEW PROJECT...or two.   MY NEW PROJECT...or two. - Page 4 EmptyThu Jan 10, 2013 11:31 am

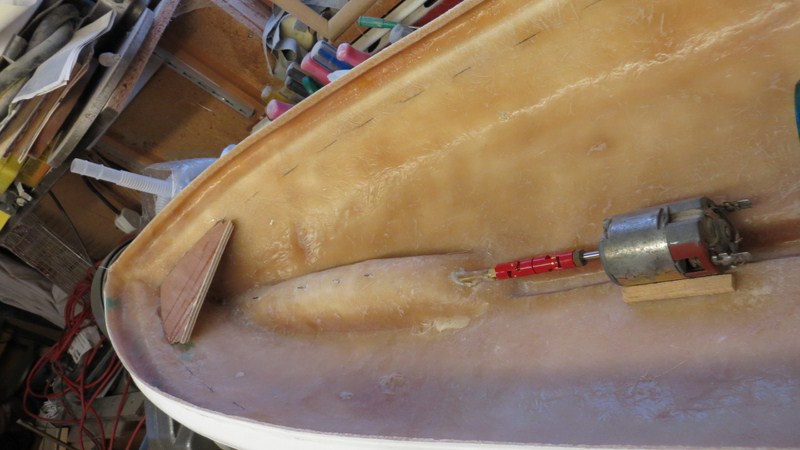
people laugh at me Barrie, but I always secure my motors in with blutack..the hotter the motor gets the better stickiness the blutack gives, lol.

Tank testing and ballasting took place this morning of the sailing lifeboat.

She has been in the "test tank" aka the bath tub for 3 hours now to test (at full ballasted weight of 6.5 kilos) to weedle out any leaks in the hull around the keel boxes and I am happy to say that she is still bone dry.

The large battery on top of the boat is the correct ballast weight needed to bring the sailor down to waterline.

this poses a slight problem in weight distribution as the whole of the deck on this boat will be sealed and totally wathertight and so the ballast will have to go in in the next day or so before the deck is glued down permenantly........this will make manhanling it somewhat painfull at times, but as there will be no room or access to put it in at a later date as a permenant fixture it is the lesser of many evils.

the motor sailor will be easier as there will be access into the hull for motor and such, and therefore can be made removeable in certain areas to make lighter to handle.

MY NEW PROJECT...or two. - Page 4 00115

MY NEW PROJECT...or two. - Page 4 00217
Back to top Go down
Guest
Guest


MY NEW PROJECT...or two. - Page 4 Empty
PostSubject: Re: MY NEW PROJECT...or two.   MY NEW PROJECT...or two. - Page 4 EmptyFri Jan 11, 2013 1:12 pm

Went down the scrap merchants today and bought 14 kilo of lead sheet for 20 quid and have cut up the first lot for the sailing boat and seated it in wedging down with the servo/battery box midships..before I set it in worth some resin tomorrow I'll give it another bath just to make sure it isn't too heavy, taking into acount the weight of the masts/top boxes and batteries plus resin.

MY NEW PROJECT...or two. - Page 4 00116

MY NEW PROJECT...or two. - Page 4 00218

MY NEW PROJECT...or two. - Page 4 00316

MY NEW PROJECT...or two. - Page 4 00416

MY NEW PROJECT...or two. - Page 4 00515
Back to top Go down
barriew
Captain (moderator)
Captain (moderator)


Posts : 2631
Join date : 2011-11-26
Age : 83
Location : Thaxted, Essex

MY NEW PROJECT...or two. - Page 4 Empty
PostSubject: Re: MY NEW PROJECT...or two.   MY NEW PROJECT...or two. - Page 4 EmptyFri Jan 11, 2013 3:22 pm

Neil,

Where do you get your lead shot? My previous supplier (leadshotballast.co.uk) has stopped selling shot and only sells sheet lead. I've found some dive shops selling it but its quite expensive that way.

Barrie
Back to top Go down
Guest
Guest


MY NEW PROJECT...or two. - Page 4 Empty
PostSubject: Re: MY NEW PROJECT...or two.   MY NEW PROJECT...or two. - Page 4 EmptyFri Jan 11, 2013 7:05 pm

I think you'll find it expensive anywhere you go now Barrie.......this stuff I bought about 15 years ago and it's the last of a batch..........but the cheepest I found when looking the other day was here..... http://www.ebay.co.uk/itm/320825068603?ssPageName=STRK:MEWAX:IT&_trksid=p3984.m1423.l2649
Back to top Go down
Guest
Guest


MY NEW PROJECT...or two. - Page 4 Empty
PostSubject: Re: MY NEW PROJECT...or two.   MY NEW PROJECT...or two. - Page 4 EmptyFri Jan 11, 2013 7:08 pm

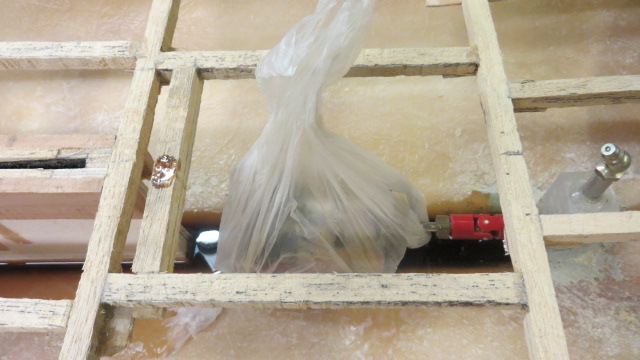
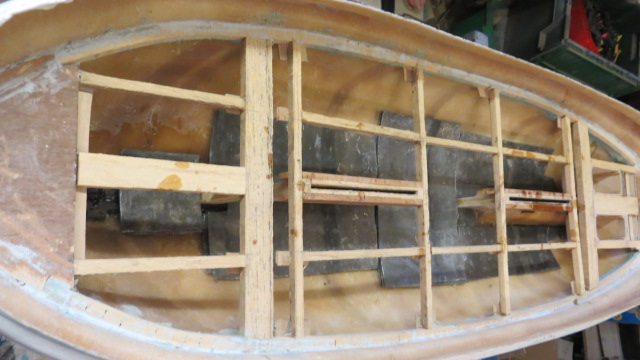
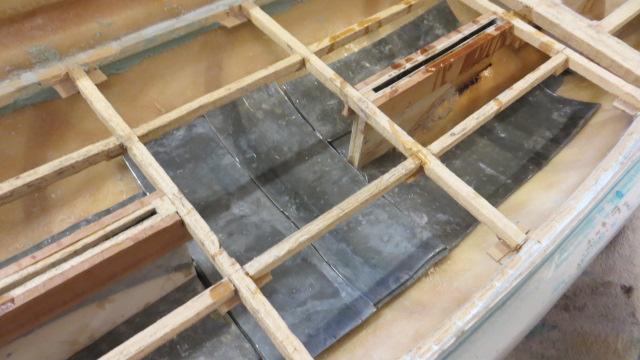
I ballasted the motor sailor this afternoon, but before I could do that I had to make a "dam" around the motor so that once I poured in the resin to set the lead sheet in place, it wouldn't flow into the well that I had made for the motor to set into.
Now both have had lead added I can give them both a bath, and add or take out any that is not needed before adding the resin.
I have also taken into account the weight of the batteries, motor sevos and estimated weight of any materials for the rest of the build.

Here's the second boat, the motor sailor.
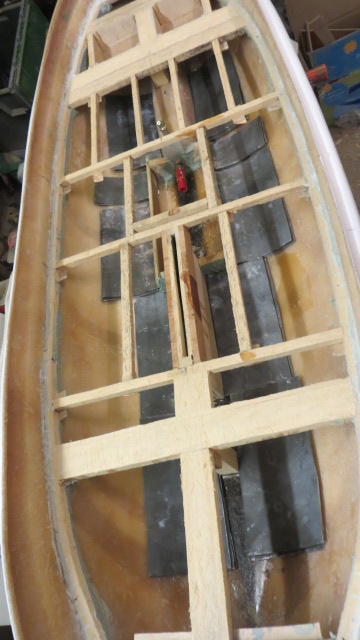
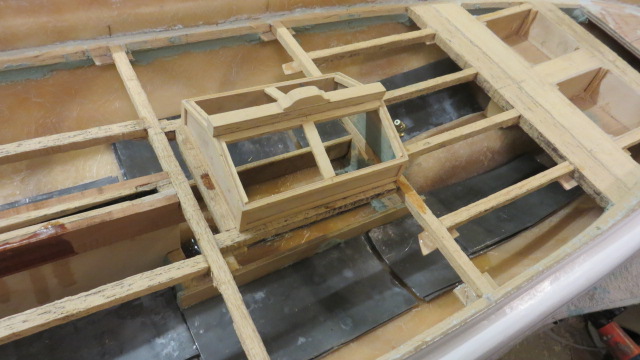
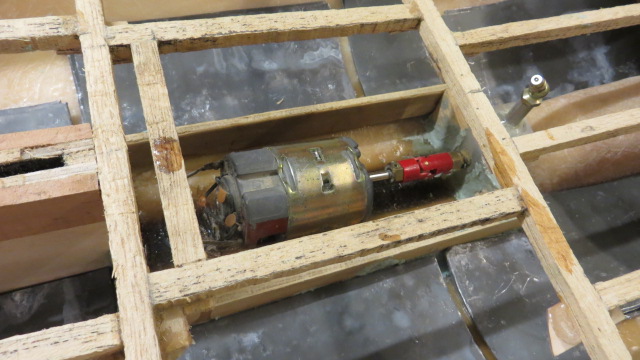
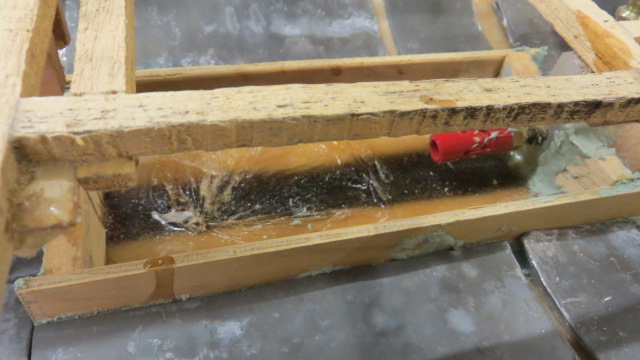


MY NEW PROJECT...or two. - Page 4 00713

MY NEW PROJECT...or two. - Page 4 00813

MY NEW PROJECT...or two. - Page 4 00913

MY NEW PROJECT...or two. - Page 4 00615
Back to top Go down
Sponsored content


MY NEW PROJECT...or two. - Page 4 Empty
PostSubject: Re: MY NEW PROJECT...or two.   MY NEW PROJECT...or two. - Page 4 Empty

Back to top Go down
 
MY NEW PROJECT...or two.
Back to top 
Page 4 of 11Go to page : Previous  1, 2, 3, 4, 5 ... 9, 10, 11  Next
 Similar topics
-
» Who wants a project
» My Next Project - Marina II
» Next Project?
» My new project - a cobbled together tug
» A FUTURE PROJECT

Permissions in this forum:You cannot reply to topics in this forum
TheRcModelBoatForum.com :: Modelling Categories & Archived Build Logs :: Lifeboats-
Jump to: