| | Graupner Manhattan 74 |  |
|
+8phil winks TonyW Roadrunner Norseman scalloway41 tattooed Footski James_H 12 posters |
|
| Author | Message |
|---|
James_H
Midshipman

Posts : 62
Join date : 2012-04-01
Age : 52
Location : Amsterdam
| | Subject: Graupner Manhattan 74 Thu Apr 05, 2012 4:43 am | |
| | |
|
| | |
James_H
Midshipman
Posts : 62
Join date : 2012-04-01
Age : 52
Location : Amsterdam
| | Subject: Re: Graupner Manhattan 74 Thu Apr 05, 2012 4:50 am | |
| | |
|
| | |
James_H
Midshipman
Posts : 62
Join date : 2012-04-01
Age : 52
Location : Amsterdam
| | Subject: Re: Graupner Manhattan 74 Thu Apr 05, 2012 5:12 am | |
| | |
|
| | |
James_H
Midshipman
Posts : 62
Join date : 2012-04-01
Age : 52
Location : Amsterdam
| | Subject: Re: Graupner Manhattan 74 Thu Apr 05, 2012 5:18 am | |
| | |
|
| | |
James_H
Midshipman
Posts : 62
Join date : 2012-04-01
Age : 52
Location : Amsterdam
| | Subject: Re: Graupner Manhattan 74 Thu Apr 05, 2012 5:28 am | |
| | |
|
| | |
James_H
Midshipman
Posts : 62
Join date : 2012-04-01
Age : 52
Location : Amsterdam
| | Subject: Re: Graupner Manhattan 74 Thu Apr 05, 2012 5:53 am | |
| | |
|
| | |
James_H
Midshipman
Posts : 62
Join date : 2012-04-01
Age : 52
Location : Amsterdam
| | Subject: Re: Graupner Manhattan 74 Thu Apr 05, 2012 6:18 am | |
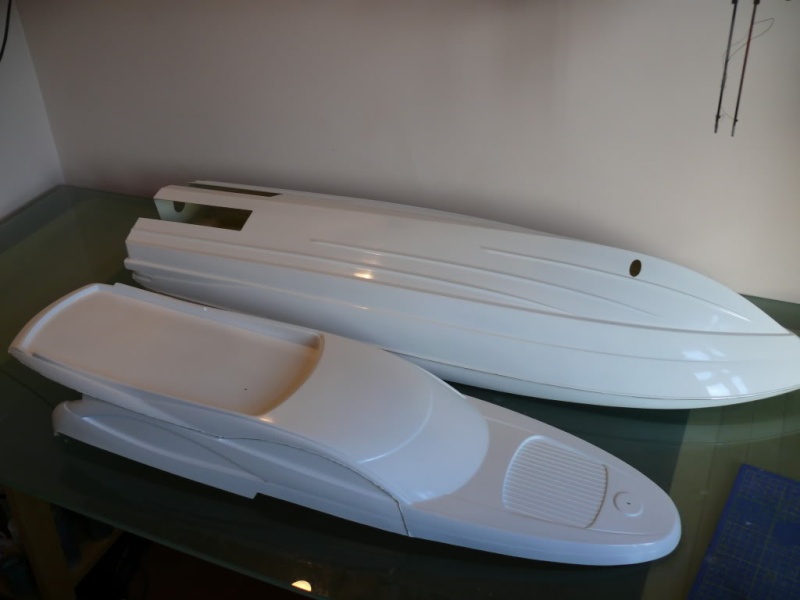
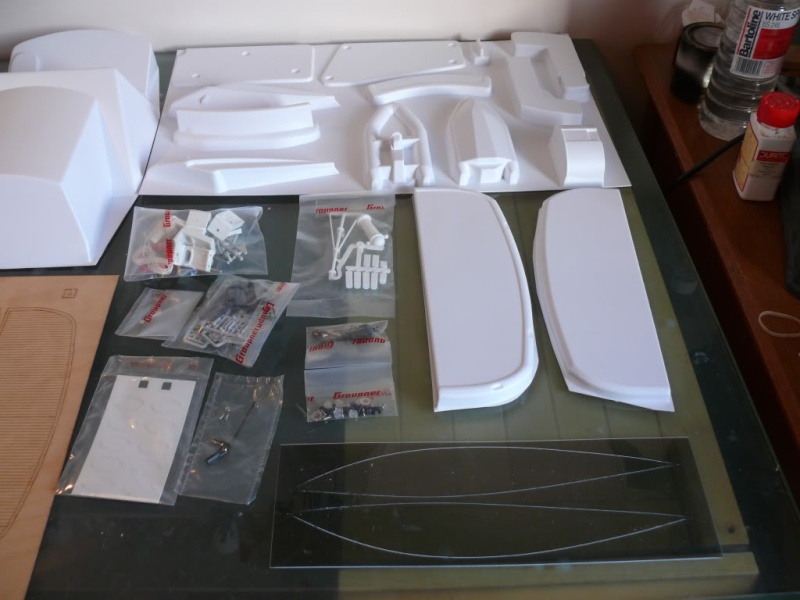
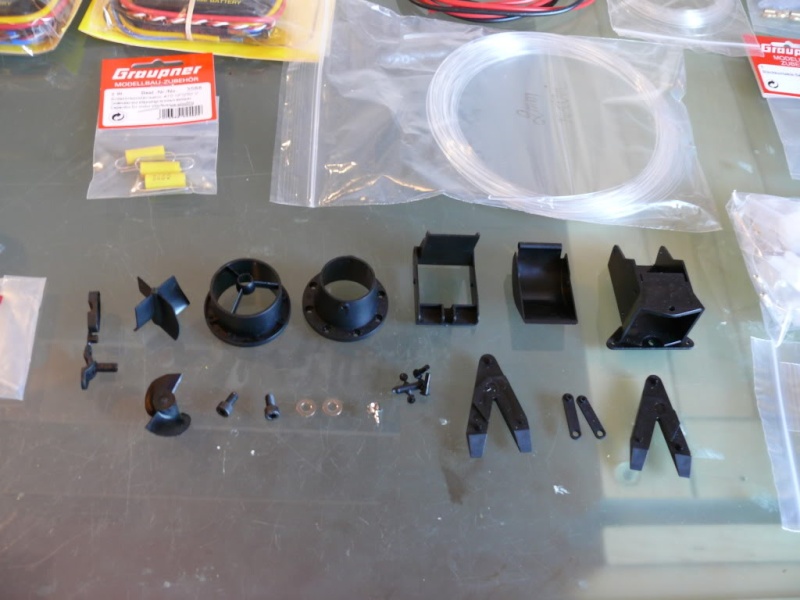
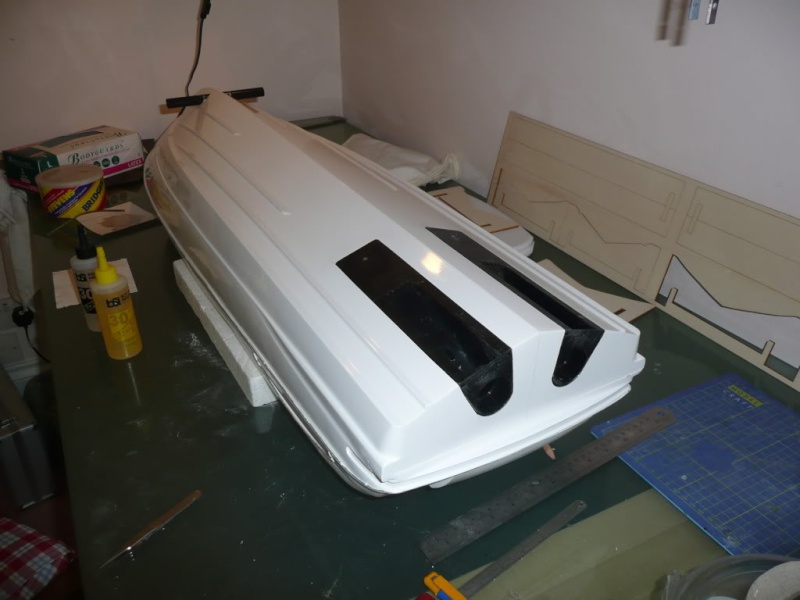
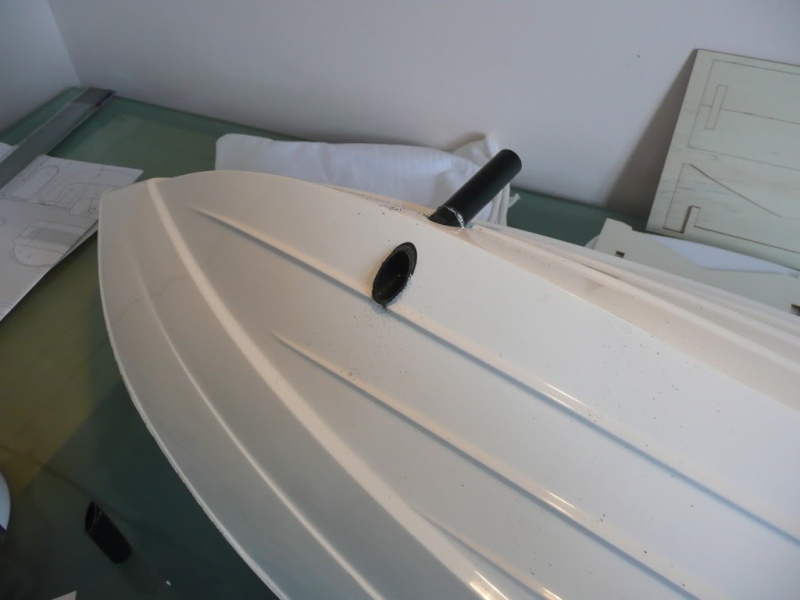
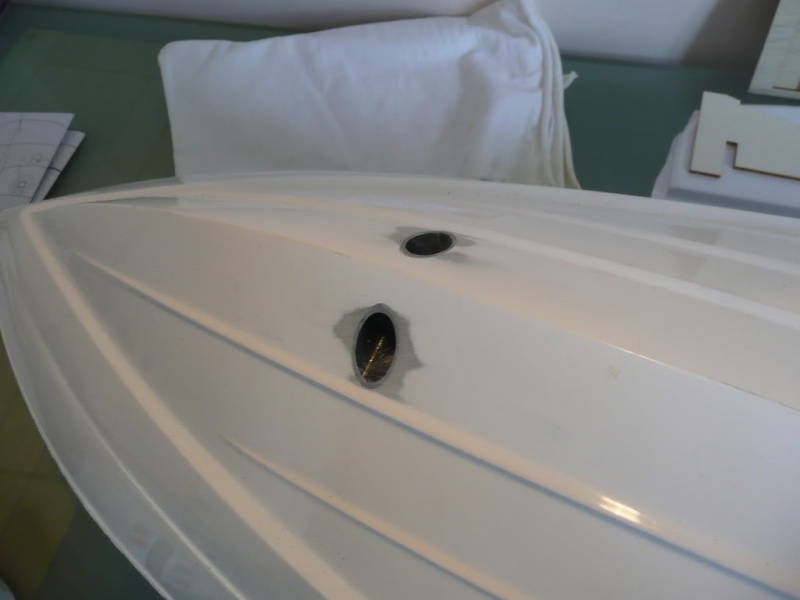
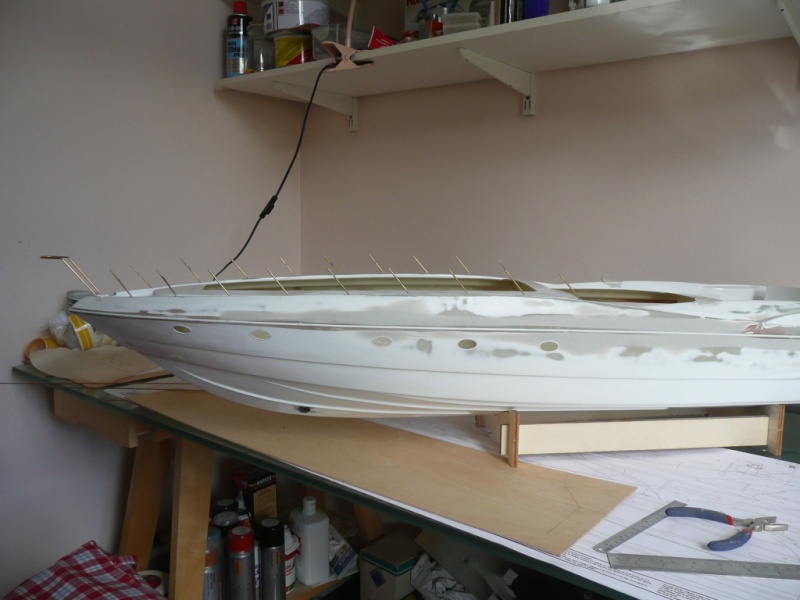
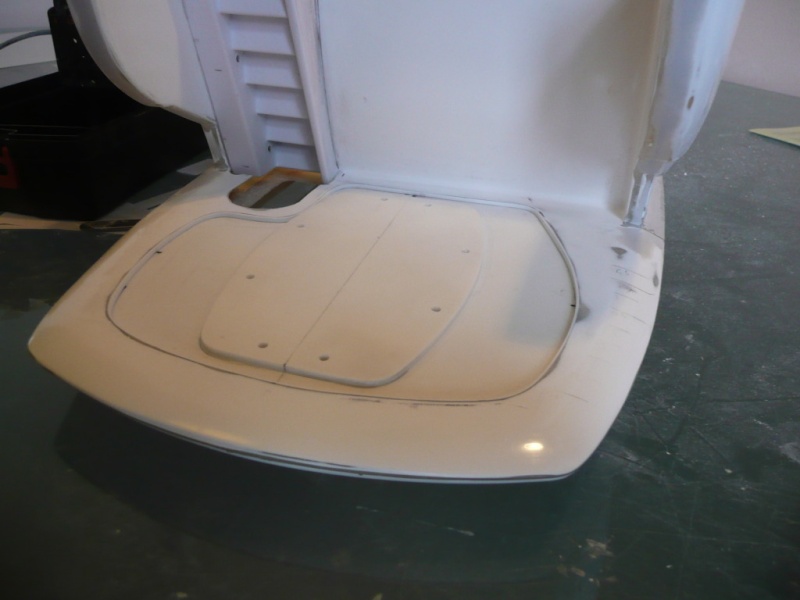
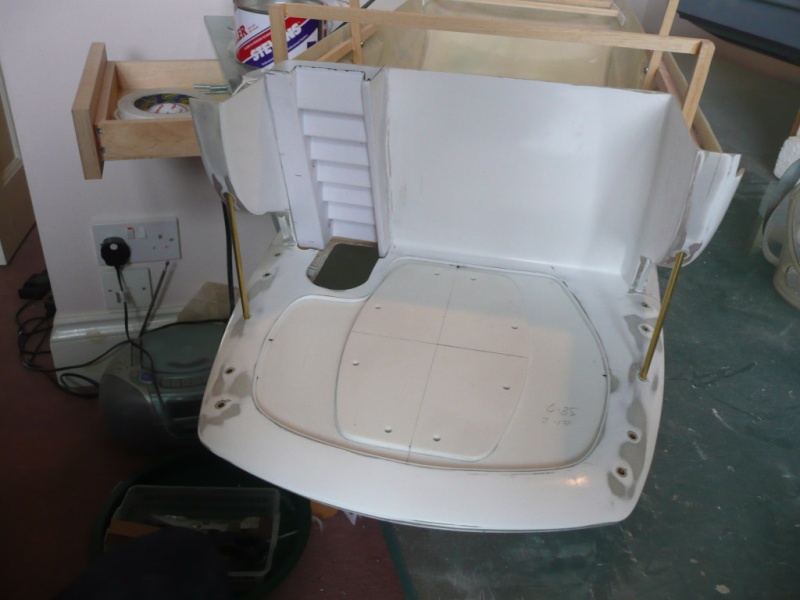
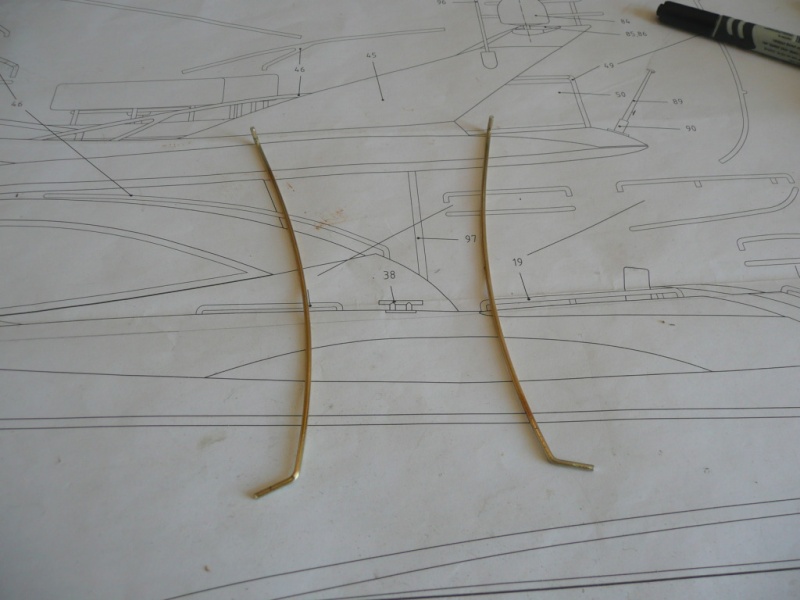
| On the last pic of the previous post there is another deviation from the kit. I noticed on photos of the real boat that there is a rope half way up the stanchions. So I fitted little eyelets of 0.5mm brass rod and used elastic to represent the rope. I also did finish all the other hand rails on the hull but forgot to take pics before removing them again. I do intend to build at least part of an interior for this model, in part because I don't like blacked-out privacy glass and also so I can have the rear glass doors open to make the rear lower-deck less dark and dingy. With that in mind I had to cut out all the top-side of the hull and fit some wooden struts so that it wouldn't go all wobbly. 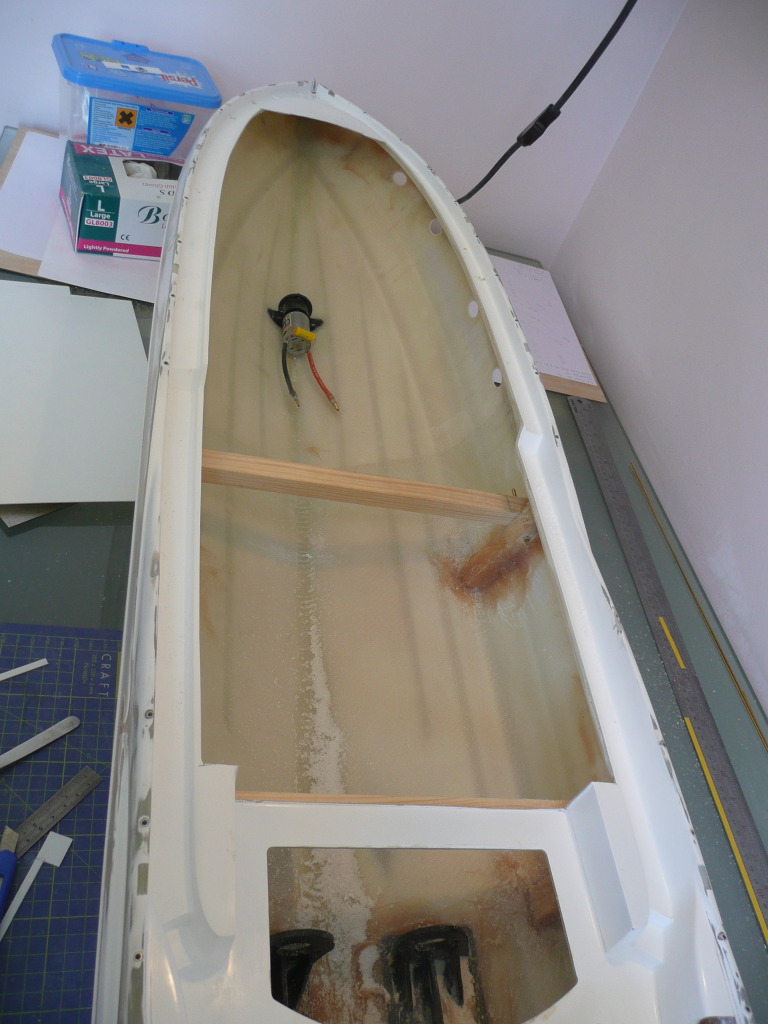 The rear rope holes were to be represented with more stickers, which I didn't like. So I cut them out of the hull.  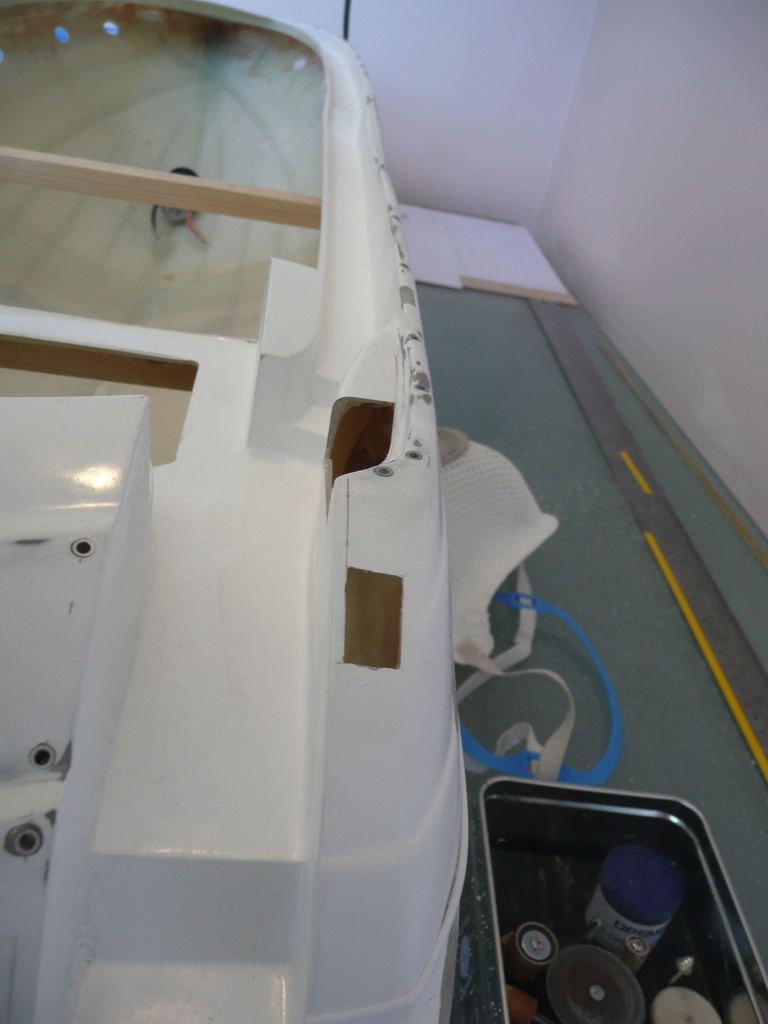   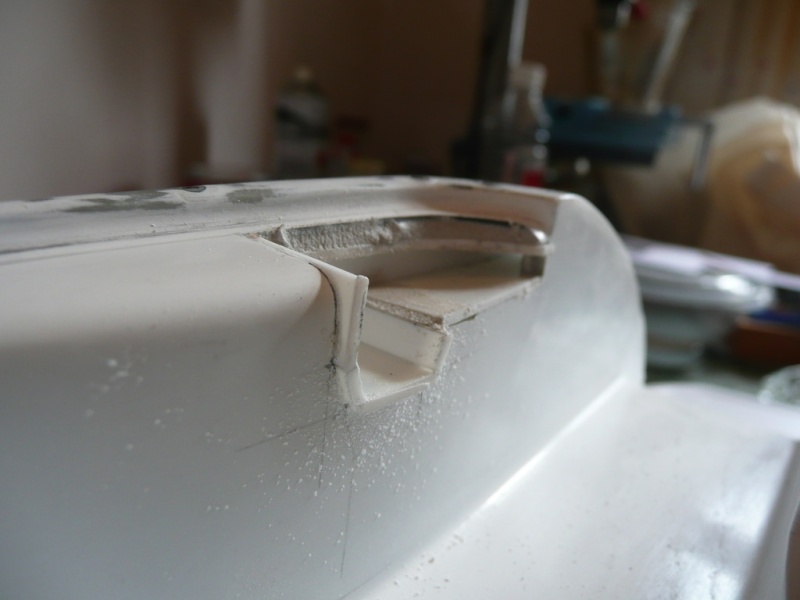 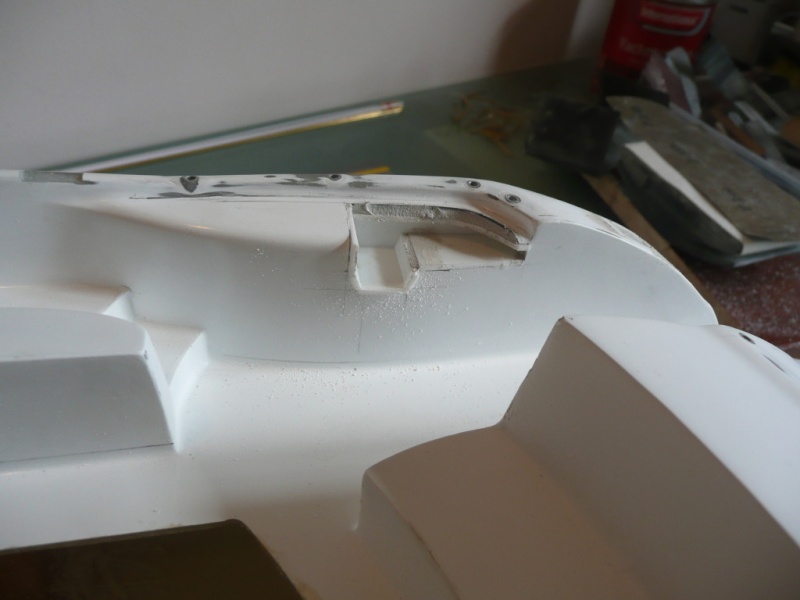 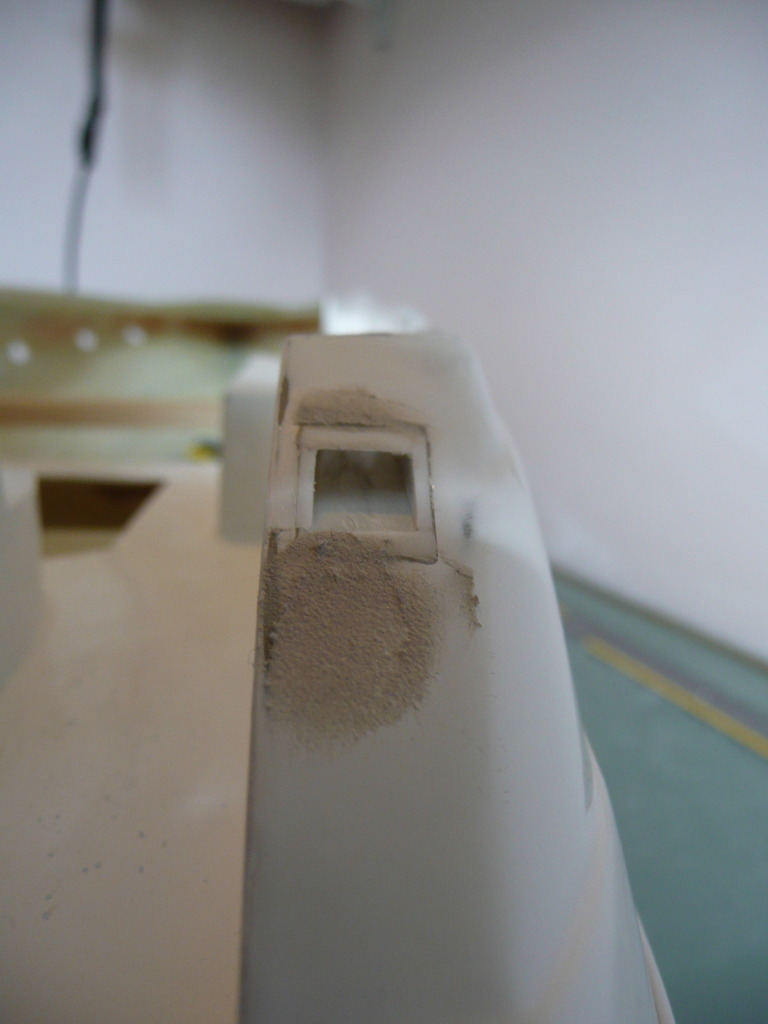 I'll make some covers for them when I've made up the cleats and electric capstans otherwise I wont be able to get them in there. | |
|
| | |
James_H
Midshipman
Posts : 62
Join date : 2012-04-01
Age : 52
Location : Amsterdam
| | Subject: Re: Graupner Manhattan 74 Thu Apr 05, 2012 7:10 am | |
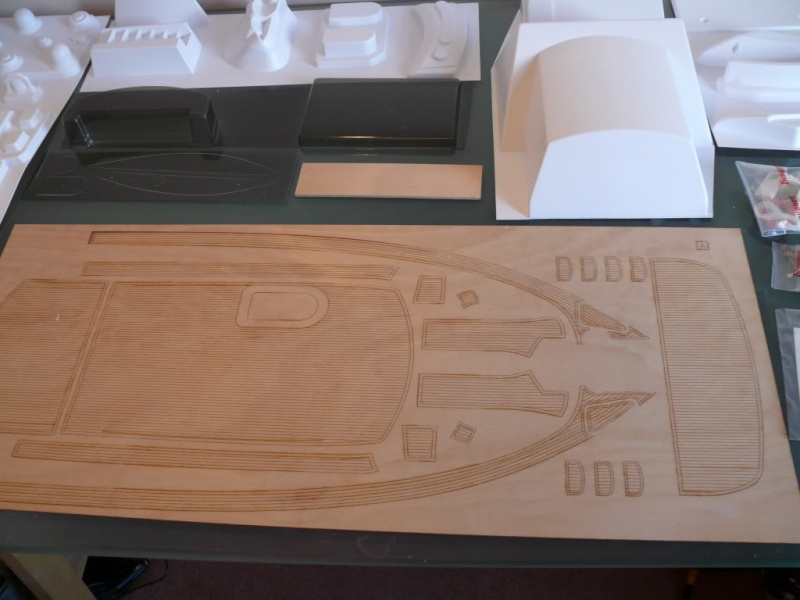
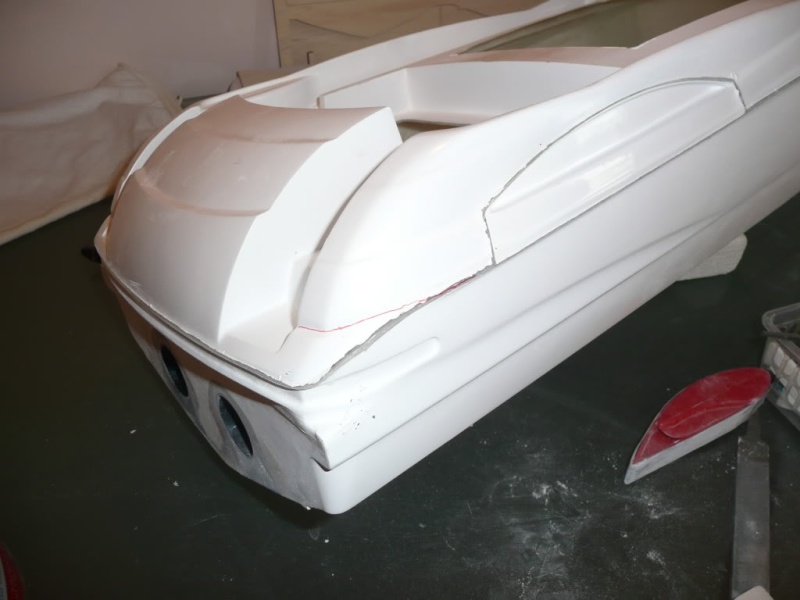
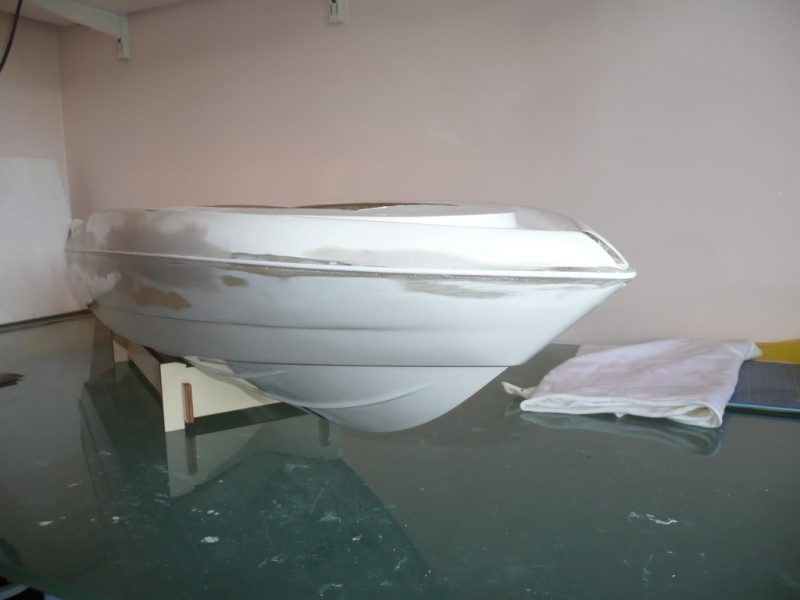
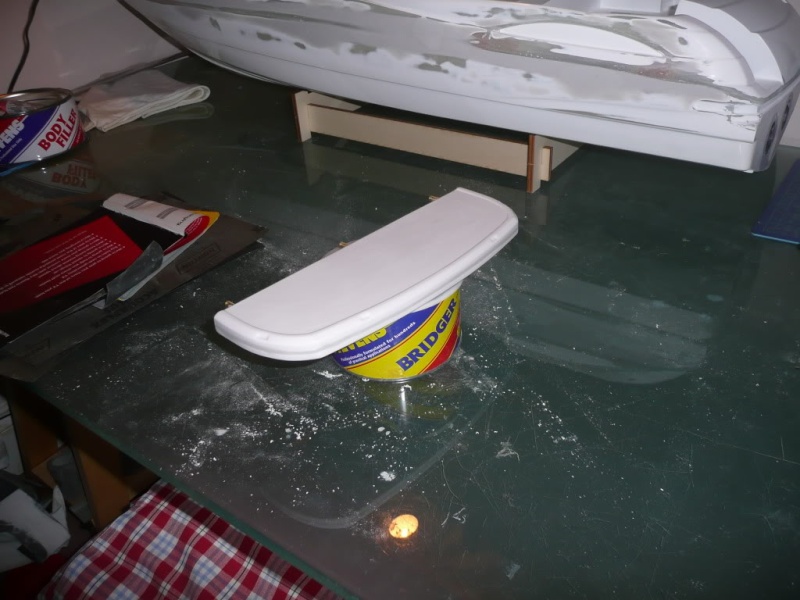
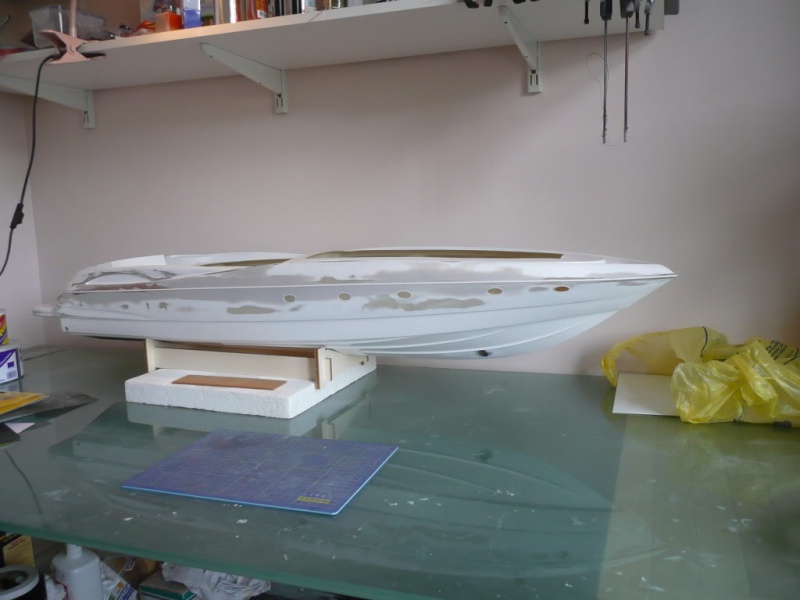
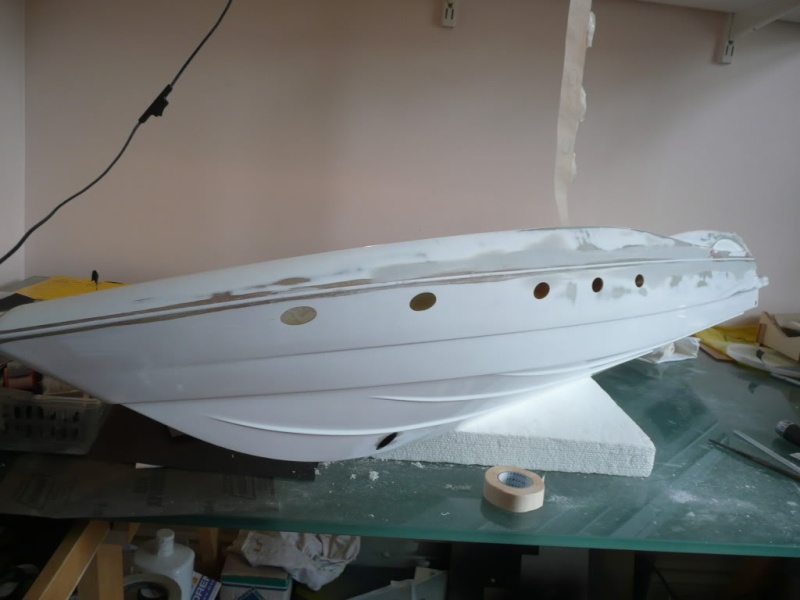
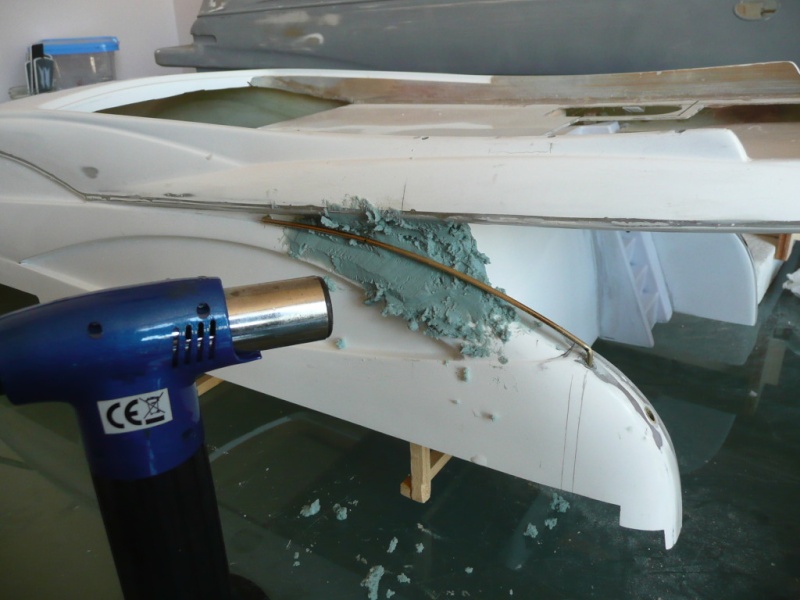
| Everything so far had been reasonably straightforward until trying to get the superstructure to fit the hull. To do this the deck planking had to be at least dry-fitted, as the superstructure sits on top of it. Problem! Not one single piece of deck planking would fit. Each and every piece was too big to fit - 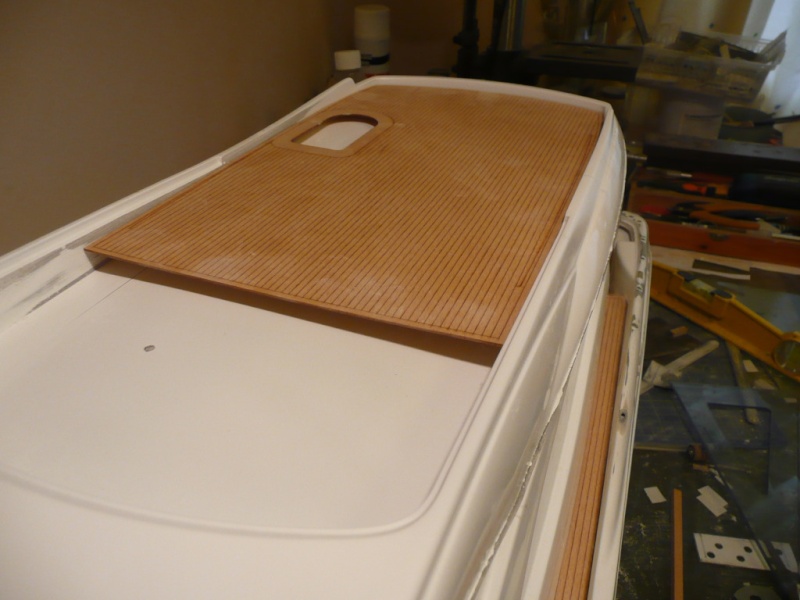 The problem is that each piece has a border plank running all the way around it. Sure it could be sanded to fit, but this would be by different ammounts in different areas, and to my mind would look absolutely terrible. The only remaining solution was to gring away the hull itself until the wood parts would fit. As I began doing this I found myself sanding right through the hull in quite a few places and I have to admit I walked away from the model for several months at this point. I evetually went back to it, and built up the insides with bridging compound before reshaping everything. This took a very long time indeed. 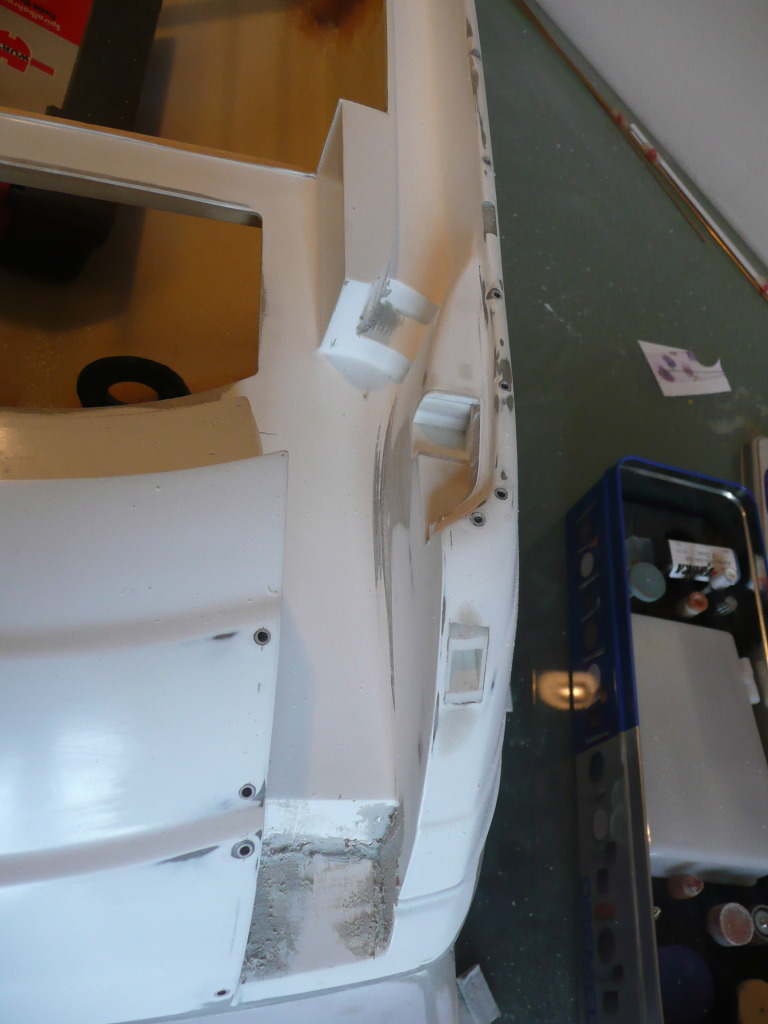 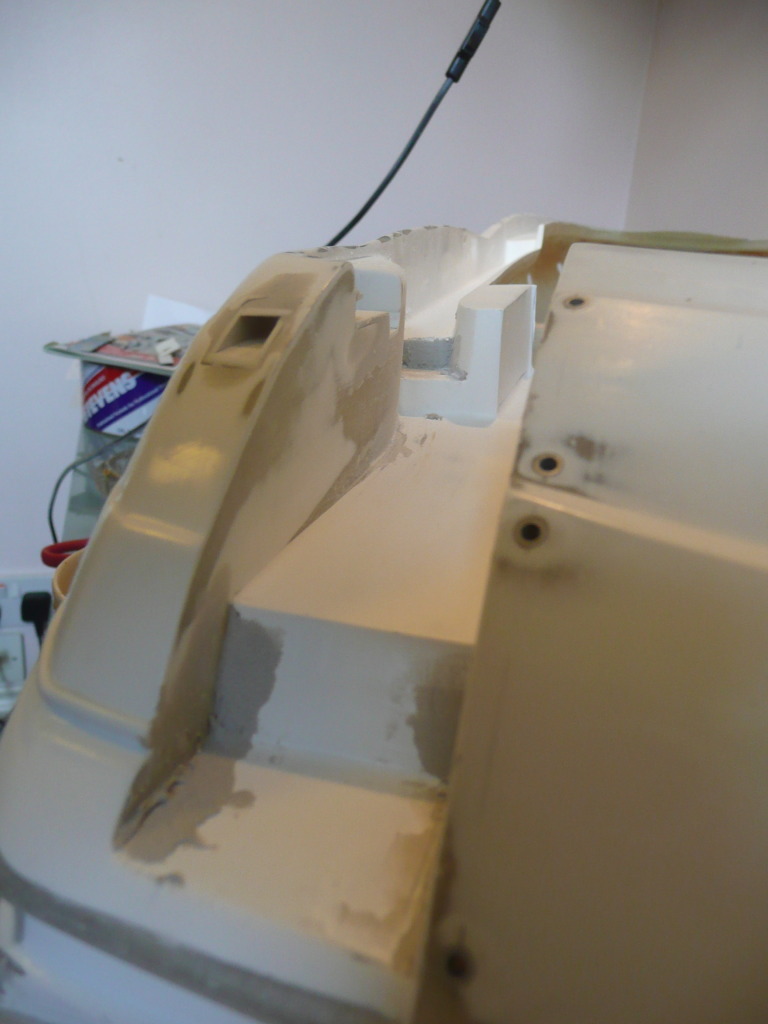 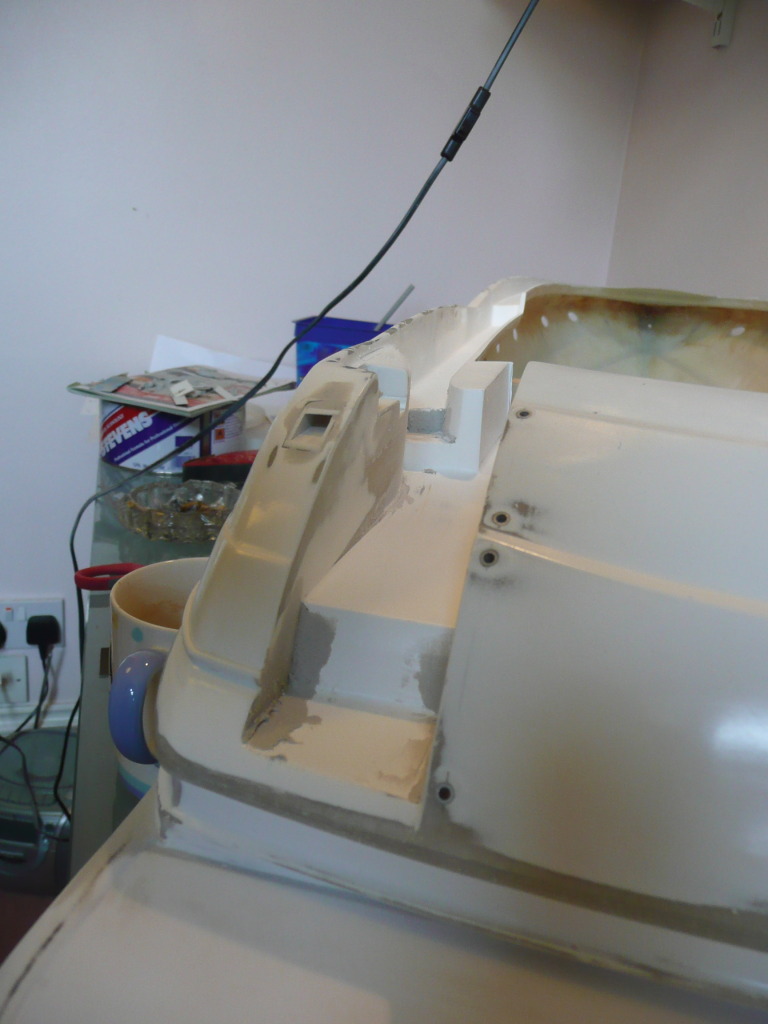 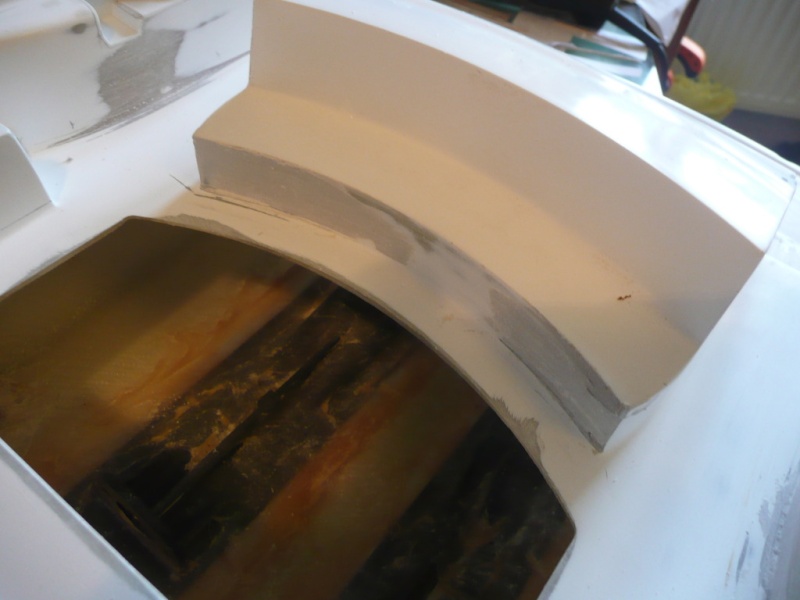 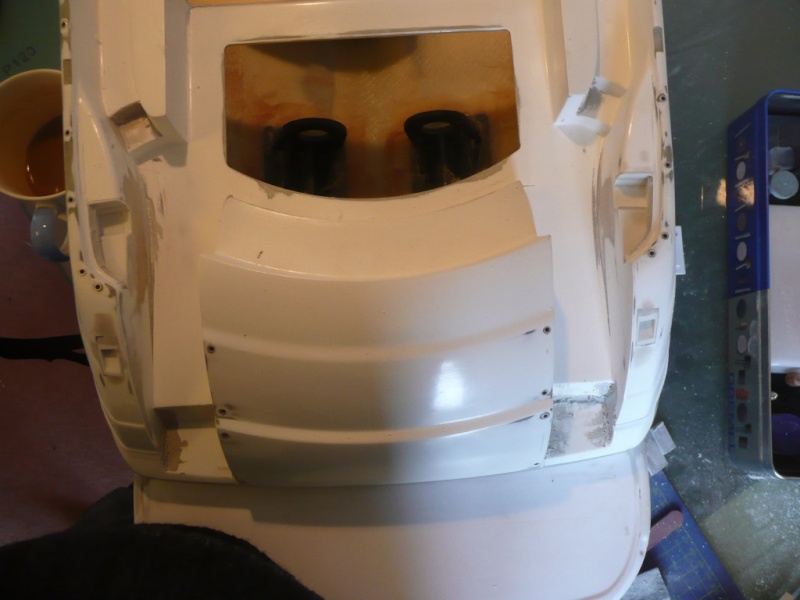 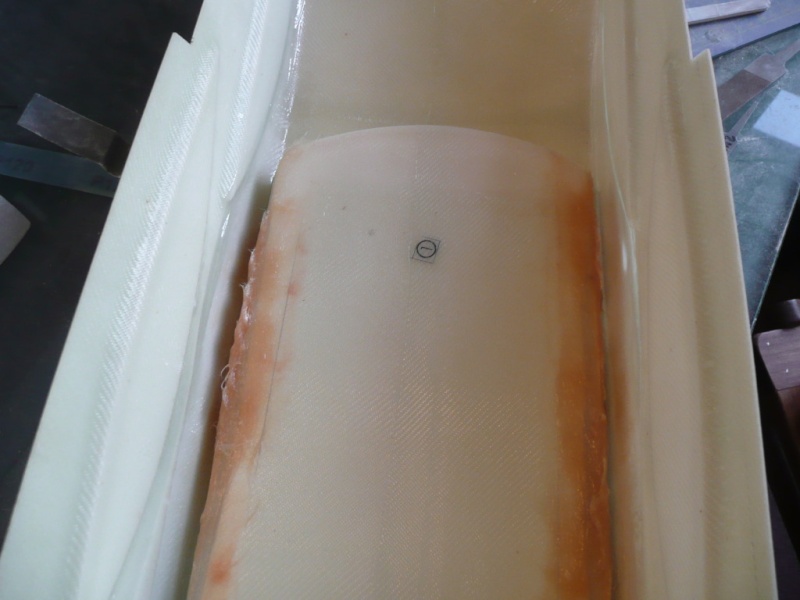 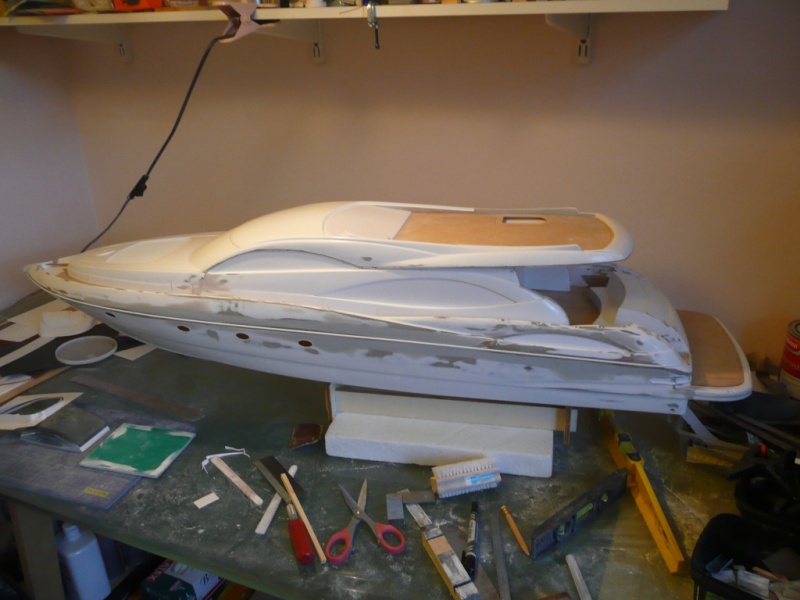 I gave the hull a light coat of grey primer at this point because I find it easier to find imperfections that way. 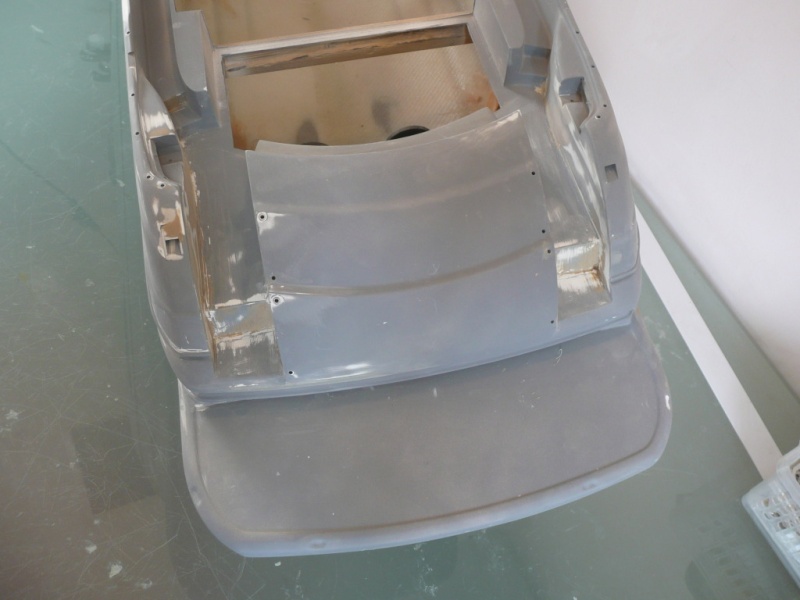 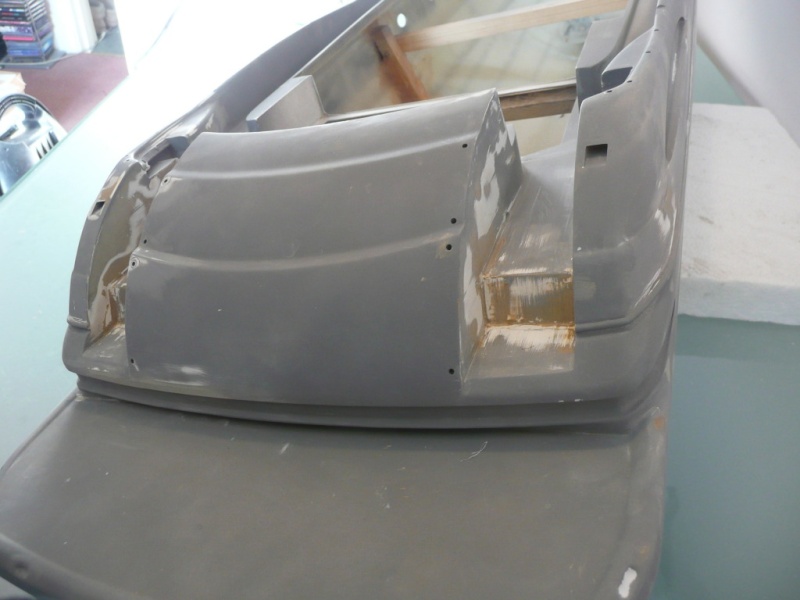 | |
|
| | |
James_H
Midshipman
Posts : 62
Join date : 2012-04-01
Age : 52
Location : Amsterdam
| | Subject: Re: Graupner Manhattan 74 Thu Apr 05, 2012 7:19 am | |
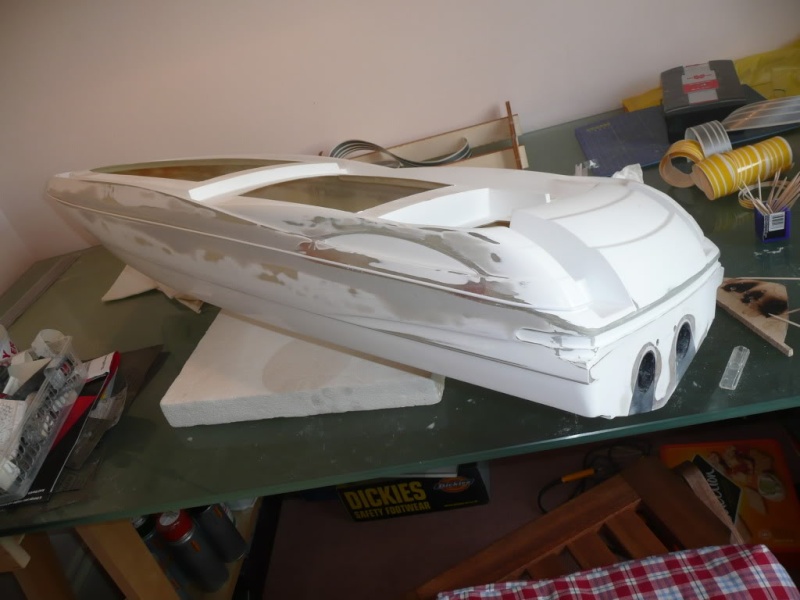
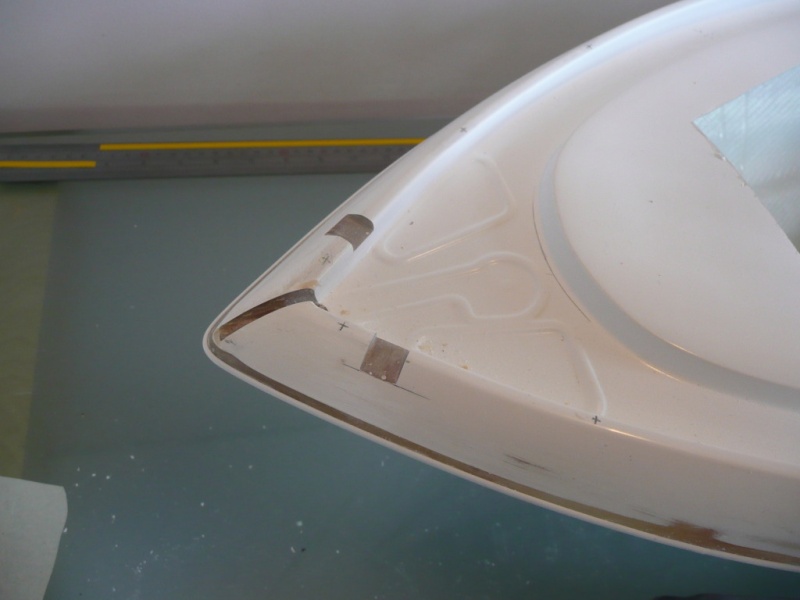
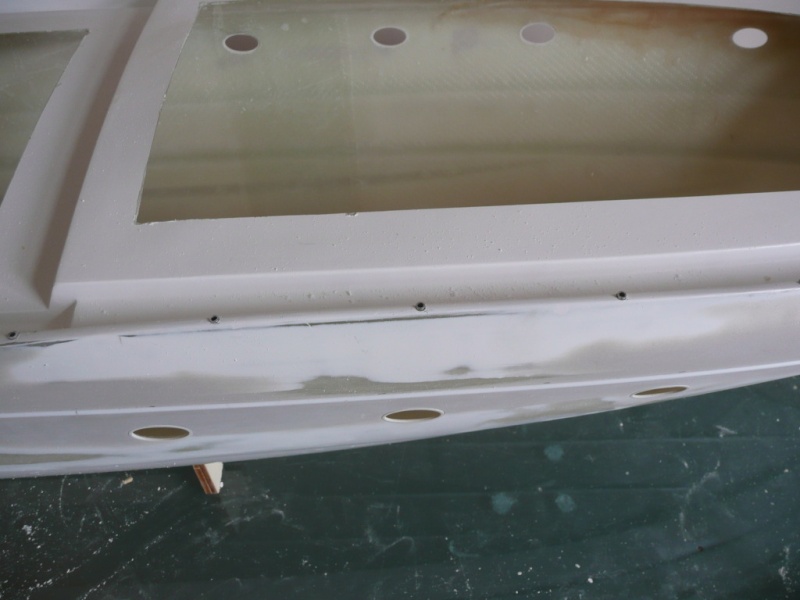
| Adding some bracing to the superstructure to pull in the sides closer to where they are supposed to be, and digging out the air-bubbles from the GRP moulding.  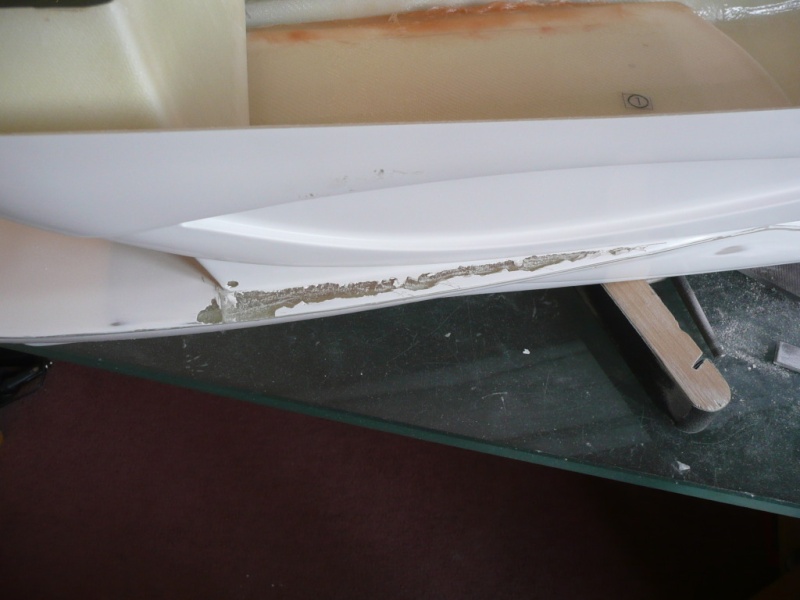 Oops! Forgot this bit so it's out of sequence. Fitting some styrene tube into the underwater light holes to give a uniform thickness. 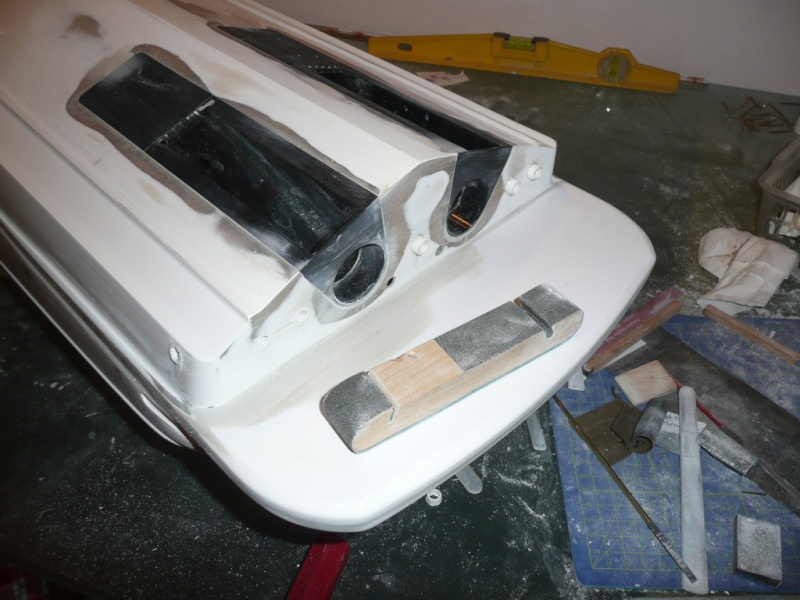 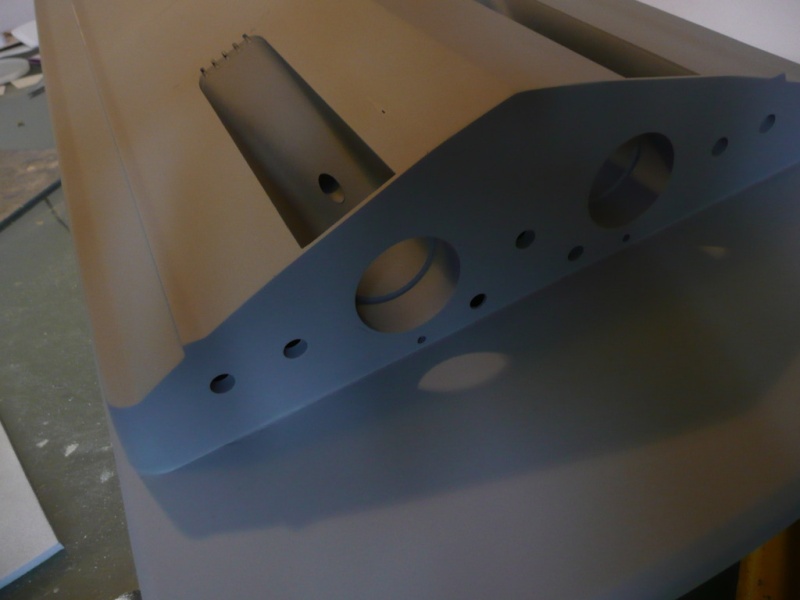 | |
|
| | |
James_H
Midshipman
Posts : 62
Join date : 2012-04-01
Age : 52
Location : Amsterdam
| | Subject: Re: Graupner Manhattan 74 Thu Apr 05, 2012 7:31 am | |
| | |
|
| | |
Footski
Master


Posts : 548
Join date : 2011-06-11
Age : 66
Location : Malaga, Spain
| | Subject: Re: Graupner Manhattan 74 Thu Apr 05, 2012 7:45 am | |
| Great build log. You really are doing her proud. i look forward to the rest. Thanks for posting.  | |
|
| | |
James_H
Midshipman
Posts : 62
Join date : 2012-04-01
Age : 52
Location : Amsterdam
| | Subject: Re: Graupner Manhattan 74 Thu Apr 05, 2012 7:56 am | |
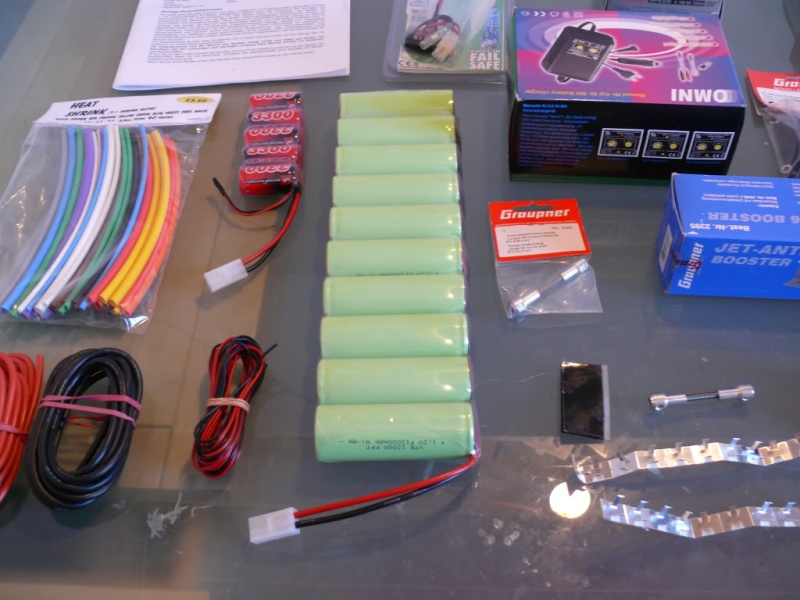
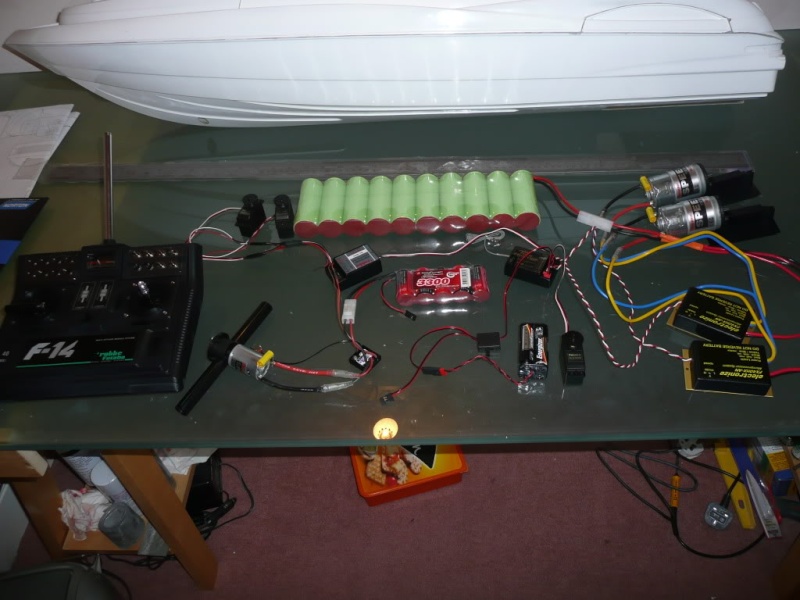
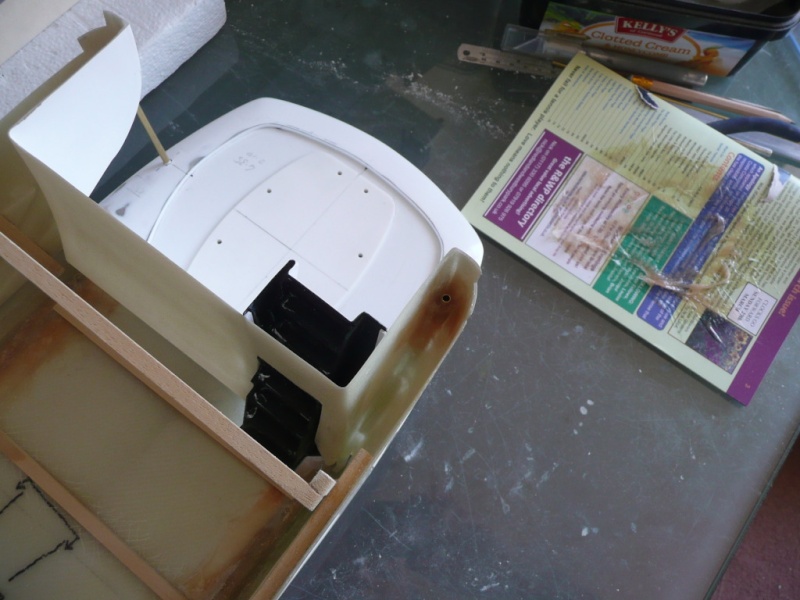
| Next I made a start on the equipment mast. This was going to need to be built from the top down as I wanted all the lights to work and no wires to be visible. Starting with the radar and masthead-light frame. This need to be made out of tubing to hide the wires. There was no way I was going to be able to bend brass or aluminium tube to such tight radii without crushing it. So it had to be styrene. The downside is that it wont look quite as nice and sharp as brass rod, and I was unable to get the rear part quite vertical as the styrene just would not hold that shape. the very fine wire has been robbed from an old mobile phone charger.  Then on to the mast itself - the lighting needed fitting first. All the domestic-type spotlighting is using micro ultra-bright LEDs in warm white. These LEDs are only 1.8 x 0.8 x 0.8mm.  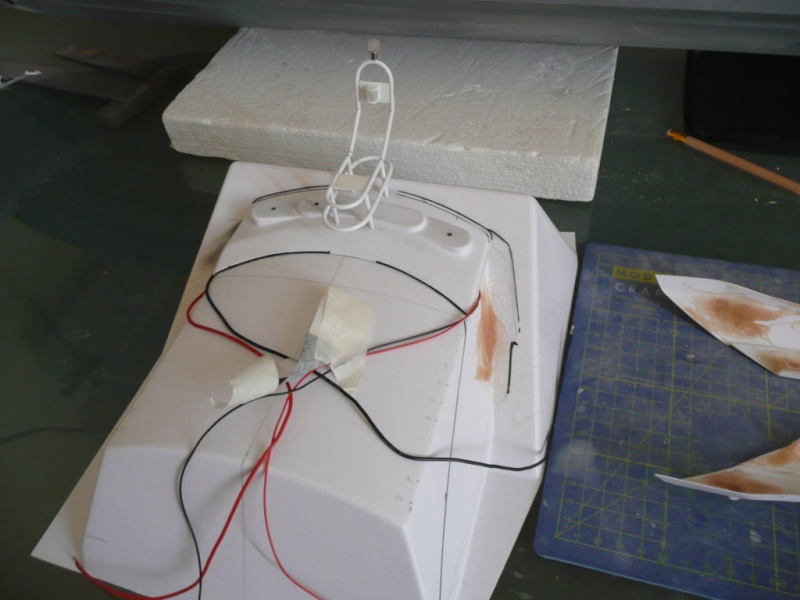 I reinforced the side panels with bridger wherever a railing would need to be fitted later.  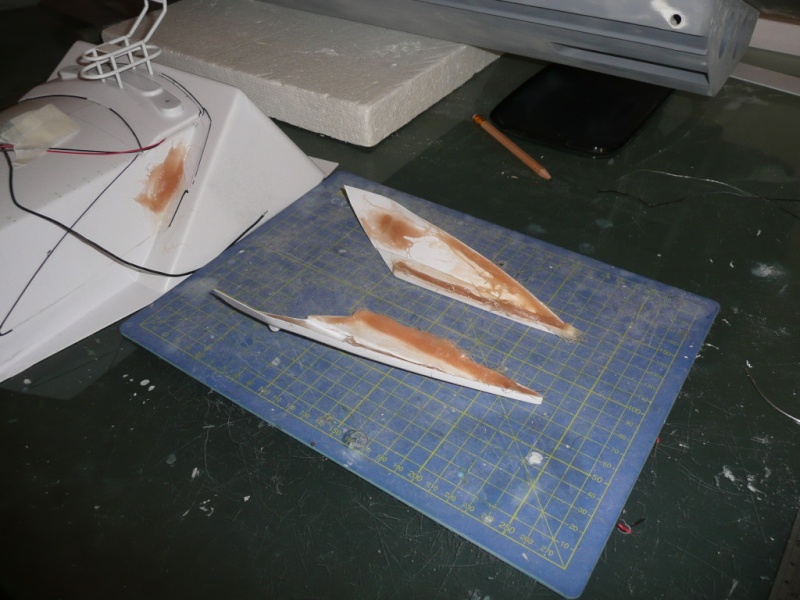 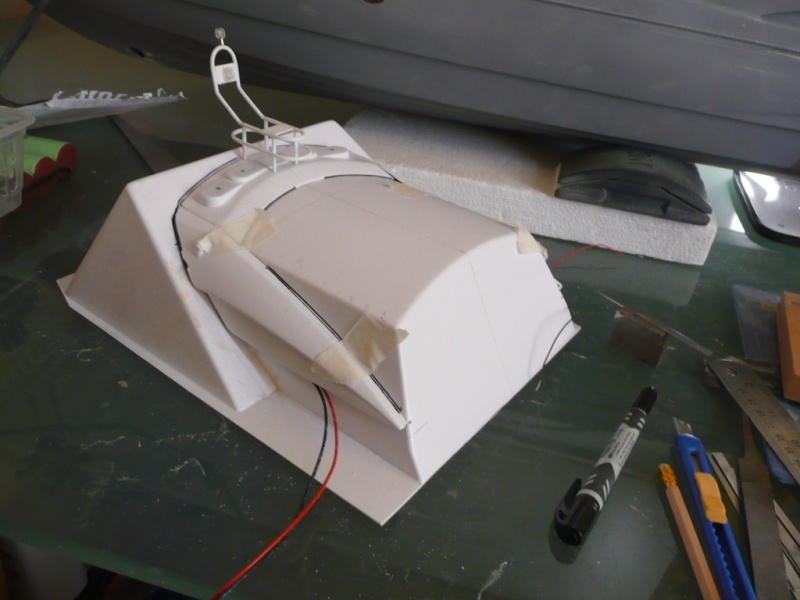 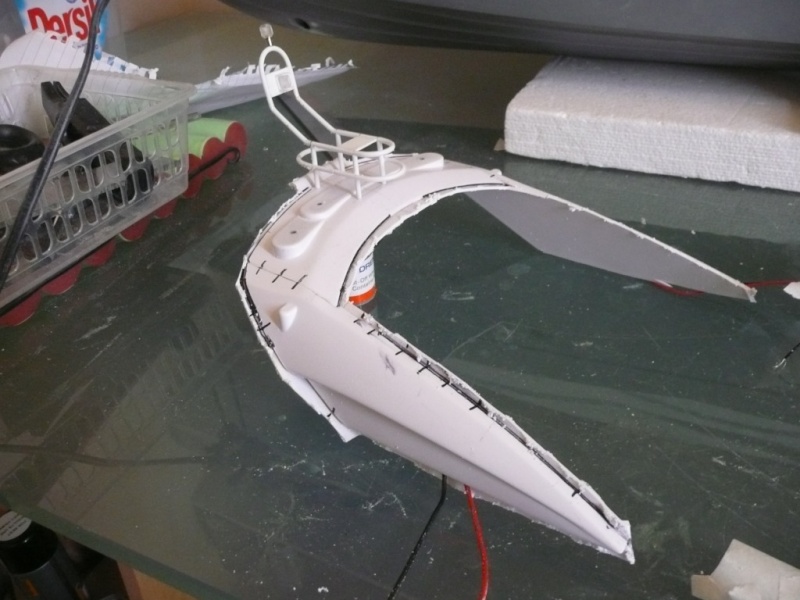 After sanding all this nicely to shape and smooth, I test fitted it to the superstructure only to find I'd put the side panels on at the wrong angle. If I'd started with this it would not have been much of an issue, but because I'd already fitted the masthead frame the error was obvious. So I had to carefully cut them off and start over. I did eventually get it looking ok though. 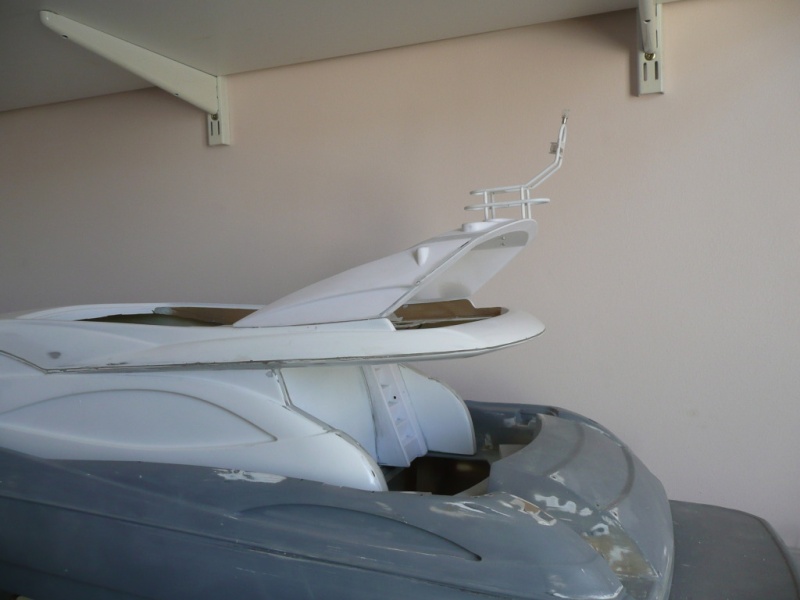 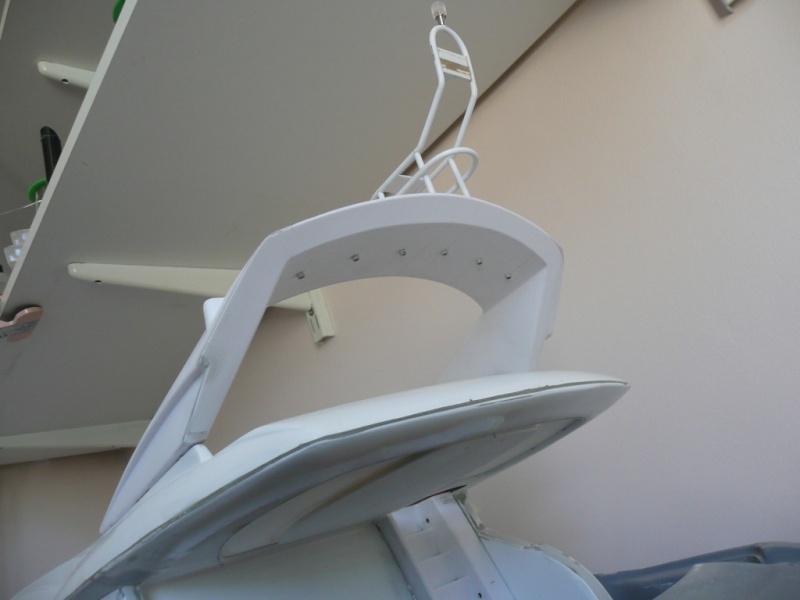 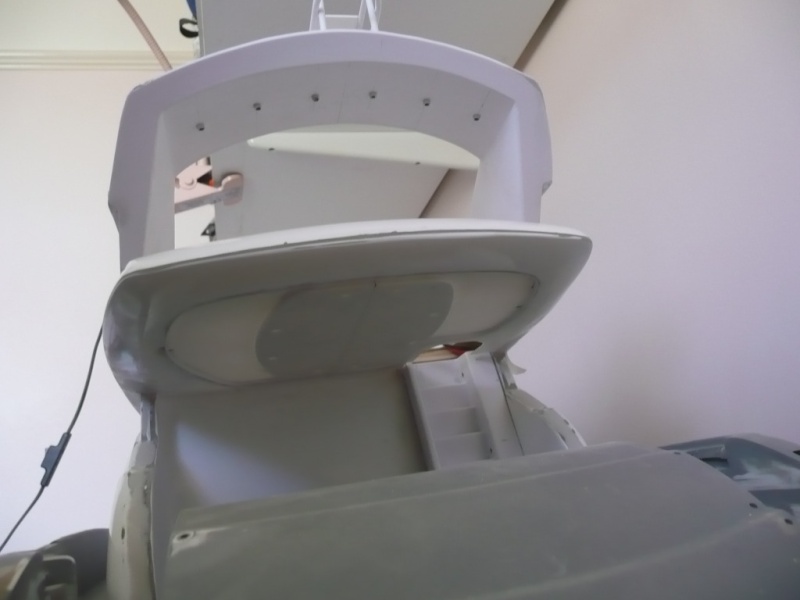 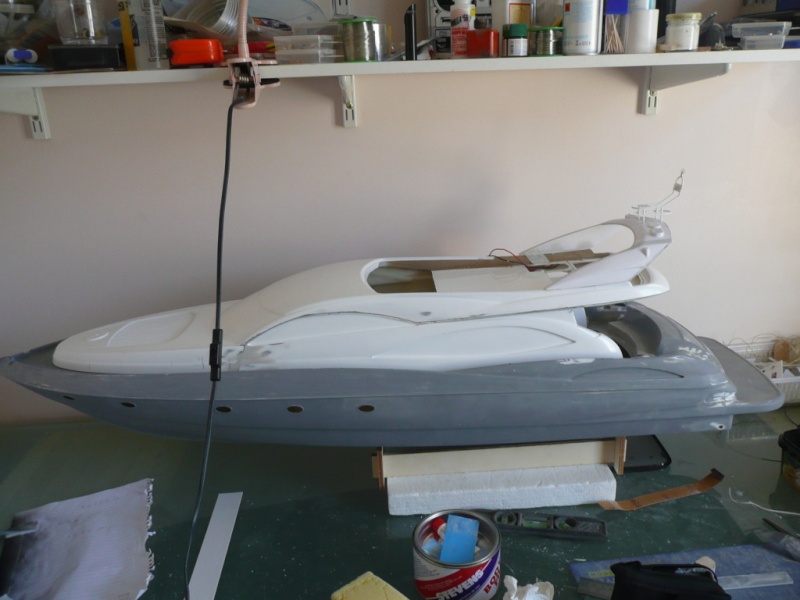 ...And that's all up to date. Will post more when I've made more progress. | |
|
| | |
James_H
Midshipman
Posts : 62
Join date : 2012-04-01
Age : 52
Location : Amsterdam
| | Subject: Re: Graupner Manhattan 74 Thu Apr 05, 2012 7:57 am | |
| Thanks Footski (Barry?)
Sorry, we were both posting at the same time. Confused me for a minute! | |
|
| | |
tattooed
Able Seaman


Posts : 45
Join date : 2011-06-30
Age : 60
Location : Bristol
| | Subject: Re: Graupner Manhattan 74 Thu Apr 05, 2012 7:24 pm | |
| your doing a grand job there james wish you would have given me a call i could have got you some nice stainless steel for your hand mate | |
|
| | |
James_H
Midshipman
Posts : 62
Join date : 2012-04-01
Age : 52
Location : Amsterdam
| | Subject: Re: Graupner Manhattan 74 Thu Apr 05, 2012 7:44 pm | |
| Cheers Andy.  Stainless Steel? You mean for the railings? That's ok mate, I was going to use chrome paint. I've used it before at work on cars and it looks pretty good, particularly with a black undercoat. Wouldn't I need a TIG to weld stainless? I've not done it before. I'll try experimenting with different stuff nearer to painting time and if the results not great I'll maybe take you up on that offer if it's still ok. Thanks. | |
|
| | |
tattooed
Able Seaman
Posts : 45
Join date : 2011-06-30
Age : 60
Location : Bristol
| | Subject: Re: Graupner Manhattan 74 Thu Apr 05, 2012 7:50 pm | |
| i could tig weld it for you james or you can braze it also if you need some i've got some clear and smoked acrylic sheets if you need some | |
|
| | |
Guest
Guest
| | Subject: Re: Graupner Manhattan 74 Thu Apr 05, 2012 11:12 pm | |
| Great build James well done.
Damien.
|
|
| | |
James_H
Midshipman
Posts : 62
Join date : 2012-04-01
Age : 52
Location : Amsterdam
| | Subject: Re: Graupner Manhattan 74 Fri Apr 06, 2012 4:28 pm | |
| Cheers Damien. I'll try not to mess up the rest of it [touches wood, avoids ladders and scatters salt about the place]
Andy - I might take you up on the offer of some smoked acrylic if I may. I have plenty of clear
that I will use on the lower deck, but was unsure what to do on the flybridge. Smoke paint only works on one side
and both will be visible. Needs to be a real light smoke tho'. | |
|
| | |
tattooed
Able Seaman
Posts : 45
Join date : 2011-06-30
Age : 60
Location : Bristol
| | Subject: Re: Graupner Manhattan 74 Fri Apr 06, 2012 5:48 pm | |
| the acrylic is thick james about 5mm but i've also got some tinting film we use on the truck windows which your more than welcome to if its any use to you | |
|
| | |
James_H
Midshipman
Posts : 62
Join date : 2012-04-01
Age : 52
Location : Amsterdam
| | Subject: Re: Graupner Manhattan 74 Wed Apr 11, 2012 12:48 pm | |
| | |
|
| | |
scalloway41
Able Seaman

Posts : 36
Join date : 2011-06-11
Age : 58
Location : coventry
| | Subject: Re: Graupner Manhattan 74 Wed Apr 11, 2012 9:38 pm | |
| Stunning stuff.
Following this with great interest. Keep up the good work. | |
|
| | |
James_H
Midshipman
Posts : 62
Join date : 2012-04-01
Age : 52
Location : Amsterdam
| | Subject: Re: Graupner Manhattan 74 Sat Apr 14, 2012 2:40 pm | |
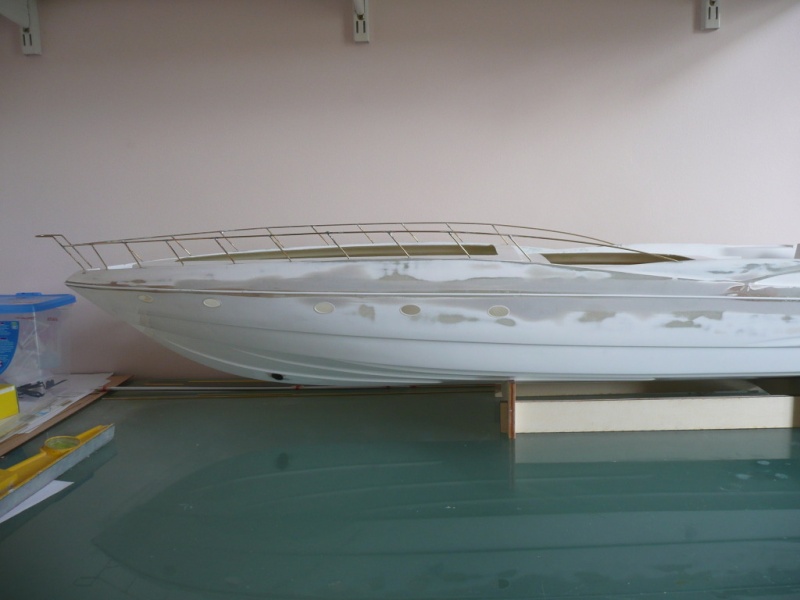
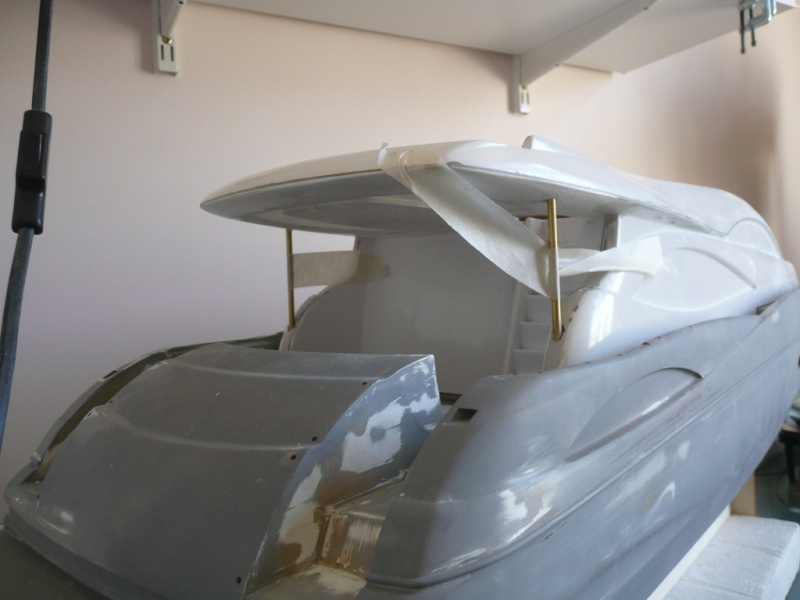
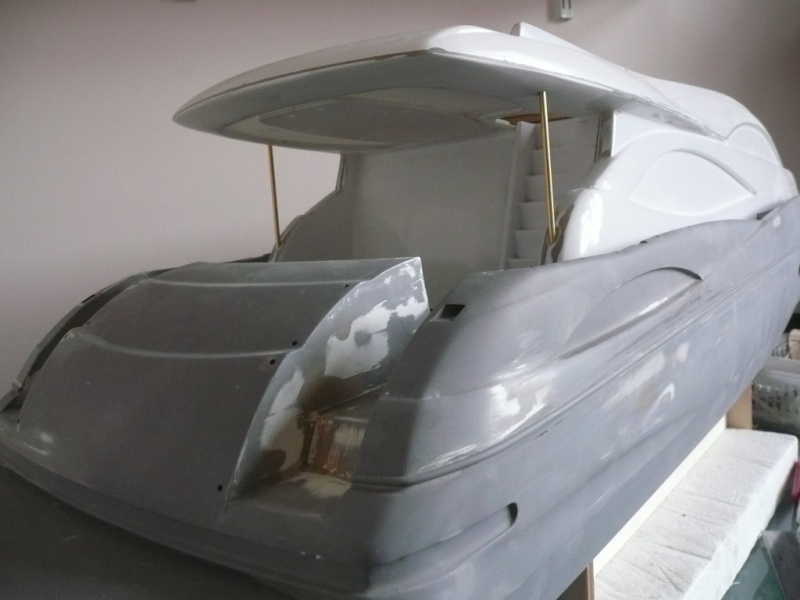
| Thanks scalloway. Lots of work for little progress at the moment. The equipment mast, as per the kit is not quite the right shape at the rear. I'm assuming this is for ease of construction as they are horribly complex shapes. The knock-on effect of this is that the handrail between the mast-uprights has to be moved forward of it's stanchions in order that each end will have something to attach to. Enter stupid, and a decision was made to get all this as close to scale as possible. 3 days later (I kid you not) of foul language and torn hair, I have something to post. Was it worth it? Dunno. It'll now be much harder to glaze! 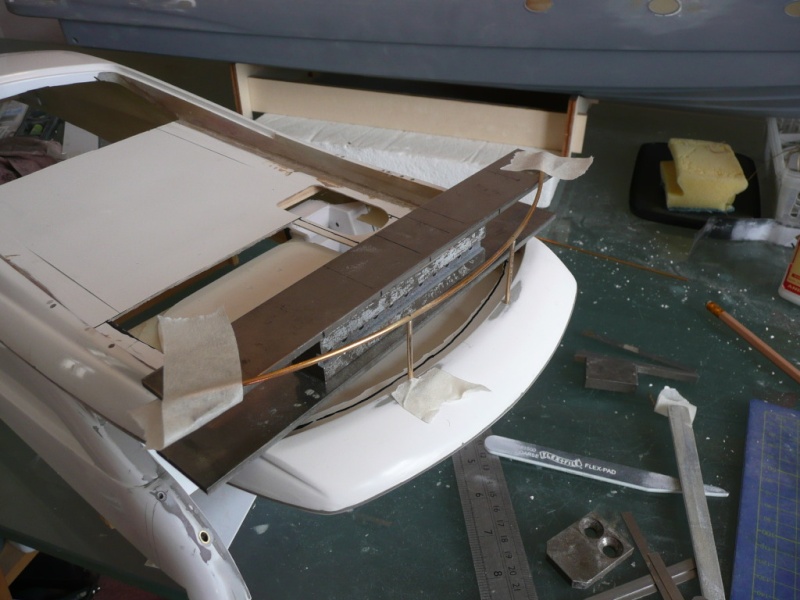 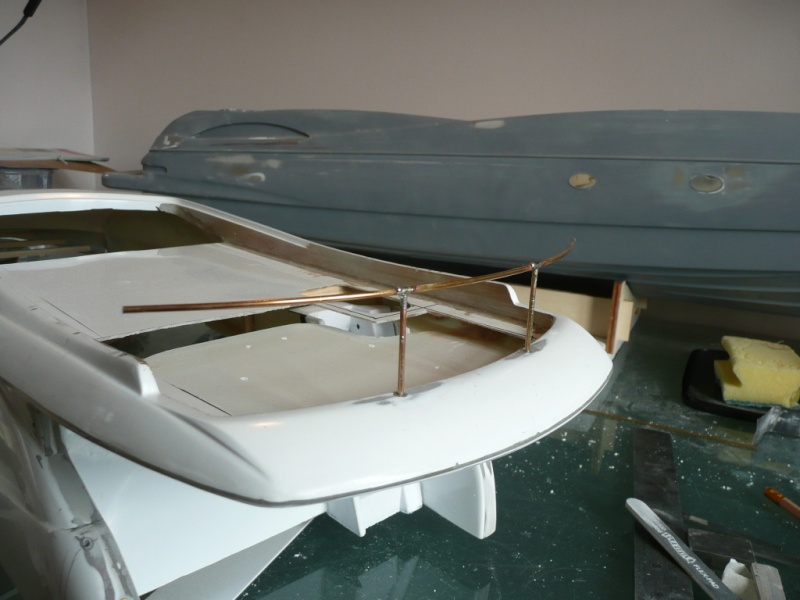 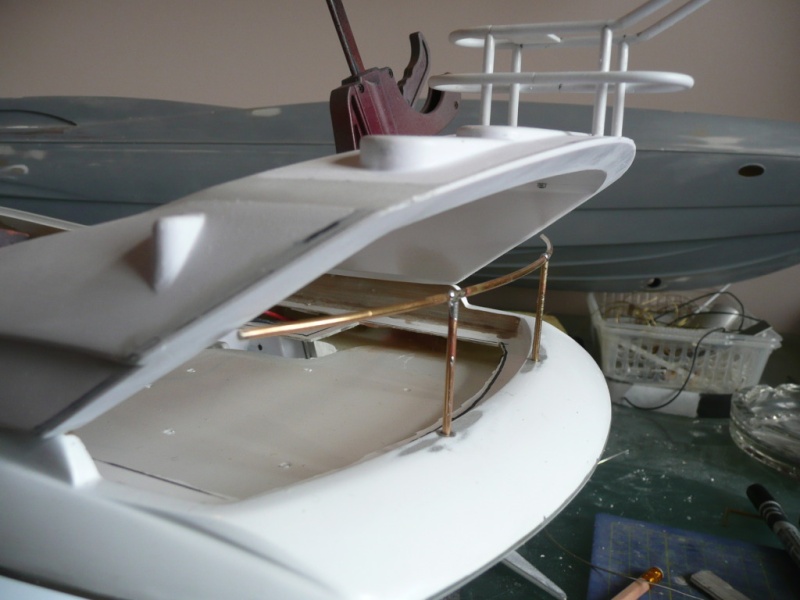 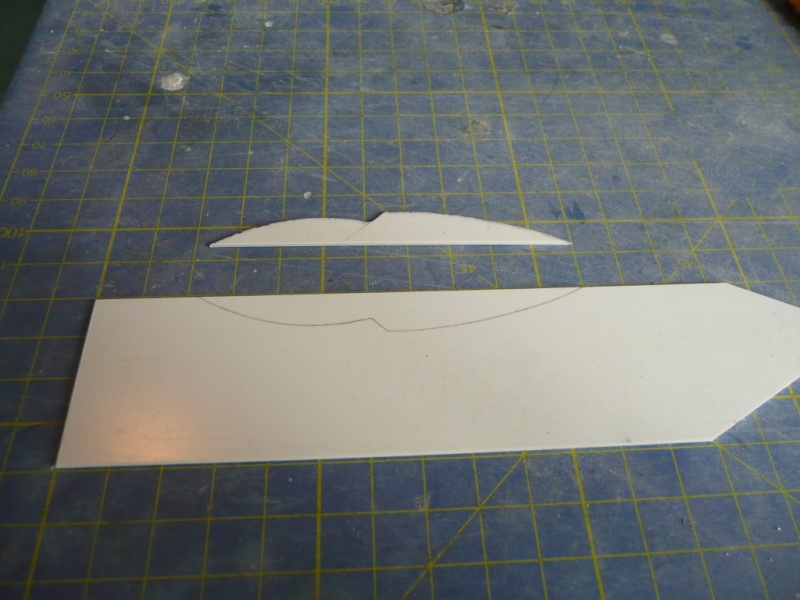 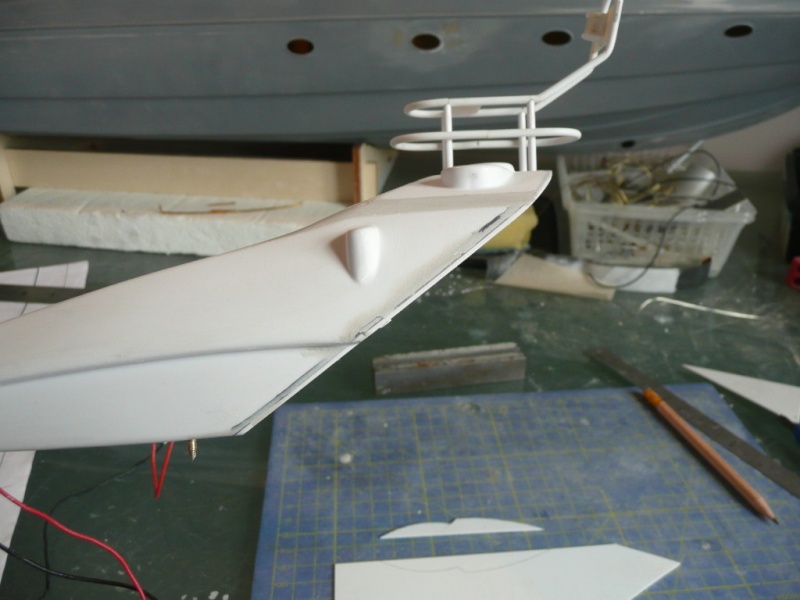 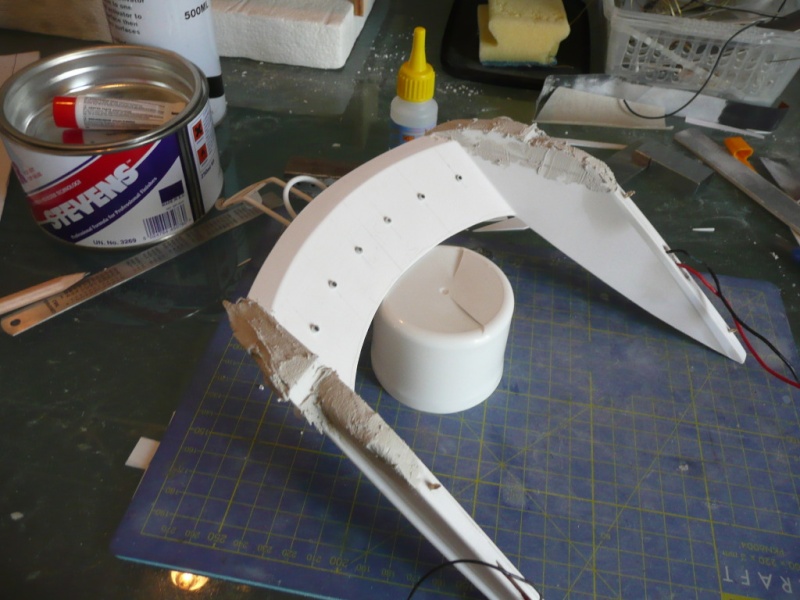 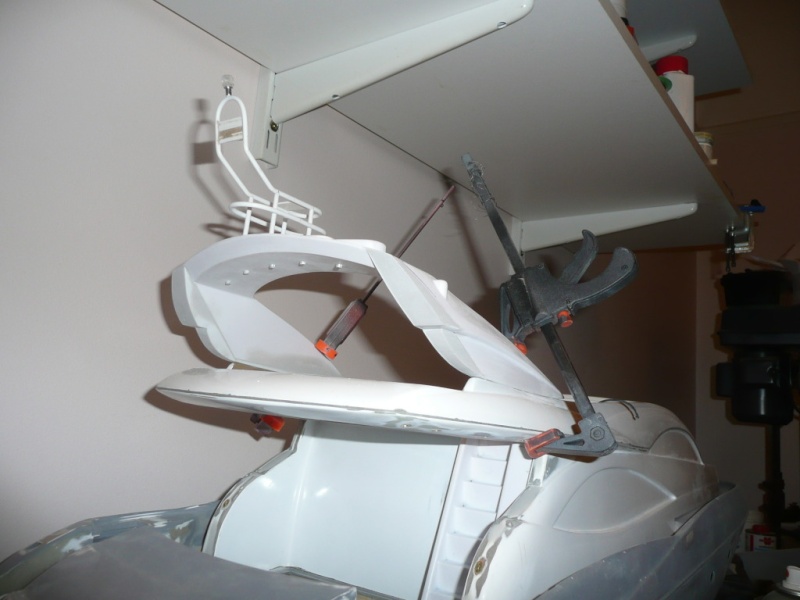 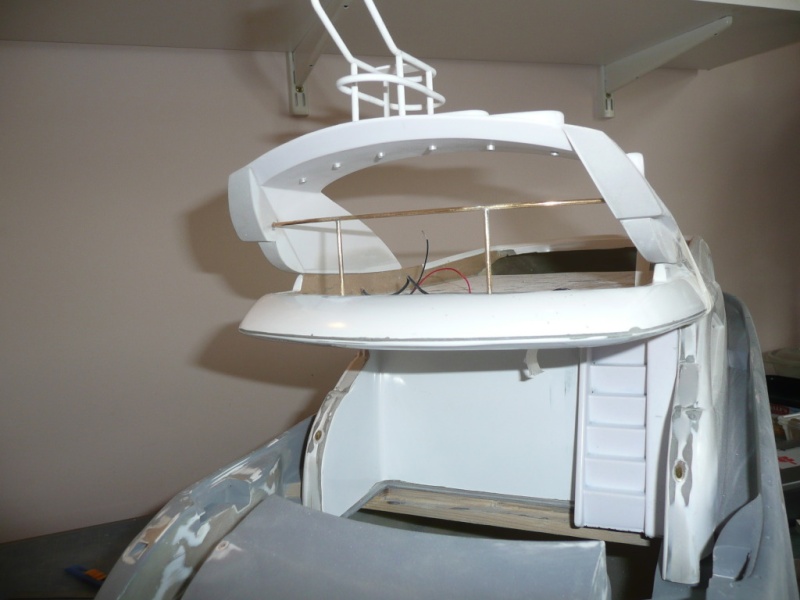 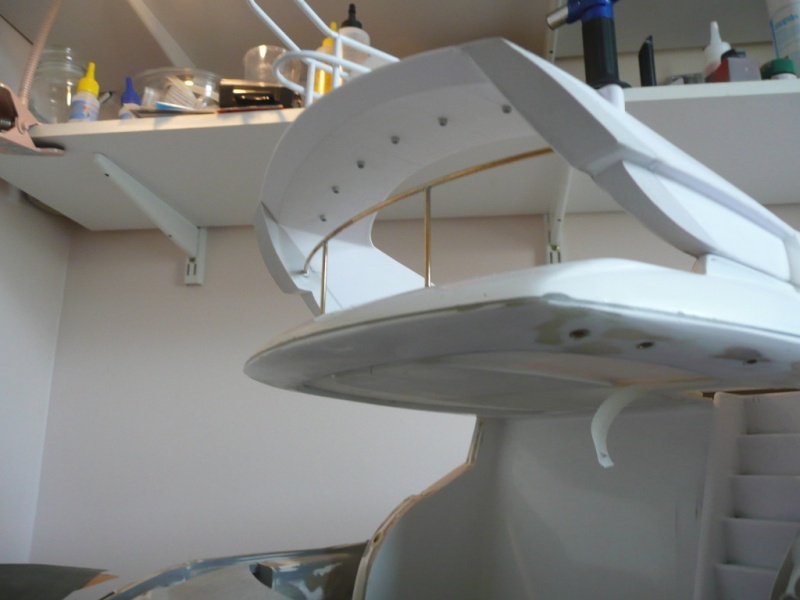  | |
|
| | |
tattooed
Able Seaman
Posts : 45
Join date : 2011-06-30
Age : 60
Location : Bristol
| | Subject: Re: Graupner Manhattan 74 Tue Apr 17, 2012 12:05 pm | |
| your attention to detail james is out of this world , and just think when this one is done then you can start on hms bristol go on you know you want to mate | |
|
| | |
Guest
Guest
| | Subject: Re: Graupner Manhattan 74 Tue Apr 17, 2012 11:40 pm | |
| I've missed this up to now....what a superb build..............and boy oh boy what a super looking boat.
great stuff James.......I'll follow this one for sure.
neil. |
|
| | |
James_H
Midshipman
Posts : 62
Join date : 2012-04-01
Age : 52
Location : Amsterdam
| | Subject: Re: Graupner Manhattan 74 Wed Apr 18, 2012 8:14 pm | |
| Thanks guys. Compliments indeed! Will not be getting it scale to the nth degree with everything, but where I think it's practical I shall try to improve on the kit. Not sure about Bristol next Andy. I'll get to it at some point, but am finding this build a bit of a chore to be honest, so maybe something a bit easier and definitely smaller by way of respite. However, I reserve the right to change my mind as there's a way to go yet! Today's installment is yet more railings. I got a bit carried away with the soldering-flame at one point while not having applied enough fire-paste, and scorched the sun-deck a bit black. They do say sunbathing is bad for you. All rectified with a little sanding tho'. 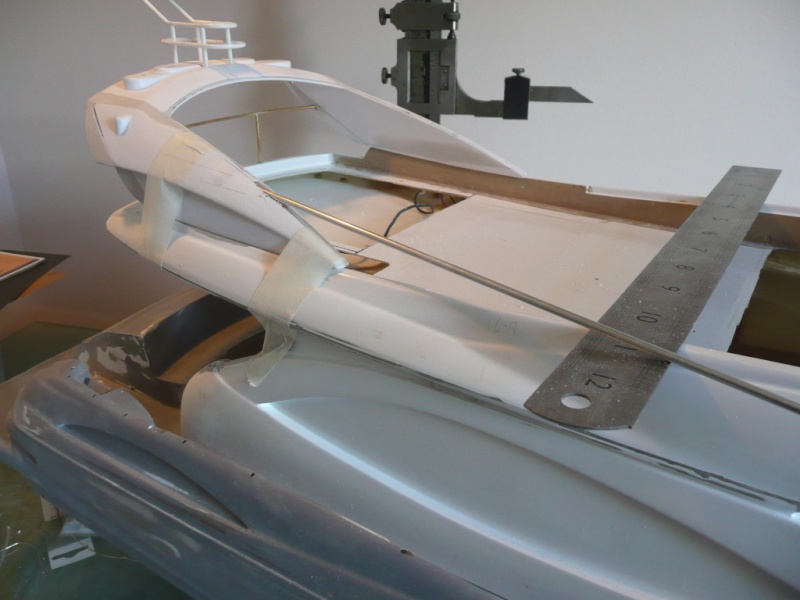  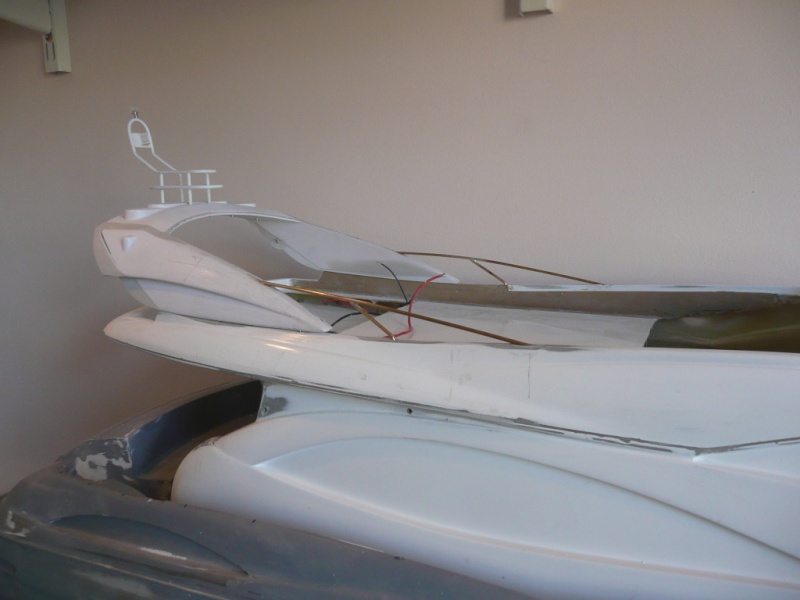 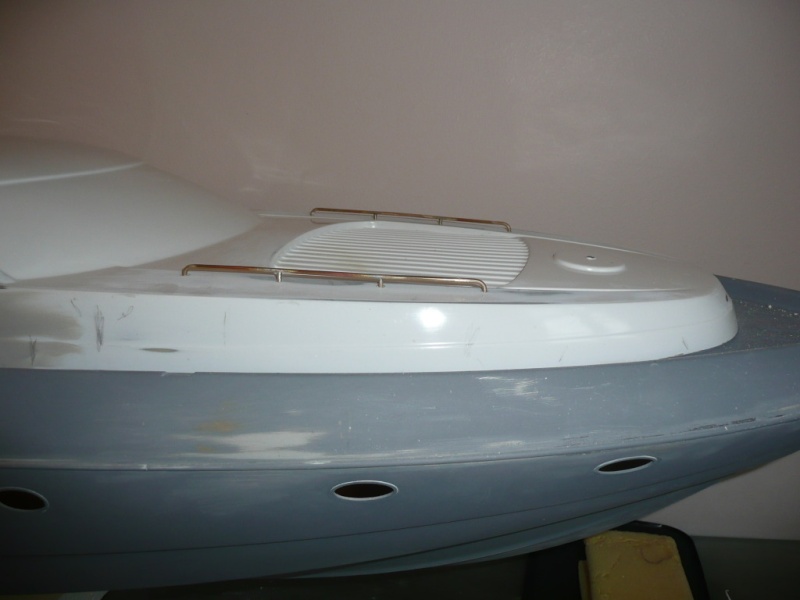 | |
|
| | |
James_H
Midshipman
Posts : 62
Join date : 2012-04-01
Age : 52
Location : Amsterdam
| | Subject: Re: Graupner Manhattan 74 Wed Apr 25, 2012 9:00 pm | |
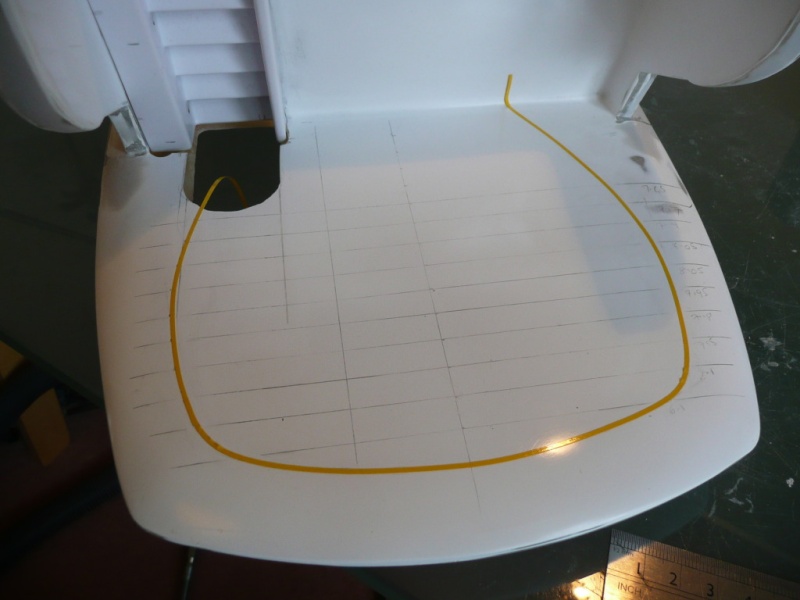
| A bit more work and a few problems encountered. If anyone has any advice on these, I'd be grateful. Fitting of the flybridge front-panel. For some reason I lined up the front edge when glueing, rather than the back edge that lines up with the decking. Ho hum, managed to grind it off okay with a dremel and stuck it back on properly. Also I cut out the hatchway and fitted the domestic-lighting sockets for the flybridge. 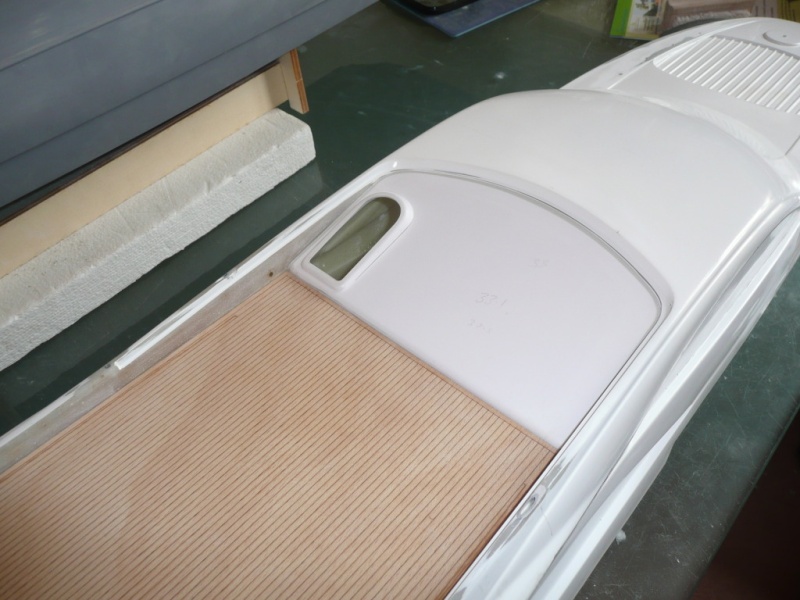 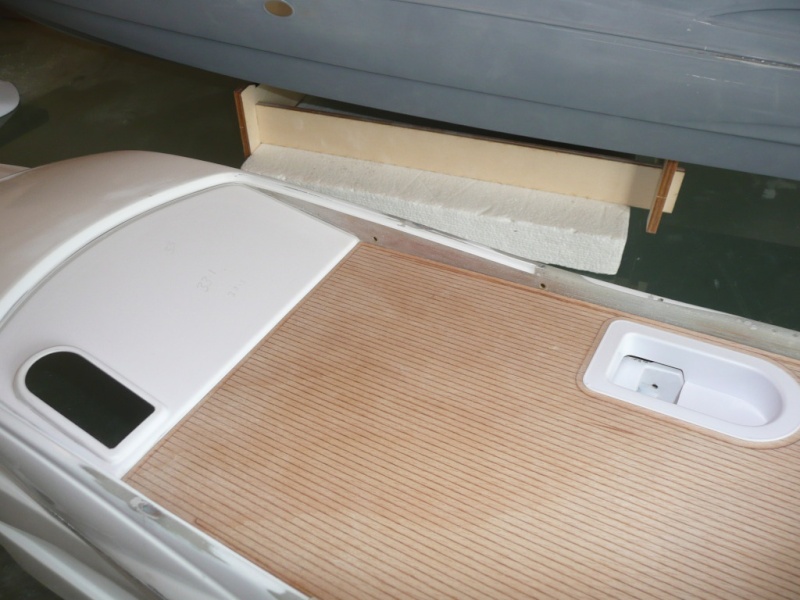 Did some tidying up around the underside of the companionway hatch, and hid the edge with some 2mm quarter-round styrene 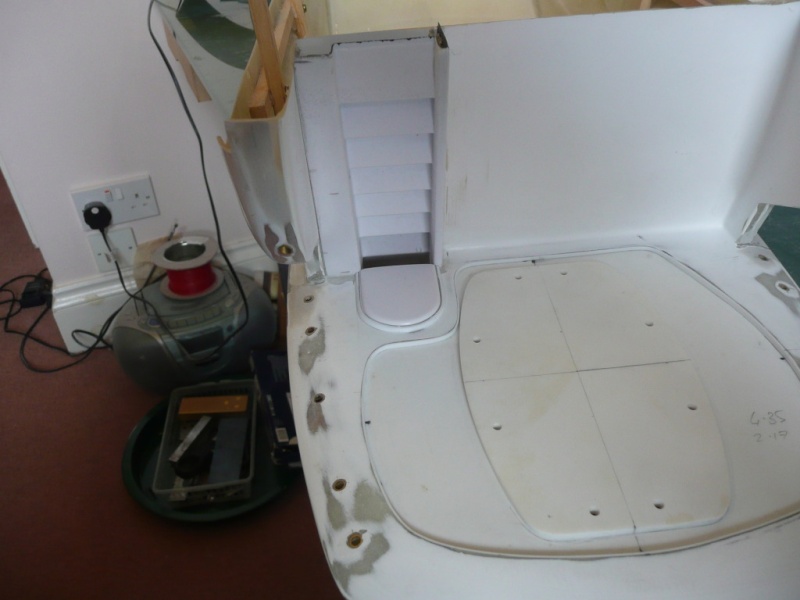 I then did the domestic light fittings for the bulwarks. This was a very long job as access is difficult. 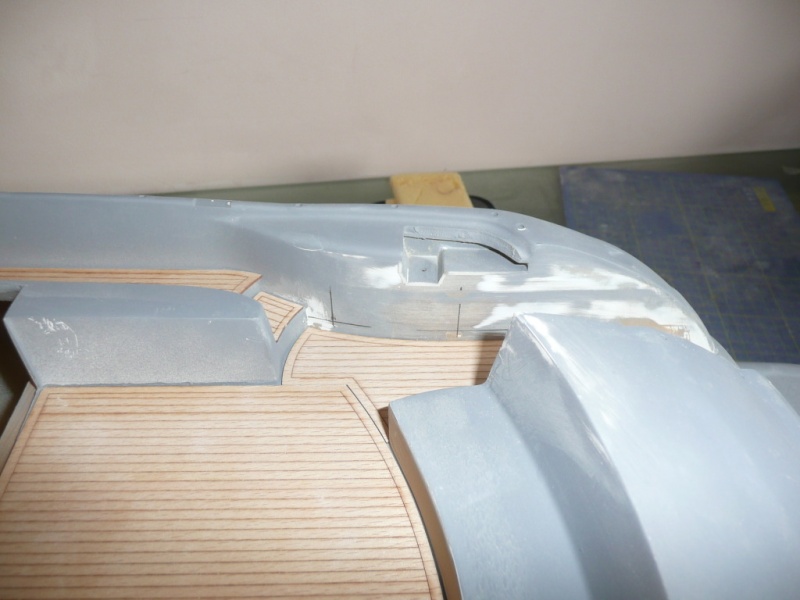 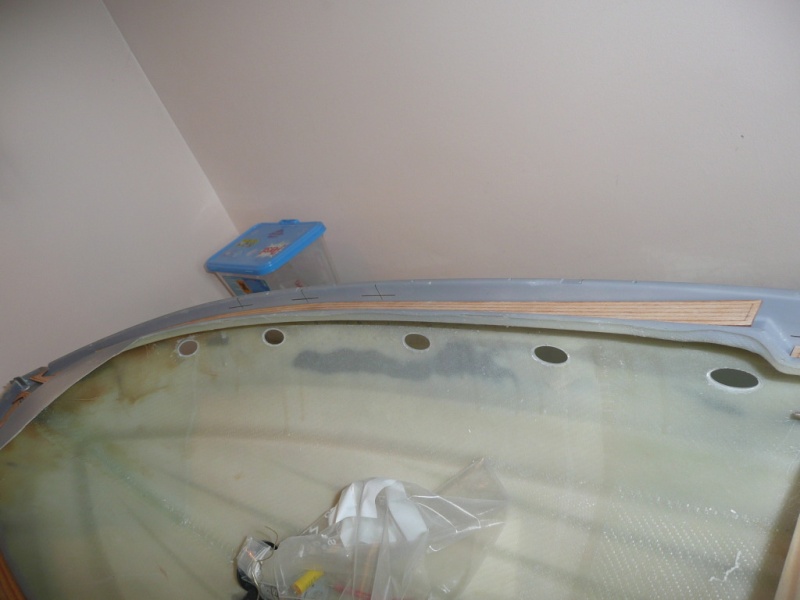 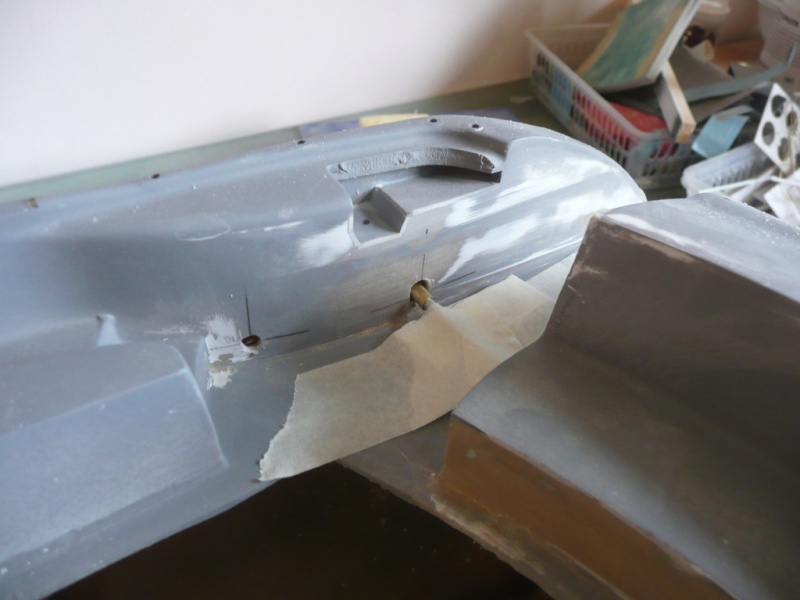 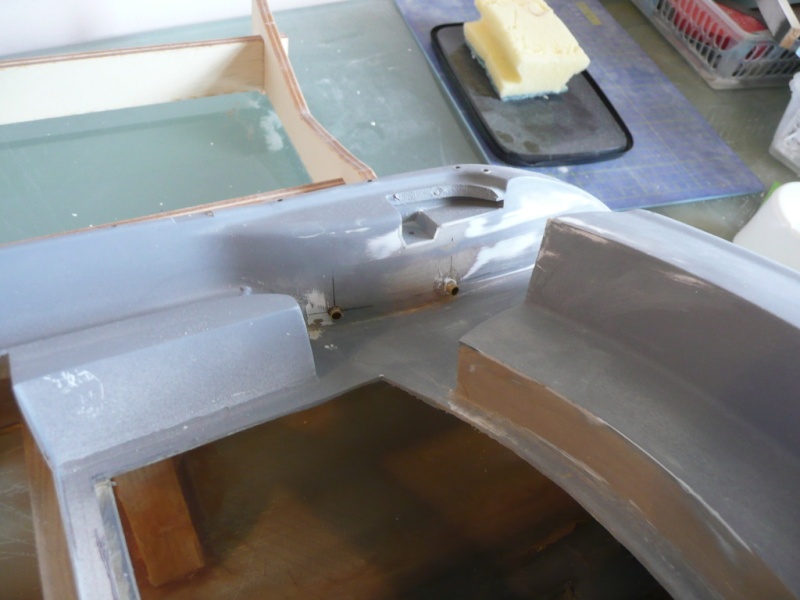 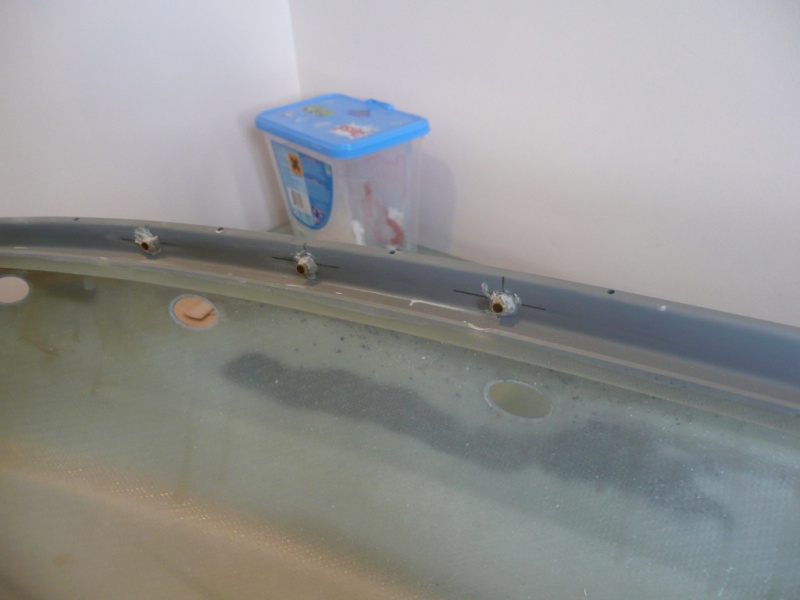 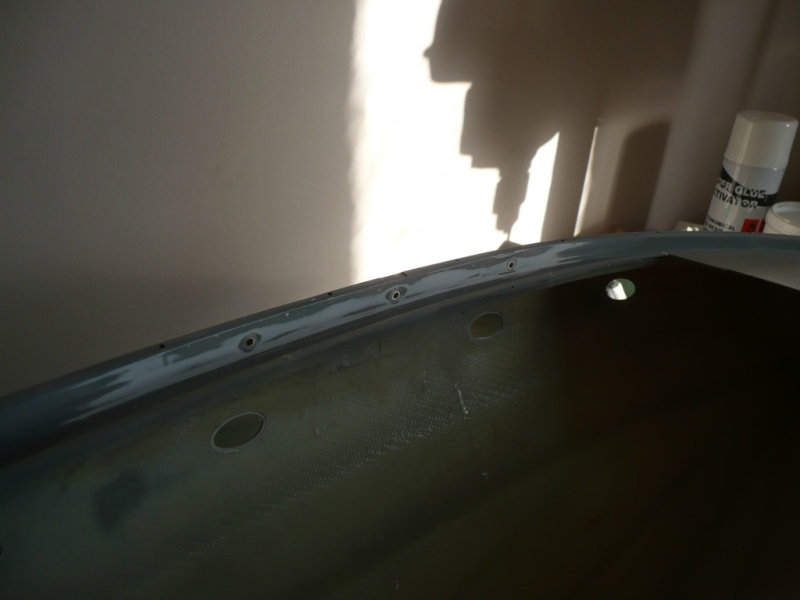 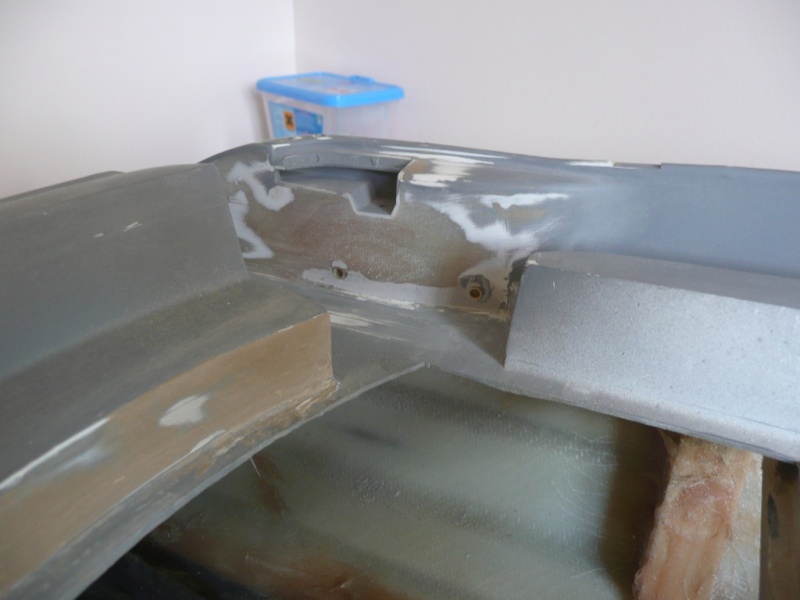 I realized I'd forgotten to file the lower edge of the steps to allow for the decking, so got that to fit. 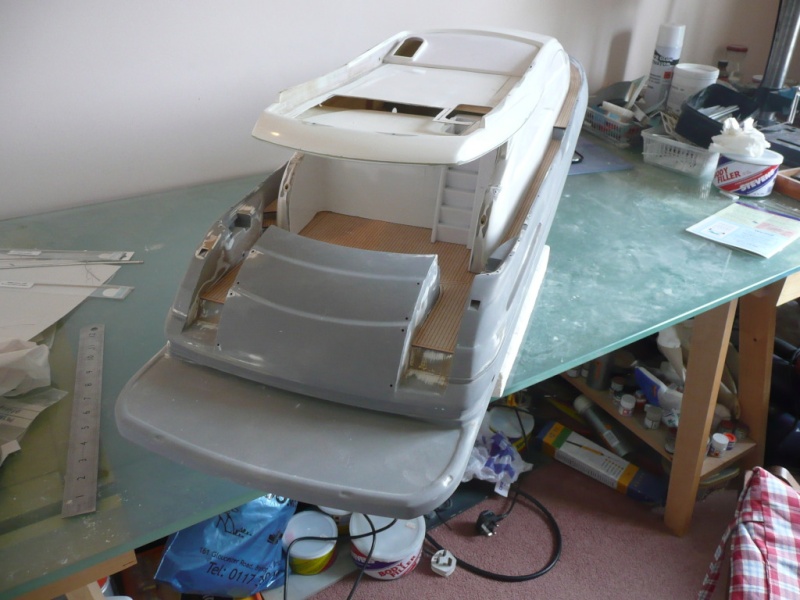 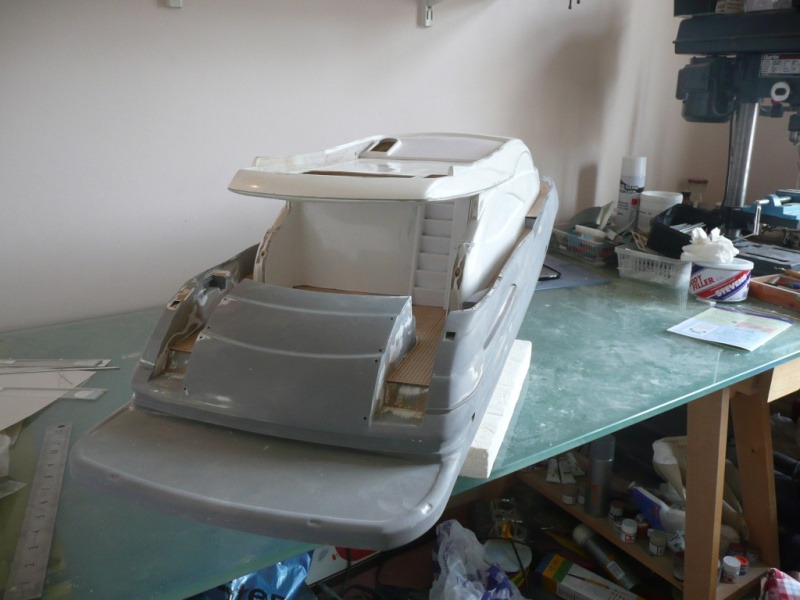 Then I made some little capstans for the rear mooring ropes, and the hatch covers for them. The shape was made with a car brake-pipe flaring tool. 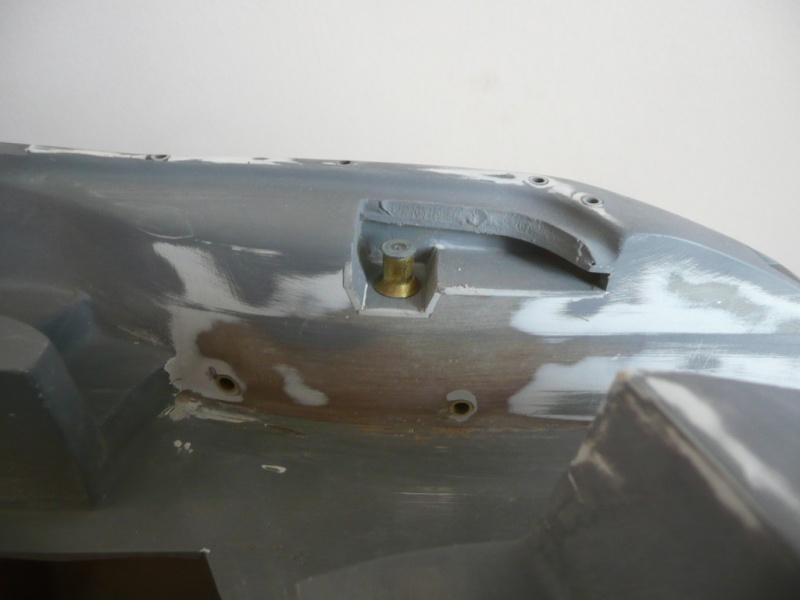 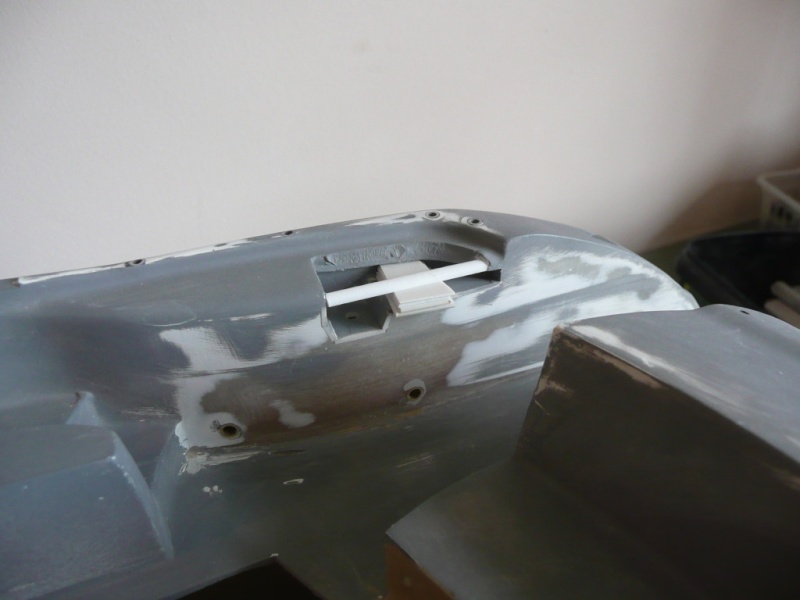 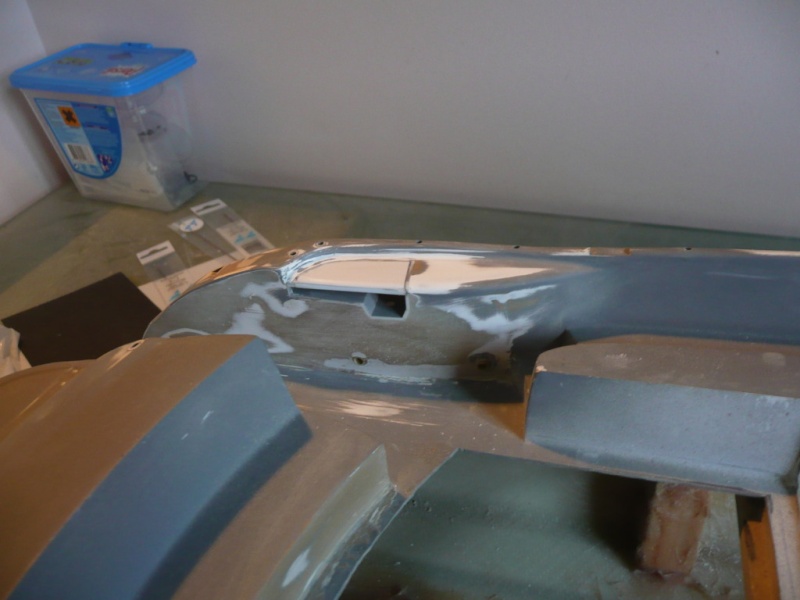 The following few pics show the problems I've found. I don't really know what to do about them so any suggestions would be most helpful. To be fair, Graupner do say this kit is aimed at advanced modellers, so I did expect to struggle. First up, there's a slight scuff on the removable section of the decking. I am hoping a few coats of varnish with sanding to make a level surface will make it much less obvious. Will it? 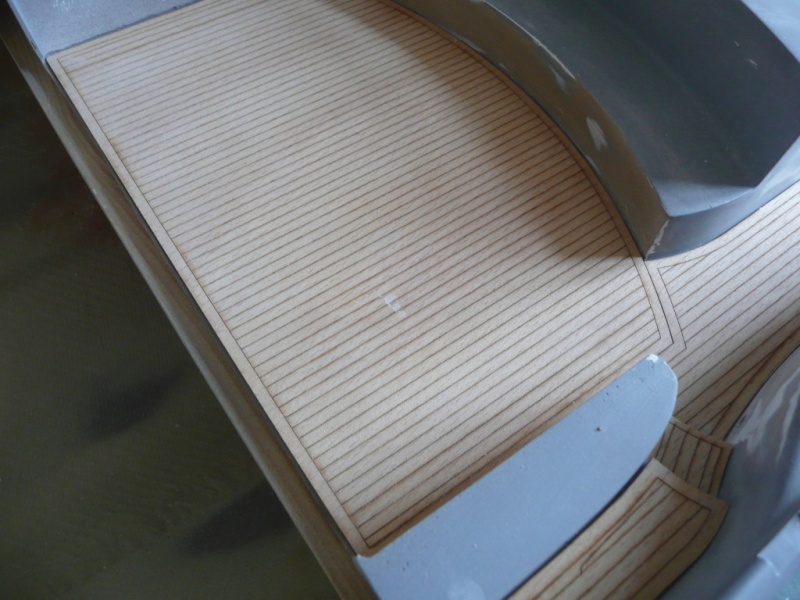 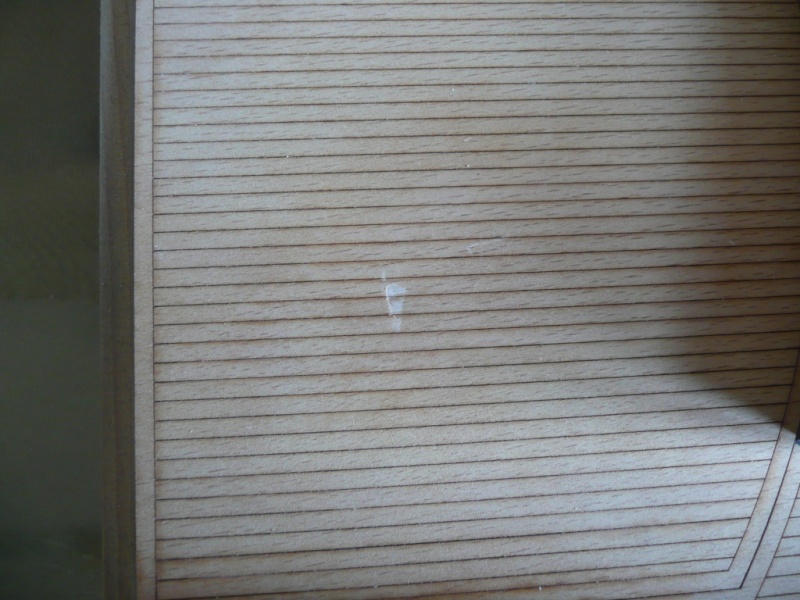 Next, the front of the superstructure is not wide enough to meet up with the decking. I've thought about building up these areas with some filler, but the step halfway up makes the job look very difficult as that line must be perfect. 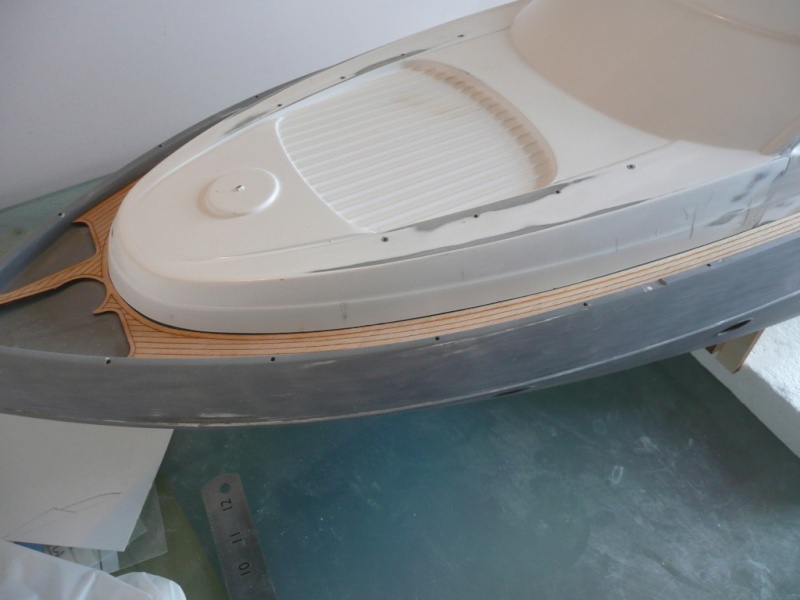 Also at the bow, there's some piping moulded into the deck, that the wooden decking fits around - or rather, doesn't quite. It also isn't really very distinct in places, probably as it is unlikely to be one of the first hulls made from the mould. But the worst bit is that the forward left piece does not have the same angle as the bulwark that it is supposed to butt up against. It is hard to make out from the photo admittedly, but in the flesh is an eyesore that I haven't the first clue how to rectify. 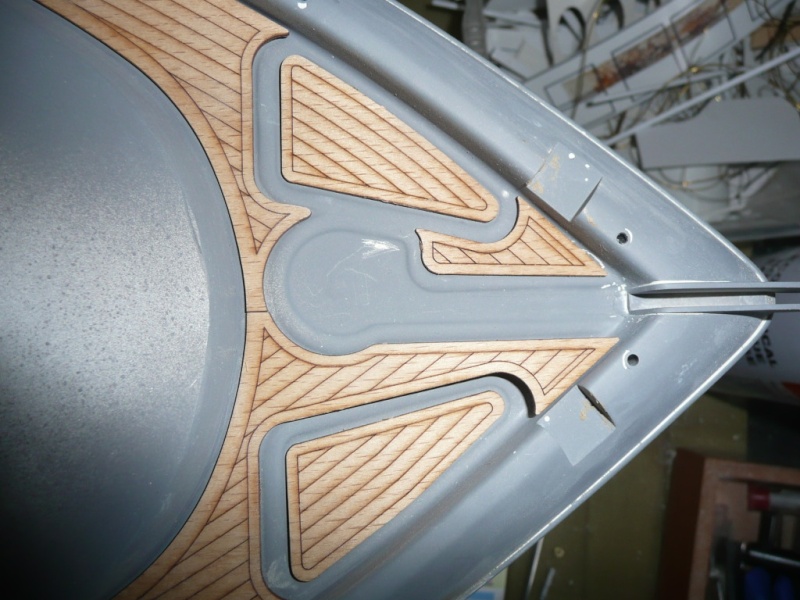 | |
|
| | |
Guest
Guest
| | Subject: Re: Graupner Manhattan 74 Wed Apr 25, 2012 9:08 pm | |
| WOW!!!..........looking superb.
neil. |
|
| | |
Guest
Guest
| | Subject: Re: Graupner Manhattan 74 Wed Apr 25, 2012 10:39 pm | |
| - nhp651 wrote:
- WOW!!!..........looking superb.
neil. Indeed it is great work James. Damien. |
|
| | |
James_H
Midshipman
Posts : 62
Join date : 2012-04-01
Age : 52
Location : Amsterdam
| | Subject: Re: Graupner Manhattan 74 Sat Apr 28, 2012 6:09 pm | |
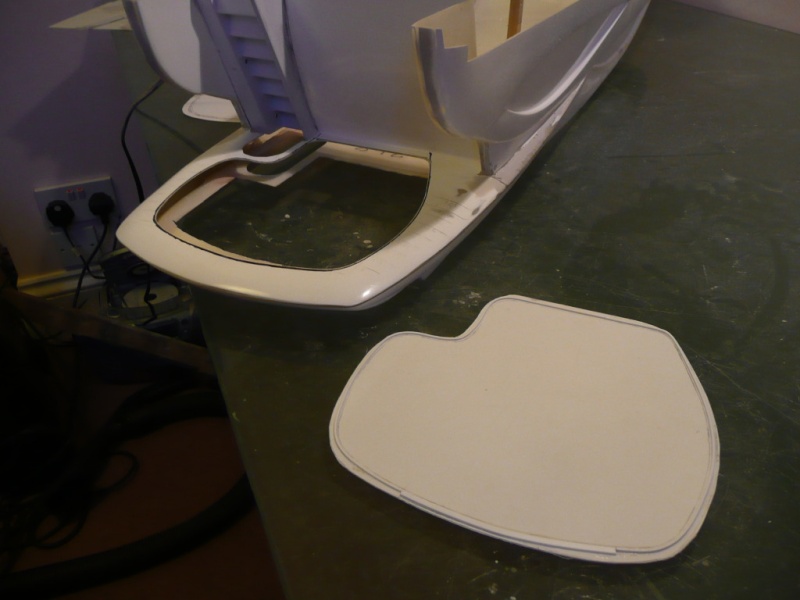
| Thanks guys! I was a bit stuck with what to do with the foredeck, so I had a trawl around the inter-web for pictures. It would seem that the real boat is somewhat different to the kit in this area, in that the anchor winch lockers have a decking border and not a GRP one. So I decided to use the wood that the laser-cut parts had been removed from, and sand it to shape. I had to psyche myself up a bit to start grinding the moulding away, as it wasn't horribly bad. But I new it would ultimately annoy me on the finished model so it had to go. Got through a lot of double-sided tape on this bit! Pic1 - Stared at this for quite some time.... 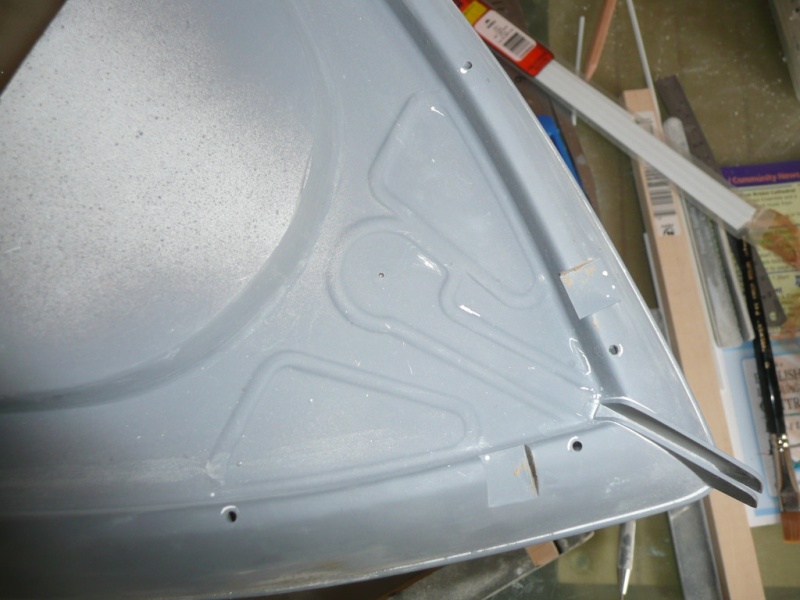 Pic2 - ....and then went for it with the dremel 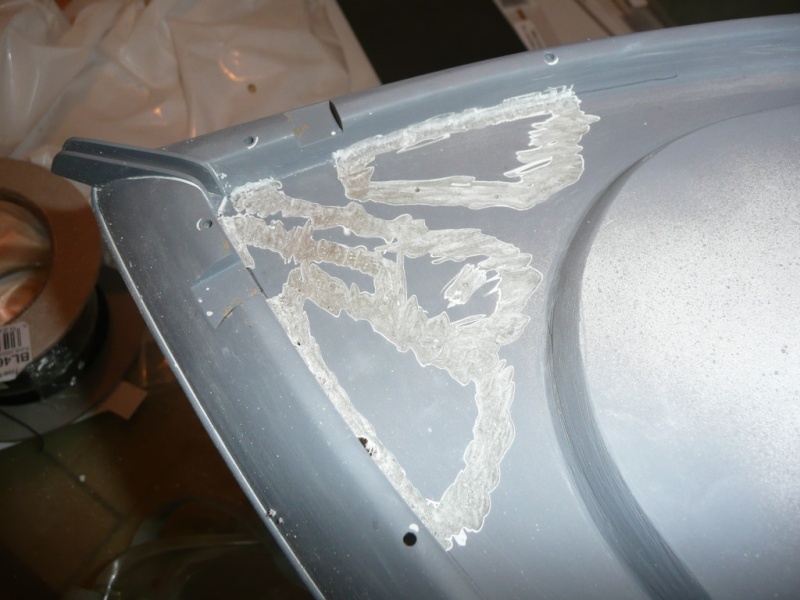 Pic3 - Yet more filler 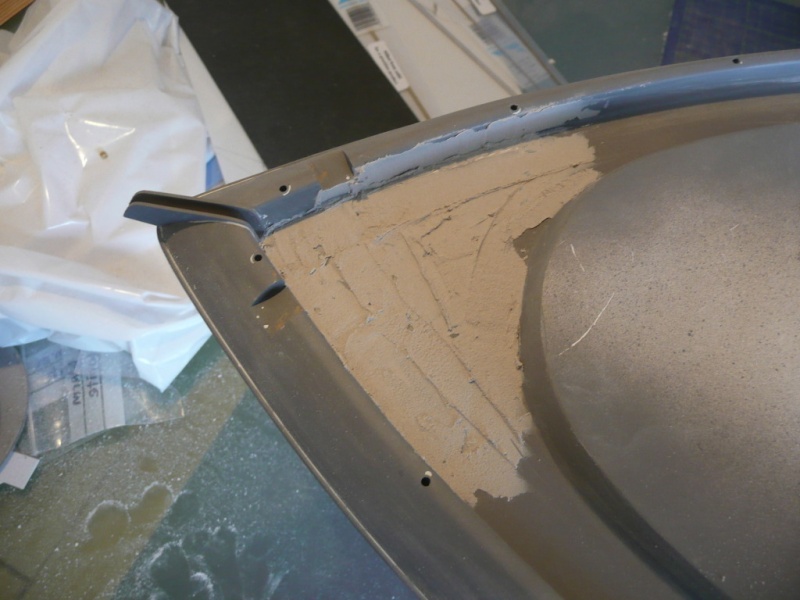 Pic4 - sand, sand and sand some more 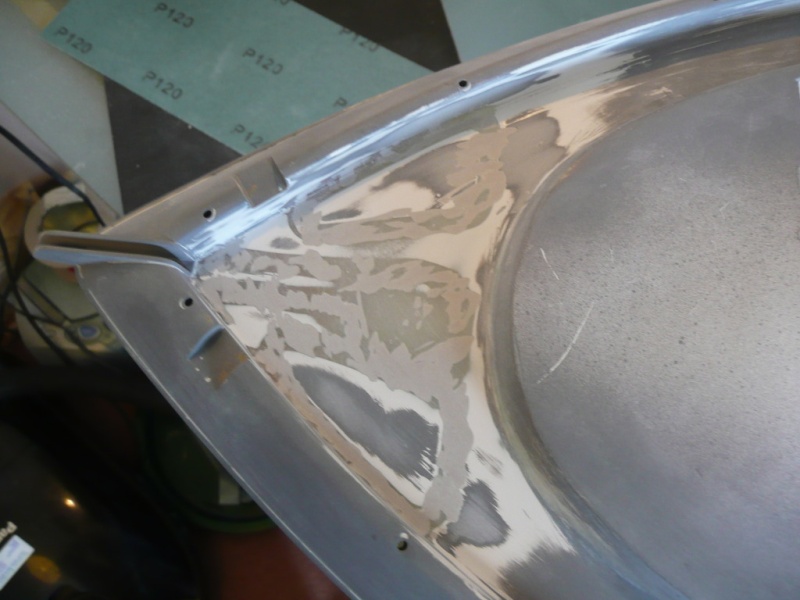 Pic5- Dry fitting (sticky tape fitting) for template 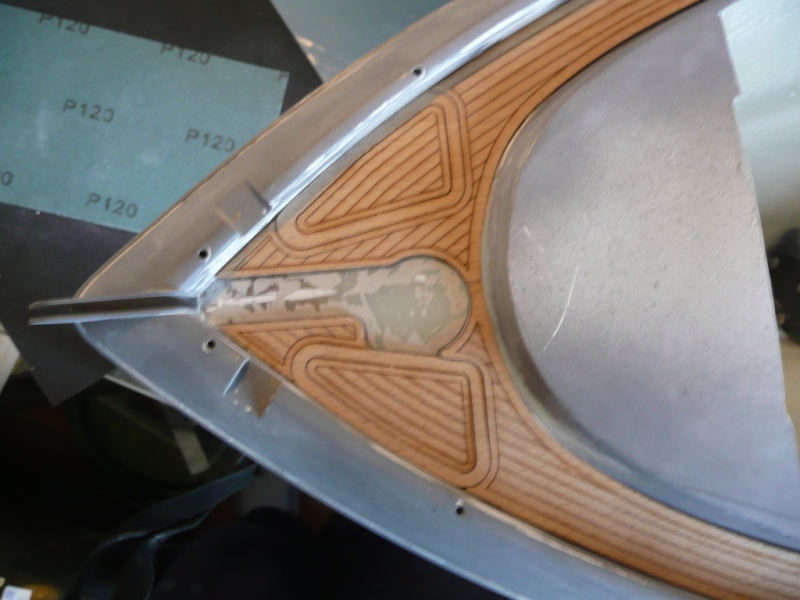 Pic6 - Base styrene the same thickness as the decking 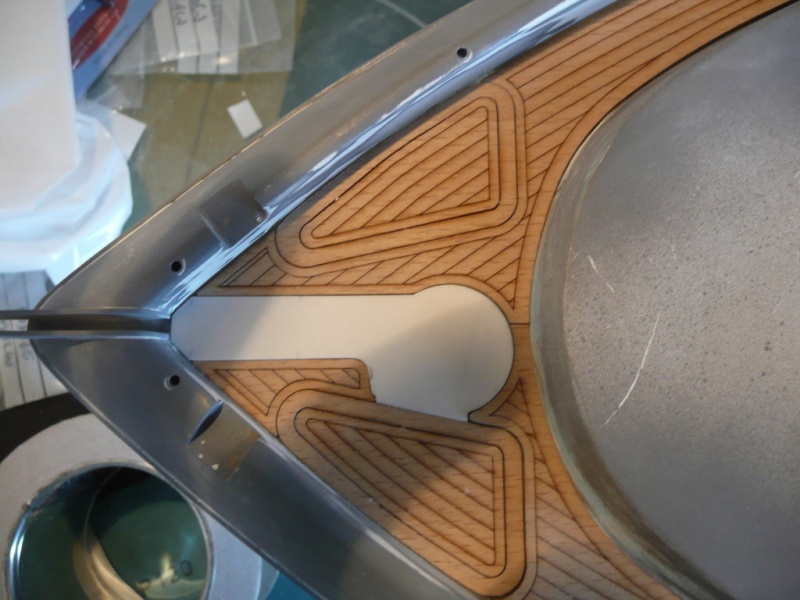 Pic7 - Just about managed to pursuade some styrene half-round to an acceptable shape. It did break on me in one area, but a blob of CA plugged the split and will only need a tiny smidge of filler later. 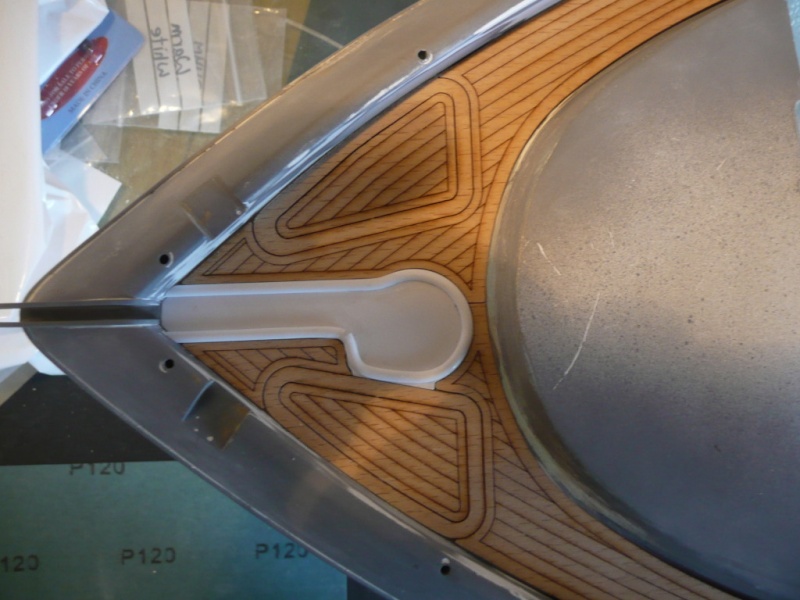 | |
|
| | |
James_H
Midshipman
Posts : 62
Join date : 2012-04-01
Age : 52
Location : Amsterdam
| | Subject: Re: Graupner Manhattan 74 Tue May 01, 2012 7:43 pm | |
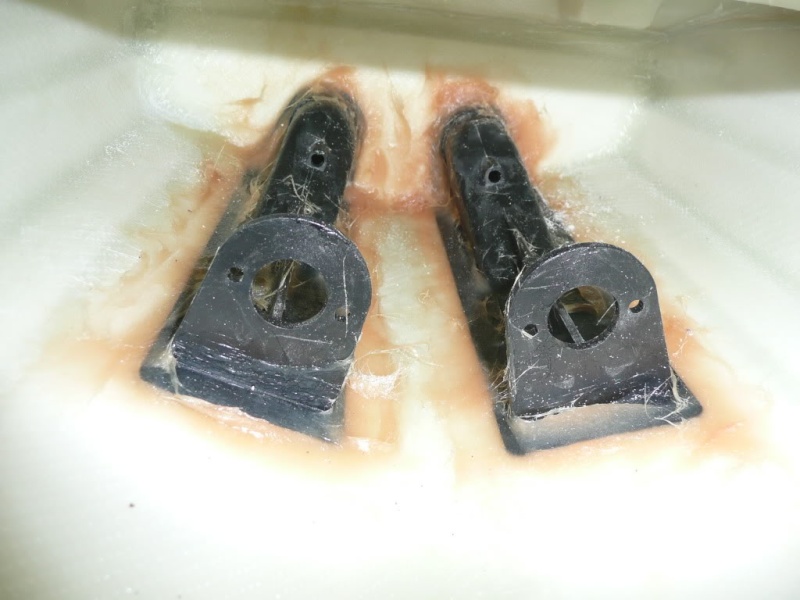
| The last of the detail work for the hull. Hooray! Put some styrene inserts in the forward cable-guides for a crisper shape, and fitted the tie-downs for the stern platform. Now it just needs a damn good clean, a wet sanding and one more coat of grey primer. After that if there are no major surface flaws, the hull-lights and the remaining jetdrive components can be fitted and then it's painting time (for the hull only, obviously). Could I actually be on the verge of serious progress?  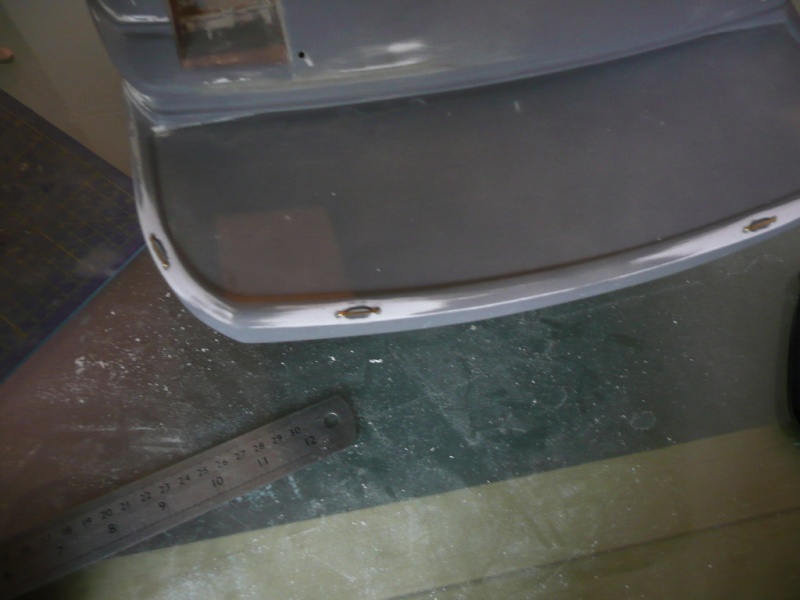 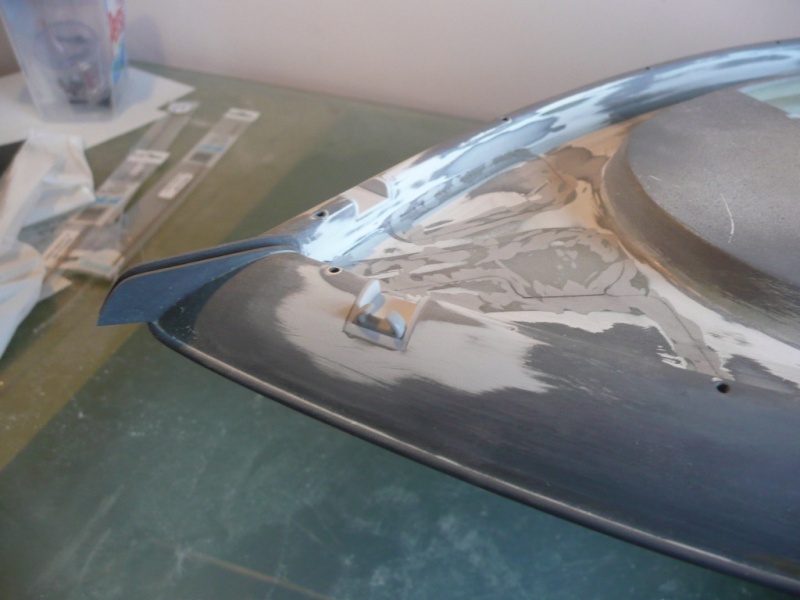 | |
|
| | |
Guest
Guest
| | Subject: Re: Graupner Manhattan 74 Wed May 02, 2012 12:58 am | |
| Looking great James, Have you fixed the scuff on the section of deck? if not with a paint small brush apply some water to the scuff area and allow to dry the water will raise the grain then a light sand with 600 grit will smooth it and will look much beter than it is now or will remove the scuff entirely.
Cheers Damien. |
|
| | |
Footski
Master
Posts : 548
Join date : 2011-06-11
Age : 66
Location : Malaga, Spain
| | Subject: Re: Graupner Manhattan 74 Wed May 02, 2012 8:16 am | |
| Great tip Damien....
She is a work of art.. | |
|
| | |
James_H
Midshipman
Posts : 62
Join date : 2012-04-01
Age : 52
Location : Amsterdam
| | Subject: Re: Graupner Manhattan 74 Wed May 02, 2012 1:24 pm | |
| Thanks guys, and brilliant idea Damien; I shall definitely give that a go.
Some other things I could use advice on, if you're willing -
Is it possible to heat-bend clear styrene and sand the edges smooth without removing the protective film?
I have to try and make these 3 glass panels just under the equipment mast - see pic (sorry it's so small)
http://expediatenerifeproperty.files.wordpress.com/2010/03/tymc221.jpg
I would like to make the seats look as good as possible. Is some sort of cloth a good idea
or is it maybe better to try to achieve the right scale look just with painting?
I suppose the same question applies to carpets as well, any ideas? - seats pic
http://newimages.yachtworld.com/resize/1/34/22/603422_0_220620101732_2.jpg
Scale is apparently 1:20. I've recently looked at what you get in the Amati Grand Banks kit - real upholstery (or it looks like it)
I thought the stitching would look too big for scale, but it does look okay to me as does the same stuff for the Riva. Any idea what they use? | |
|
| | |
Guest
Guest
| | Subject: Re: Graupner Manhattan 74 Wed May 02, 2012 1:37 pm | |
| Re your seat coverings I have used scrap clothing leather have a look at my seaport tug thread 4th pic down the grey seat cover is leather I originally got the leather as a bag of scraps on ebay the pic will give you an idea of thickness the scraps come in many colours & used for pants and jackets, you could use an old pair of jeans for denim look covers.
Damien. |
|
| | |
James_H
Midshipman
Posts : 62
Join date : 2012-04-01
Age : 52
Location : Amsterdam
| | Subject: Re: Graupner Manhattan 74 Thu May 03, 2012 9:15 am | |
| Cheers Damien, that's some food for thought.
I've tried your water-trick on the decking area. Nothing seemed to be happening at
first despite several applications.
But on turning the piece upside down, I realised the grain on the underside had
lifted and the damage was actually a split right the way through and not just a scuff.
This hadn't been visible prior to the water treatment.
So I placed the decking piece face down on a flat surface and pushed the wood back
as flat as I could before glueing a bit of wood on top of the split to reinforce it.
Now the water started lifting the topside grain and I sanded as much as I dared so as not to
remove the caulking lines.
The mark hasn't entirely gone but it is an order of magnitude better than before.
Thanks very much for that gem of advice. I am in your debt sir! | |
|
| | |
Guest
Guest
| | Subject: Re: Graupner Manhattan 74 Thu May 03, 2012 11:24 am | |
| No payment necessary James happy to supply free gems as needed  |
|
| | |
Norseman
Master

Posts : 219
Join date : 2011-06-11
Location : Liverpool
| | Subject: Re: Graupner Manhattan 74 Thu May 03, 2012 1:12 pm | |
| - James_H wrote:
- I would like to make the seats look as good as possible. Is some sort of cloth a good idea?
Hi James I've just read this from start to here - very nice it is too. Re upholstery - I needed something and elected to raid my wifes accessories hangar No3. I selected a white faux leather handbag (purchased in Turkey years ago and unused ever) and proceeded to unstitch it. Then a blade to clear the underside did the trick. It's quite thin now, will take a glue, and won't be affected by water. I suspect she will never notice ...... but I could have gone to a carboot sale for a handbag. Dave | |
|
| | |
James_H
Midshipman
Posts : 62
Join date : 2012-04-01
Age : 52
Location : Amsterdam
| | Subject: Re: Graupner Manhattan 74 Thu May 17, 2012 8:47 am | |
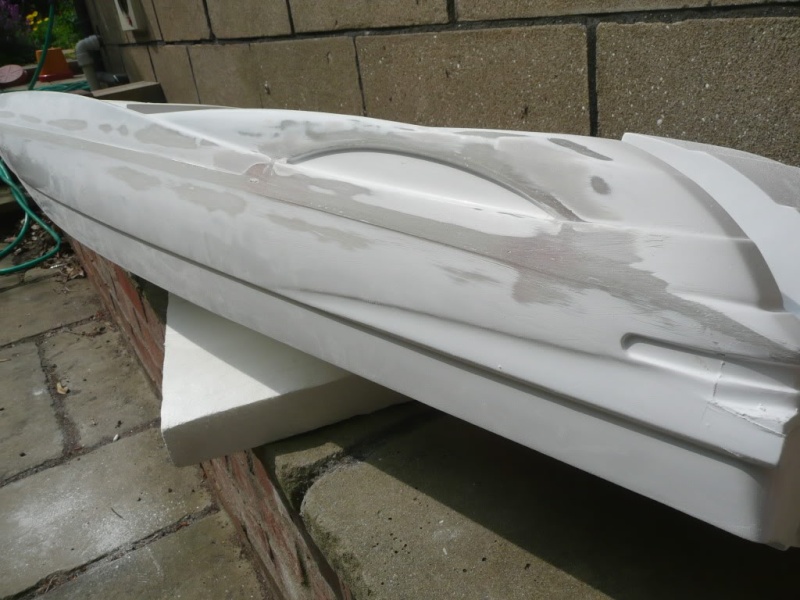
| Cheers Dave, that's a very good idea. Though I'm not sure I'd escape with my life if I tried the same with my wife's handbags. I could of course go and buy a cheap one myself, though I would expect to receive smirks from whoever sold it to me! Sorry about the lack of updates recently. I can only assure you that it's not due to lack of work, more a lack of any progress that would be worth taking pictures of. I did manage to get a coat of primer on, despite the weather. Unfortunately the result was nowhere near as good as I had hoped, so I had to resign myself to lots more tedious filling and sanding. But it wasn't just surface imperfections, things also needed re-shaping in quite a few areas. Pic1. The dremel-butcher strikes again. Someone should probably take this tool away from me, but I was unhappy with the sharpness of the corners and wanted to try to improve them.  Pic2. This recess at the stern was all over the place. I am finding this area really really hard to get looking nice. 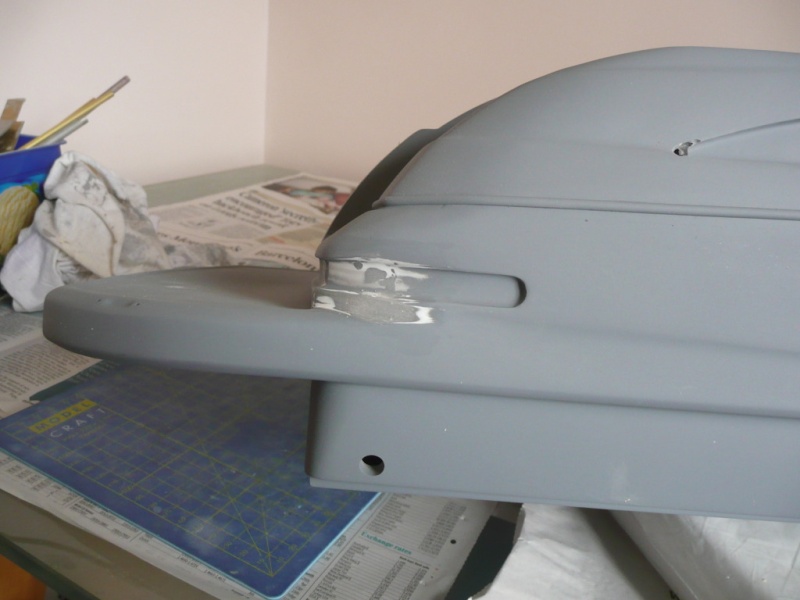 Pic3. A bit better, but still not good enough. 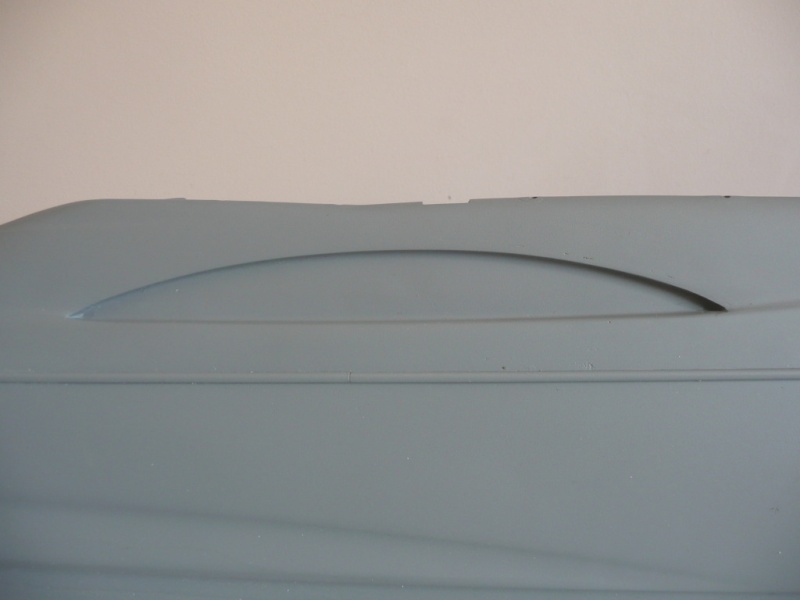 Further, I had a bit of a re-think about how I was doing the transom lights. I had originally decided to glue the LEDs to the rear of the light-tubes, then once the hull was painted, to fill them up with clear epoxy from the outside. I decided that maybe a better result might be achieved if I were to fit a 1mm deep collar to the outer edge of the tube so that a disc of clear styrene could be inserted from the rear to give a nice flat reflective lens, and then epoxy could be applied behind this for a waterproof seal, and then finally glue the LED behind this epoxy plug. The difficulty was cutting off a 1mm section of tube perfectly square as even my mitre block is not accurate enough for this. Pic4. Using a flat piece of metal to sand one end of the tube nice and square.  Pic5. I glued a piece of snap-off knife blade to some 1mm styrene so that a line could be scored at the correct height more accurately than I could have done with a pencil. 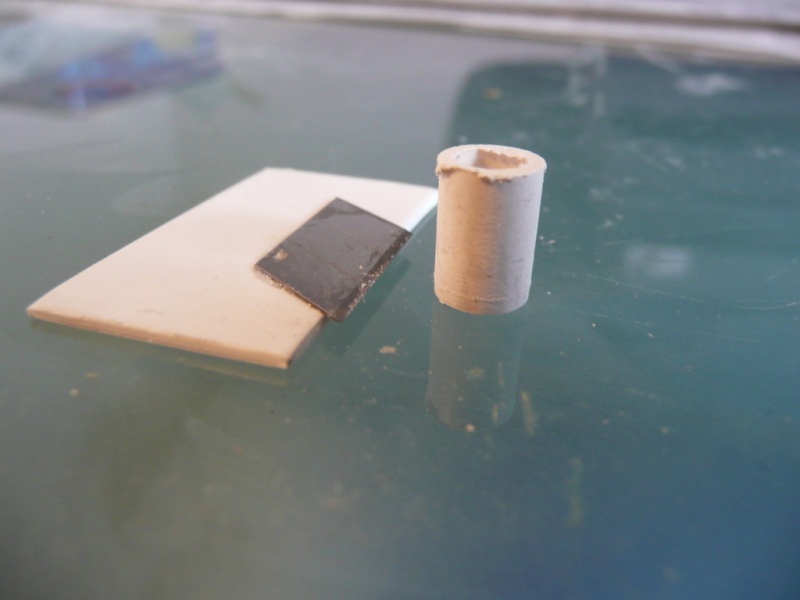 Pic6. Using a little jig that could be attached to the hull with double-sided tape, the soft brass wire could then be adjusted until the score-line aligns with the surface of the hull for gluing with thin CA. 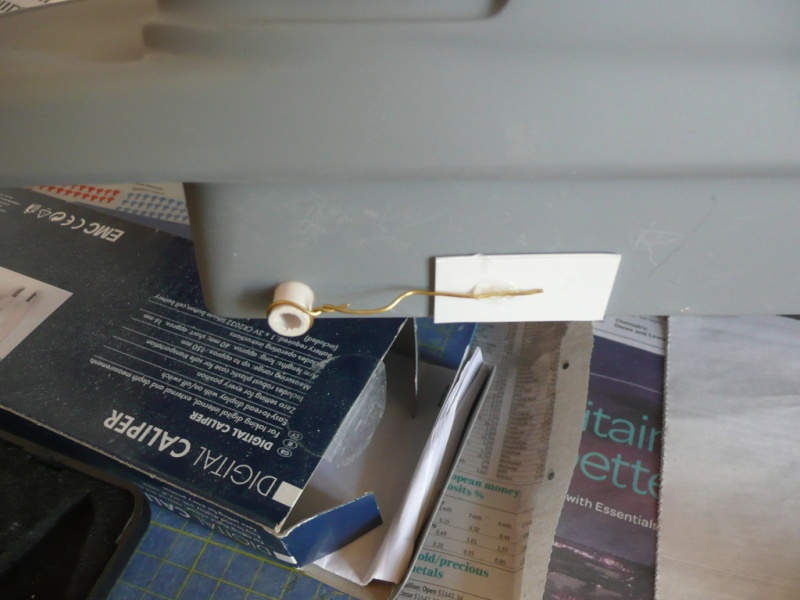 Pic7. The end result looks pretty even and consistent to me. I'm happy with this at least. 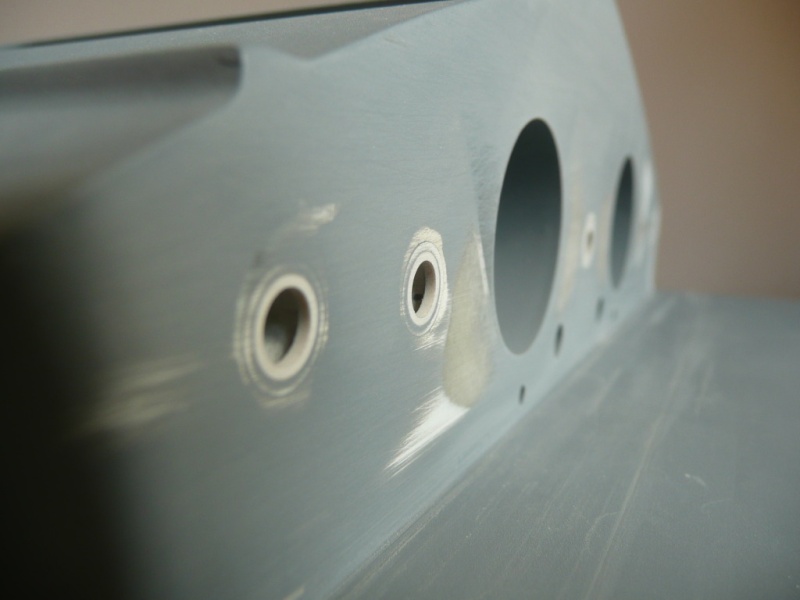 That is not where work has stopped, far from it. I have now spent just over 30 hours work trying to get the hull good enough for painting and it is proving a slow, painstaking and tedious process. Every single surface is curved in one way or another, and a sanding block cannot be used anywhere except the very bottom surface of the hull. Also because I have had to remove the gel-coat in many areas the porous nature of the GRP-moulding is really hampering efforts. In addition I have had several splits and cracks appear where either the moulding is too thin, has large air bubbles, or where the hull to deck bond has not been done effectively during manufacture. Still, I plod obstinately onward and will post the results when there are some. I just can't say just now when that will be. Pass the filler will you. James | |
|
| | |
Roadrunner
Forum Overlord

Posts : 1714
Join date : 2011-06-10
| | Subject: Re: Graupner Manhattan 74 Thu May 17, 2012 9:39 am | |
| awsome work so far, very impressed, i love a good kit bash, theres always something on a model i hate and end up changing but the end results are normally worth it keep it up 
_________________
I'm Not Anti-Social, I'm Anti-Stupid.
| |
|
| | |
James_H
Midshipman
Posts : 62
Join date : 2012-04-01
Age : 52
Location : Amsterdam
| | Subject: Re: Graupner Manhattan 74 Thu May 17, 2012 11:26 am | |
| Thanks for the kind words Roadrunner, moral support is very welcome at this slow-going stage of the build.
I would like to add that my intention is not to "bash" the kit or manufacturer in this thread, more to describe
the problems and difficulties I encounter.
It is worth mentioning again that this is only my second model boat build, so although I believe I have a reasonable
mechanical aptitude I am still very inexperienced and may well not be going about things in the best, or even the right, way.
Additionally, although this may look like a boat without a great deal of "character" or "atmosphere" and look a bit toy-like as
opposed to exact-scale, this may have misled me into believeing that it wouldn't be that difficult.
Perhaps if I'd thought about it a bit more I'd have realised that sunseekers are definitely towards the more extreme end of
boat-design what with all the complex-curves and absence of straight lines.
This is a huge model, not just by length but by internal volume, and consists of many parts almost all of which will be usable.
It is difficult to see how Graupner could have done better for the price without building a brand new mould for each customer.
The choice to add extra detail was mine alone and has perhaps added a level of complexity that I was not really ready for.
We shall see..... | |
|
| | |
Guest
Guest
| | Subject: Re: Graupner Manhattan 74 Thu May 17, 2012 1:20 pm | |
| Keep at it James you're doing a bloody good job of it mate!!!!!!!! |
|
| | |
James_H
Midshipman
Posts : 62
Join date : 2012-04-01
Age : 52
Location : Amsterdam
| | Subject: Re: Graupner Manhattan 74 Thu May 17, 2012 2:42 pm | |
| Thanks Damien, I can feel morale improving. Shame the weather isn't doing likewise tho'. | |
|
| | |
Guest
Guest
| | Subject: Re: Graupner Manhattan 74 Fri May 18, 2012 3:10 am | |
| Lol know what you mean lovely sunny day wind at 20kph temp with wind chill 2c |
|
| | |
Guest
Guest
| | Subject: Re: Graupner Manhattan 74 Fri May 18, 2012 12:28 pm | |
| A most superb job indeed.the quality of finishing each part is excellent.
neil. |
|
| | |
Norseman
Master
Posts : 219
Join date : 2011-06-11
Location : Liverpool
| | Subject: Re: Graupner Manhattan 74 Sun May 20, 2012 8:38 pm | |
| - James_H wrote:
- Also because I have had to remove the gel-coat in many areas the porous nature of the GRP-moulding is really hampering efforts.
I'm interested how you will get round the loss of gel coat - I might have a similar problem soon. I really like what you are doing here - keep up the good work. Dave | |
|
| | |
James_H
Midshipman
Posts : 62
Join date : 2012-04-01
Age : 52
Location : Amsterdam
| | Subject: Re: Graupner Manhattan 74 Wed May 23, 2012 8:43 am | |
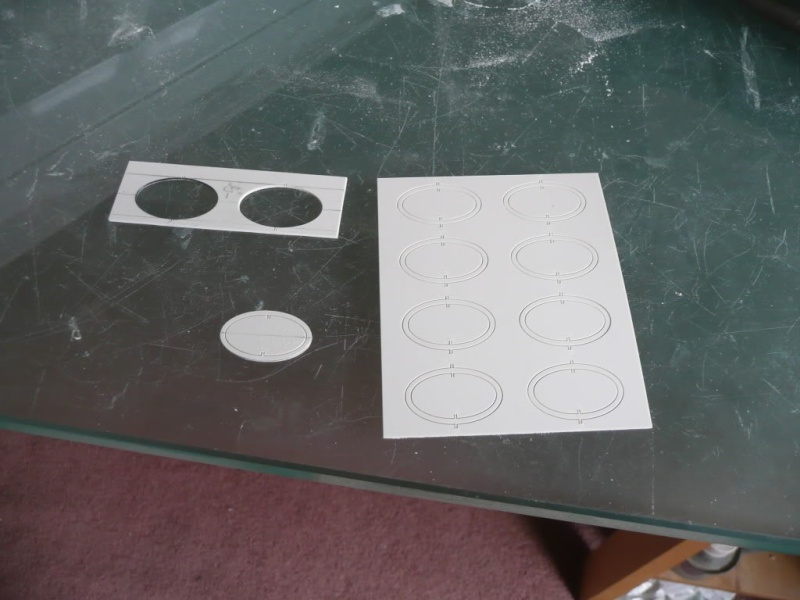
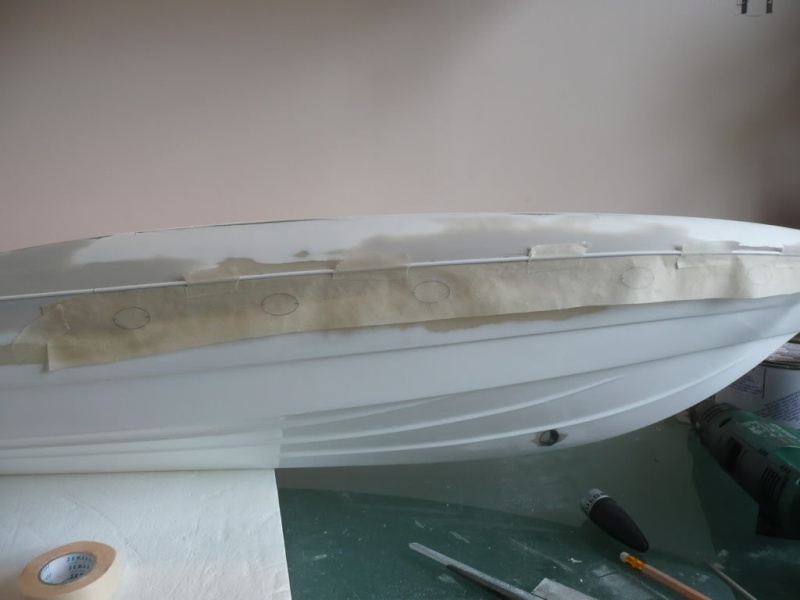
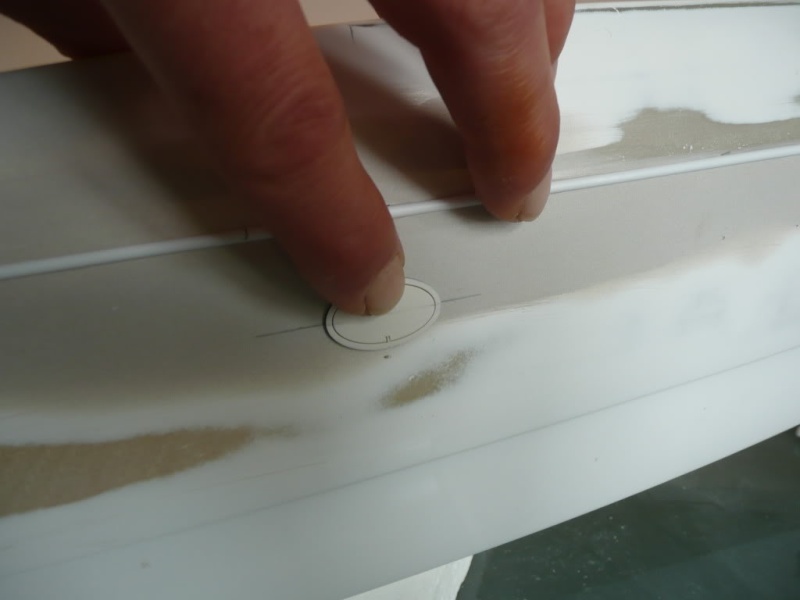
| Thanks Neil. I'm probably being a bit OCD about some parts because I am annoyed with myself
for not thinking through the portholes a bit better. If they were round I'd redo them, but elipses
are too difficult to remake (for me anyway) so I'm going to have to live with them.
Hi Norseman. removal of the gel-coat is not in itself a huge problem, it's just that it will cost a bit more
time and money to get back to a smooth surface again.
Gel-coat is a bit like a sheet of styrene in that it is ready for painting as is. The only thing to do is to matt the gloss
surface with fine abrasive paper to provide a key for the paint to stick to.
If it is removed, then the amount of work to get back to a paintable surface will vary depending on what type of resin
was used in the GRP.
This is similar to the difference between 5 minute epoxy and 24 hour epoxy. If you make a pool of 5 minute epoxy you will
find that once it is set it is full of tiny air bubbles. This is because it sets so fast that there isn't time for the bubbles to rise to the surface
and is why it isn't desirable for either gluing in a propshaft or using as glass for portholes. If the surface is then sanded down, it will
resemble a piece of pumice stone in surface texture, ie full of little holes.
The same is true of car body filler. Even after sanding smooth, the surface can end up quite porous, although the fine easy-sand stuff
is a bit better in this respect.
So you can end up with a surface that like a bare piece of wood does need more work before it can be painted. I use something called
1k stopper which can be obtained from car accessory shops. This is like a fine paste that you just smear on as thinly as possible, straight
out of the tube. It doesn't take long to dry as hopefully you've only applied a fraction of a millimetre in thickness and is very quick and easy
to sand smooth.
The downside is it is quite expensive, but it does go a long way and lasts for years on the shelf.
How far you go with it is up to you. What looks like a nice smooth surface on a dull day may not look quite so nice in blazing direct
sunlight, though the primer coats will also provide a degree of filling up to a point.
The only way to be sure is to fill what you can see and put some primer on. Then hold it up to a very bright light source and see
if it is good enough. If not, reach for the stopper again and repeat until you are happy. | |
|
| | |
James_H
Midshipman
Posts : 62
Join date : 2012-04-01
Age : 52
Location : Amsterdam
| | Subject: Re: Graupner Manhattan 74 Sat May 26, 2012 9:27 pm | |
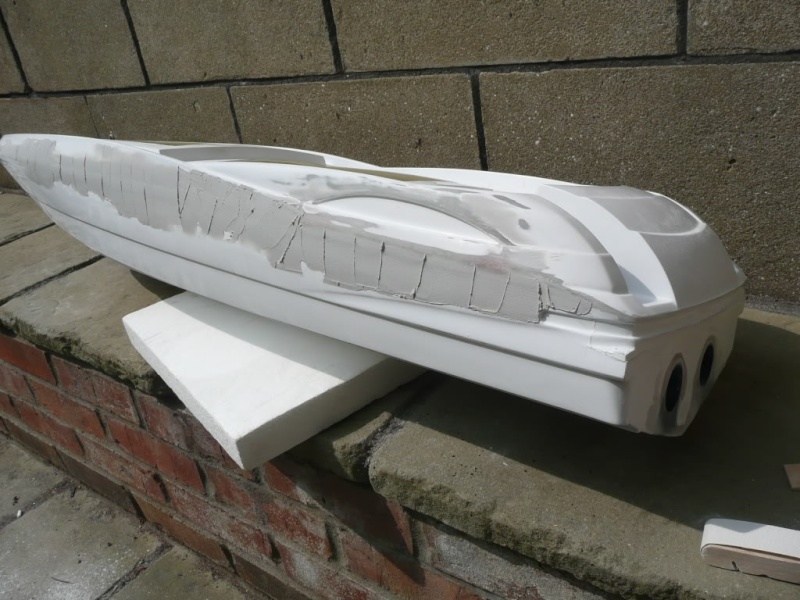
| The filling and sanding continues....... After asking Neil about the benefits of filler-primer I decided to give it a go. I like it. It didn't do everything I could have wished for but it did help considerably. Cheers Neil. Pic1. The first coat is on..... 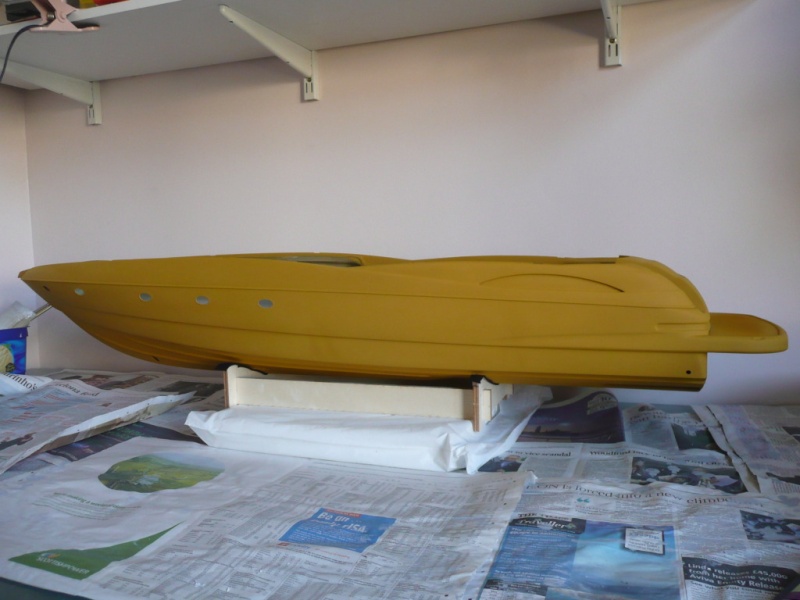 Pic2. ...and I can now see some results for my efforts with the shape of the stern recess and the side crescents are looking better too. 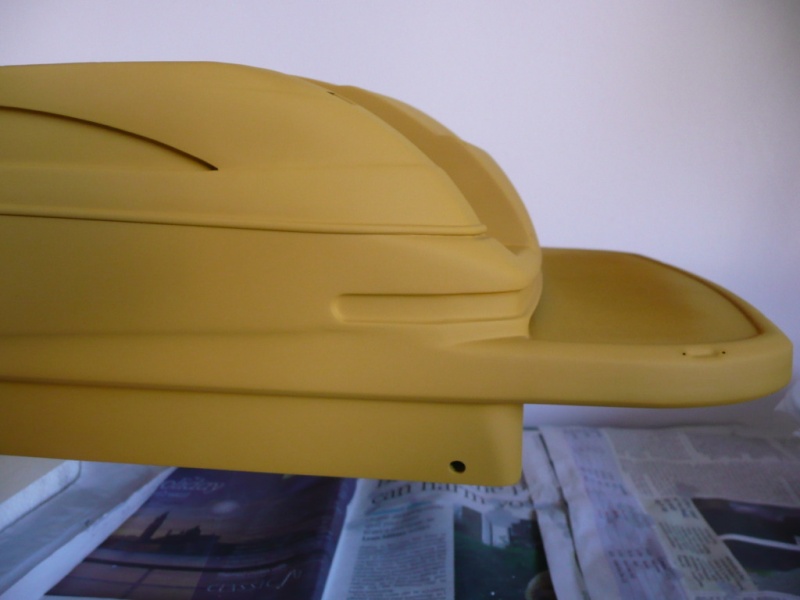 Pic3.  Pic4. 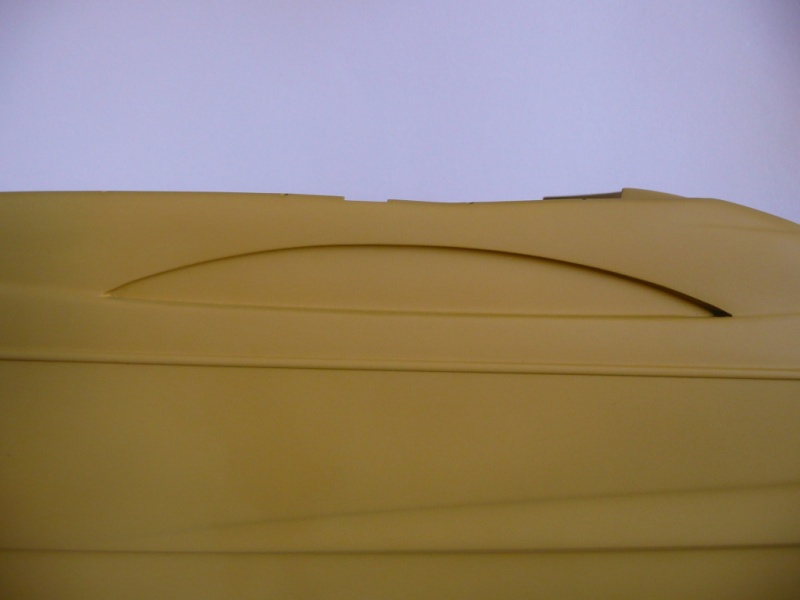 Pic5. 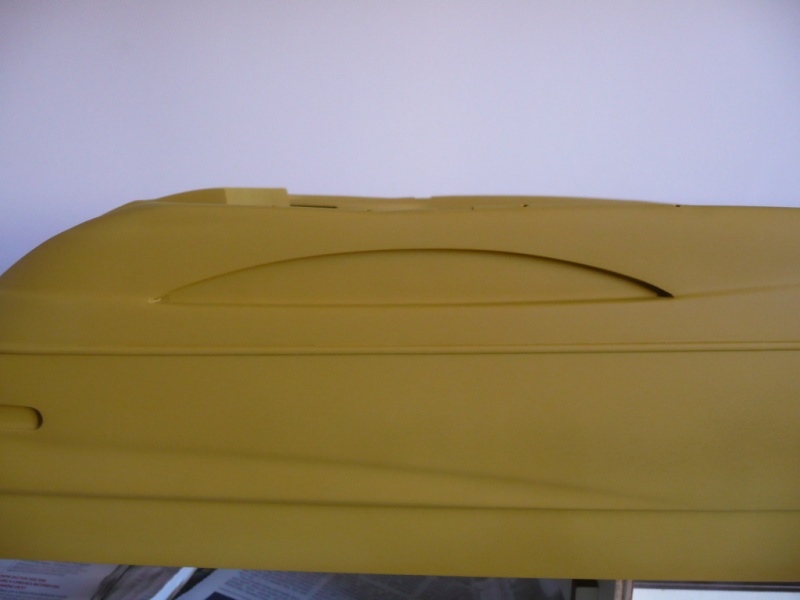 Pic6. Felt some horrible lumps while wet-sanding where I'd stuck the wooden hull-braces. Damn! Had to sand right through to the resin to smooth. Damn again! This is a really long and slow process  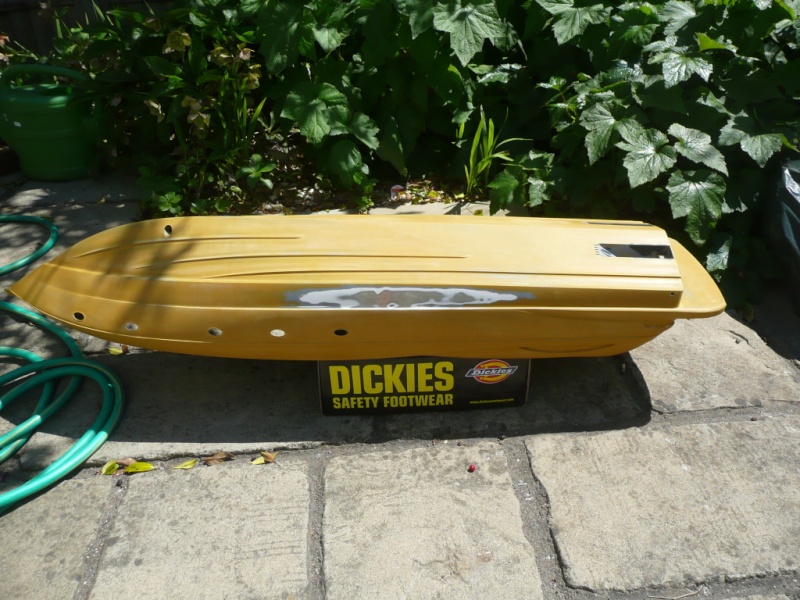 Pic7. Still, the transom is now smooth and so is the bottom of the hull so jet-drive components can be fitted. Dry fitting first. 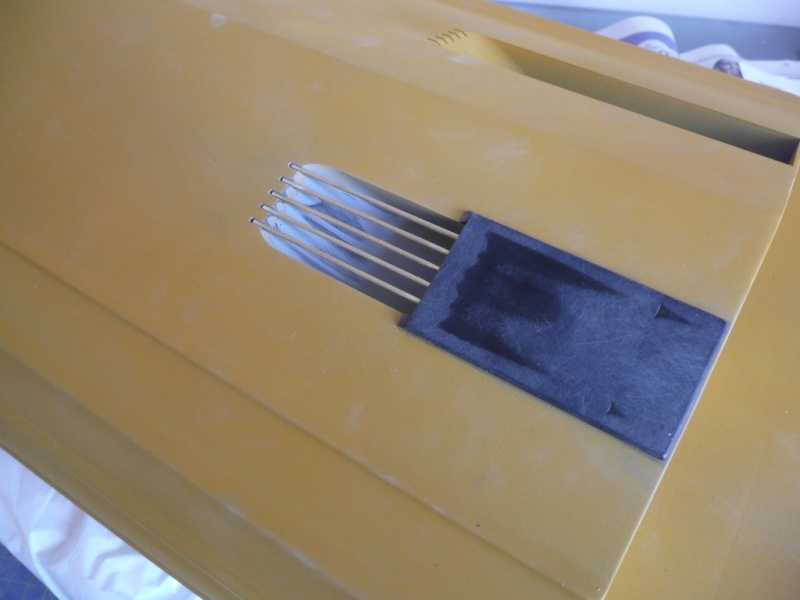 Pic8. Epoxying in the prop-shafts using some tape to keep the epoxy from running off them. 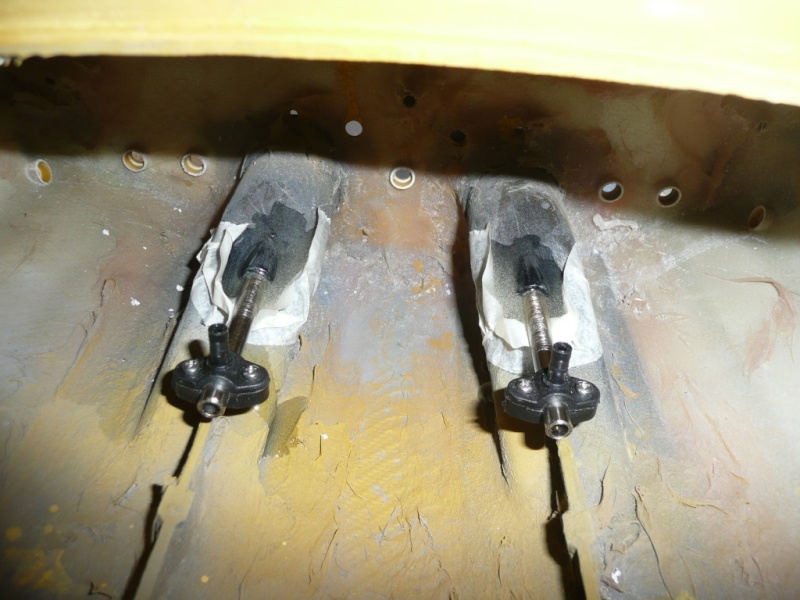 Pic9. Getting the nozzles square.  Pic10. All fitted ready for priming. 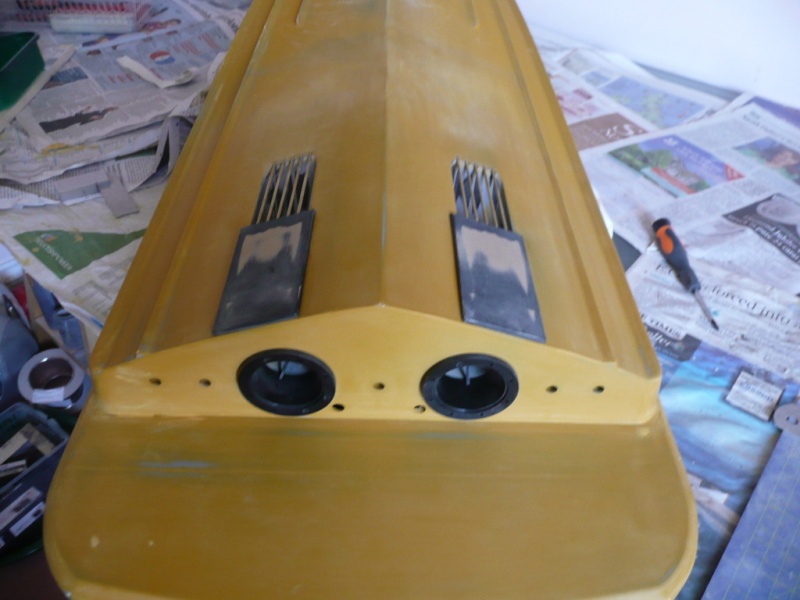 | |
|
| | |
Guest
Guest
| | Subject: Re: Graupner Manhattan 74 Sat May 26, 2012 10:06 pm | |
| that looks amazing, James....... very nice indeed.
neil. |
|
| | |
James_H
Midshipman
Posts : 62
Join date : 2012-04-01
Age : 52
Location : Amsterdam
| | Subject: Re: Graupner Manhattan 74 Tue May 29, 2012 8:52 pm | |
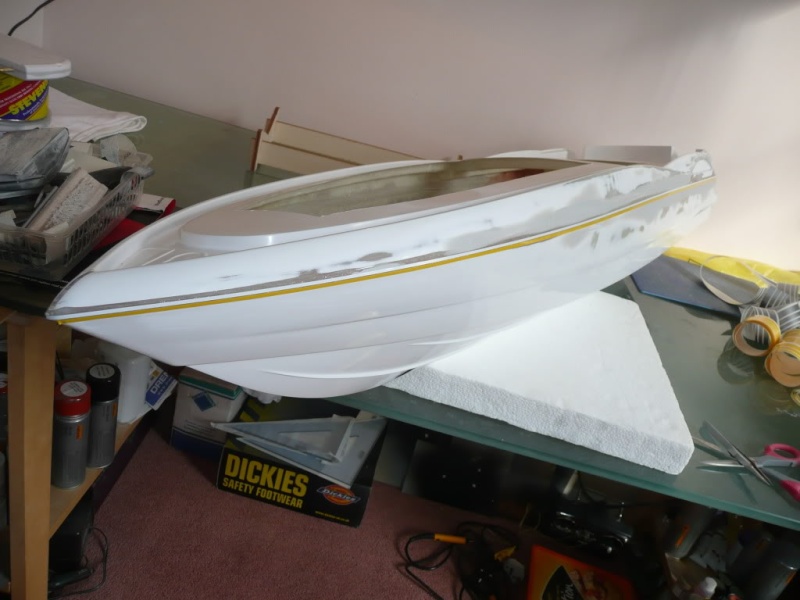
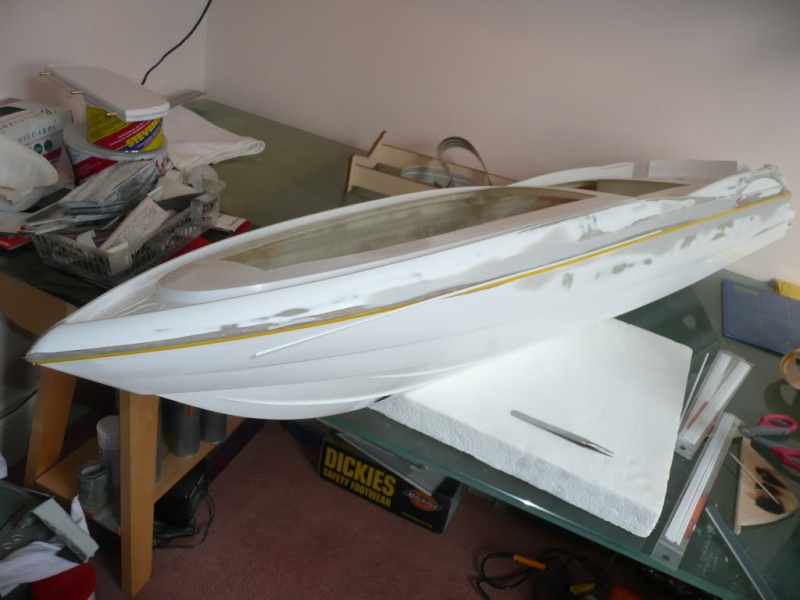
| Thanks Neil. Still not ready for paint though sadly. I really should buy some shares in Halfords what with all the primer I'm getting through. Pic1. Assembling the steering linkage bellows onto the transom tubes. I hope the rubber never perishes because they will be murder to replace. 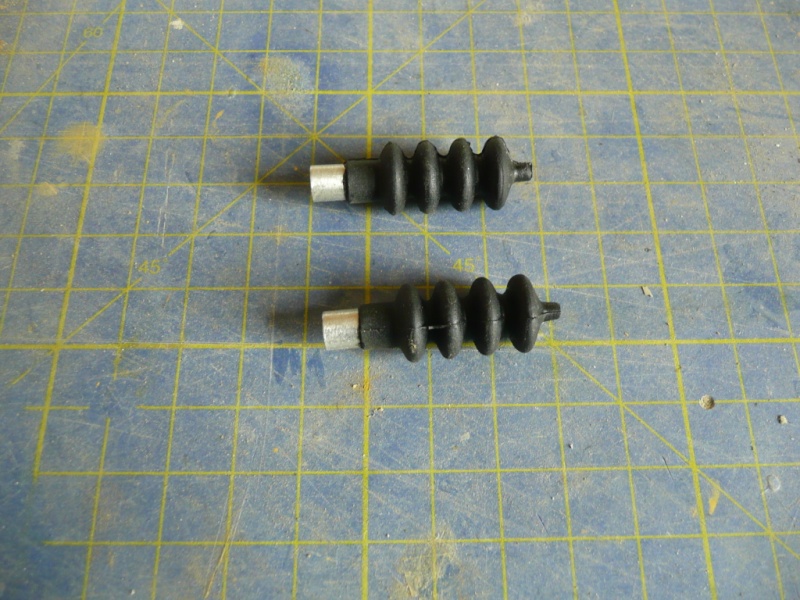 Pic2. Fixing the tubes flush with the transom. The instructions suggest they should protrude by a few millimetres, hope it wont matter! 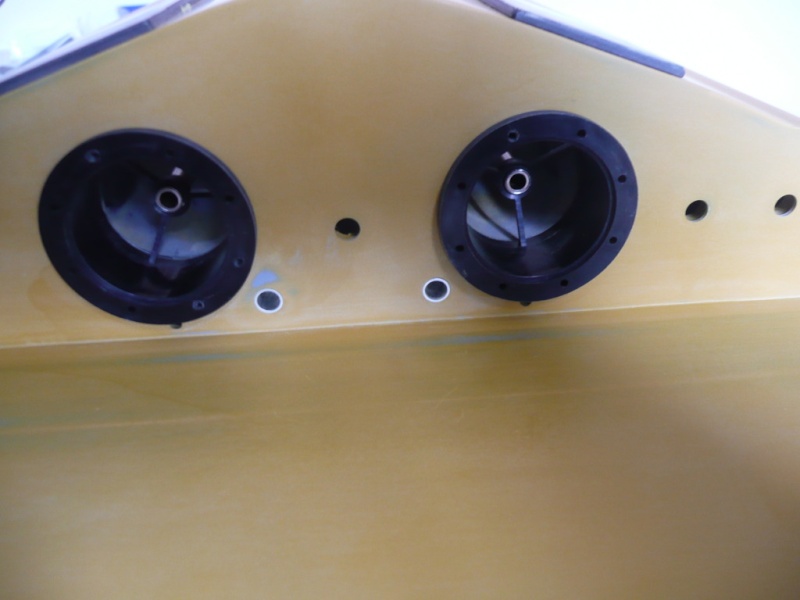 Pic3. Bellows on the inside never to be got at again. 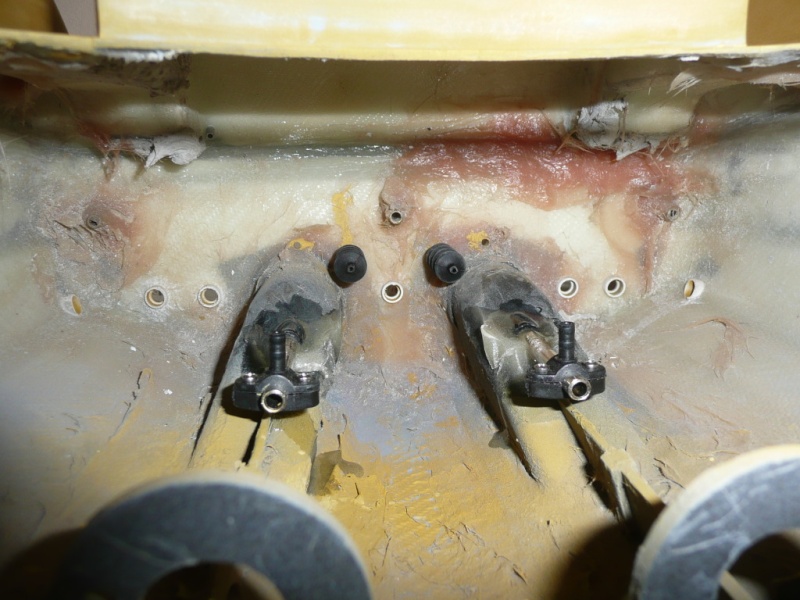 Pic4. Adding the mooring rope tunnel surrounds. They are a bit bigger than the holes but there was not much I could do about that. To avoid problems with using CA on a painted surface I scored it with a knife, filed smooth and wiped over with acetone before gluing. 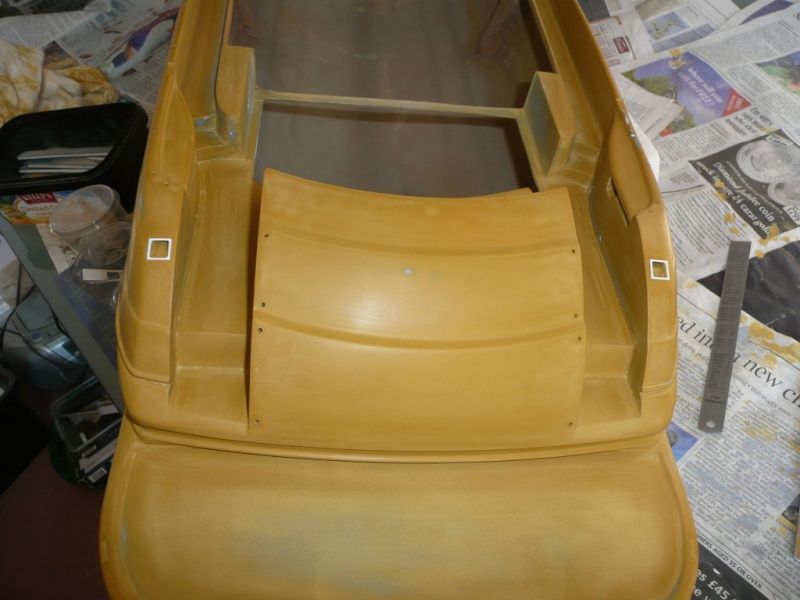 Pic5. And we're back to white again. Hooray! 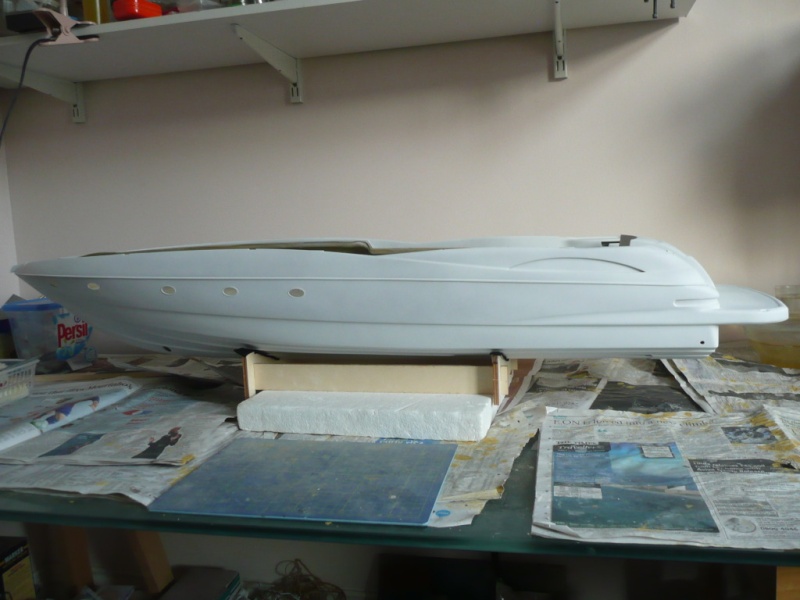 Pic6. Notice how the transom is not quite square to the Jet-drive outlets. I saw that when work first began, but I decided not to do anything about it due to the hassle.  Pic7. Still more filling needed [sigh]. Difficult to see in my rubbish photo, but the lower left inner-edge of the rope tunnel needs attention.  Pic8. The consequences of removing the gel-coat. See what looks like a couple of pin-holes around the light fitting in the centre of the pic. One 2cm above and another just to the left and slightly below. Honestly! Sometimes it feels like as I fill and sand one area, an army of ants is munching holes somewhere else. 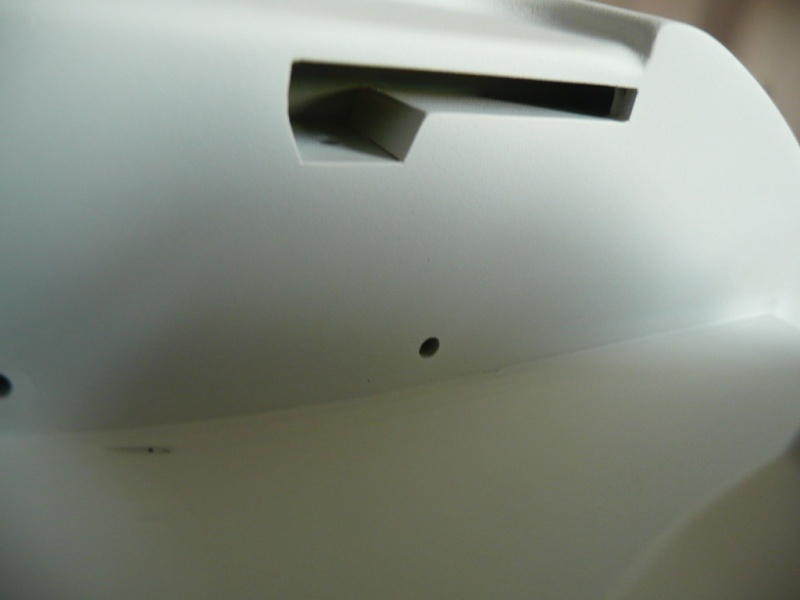 So I'm now, what, on my fifth coat of primer at £7.50 a pop for a very thin coat (500ml tin). There will be at least another 2 coats required before first top-coat goes on. This boat is really pushing the limits of my wallet and patience. I hope she's going to be worth the effort! Now where did I put my favourite white jacket with the extra, extra long sleeves  | |
|
| | |
James_H
Midshipman
Posts : 62
Join date : 2012-04-01
Age : 52
Location : Amsterdam
| | Subject: Re: Graupner Manhattan 74 Sun Jun 10, 2012 9:06 am | |
| Well I fancied a bit of respite from the perpetual filling and sanding routine, so I thought I'd get on with the domestic spot-lights in the hull. I wanted to fit these before the final colour-coat as they would have to be fitted from the outside and so there was a chance I would make a mess with the glue and have to tidy it up. I'm glad I did too, because some of the sockets broke out of the hull when I was trying to sand out the primer that had reduced their size somewhat and repairing them now was better than doing it later. As with the equipment-mast these are the 1.8x0.8x0.8mm warm white ultra-bright type. 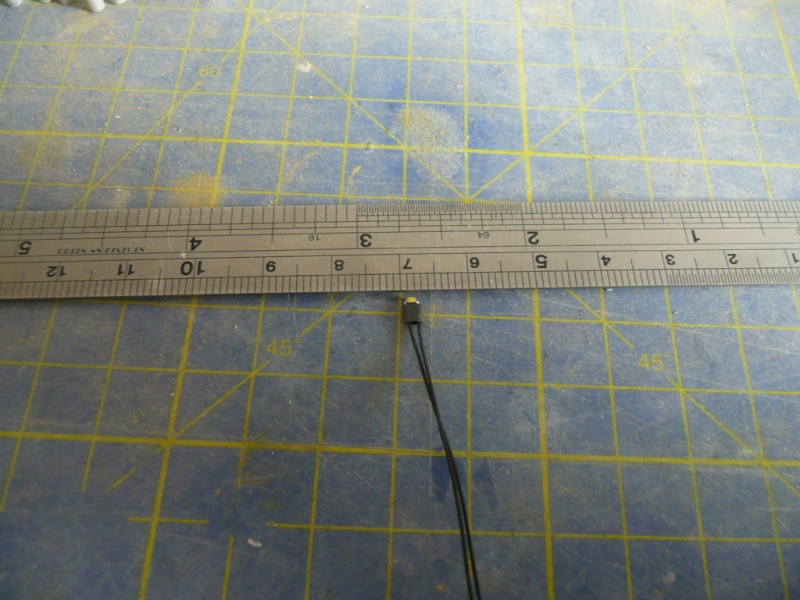 3mm aluminium tubes cut off to approx 4mm are to represent the chrome surround part of the lights. 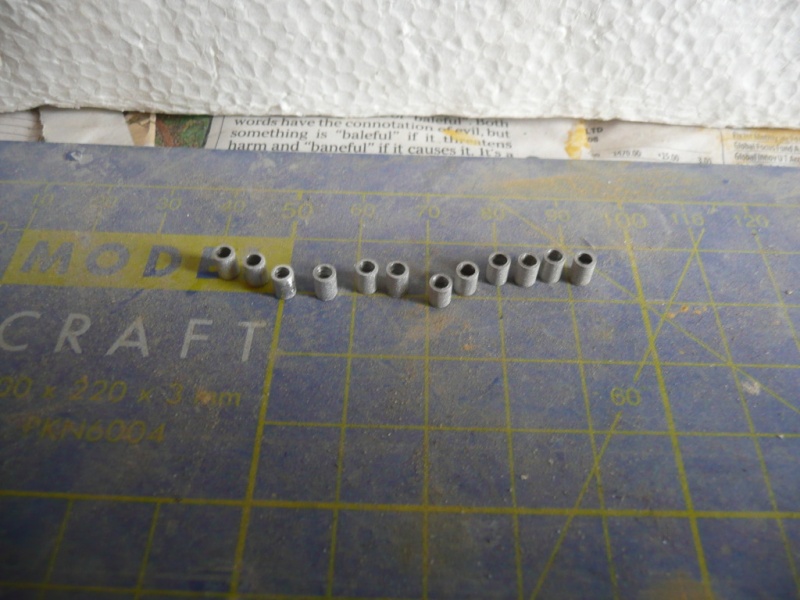 A length of 2mm fibre-optic is then pushed through the outer tube to represent the lens, and the LED is glued to the back of this with CA. I later removed the small piece of heat-shrink from the LED so that the CA could completely surround it for a more robust join. ( I still had several break on me during fitting tho') 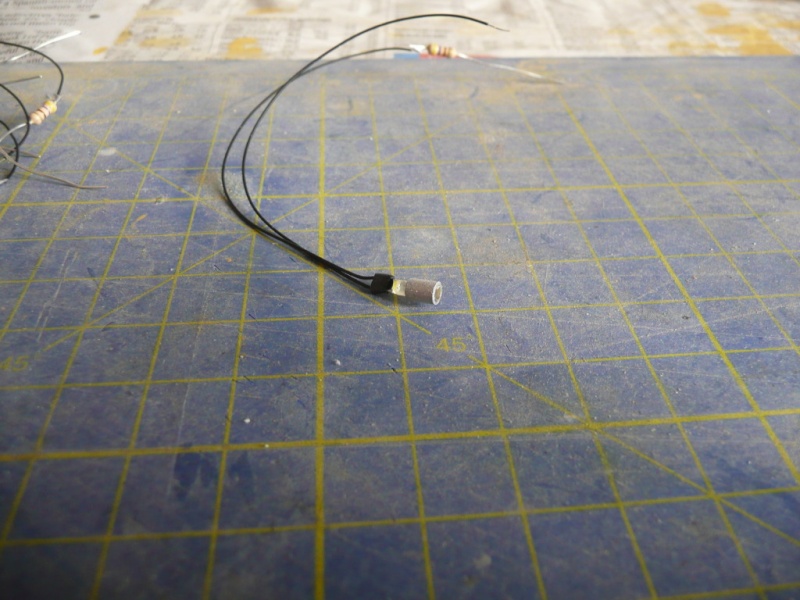 All completed, very fiddly they were too. 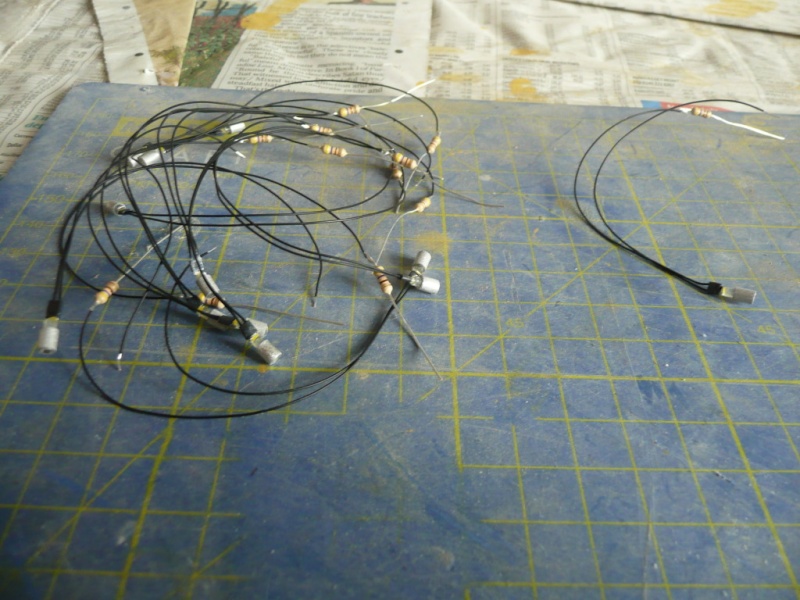 As I couldn't really rely on a white hull to stop light-soak I thought I'd better put some matt black paint on them now. Masked off..... 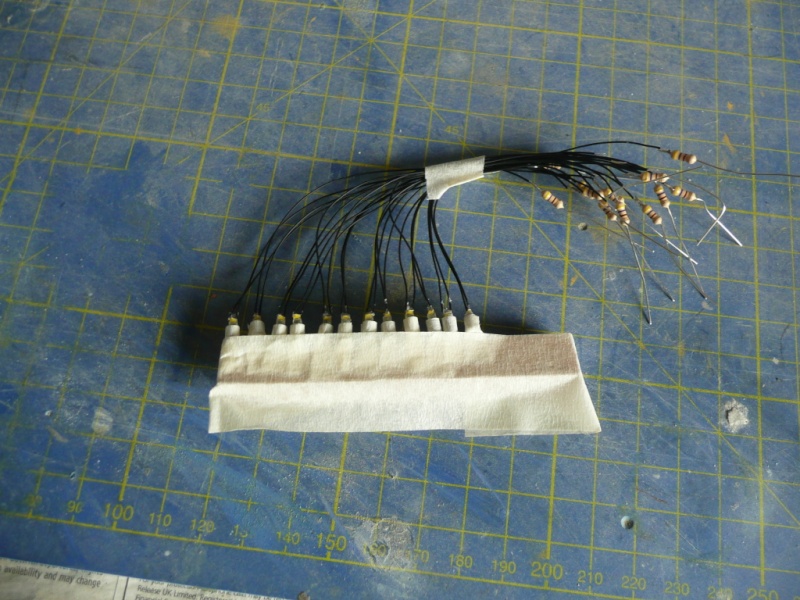 .....and ready to fit. 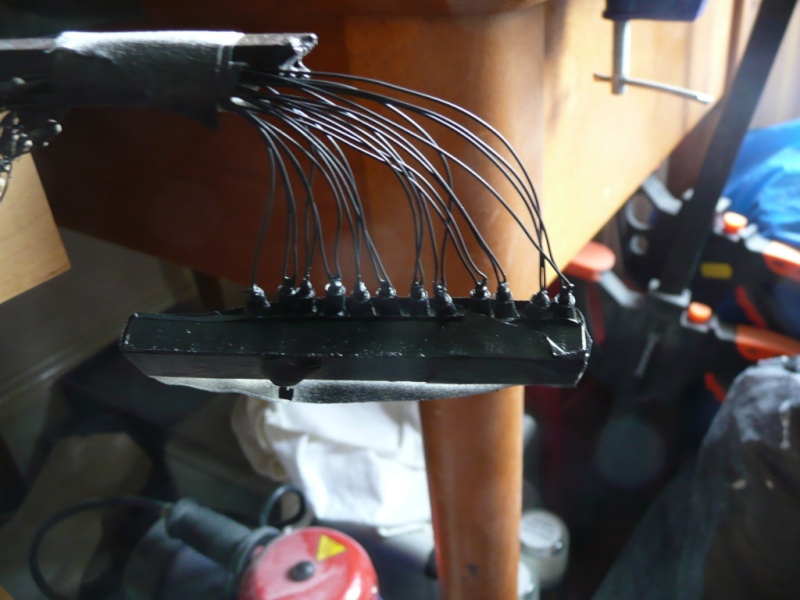 After fitting I thought it might be a good idea to sand them down to something close to their final size to make for less work later when the top-coat is on. The idea is to paint them over, then use a thickness template like the one in the next pic, but a bit thinner, to sand off the paint and leave what hopefully will look like a domestic spot-light fitting about 0.5mm proud of the hull. 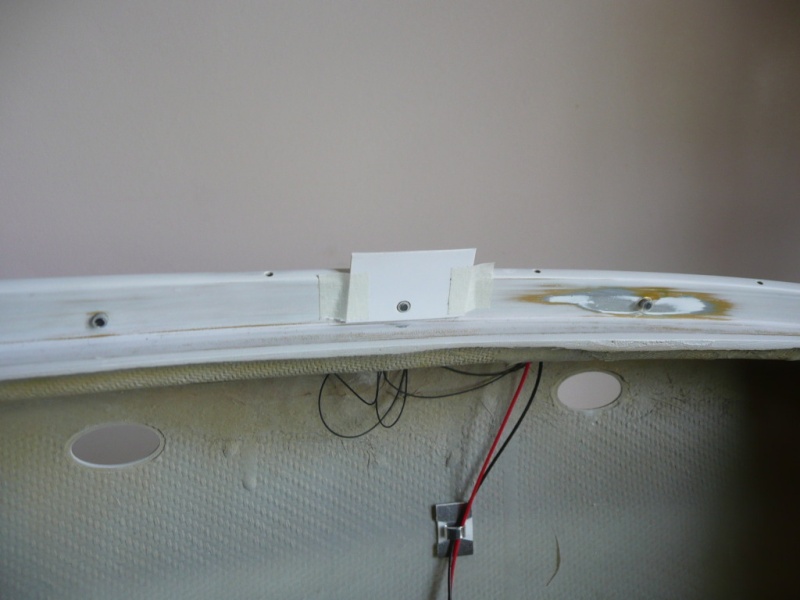 Checking they all work.......and they do, hooray! 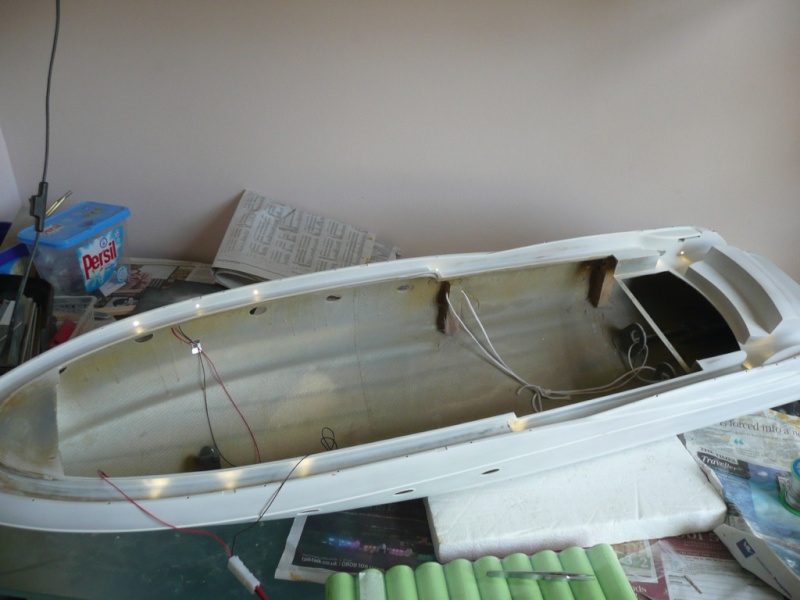 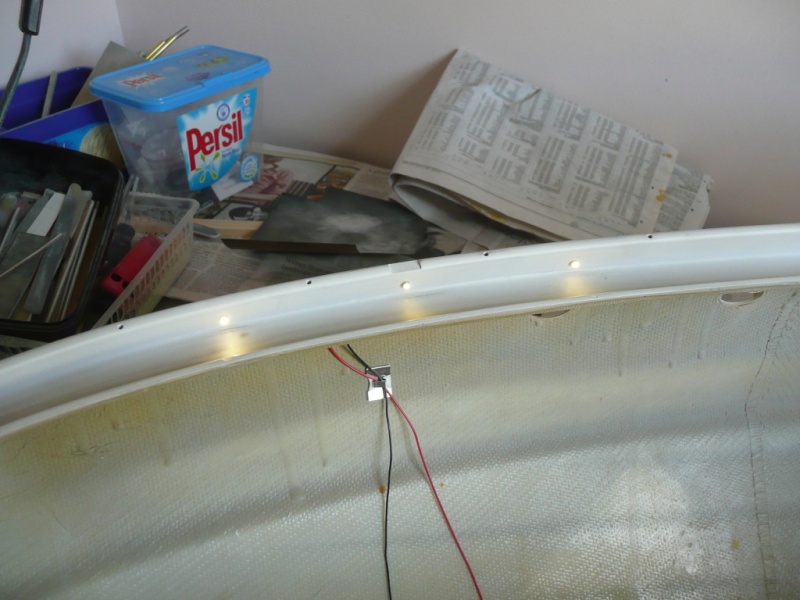 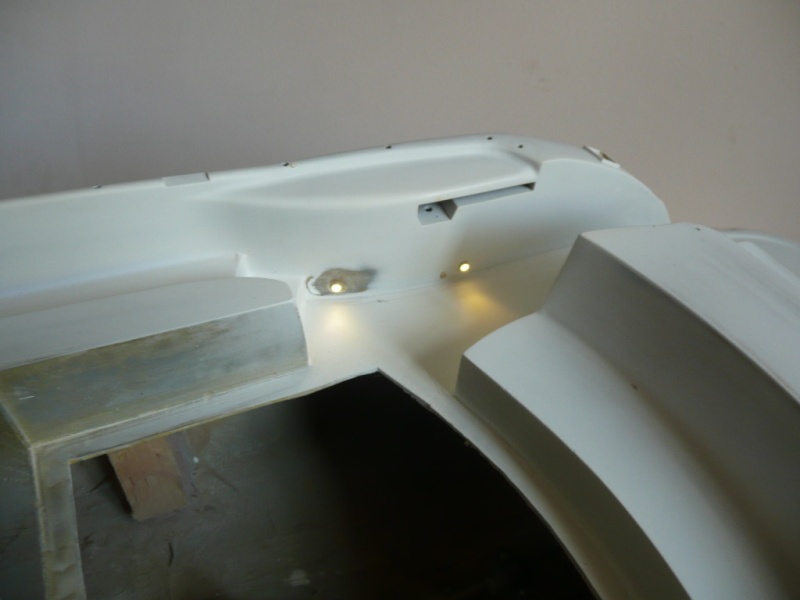 And so, respite concluded, it's back to the grind. One more coat of primer.......getting better  The lights now painted over. They will now stay this way until right at the end when a light sanding should reveal a nice light (hopefully). 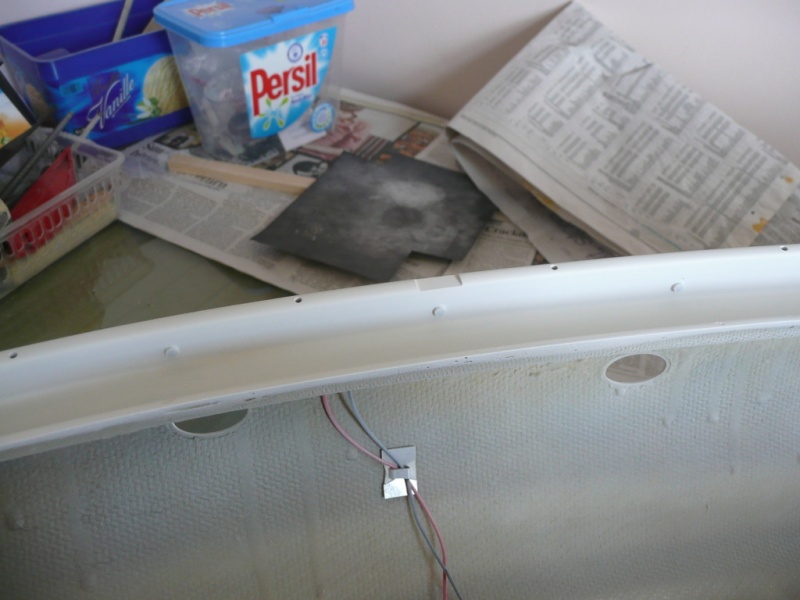 | |
|
| | |
Sponsored content
| | Subject: Re: Graupner Manhattan 74 | |
| |
|
| | |
| | Graupner Manhattan 74 | |
|