TheRcModelBoatForum.com
Please login using your username and password to use the forum.

If you do not have an account please register to participate, it’s free!
TheRcModelBoatForum.com
Would you like to react to this message? Create an account in a few clicks or log in to continue.


https://www.thercmodelboatforum.com/
 
HomeHome  PortalPortal  Latest imagesLatest images  RegisterRegister  Log inLog in  


 Bigg's Take on the Q1 Mini Tug!

Go down 
3 posters
AuthorMessage
Biggs Darklighter
Deck Hand
Deck Hand


Posts : 13
Join date : 2020-05-01

Bigg's Take on the Q1 Mini Tug! Empty
PostSubject: Bigg's Take on the Q1 Mini Tug!   Bigg's Take on the Q1 Mini Tug! EmptySat May 09, 2020 5:28 am

Those who know me, know I have a problem, I can't leave well enough alone.  No car I have ever owned (and there are at least two dozen) has left my possession "stock".  I rarely build an RC model, and leave it "stock" as designed.  Sometime, but rarely.  Sometimes my crazy ideas work, sometimes not.  This won't be a boring exception.  drunken

So I am claiming this is a "practical" build.   jocolor   I need, well this is my excuse, a rescue boat for my sailboats.  I have yet to get one stuck I couldn't get back, eventually.  But it might happen someday, right?  Yeah, so my sailboats are all a lot bigger than this little tug, so I need to overpower it.  And I don't want an exposed prop to tangle with any lines that might be in the water.  And if things go sideways enough to need this little guy, a good chance there will be lines in the water...  If a mast or shroud breaks, I may also have sails in the water.  And many of those easily cost more than one of these little tugs.    
So the obvious solution, is to put a jet prop unit in it.   bom   And for good measure, I will likely go brushless too!   tongue  bounce

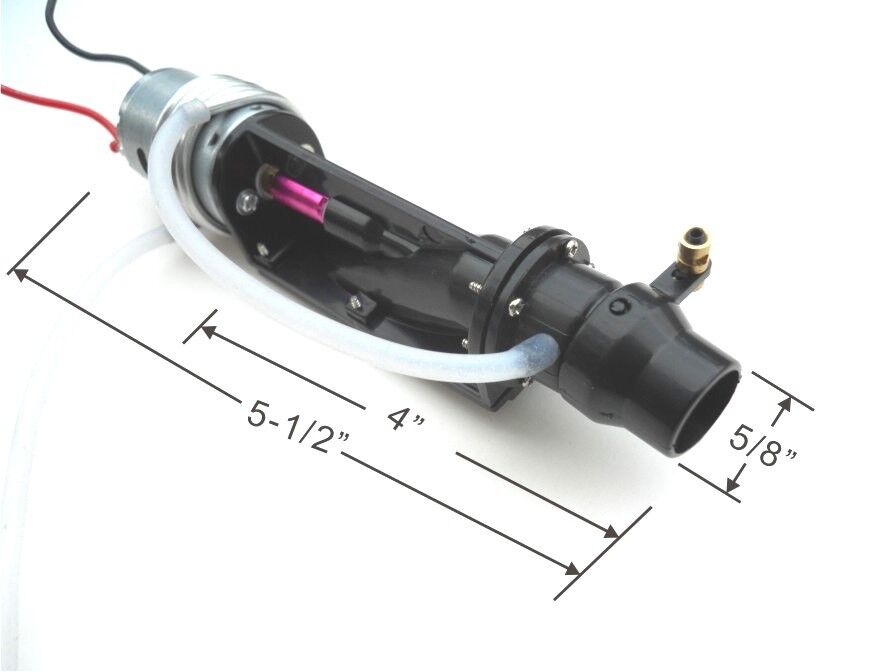
At a glance, it will fit.  The measurements look promising.  Where it will get interesting is in the back.  The stern issn't thick enough, so I will be dropping the hull down into a sorta v configuration to get enough draft/depth for the unit.  I grabbed an LK 2016 unit with brushed motor and the water-cooling coil.  Without the brushed motor and buying the cooling coil, I was only saving $3.  So I grabbed the whole deal, $3 is worth the option to go either direction.  If room is too tight, I can possibly get away with one of the small brushed ESC I use for my 1/12 crawlers.   

The jet-drive arrived Monday.  The boat was supposed to have arrived on Tuesday, it didn't...  It looks like it will be here this coming Monday though.  Actually it arrived in town noon today, so maybe I get lucky and it goes out on the delivery route tomorrow!?!  

Since out of the box the plan is to do "dumb things" to this little guy, I probably won't use the actual kit for this build (or maybe build both side by side).  Instead, I am going to scan and import all of it into Design Space.  Including the abs cabin.  This gives me flexibility to also quickly adjust the size, if I decide I have to build it bigger.  We will see what I have on hand to use for materials, but likely I will just use balsa.  I will employ a sneaky trick I use for sailboat building to strengthen it, without using fiberglass!  Building this with balsa will get a boat in the water FAST too!  I think I can cut up to 3mm lite ply with my Cricut Maker though.  So I will see.  Obviously a lot of the scale parts will be missing this way       

I may NEED to build both.  A rescue tug to rescue the rescue tug... scratch

The jet drive version probably won't be super scale detailed.  But it will get lights!  I have a cool emergency blue flasher on the way and a led light controller set for boats sitting the shelf.  

I will leave you guys with that for now!  I am going to cheat and snag some stock pictures off the eBay sellers, since they do that to everyone else anyways.  And I am too tired to grab a real camera and go clear a spot on the workbench for a boring picture of a jet drive unit...  (I grabbed a white one though.)  

Bigg's Take on the Q1 Mini Tug! S-l1600

Bigg's Take on the Q1 Mini Tug! S-l1600

Bigg's Take on the Q1 Mini Tug! S-l1600
Back to top Go down
Biggs Darklighter
Deck Hand
Deck Hand


Posts : 13
Join date : 2020-05-01

Bigg's Take on the Q1 Mini Tug! Empty
PostSubject: Re: Bigg's Take on the Q1 Mini Tug!   Bigg's Take on the Q1 Mini Tug! EmptyTue May 12, 2020 5:38 am

Cool, all my parts are here now!  I cleared the shop workbench off and snagged some pictures.  For the $70 spent, I am super impressed with the kit.  It came VERY well packed and is super complete.  It even came with an unexpected ESC for the dinky little motor! 

As mentioned, before I touch this kit I want to digitize it and save it.  So the first problem is, I need a size reference.  This is a problem I have come across multiple times when working with various digital plans.  PDF's never scale right.  While there is software out that that is supposed to fix this, it never works perfectly either and there is no one digital solution that is simple to use to verify, convert, and fix these various issues.  And FORGET it if you decide to change the scale.  The older Adobe Master Collection or whatever it was "probably" could fix this all in house, but it was far from easy to do.  I refuse to pay for the new subscription based stuff when I use it so irregularly.  Anyways trying to fix this with software is a battle I have fought enough times and wasted hours researching, that I have given up on manipulating these digitally.  Unfortunately part of the process is still, digital.  

So the process either starts with a digital plan, or making the file.  In this case I am scanning the wood and ABS sheets in on my flatbed scanner, saving to the laptop, then uploading those scans to Design Space.  Next I decide deciding on the cut lines vs draw ones.  I can hide lines too if I want.    Between the scanned file and opening that in Design Space, I have already lost a size reference.  While it is super easy to resize it in DS, I have to either know the measurements of parts on each sheet, or have a known "artifact" scanned into each each image.

The artifact method is the easy way.  You create an item of a known dimension, say 100mm x 100mm, and set that on or next to each sheet being scanned.  My flatbed is big enough I will probably use a large (compared to the model) 100mm square off to the side.  Yes, I am American, and yes I prefer to use the metric system for stuff like this.  MUCH easier to scale and adjust.  I seem to remember stumbling across a special trick rectangle that was perfect for figuring out if a drawing had scaled correctly.  Digging around finds references to the Golden Rectangle, and the 3:5 rectangle.  I need to figure out if either of those is more useful than a simple 100x100 square.  

So after seeing this tiny motor next to the brushed jet motor, and realizing I am likely swapping that out for brushless... I think it would be smarter to use the plywood hull for the jet mods.  The small stocker won't overpower a lightweight balsa hull.  

Bigg's Take on the Q1 Mini Tug! Img_6414
Bigg's Take on the Q1 Mini Tug! Img_6411
Bigg's Take on the Q1 Mini Tug! Img_6410
Back to top Go down
Biggs Darklighter
Deck Hand
Deck Hand


Posts : 13
Join date : 2020-05-01

Bigg's Take on the Q1 Mini Tug! Empty
PostSubject: Re: Bigg's Take on the Q1 Mini Tug!   Bigg's Take on the Q1 Mini Tug! EmptyTue May 12, 2020 5:51 am

The jet drive looks like it is going to be a lot easier to fit than I thought.  I got a lot of room in front of it.  

Bigg's Take on the Q1 Mini Tug! Img_6417
Bigg's Take on the Q1 Mini Tug! Img_6415
Bigg's Take on the Q1 Mini Tug! Img_6416
Back to top Go down
Tugs
Deck Hand
Deck Hand


Posts : 3
Join date : 2020-04-12

Bigg's Take on the Q1 Mini Tug! Empty
PostSubject: Re: Bigg's Take on the Q1 Mini Tug!   Bigg's Take on the Q1 Mini Tug! EmptyThu May 14, 2020 11:44 am

Do you think that it is going to  be underpowered????? lol!
Back to top Go down
Biggs Darklighter
Deck Hand
Deck Hand


Posts : 13
Join date : 2020-05-01

Bigg's Take on the Q1 Mini Tug! Empty
PostSubject: Re: Bigg's Take on the Q1 Mini Tug!   Bigg's Take on the Q1 Mini Tug! EmptyFri May 15, 2020 5:40 am

Possibly...  Hence possible contingency plan to swap in a brushless motor and esc!  tongue  Good news is, I should need less ballast with the jet drive in either configuration.   Twisted Evil 

If it ever gets called into actual rescue service though, I have some big boats.  One will be about 25lbs or 11kg.  And this is the weight without sails in the water or a flooding hull.  

With my sailboats/yachts, a displacement weight is usually known.  A lot of the designs will go as far as to have a detailed weight budget with the "cost" of materials pretty closely known out the gate.  A scale is commonly used during building, especially on the smaller ones.  

I wish I knew even a ballpark on this little guy....  I may have to build that second hull up first just to get an idea of the total displacement.

Some progress, got the reference template designed, just need to dig out materials and toss it on the Maker.
Back to top Go down
Biggs Darklighter
Deck Hand
Deck Hand


Posts : 13
Join date : 2020-05-01

Bigg's Take on the Q1 Mini Tug! Empty
PostSubject: Re: Bigg's Take on the Q1 Mini Tug!   Bigg's Take on the Q1 Mini Tug! EmptyFri May 22, 2020 8:27 pm

Newbie question...  I am not used to working with plastics.  Since I am templating the whole boat, I could avoid this I guess, but what would I use for the white plastic bits?  MEK?  Cyno?  Do I use something different to attach them to the wood parts?  

For most of my wood boat building, I use Cyno.  Sometimes, I will use aliphatic for planking.  For vintage work I have even tried hide and casein glues.  I used epoxy a lot building planes, but not recently for boats.
Back to top Go down
barriew
Captain (moderator)
Captain (moderator)


Posts : 2624
Join date : 2011-11-26
Age : 83
Location : Thaxted, Essex

Bigg's Take on the Q1 Mini Tug! Empty
PostSubject: Re: Bigg's Take on the Q1 Mini Tug!   Bigg's Take on the Q1 Mini Tug! EmptySat May 23, 2020 6:12 am

For the plastic to plastic in the UK we would use a liquid polystyrene glue such as Revell - MEK is not easily available here. For plastic to wood, cyno or epoxy would be my choice.

Barrie
Back to top Go down
Sponsored content


Bigg's Take on the Q1 Mini Tug! Empty
PostSubject: Re: Bigg's Take on the Q1 Mini Tug!   Bigg's Take on the Q1 Mini Tug! Empty

Back to top Go down
 
Bigg's Take on the Q1 Mini Tug!
Back to top 
Page 1 of 1
 Similar topics
-
» Biggs Darklighter saying hello!
» Mini Puffer
» Chinese Mini Tug
» Chinese mini tug- Q3!
» Fancy a Mini Bandsaw

Permissions in this forum:You cannot reply to topics in this forum
TheRcModelBoatForum.com :: The Slipway :: Active Build Blogs!-
Jump to: