|
| | Chinese mini tug- Q3! |  |
| | | Author | Message |
|---|
Roadrunner
Forum Overlord


Posts : 1714
Join date : 2011-06-10
 |  Subject: Chinese mini tug- Q3! Subject: Chinese mini tug- Q3!  Wed Apr 01, 2020 9:25 pm Wed Apr 01, 2020 9:25 pm | |
| I’ve seen a few people build the chinese mini tug kit recently and it looks to be a great little kit, so I went on eBay and there it was the kit a lot of people are doing... I scrolled down and sadly everywhere thy at sold it they were all out of stock...  I kept scrolling down the page and anyone who uses the eBay app like me knows there is a similar item section close to the bottom which is where I spotted this chinese tug kit called the Q3 one kit I’ve not seen anyone else build yet.. so I figured for the grand total price of £45 to buy it... it arrived today 3 weeks after ordering... from China.... hopefully not Convid19 infected (unlikely the way it was packed in shrink wrap cellophane) So I figured since the kids are driving me batty and won’t let me to the workshop for long periods I only get an hour or so in the evenings at the moment to myself I thought I would try this kit since I’m unable to dedicate long periods to my current projects, this ones also small enough that the mrs will let me build it in the house on the dining room table! So as per eBay I had a few options in kit and parts, so I ordered the base wood pack and the window set, I left off the running gear as I like having better options, and now the ability with the lathe to make up custom shafts etc... This boat unlike the other Chinese kit running around is designed to take a 2208/2212 kv brushless motor! And if you have seen this on eBay there is a cracking photo of this flying out of the water quite literally!!!!!!! So for those who enjoy my custom builds let see what I can make with this kit!    | |
|   | | Roadrunner
Forum Overlord


Posts : 1714
Join date : 2011-06-10
 |  Subject: Re: Chinese mini tug- Q3! Subject: Re: Chinese mini tug- Q3!  Wed Apr 01, 2020 9:33 pm Wed Apr 01, 2020 9:33 pm | |
| The box arrived very well packed, the box itself with the parts in was contained in a much larger box covered in foam wrapping and the foam penuts, as you can see from the photos the actual kit box was undamaged, and shrink wrapped, really well done for that, the parts are perfect ( as in not damaged) opening the box the wood parts again shrink wrapped, so no warpage so far on a quick look, and there is a chinglish set of instructions but with a lot of colour photos which will help decipher some of the language issues I hope. As you can see from the parts I have all the wood parts laser cut and a base board, the plastic card windows and Perspex glass, mast material, and a set of what I think are water slide transfers. I’m not sure if a stand is included in the wood parts until I have a look through, but making a stand isn’t really a big deal... So let’s get on with it!!!  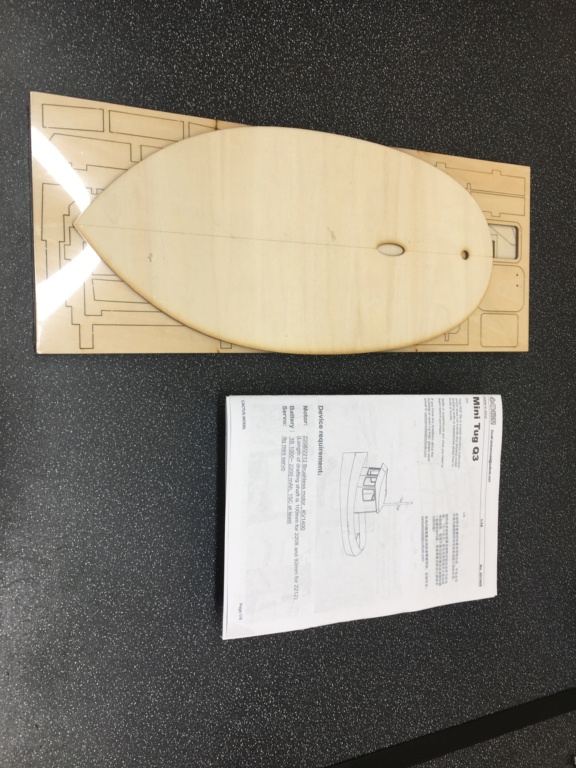 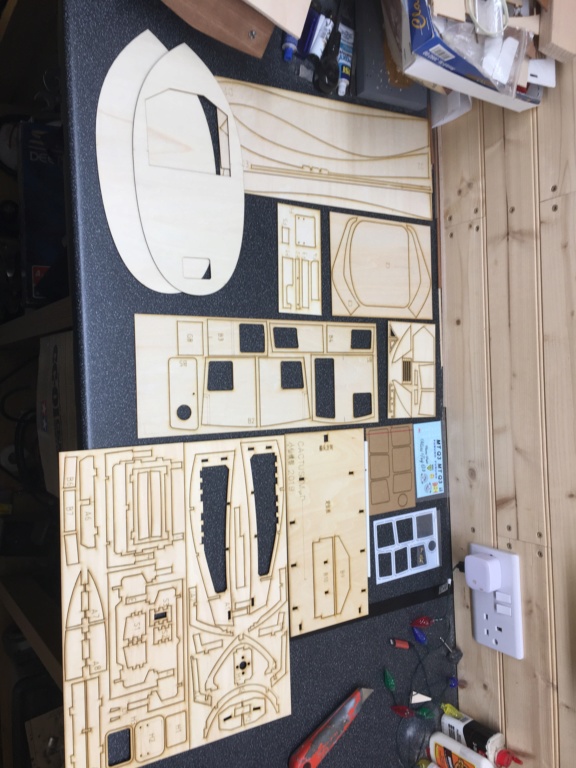 | |
|   | | Roadrunner
Forum Overlord


Posts : 1714
Join date : 2011-06-10
 | |   | | T33CNO
Gunner

Posts : 152
Join date : 2020-03-14
Location : Leeds
 |  Subject: Re: Chinese mini tug- Q3! Subject: Re: Chinese mini tug- Q3!  Wed Apr 01, 2020 11:23 pm Wed Apr 01, 2020 11:23 pm | |
| Unfortunate indeed  . The images on eBay certainly look symmetrical so perhaps a one off cock up. https://www.ebay.co.uk/itm/Set-DIY-Model-Q3-Mini-Tug-1-18-Harbor-Tug-300-Mm-RC-ABS-Wooden-Ship-Kit-Gift/153865699852?hash=item23d31c420c:g:F5UAAOSwk8RebjP7 | |
|   | | Roadrunner
Forum Overlord


Posts : 1714
Join date : 2011-06-10
 |  Subject: Re: Chinese mini tug- Q3! Subject: Re: Chinese mini tug- Q3!  Thu Apr 02, 2020 12:44 am Thu Apr 02, 2020 12:44 am | |
| I’ve corrected one side almost perfectly to fit the frames correctly, I have to tidy up some of the cut angles as they are oversize slightly... but as you can see from the frame mock up of one side all the frame parts for that side now sit exactly where they are suppost to be in conjunction with other parts, now all I have to do is make up the other side.... Sigh this is a bit of a ball ach to be honest as one side was higher and one lower so both needed adjusting.... The fix was easy enough after working out which part sits where and where each part sits with each other, it was simply a matter of marking up the difference on matching ply size offcuts and supergluing them to the frame once dry I coated the seam with superglue and bicarb to make a thick paste and sanded smooth.... I will look to reinforce the joints as I progress ( probably use some 0.5mm veneer on one side to strengthen and keep everything tidy) but right now the parts are pretty tough! I really am hoping that’s the last of the error on this kit... to much of it and I’ll be remaking entire parts to fit! 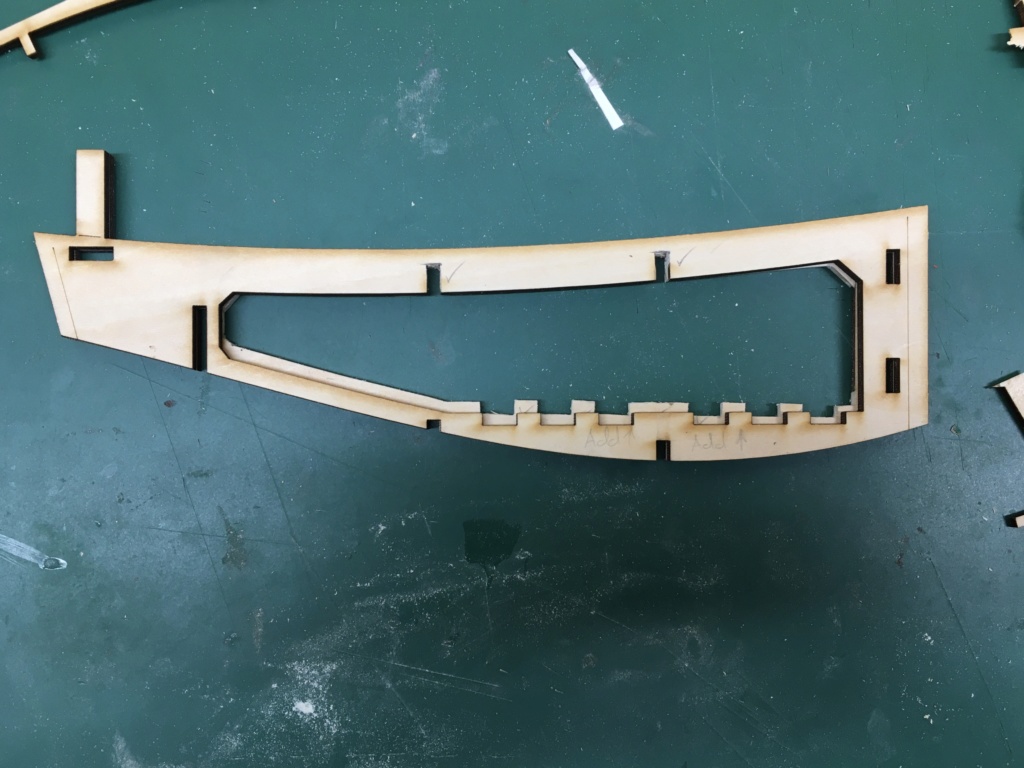 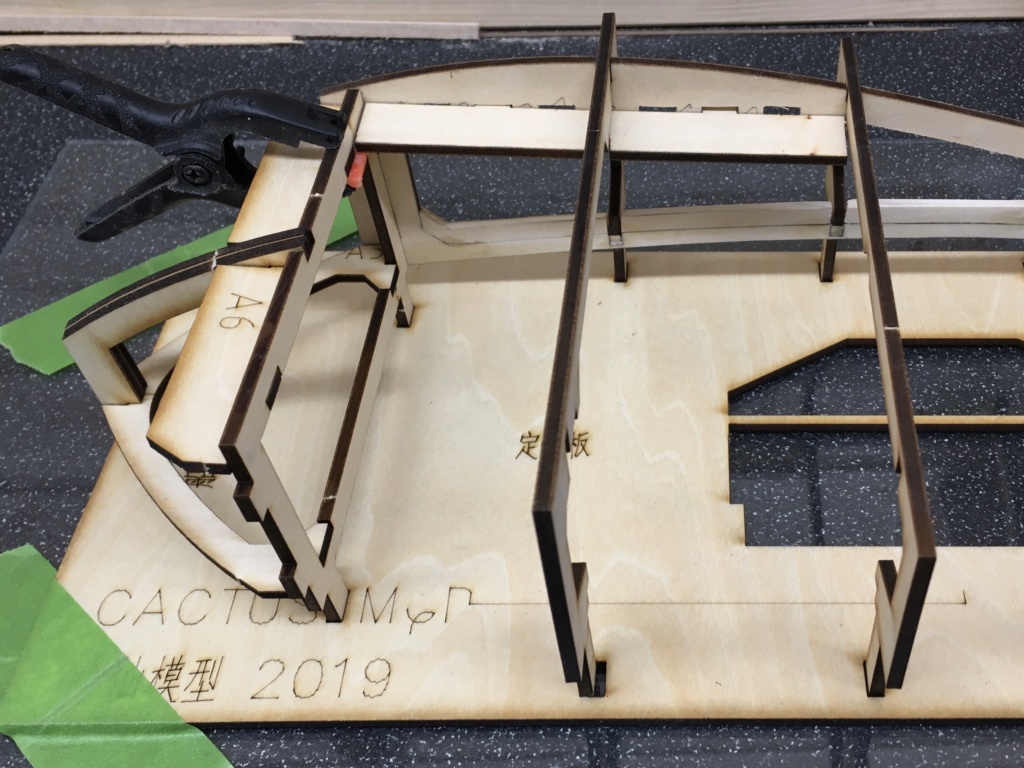 | |
|   | | Roadrunner
Forum Overlord


Posts : 1714
Join date : 2011-06-10
 |  Subject: Re: Chinese mini tug- Q3! Subject: Re: Chinese mini tug- Q3!  Thu Apr 02, 2020 1:48 am Thu Apr 02, 2020 1:48 am | |
| And finally at almost 2am... both side frames are now spot on, I’ll clean up everything tomorrow once the glue has fully cured and work out where and if I need some reinforcement in those areas.. 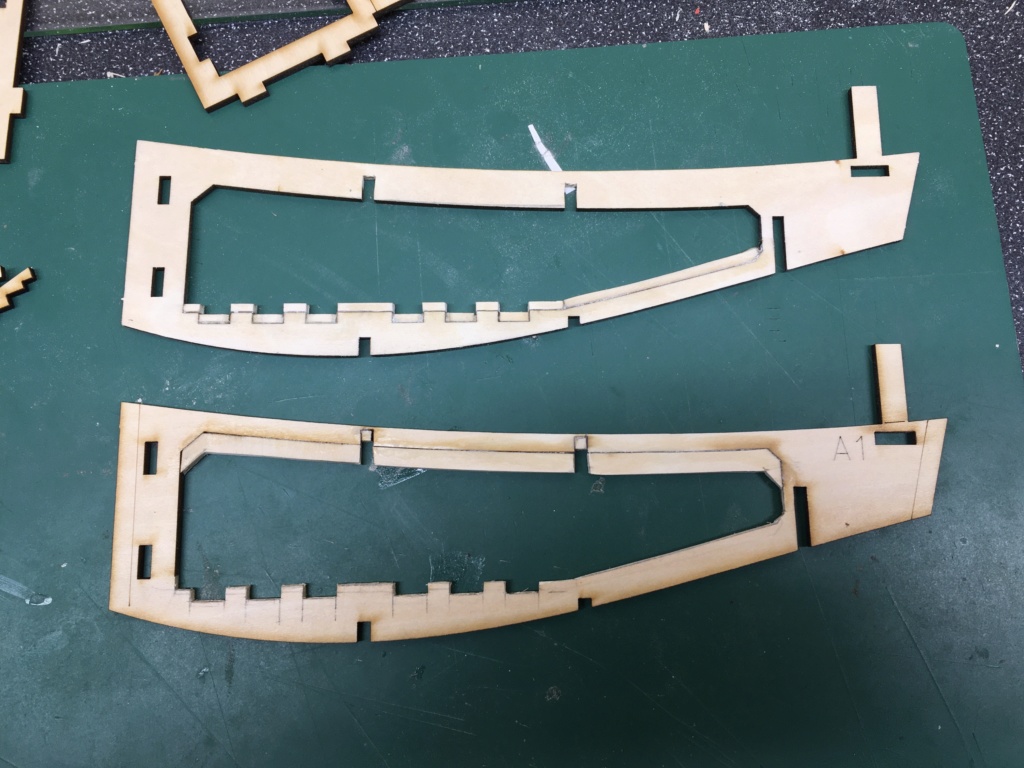 | |
|   | | Roadrunner
Forum Overlord


Posts : 1714
Join date : 2011-06-10
 |  Subject: Re: Chinese mini tug- Q3! Subject: Re: Chinese mini tug- Q3!  Thu Apr 02, 2020 12:22 pm Thu Apr 02, 2020 12:22 pm | |
| Now the glue is totally set and rock solid, I spent some time cleaning up the worse of the frames, overall they won’t be tidy but will work, I’ve also triple checked that they are correct in terms of parts lining up now, so I’ve photocopied the better of the two frames ( they are a tighter fit to the other parts) so if anyone has this kit and finds the parts are also wrong just drop me a message and I’ll post/email you a 1:1 photo copy of the frame how it should be for you to adjust yourself of remake the part. Talking of remaking the part I was tempted to do that myself, however I don’t have any 3mm ply on hand, I only have a huge selection of 0.5/1/2 and 3mm... I don’t think long term this correction of the frame will effect the model long term with the right reinforcement and once painted you won’t see the repair anyway. Lazy I know... So if you need the frame correction let me know! 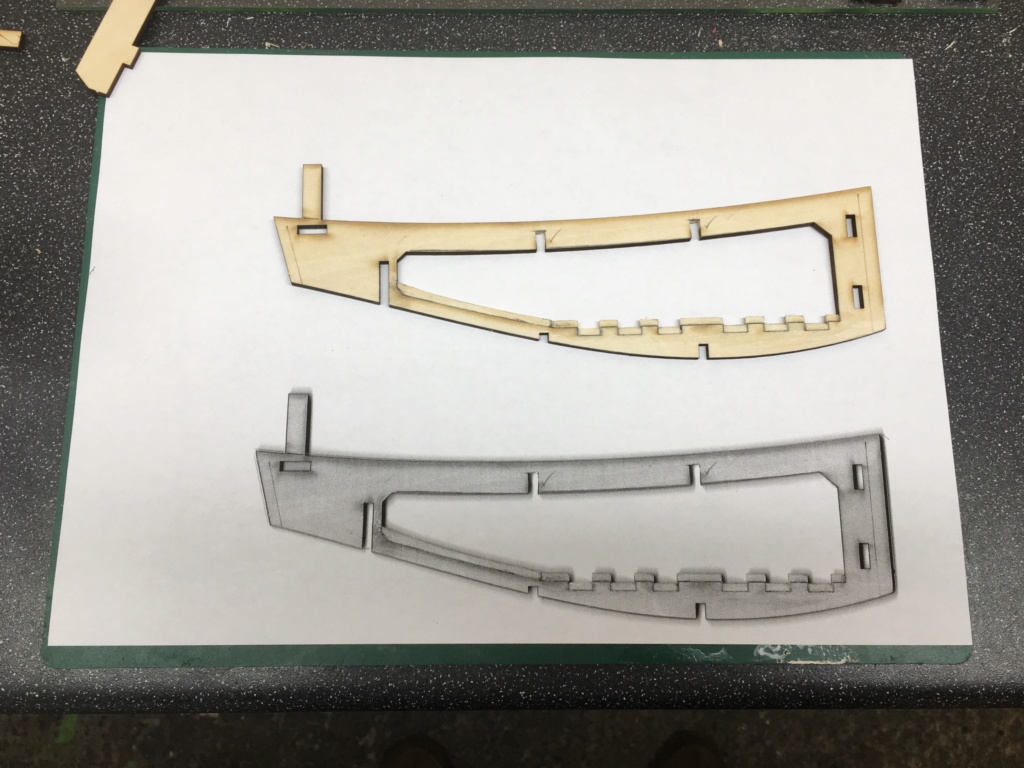 | |
|   | | Roadrunner
Forum Overlord


Posts : 1714
Join date : 2011-06-10
 |  Subject: Re: Chinese mini tug- Q3! Subject: Re: Chinese mini tug- Q3!  Thu Apr 02, 2020 2:42 pm Thu Apr 02, 2020 2:42 pm | |
| I’ve started tacking the frame together this afternoon with some thick superglue, I’m pleased to say with the side frames now adjusted everything inside lines up and is square and level to its relative faces and parts... hopefully this is the last of the errors... fingers crossed... The reinforcement for the base I will just do with some epoxy on the under side so it can’t be seen, the top edge I will address later once I get Ty r boat flipped over and start on the deck. 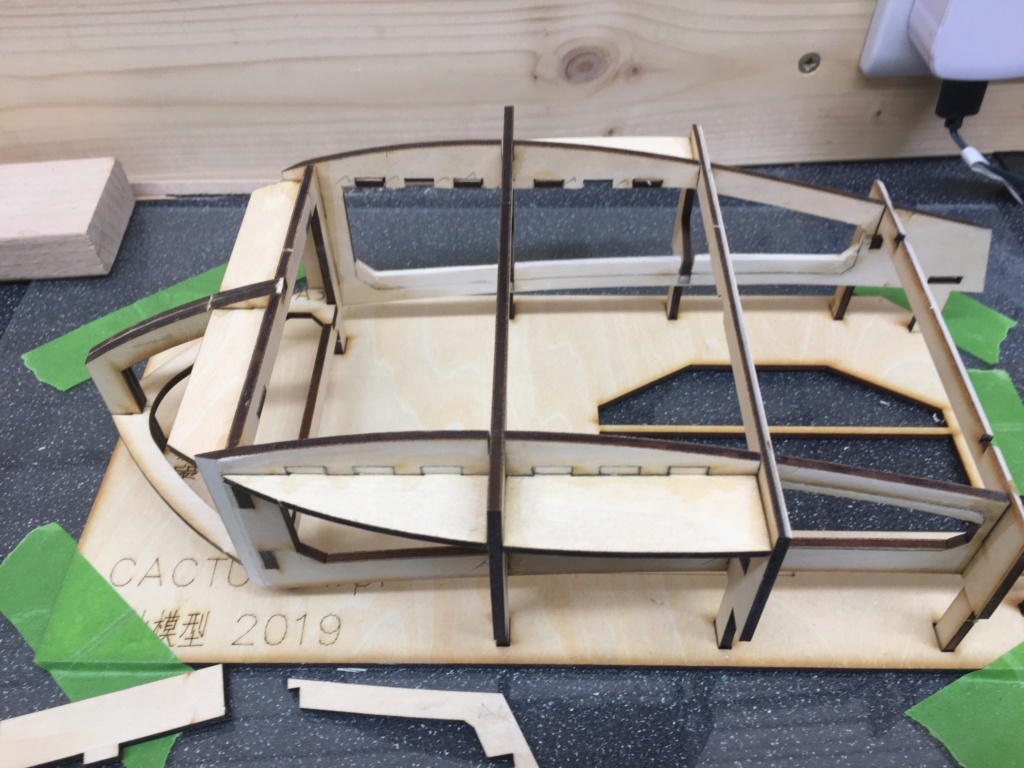 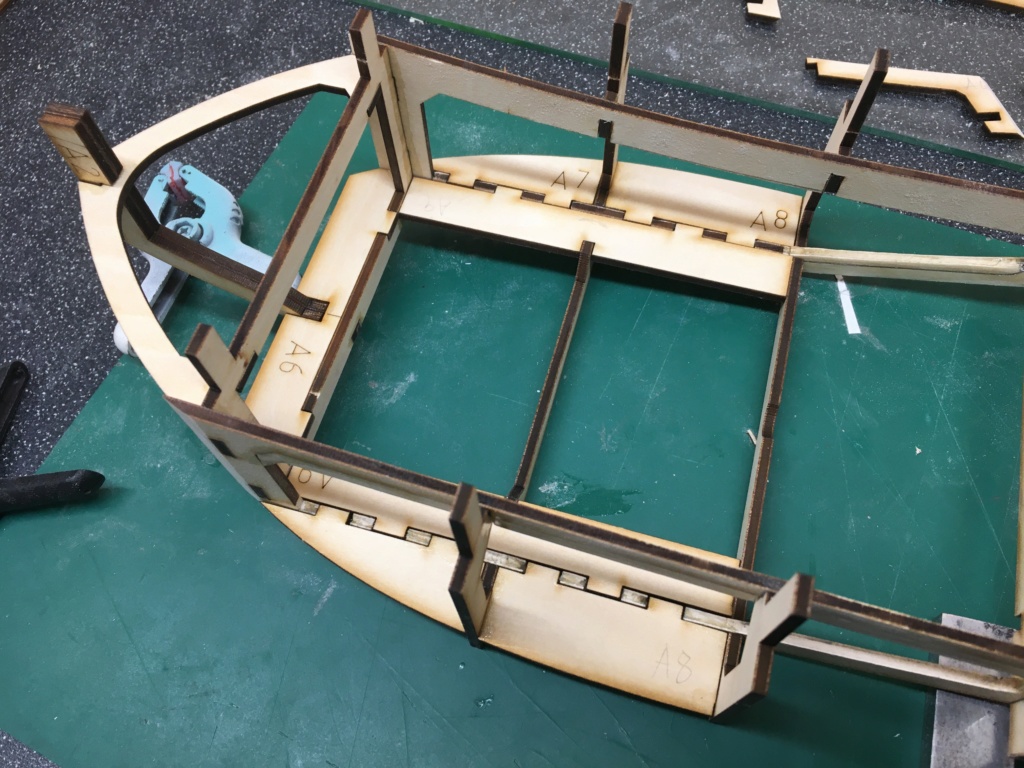 | |
|   | | Roadrunner
Forum Overlord


Posts : 1714
Join date : 2011-06-10
 |  Subject: Re: Chinese mini tug- Q3! Subject: Re: Chinese mini tug- Q3!  Thu Apr 02, 2020 2:53 pm Thu Apr 02, 2020 2:53 pm | |
| And finally here is the frame fully erected, all the edges chamfered on the frames that are supposed to be to take the skin flush, I’ll now spend some time epoxying the joints and true up the hull to ensure square, but it’s pretty much perfect as it is given the base board. 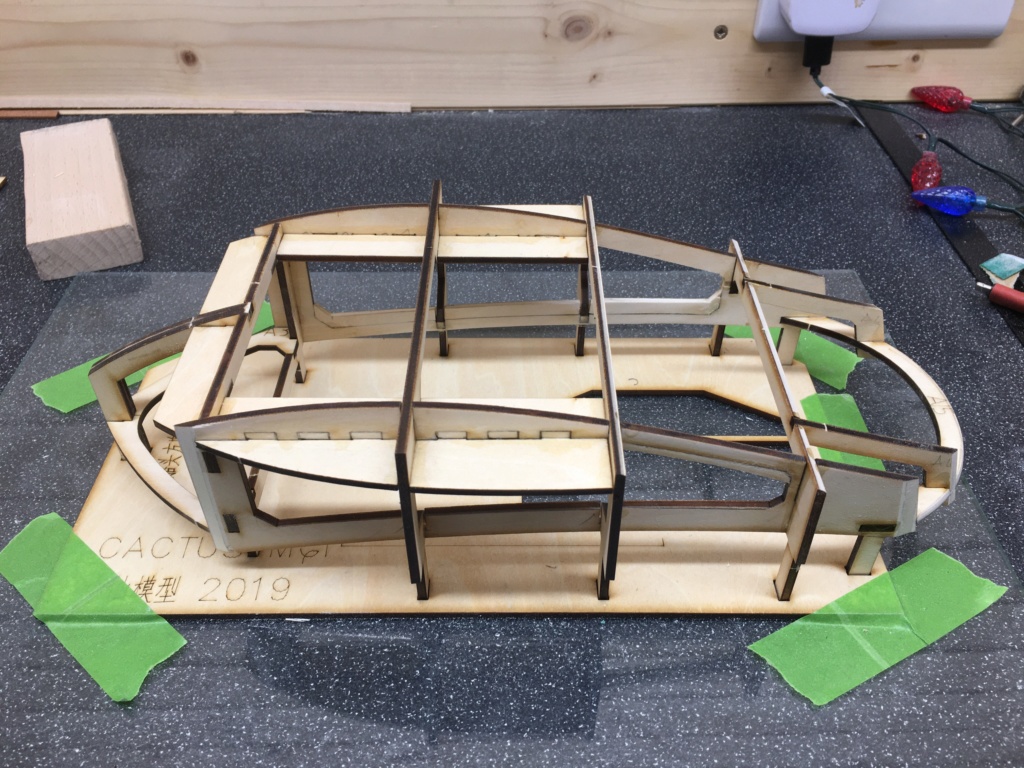 | |
|   | | Roadrunner
Forum Overlord


Posts : 1714
Join date : 2011-06-10
 |  Subject: Re: Chinese mini tug- Q3! Subject: Re: Chinese mini tug- Q3!  Thu Apr 02, 2020 11:05 pm Thu Apr 02, 2020 11:05 pm | |
| Ok so some good progress... No real issues so far glad to say... I’ve epoxyed all the joints on the base to strengthen the frame correction, that modification is not failing any time soon that’s a fact. I’ve also glued on both side panels from bow to mid stern, going off the plan it says to start at the bow and push back... that works but the side panels are to long so they overlap... so I tried adjusting the bow to have more of a v shape to see if the rear would fit together, sadly that’s not the case as pushing to bow to a more pronounced V shape which is how the manual photos show it the bow has no glue points... So I got the bow right to the frame with only a small gap from the stem and chamfered the seam, I’ve glued and epoxyed all the way to the 3bulk head and marked where the stern overlaps both sides using the formers center point, all I have to do is trim the stern part of the panels a couple of MM and they should both fit to the frame and butt up together nicely. This is a job I’ll do tomorrow, I’ll give all the epoxy joints some time to really harden up as the stern requires a bit of twisting to get the shape, I don’t want to break a joint through impatience. More tomorrow... hopefully! 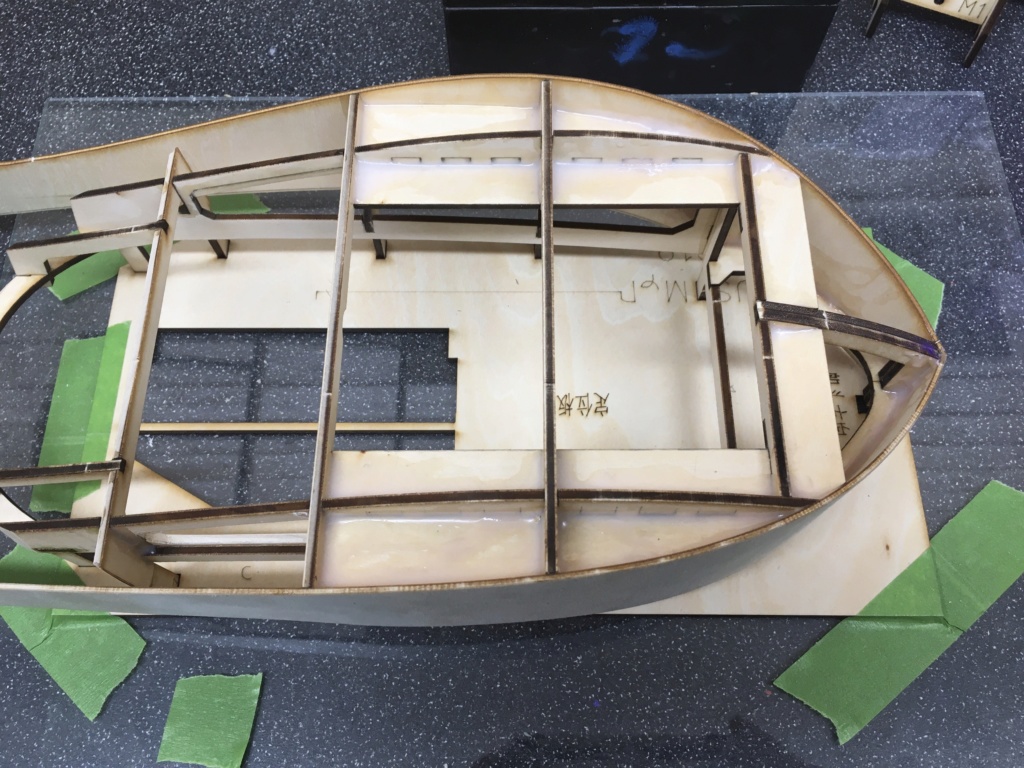 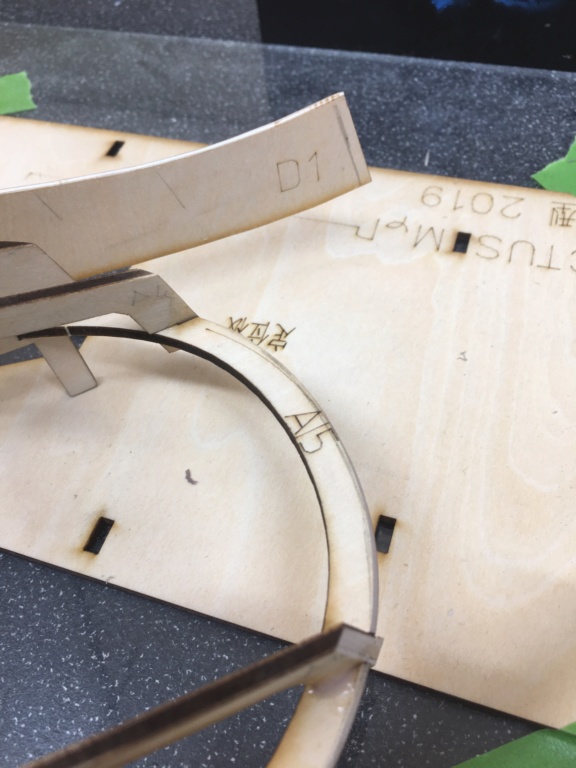 | |
|   | | Roadrunner
Forum Overlord


Posts : 1714
Join date : 2011-06-10
 |  Subject: Re: Chinese mini tug- Q3! Subject: Re: Chinese mini tug- Q3!  Fri Apr 03, 2020 2:16 pm Fri Apr 03, 2020 2:16 pm | |
| Today I’m working on the stern of the side skin, last night before bed I attempted to epoxy the skin around the curve to hold it shape, for the most part it’s held however the very edge was breaking the epoxy joint and trying to flex out, so before the joint fully breaks I’ve busted out the hardcore glue.. in this case my tub of grp compound, for those who don’t know what that is, it’s a epoxy and glass mating mix which you add the harder to make set, apply it and clean up the mess when it sets, I usualy use this for joint reinforcing on areas that are hard to reach or have very little glue surface, and in this case some ply wood that won’t co-operate, now usually I would steam the sheet material for this type of operation however, I have absolutely no clue as to what type of ply this is... I’m going to just simply assume it’s very cheap ply material which will most likely delaminate the moment any water or steam hits it for forming. So in this case the grp compound should do the job very well and holding the skin in, I’ll rack up the other side once this sets and do the same thing... The top of the deck bulwarks are going to be the same bend.... however as that is a face I won’t be able to hide an unsightly joint like this, I will actually swap over to my 0.5mm ply and make a second skin that can hold the joint over its length with wood glue... more on that much later... just planning forwards.. Once the skin is on correctly I’ll clean up the base of the frames and glue the base down. More to come slightly later today. 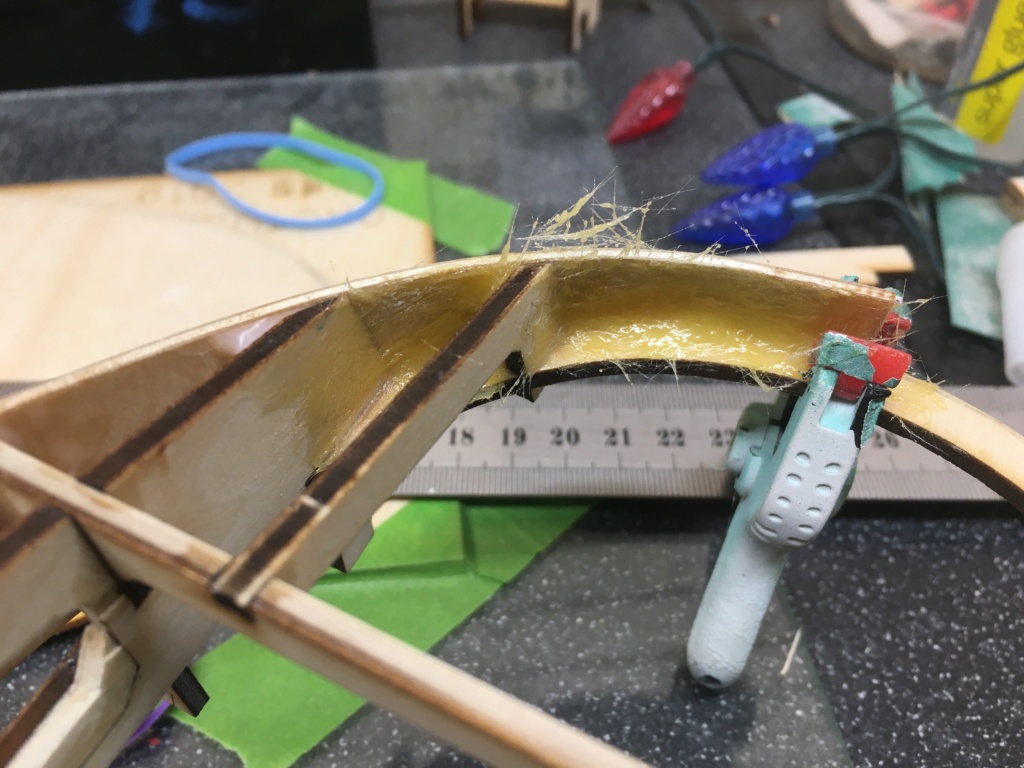 | |
|   | | Roadrunner
Forum Overlord


Posts : 1714
Join date : 2011-06-10
 |  Subject: Re: Chinese mini tug- Q3! Subject: Re: Chinese mini tug- Q3!  Fri Apr 03, 2020 11:33 pm Fri Apr 03, 2020 11:33 pm | |
| Been a productive day again fortunately, but slow progress in terms of achievement simply due to glue drying times... Anyway, the Grp compound setup fine so I was able to trim the other half of the stern and tack that in place and grp it in fully, after it cured I sanded the curve back In fully as it wasn’t perfect, there is some thinning of the material top and bottom of the panels doing that, but the base panel has secured that along with some more epoxy on the joint, and the top will become firm once the deck slides into place, Talking of the bottom panel that has also been secured with a mix of wood glue, a few tacks of super glue to free up fingers and a locating screw in the bow to pull in the shape while the glue sets up, ( I’ll remove it a little later and fill the hole) and once set I’ve taken the time to epoxy all the seams. I’ll let this cure up over night now and sand the base flush to the sides. There is some overhang and some under cut in places with the base part so I will actully use some of the grp compound on the outside seam to ensure the hull is fully water tight, as well as aiding in the side and base panels positions. It’s a little bit overkill but I’m not going to take any chances with this kit, better safe than sorry! 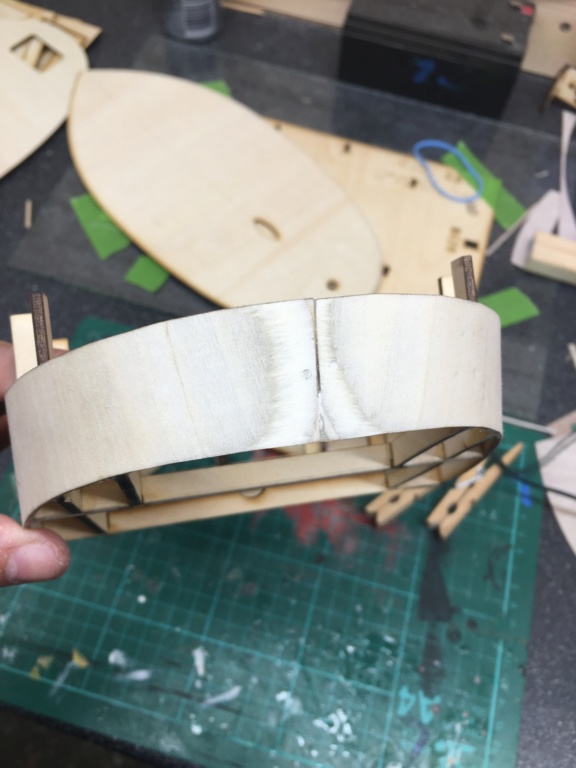 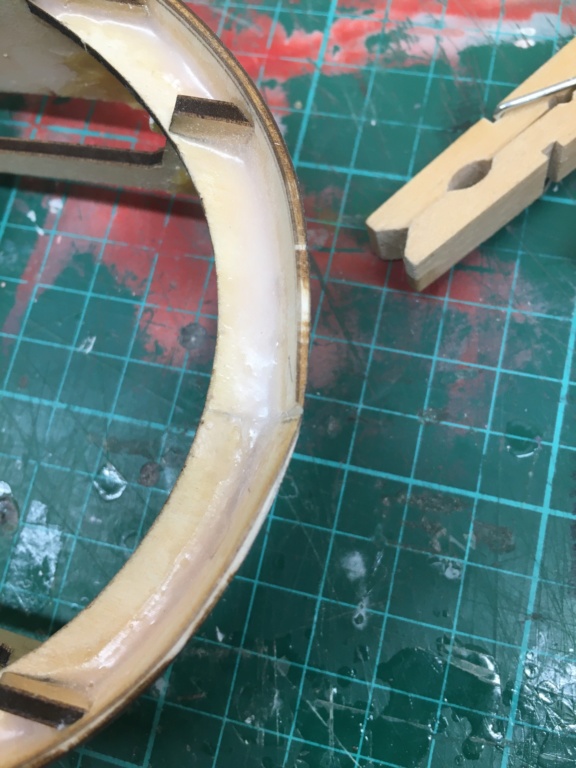 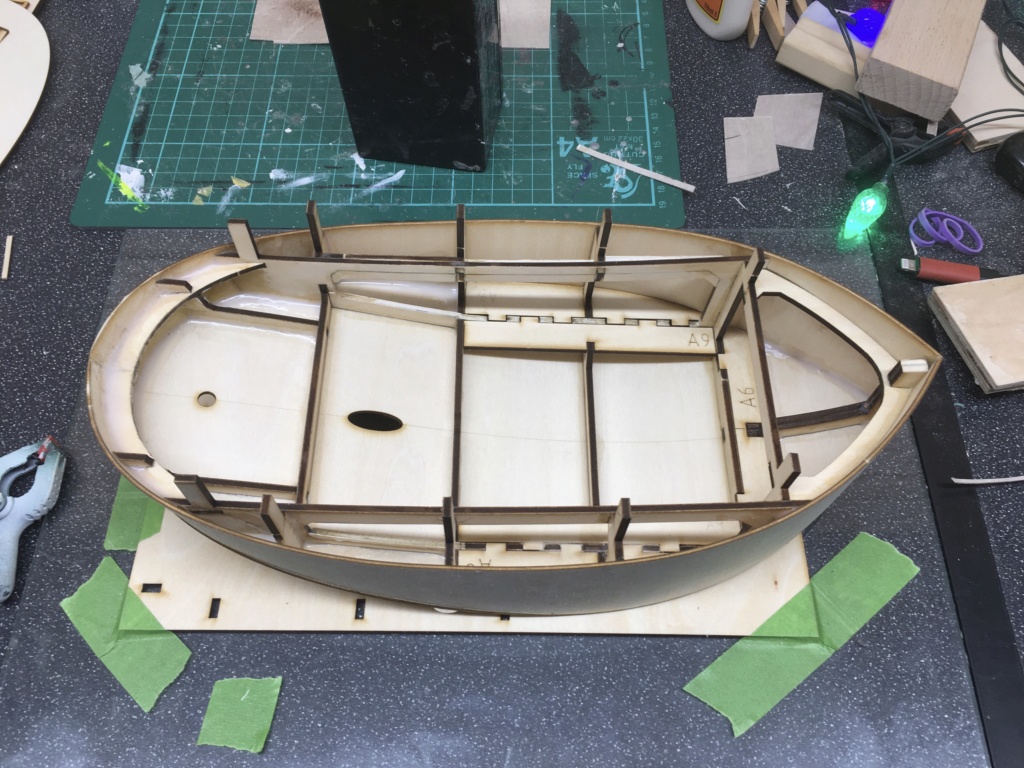 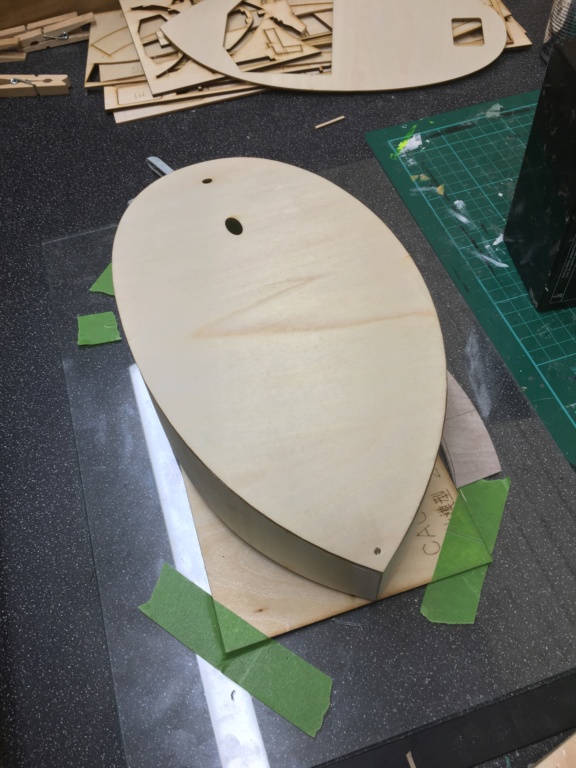 | |
|   | | Roadrunner
Forum Overlord


Posts : 1714
Join date : 2011-06-10
 |  Subject: Re: Chinese mini tug- Q3! Subject: Re: Chinese mini tug- Q3!  Sun Apr 05, 2020 3:07 pm Sun Apr 05, 2020 3:07 pm | |
| I didn’t achieve much yesterday, just lack of time in the workshop.. I did however I mount the hull from the base board, trim off the base board supports, and trim the deck to fit, all those jobs very easy and very little work needed, the deck only required trimming at the stern, that’s simply due to the shape not everyone’s will be “exactly” as planned but mine only required a little 0.5mm trim and a taper on the side edge to fit firm. While I was at the stern I also reinforced the joint that was very thin after sanding the correct curvature in, just make up with a couple strips of lime and sanded internally to keep the deck shape. Today I plan to sand the hulls base panel and glass over all the seams and sand back to smooth. This will ensure strength and watertightness on all joints, although I doubt I need it, none the less nothing better to do! 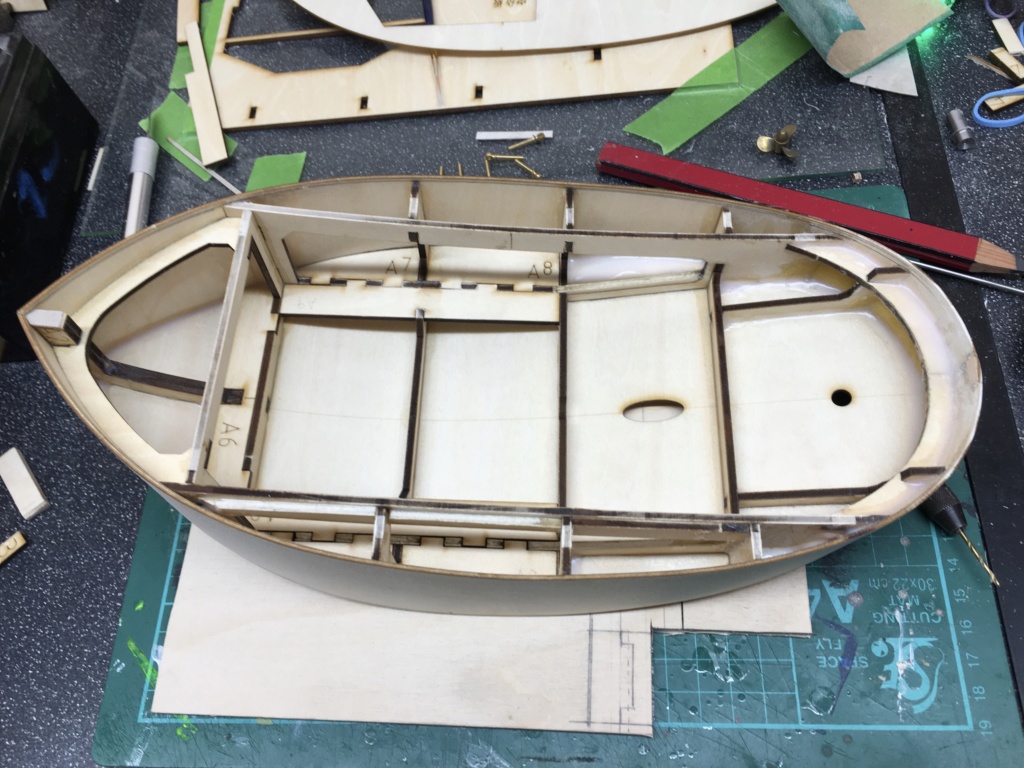 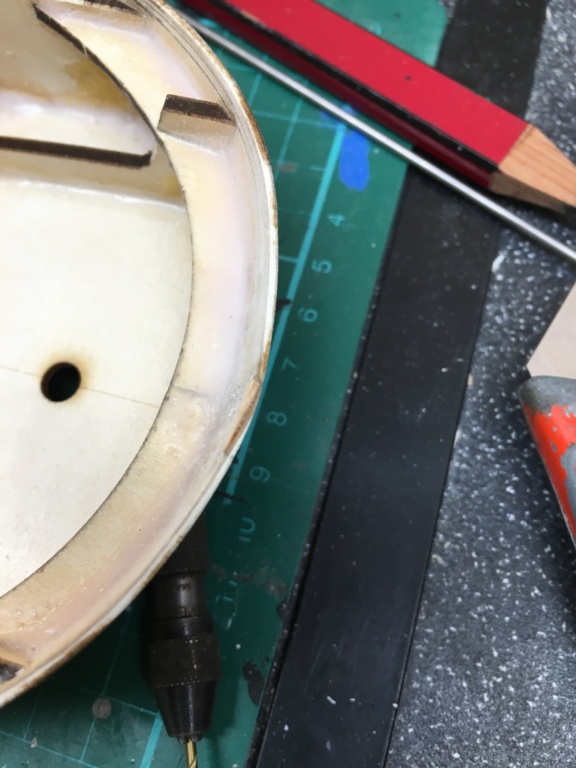 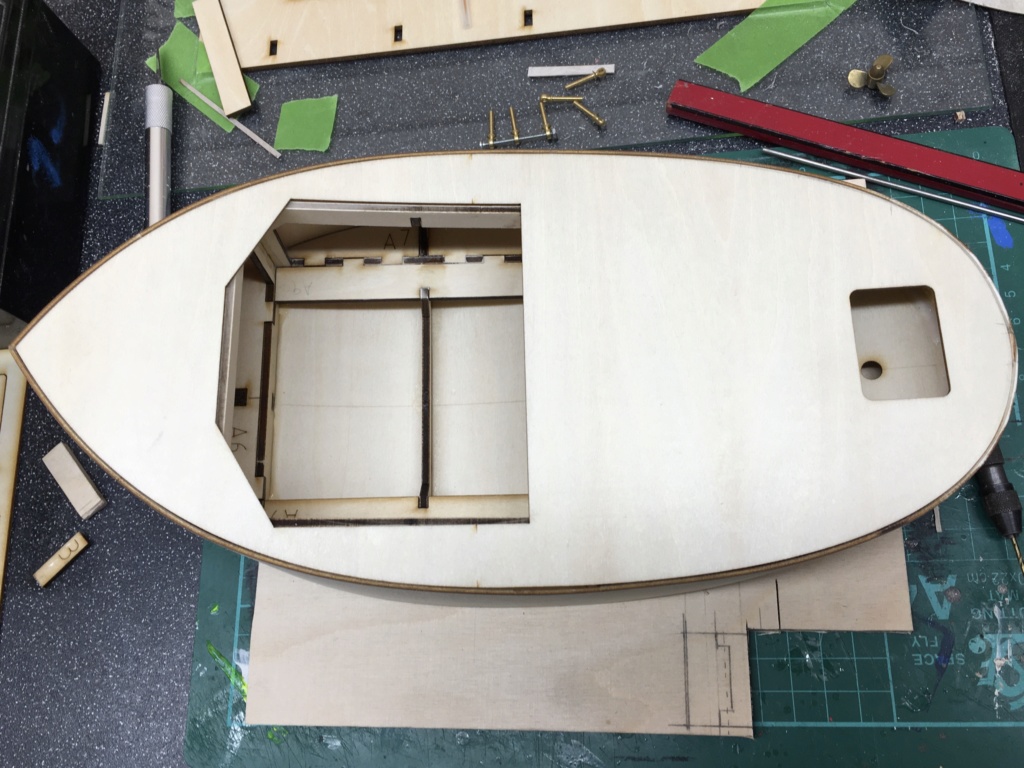
Last edited by Roadrunner on Mon Apr 06, 2020 2:51 pm; edited 2 times in total | |
|   | | Roadrunner
Forum Overlord


Posts : 1714
Join date : 2011-06-10
 |  Subject: Re: Chinese mini tug- Q3! Subject: Re: Chinese mini tug- Q3!  Sun Apr 05, 2020 5:23 pm Sun Apr 05, 2020 5:23 pm | |
| I’ve glasses the seams of the hull on the base, I’ll take the rest of the evening to sand this smooth, p38 for any odd spots, but this should secure the hull long term, there isn’t a whole lot to do until my shaft arrives in the post, due to recent events I’m not sure how long I’ll be waiting before I can progress a lot faster, the issue with this kit is once parts are installed it’s very hard to uninstall them, as access is very limited so I will look to make things a little easier, possible a detachable tray that can hold the motor and servo so I can slide out through the hatch, I’m also going to add a skeg to the hull, since it’s flat bottomed and I don’t fancy a speed tug, I think this will be a way to help keep the boat stable with a more suitable water line weight. The rudder will be the next think I work on in conjunction with the skeg, I had thought about a steering kortz but the space underside is limited with the curvature, so I will have a little test and see if that can be achieved if not standard rudder assembly, but I’ll make up the rudder tube on the lathe, the rudders hole in the hull is laser cut at 7mm, a rudder for this boat needs not be more than 3mm by any scale. So a few things to do... 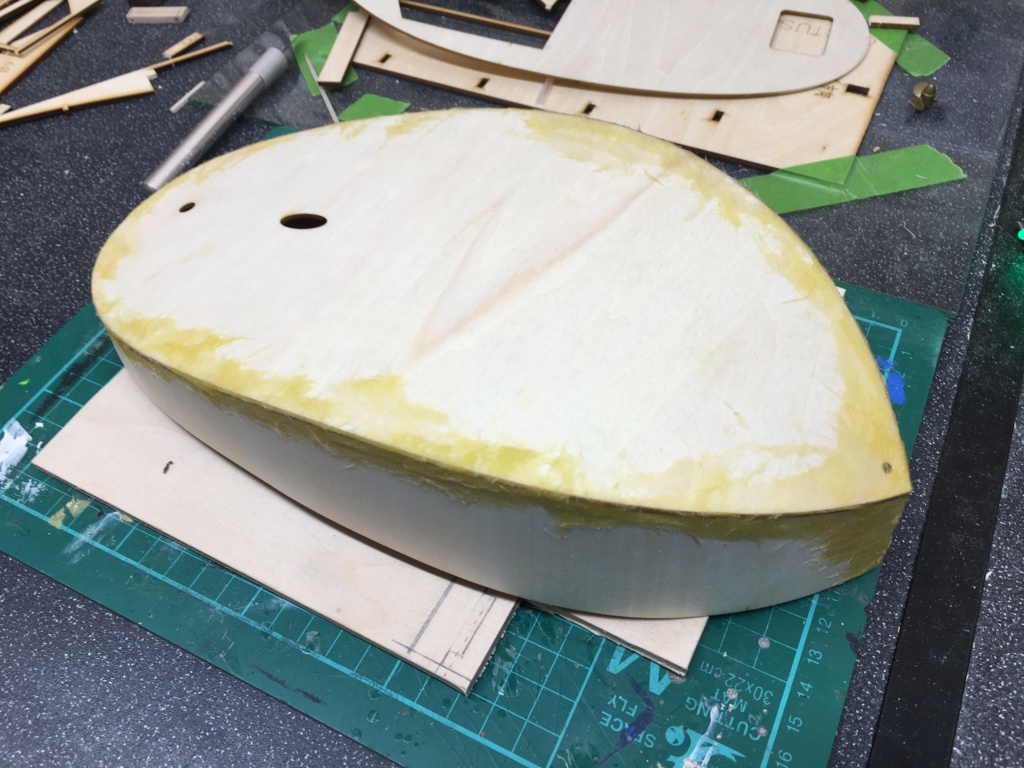 | |
|   | | Roadrunner
Forum Overlord


Posts : 1714
Join date : 2011-06-10
 |  Subject: Re: Chinese mini tug- Q3! Subject: Re: Chinese mini tug- Q3!  Sun Apr 05, 2020 7:20 pm Sun Apr 05, 2020 7:20 pm | |
| After a couple hours sanding this is the end result of the seams all nicely smooth and tidy, I’ve even rounded over the sharp edge on the base for a better paint finish, There are a couple of air holes and low spots on the overall hull but those I’ll fill when I true up the hull before priming. Later tonight I’ll start making up the skeg so I can see how much space there is for the rudder, going off a rough measurement I had 38mm to the base of the hull so I expect the rudder will be around the 30mm size, I will probably elongate this with an off center pivot to give better throw for the little model, aid it’s turning dramatically, I was half tempted to try for a mini Becker “flap” rudder but I think an off center will do a good enough job. There is no way to fit a kortz nozzle to the hull unless it was a fixed position small one that acted with the skeg Which is actually called a “Mewis Duct”, that of course is taking things a little to far for no reason and the fact the hull isn’t designed in such a way to support its function. 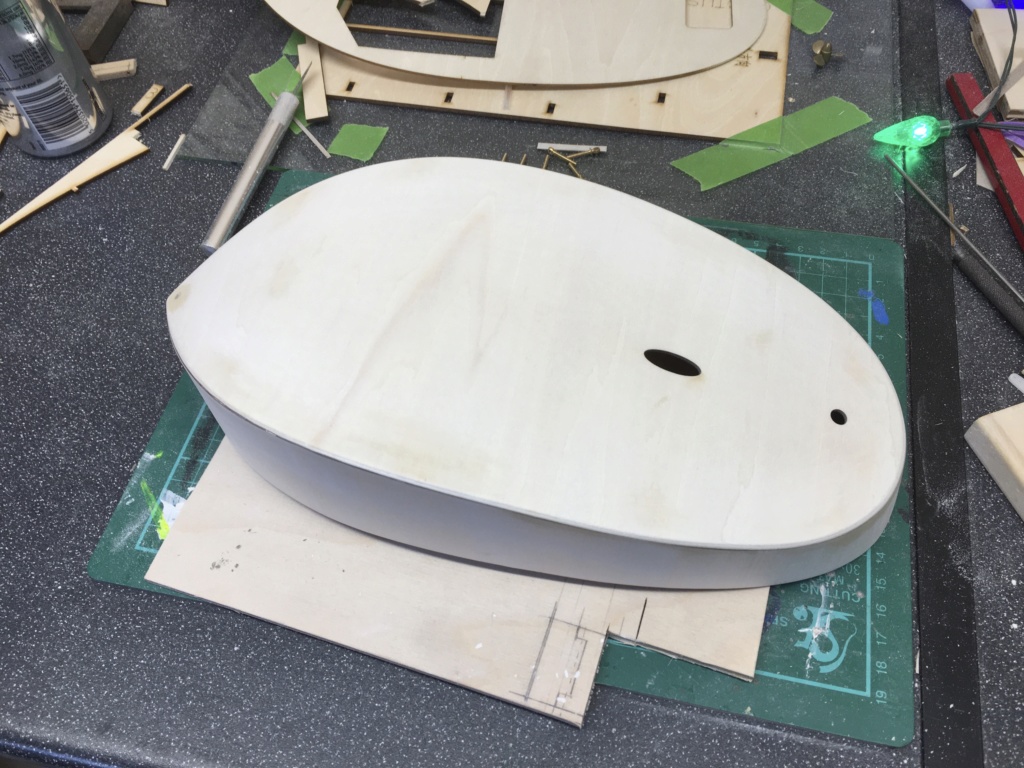 | |
|   | | Guest
Guest
 |  Subject: Re: Chinese mini tug- Q3! Subject: Re: Chinese mini tug- Q3!  Mon Apr 06, 2020 1:11 am Mon Apr 06, 2020 1:11 am | |
| |
|   | | Roadrunner
Forum Overlord


Posts : 1714
Join date : 2011-06-10
 |  Subject: Re: Chinese mini tug- Q3! Subject: Re: Chinese mini tug- Q3!  Mon Apr 06, 2020 1:57 pm Mon Apr 06, 2020 1:57 pm | |
| Thanks bud!
I’m still waiting on my stainless shaft, servo to arrive before I can progress to the deck as once it’s down space is limited, but with recent events the post office has slowed its delivery’s, so it’s all a waiting game. | |
|   | | barriew
Captain (moderator)

Posts : 2631
Join date : 2011-11-26
Age : 83
Location : Thaxted, Essex
 | |   | | Roadrunner
Forum Overlord


Posts : 1714
Join date : 2011-06-10
 |  Subject: Re: Chinese mini tug- Q3! Subject: Re: Chinese mini tug- Q3!  Mon Apr 06, 2020 2:40 pm Mon Apr 06, 2020 2:40 pm | |
| Yup I agree, there really is no access to the mechanics once that decks down, I am looking to make a detachable plate for the motor and servo to sit on that I can take out through the hatch tho... I’ve already tested if I can work a UJ and the rudder tiller from e current access and truthfully I can get those with out to many swear words, but if I position the motor as the instructions state, not only do I have to change the position of the motor spindle ( take apart the motor) but I have to float it on the stand backwards and not ideal by any means, I’ll know more once my shaft arrives and I can make up the skeg correctly, as that will determine the motor angle ( I can get a motor and shaft dead flat but I become limited to a 20mm prop and that is tiny! Even at the suggested angle the max prop is 25mm but I’m able to get 25mm c type props that will pull better for such a small prop.
Anyway little while from doing anything major with The deck just yet, I still want to epoxy and paint the inside before the deck goes down. | |
|   | | Roadrunner
Forum Overlord


Posts : 1714
Join date : 2011-06-10
 |  Subject: Re: Chinese mini tug- Q3! Subject: Re: Chinese mini tug- Q3!  Mon Apr 06, 2020 5:44 pm Mon Apr 06, 2020 5:44 pm | |
| I’ve made up the rudder tube with some stainless on the lathe, I’ve turned it to sit into the 7mm hole vertically, I’ll have to add a little internal support on on side to keep it vertical once glued, and I’ve allowed for a larger off center rudder with a little spigot on the bottom, (basically to add clearance for that type of rudder) it’s drilled to 2.5mm for some 2.5mm stainless shaft material I’ve had laying about, it needs shortening at present but you can see the overall fit and no slop in the shaft. Now all I have to do is work out where the boats level and make a skeg to fit, this then allows me to get the rudder vertical as the base of the rudder will slot into it. I’ve got a template for the skeg but I’m undecided if I want to attempt to get the shaft dead flat or keep the designated angle, flat would mean only a 20mm prop can be used give the hull, but the build instruction angle allows for 25mm prop... this I think will be the best solution as “c” type props can be brought easily for M4 shafts, along with that a 20mm prop really is tiny and I probably won’t do the job! 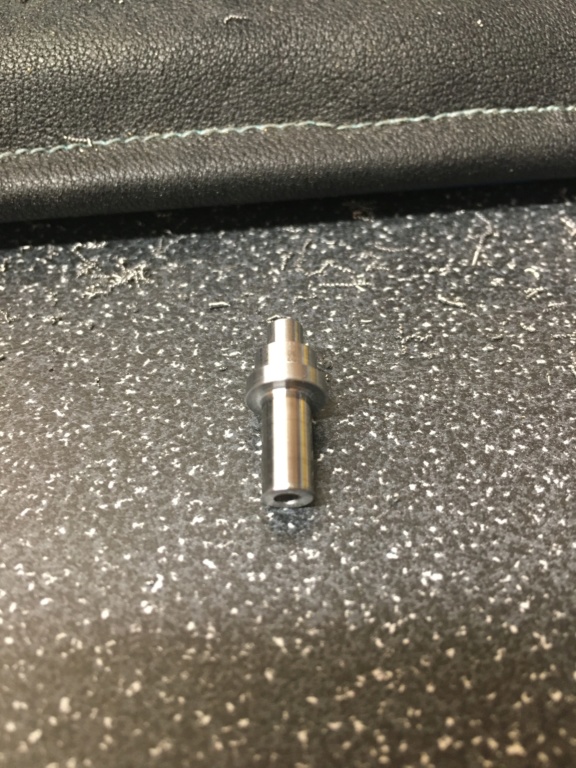 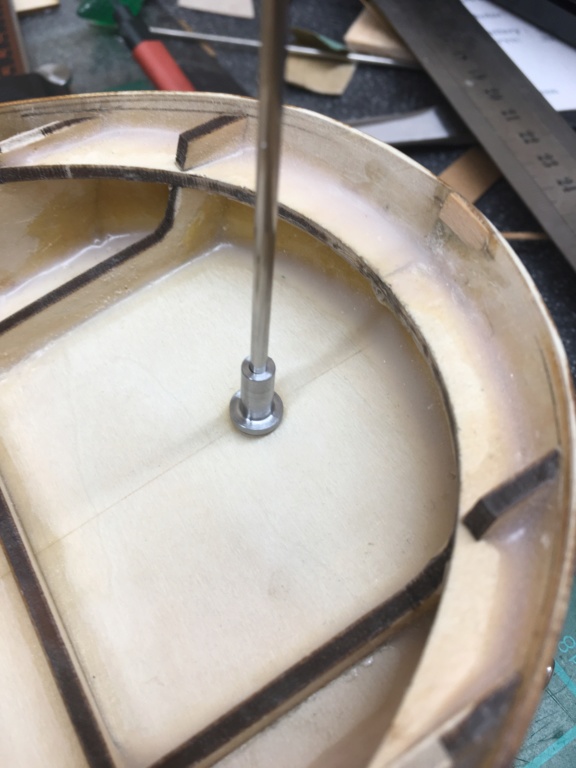 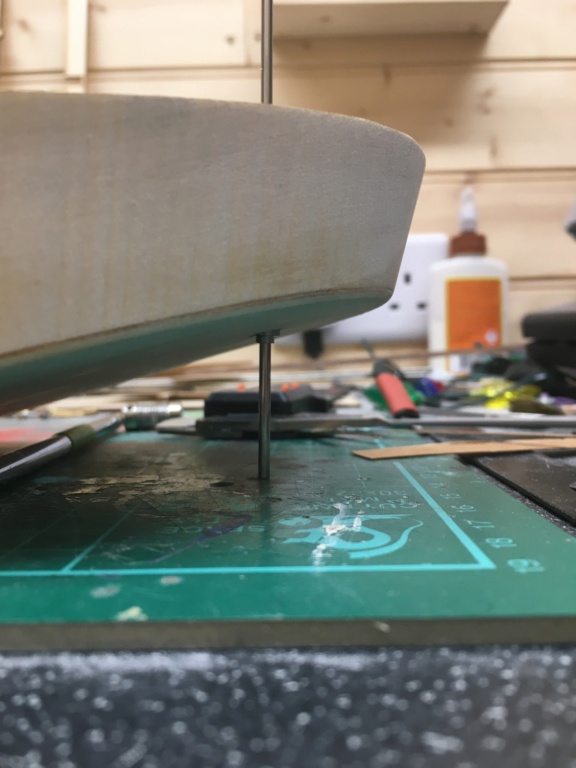 | |
|   | | Roadrunner
Forum Overlord


Posts : 1714
Join date : 2011-06-10
 |  Subject: Re: Chinese mini tug- Q3! Subject: Re: Chinese mini tug- Q3!  Mon Apr 06, 2020 11:37 pm Mon Apr 06, 2020 11:37 pm | |
| Before I do the rudder and the skeg in any finale I need a level position of the hull so I looked for the singular part of the entire boat that is level, which is actully part of the bow hatch. So I quickly made this part up and sat it on the boat, propping it up I was able to get that part level so I could mark up the boats stand... the stand itself will sit the boat level so I can mark up the skeg and rudder correctly, after which I’ll pretty it up. The stand itself is just two laminates of 4mm marine ply, with a cutout for the skeg location, I will of course box and base the stand sides long term, like most of my other stands It also functions as a place to put small tools, screws etc, anything that comes off the model so not to get dropped on the floor. For those who watch my regular builds this is the typical stand I make for many models, not ornate in any fashion but strong and practical for use and transport. I’ll finish up the stand tomorrow and get cracking on the rest... 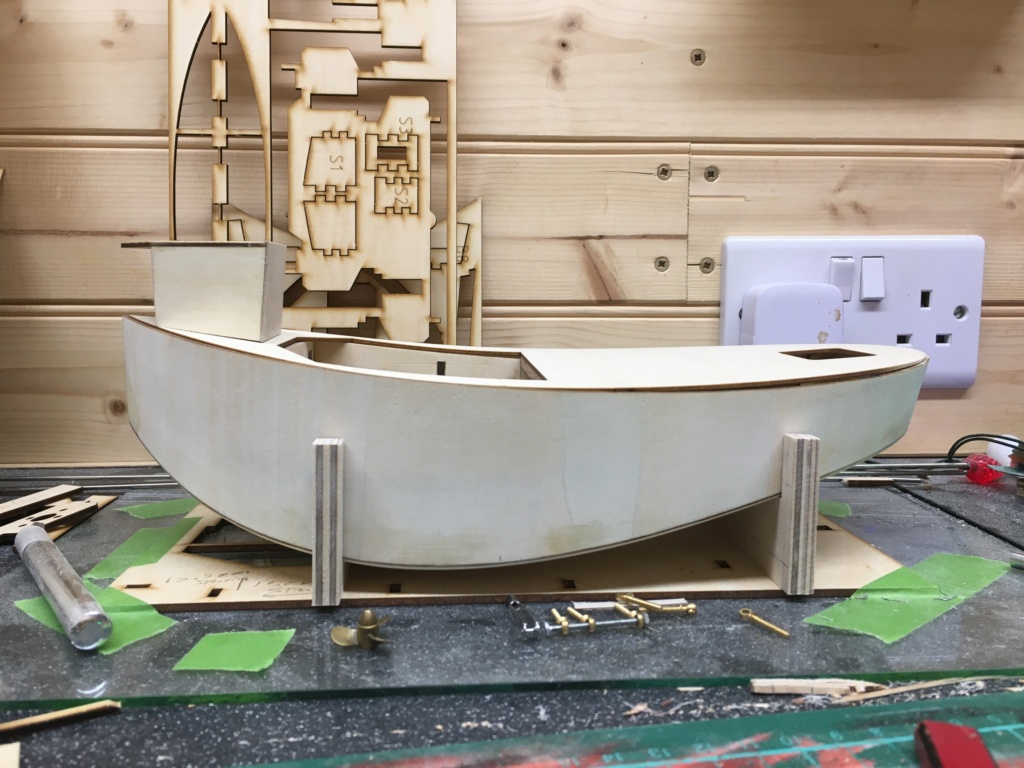 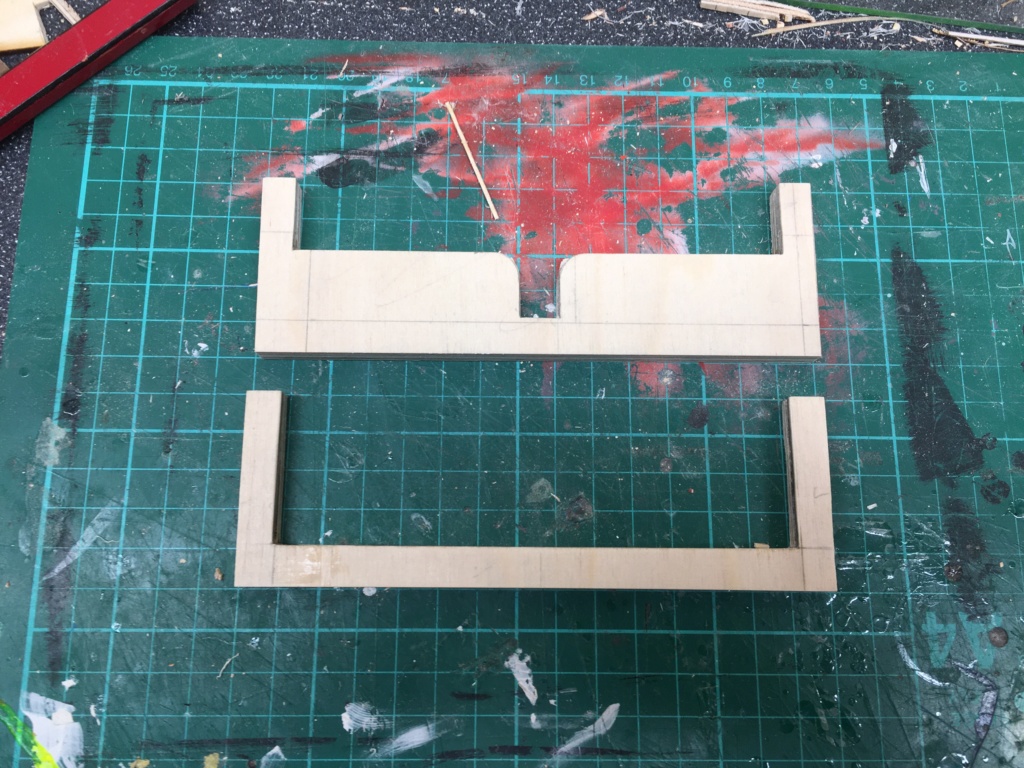 | |
|   | | Roadrunner
Forum Overlord


Posts : 1714
Join date : 2011-06-10
 |  Subject: Re: Chinese mini tug- Q3! Subject: Re: Chinese mini tug- Q3!  Tue Apr 07, 2020 5:17 pm Tue Apr 07, 2020 5:17 pm | |
| I finished up the stand for the most part today, it still needs a final sand and corners rounded over but it’s a usable stand for continuation of the jobs I need to do, I’ll finish it up properly once construction gets to the paint stage, usualy the stand will take a few knocks during build time so I’m able to repair those before it’s finished rather than after. I’ll try later to get the rudder tube in place, I’m still waiting for my servo, shaft and prop to arrive... delays in posting just means slower build progression... sigh... 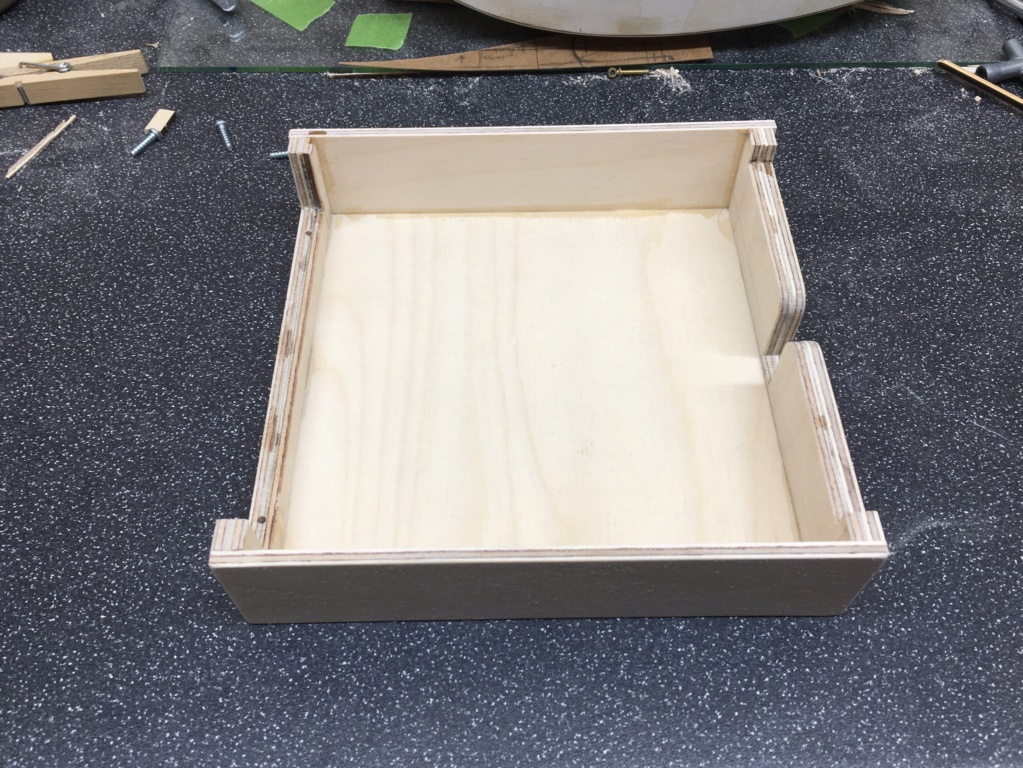 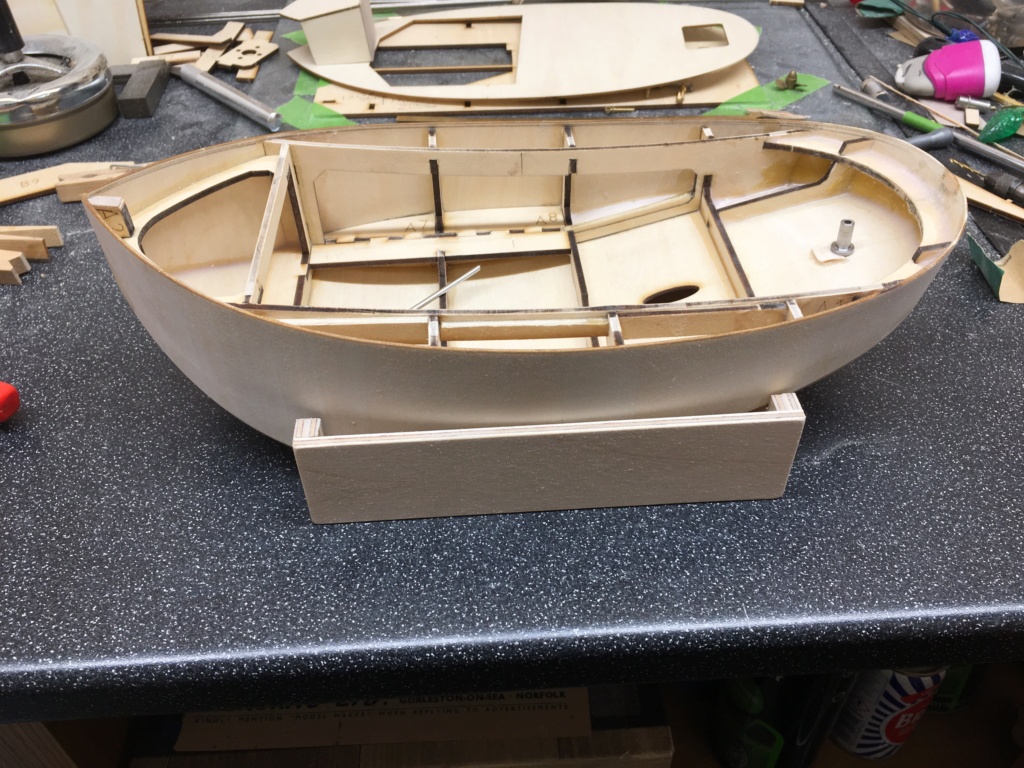 | |
|   | | Roadrunner
Forum Overlord


Posts : 1714
Join date : 2011-06-10
 |  Subject: Re: Chinese mini tug- Q3! Subject: Re: Chinese mini tug- Q3!  Tue Apr 07, 2020 9:40 pm Tue Apr 07, 2020 9:40 pm | |
| With the stand finished I was able to level the model correctly or to what I think is level... using the plans water line and some deck parts that are in line with it to set the rudder tube, I made a small tab of ply to sit under the high edge of the tube to keep it level, then epoxied it in place, while the epoxy was setting I slid the shaft in and used that with the desk to square up the shaft in all directions. Once the epoxy dried, I went over and glassed the shaft In solid, I have to fill a gap on the under side of the tube as the epoxy didn’t squeeze out there (tight fitting part) nothing a little filler won’t cure during fairing. A good result, now I’m able to start on the skeg, I have some scrap brass strip I can use for the detachable part (base of rudder) so I’ll slot that into the ply skeg I’m thinking Just need to make or find something as a bushing for the rudders post. 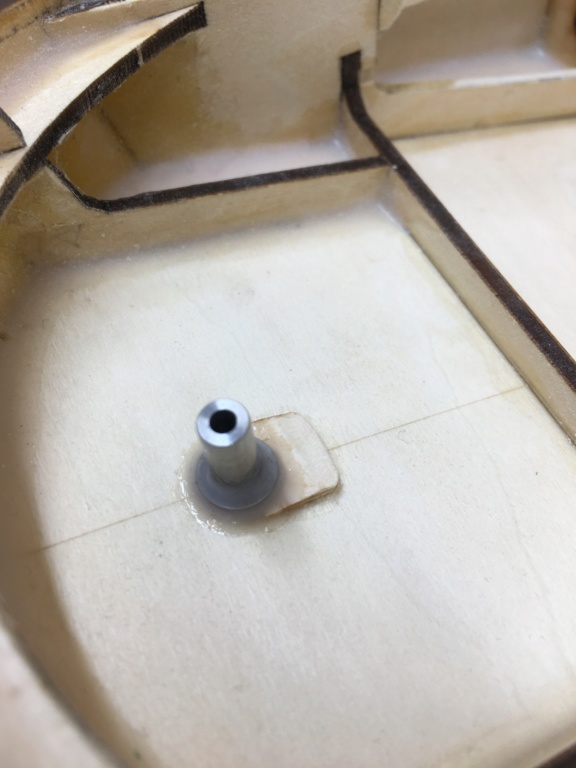 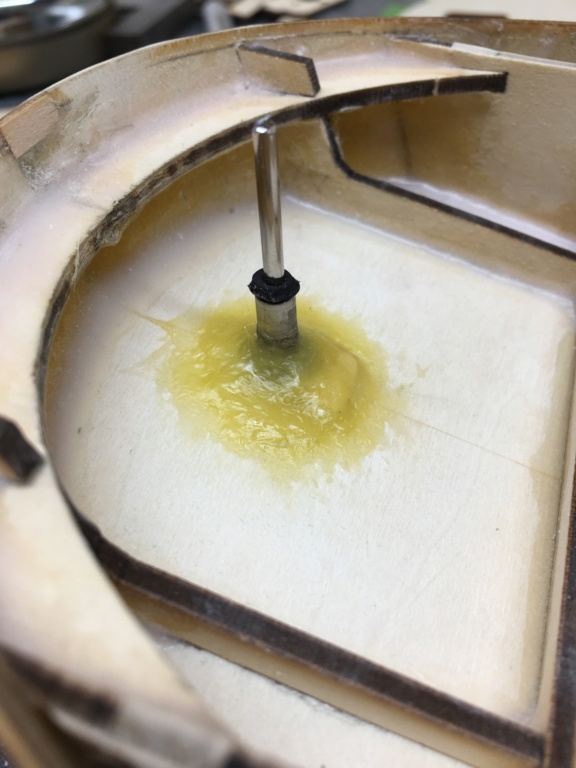 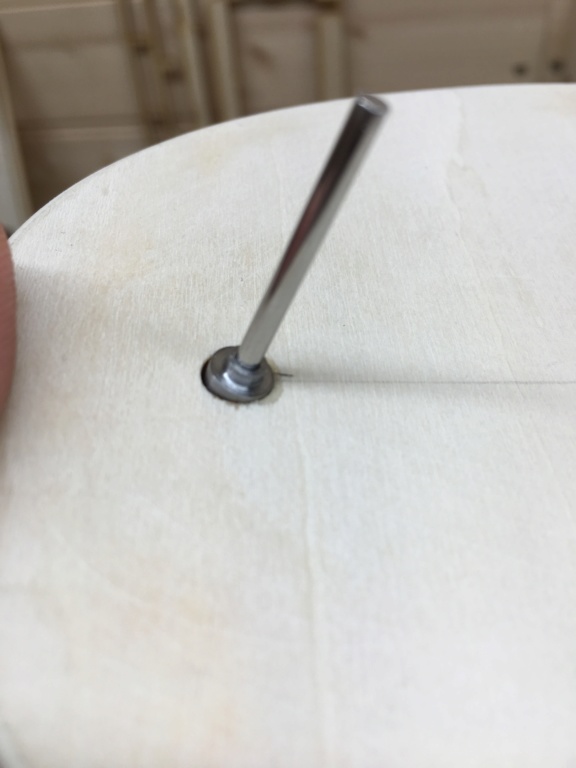 | |
|   | | Guest
Guest
 |  Subject: Re: Chinese mini tug- Q3! Subject: Re: Chinese mini tug- Q3!  Wed Apr 08, 2020 12:06 am Wed Apr 08, 2020 12:06 am | |
| |
|   | | Roadrunner
Forum Overlord


Posts : 1714
Join date : 2011-06-10
 |  Subject: Re: Chinese mini tug- Q3! Subject: Re: Chinese mini tug- Q3!  Wed Apr 08, 2020 4:28 pm Wed Apr 08, 2020 4:28 pm | |
| I’ve started to template out a skeg but I needed to ensure it was level to the hull, since this is a modification there is no set angle for the skeg, so I’m using the boats water line as a reference to level. I actully had to make up a water line marker from an old magnifying glass stand to hold a bit of lead as my actual water line marker can’t slide that low weirdly, one of those very strange things from a commercial product  anyway I’ve marked up the waterline and boot topping positions on the hull I can now use those as references to make a level skeg, which will in turn tell me the maximum rudder dimensions. I’ll do some more after dinner with a bit of luck but the first photo shows my first template slotted in place along with the hull markings. 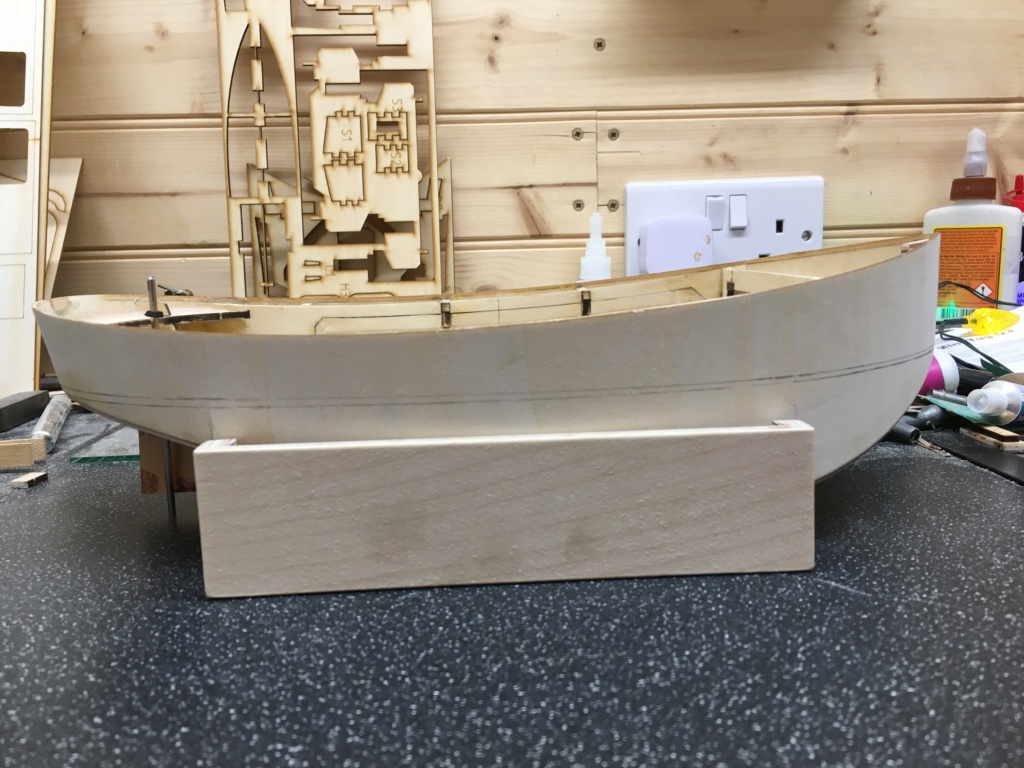 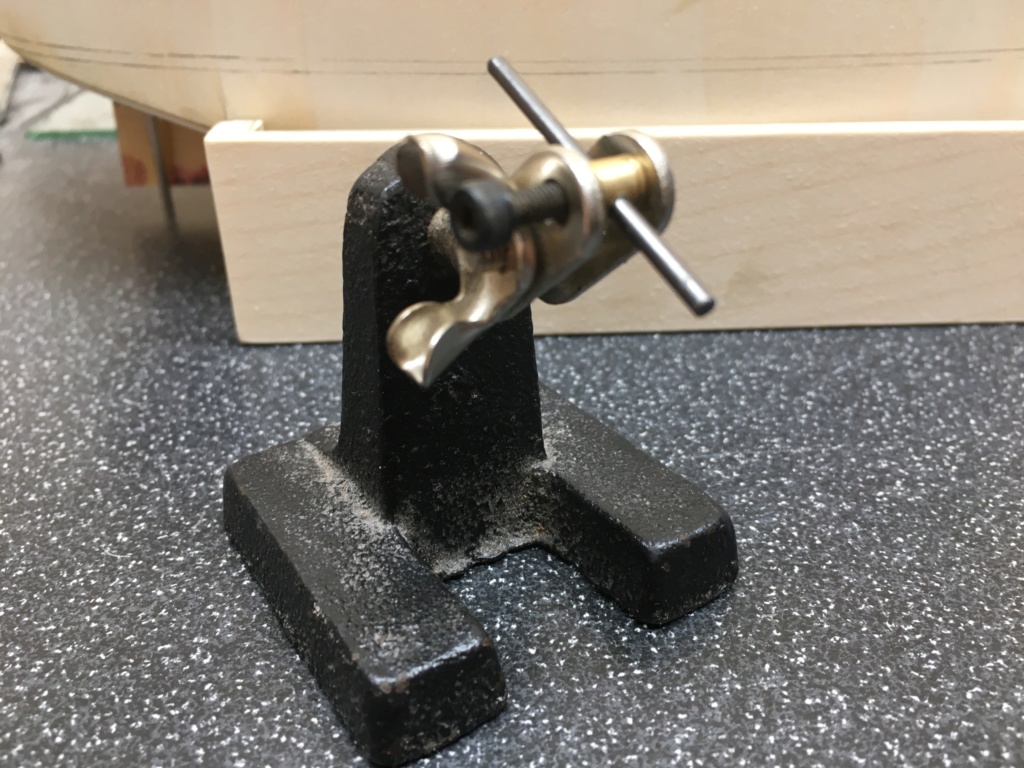 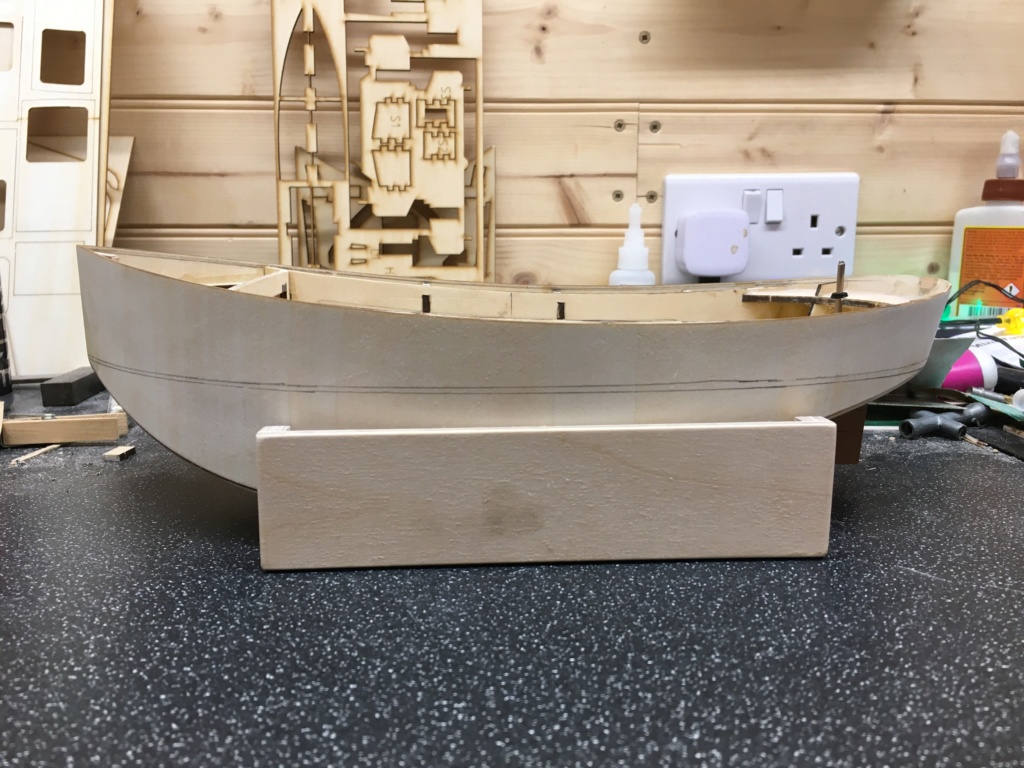 | |
|   | | Roadrunner
Forum Overlord


Posts : 1714
Join date : 2011-06-10
 |  Subject: Re: Chinese mini tug- Q3! Subject: Re: Chinese mini tug- Q3!  Thu Apr 09, 2020 1:39 pm Thu Apr 09, 2020 1:39 pm | |
| Shaft, prop and servo finally arrived, the shaft is my normal slimline go to brand this time in 4” length. The prop is a “C” type prop designed for tug boats in 25mm, and im trying out a new brand of servo from Radient mini metal gear range, it’s become a popular brand I’ve noticed and it was the same price as my mini emax metal gear servos, this one is a big bigger in size but it’s not a 15g servo like the emax it’s rated at 17g, we’ll see how it performs... Now back to finally getting some progress done... skeg shaft... 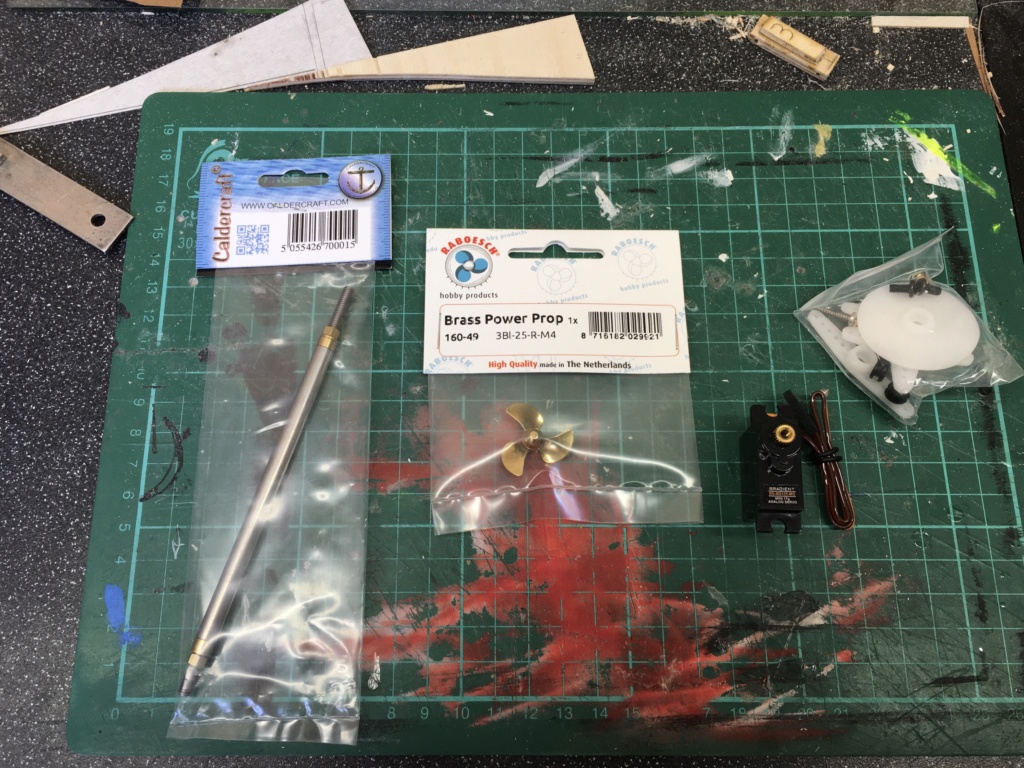 | |
|   | | Roadrunner
Forum Overlord


Posts : 1714
Join date : 2011-06-10
 |  Subject: Re: Chinese mini tug- Q3! Subject: Re: Chinese mini tug- Q3!  Thu Apr 09, 2020 4:45 pm Thu Apr 09, 2020 4:45 pm | |
| At this point the skeg I’ve been planning may not be the best idea, to make one level with the hull would reduce the rudder size dramatically, obviously there are ways around this, but I don’t think many are suitable. Anyway moving forward while I ponder on skegs, I’ve made up a support bracket for the prop shaft, the original hole is overly large designed for a standard shaft (8mm) I don’t tend to use brass shafts anymore simply due to corrosion over long term use, so sticking with my go to stainless shafts being thinner it required a mounting bracket to hold position and angle, this will let me fit a motor at the correct angle. Now the kit comes with a laser cut motor bracket, but it requires you to cut the shaft ( and they recommended a 100mm shaft ) to allow the motor to be moved in front of the 2nd bulkhead, on top of that they also want you to take the motor spindle out and reverse it, so the motor is backwards.. this I understand the logic, once the decks on you will not be able to remove a motor is mounted the ‘normal’ way, however I don’t see the point in 1 cutting a perfectly good shaft down, and 2 swapping the motor about when a different bracket can be made up that can support traditional methods of mounting, not forgetting this kit also provides you with a laser cut mount for a servo... that in my case will not fit due to the servo I brought, but the position on the plan gives you no way to remove the servo at a later date... my plan is to make a mount for both motor and servo together as one unit that can come out through the hatch, and screws vertically into the electronics tray, this will mean that the battery will not sit right in the bow as the plan states so I will make a battery tray to sit over the shaft which my hand can get the battery to sit on ( I did a dry fit to see what I can and can’t do) the electronics can then sit either side off the shaft in front of the motor. It’s an adjustment to build instructions but one I think is better than the half assed method someone came up with for this. Talking on motors, I had a spare 1500kv outrunner laying about, that was used for a display model, so I’ve removed that motor and swapped it out with an on going project on another boat... that boats motor is one suitable for this model, it’s much smaller in size but still above what the kit recommends, it’s a 1200kv 85w outrunner (20amp esc) 28mm can size. Again my go to brand overlander, tried tested and never failed! ( these even work in reverse flawlessly) but they are quite expensive In comparison to other motors similar spec. My next task is to make up a coupling, I have a few spare ones laying about but I think I’ll just make one for purpose, a UJ (Huco) coupling is actully to long to fit with the motor and shaft as is, so not suitable for this model unless I want the motor in the bow! As you can see from the photo the 25mm prop is perfect size, the photo is deceiving in this case it looks like I can add a 30mm sadly I only have 1mm clearance from the shaft correct position. The grind continues... 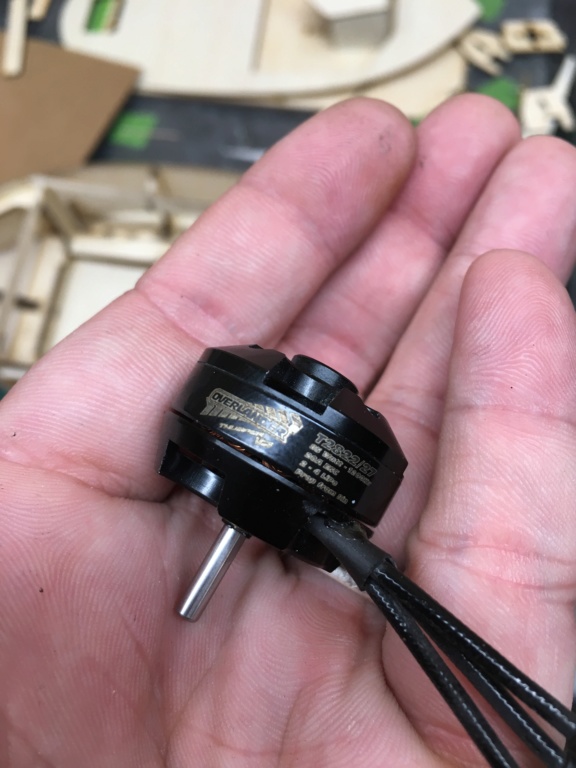 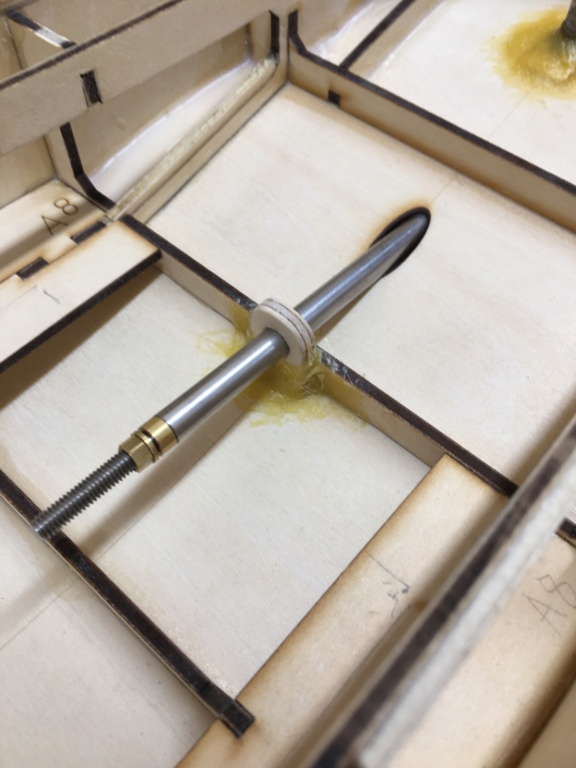 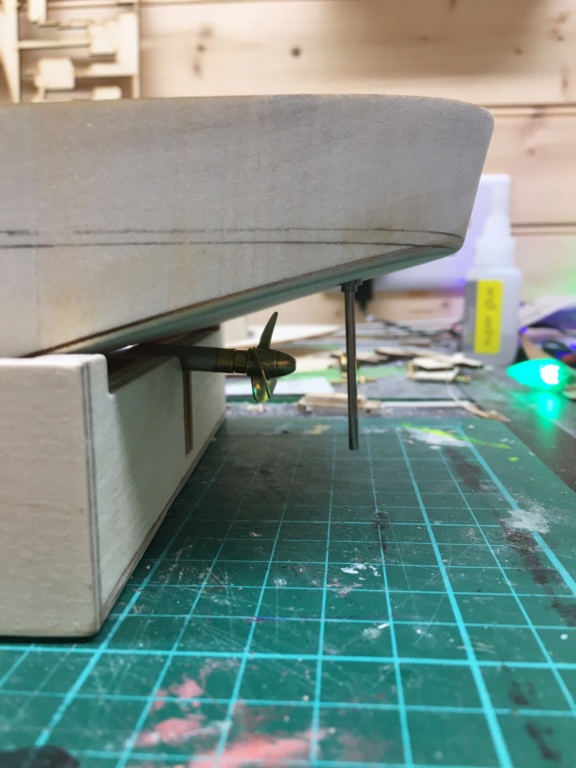 | |
|   | | Roadrunner
Forum Overlord


Posts : 1714
Join date : 2011-06-10
 |  Subject: Re: Chinese mini tug- Q3! Subject: Re: Chinese mini tug- Q3!  Thu Apr 09, 2020 10:56 pm Thu Apr 09, 2020 10:56 pm | |
| Final job the evening, I’ve glasses in the shaft permanently. Nothing major in terms of progress, i did attempt to make a coupling for the motor and shaft, but like a plonker I broke my only M4 Tap when I forgot to change speed on the lathe... yeah we all make bind head blunders sometimes .. so anyway I’ve ordered a new M4 Tap set this evening, so I’ll make up that part once it arrives. Tomorrow I will mock up the motor and servo mounting plate, which can be done with a spare huco coupling I have I’ll just adjust for distance. I’ll also take a look at the rudder now that the shafts in its fixed position. I’m still undecided on skeg at this time, I’m looking at other options just for some scale look rather than function. 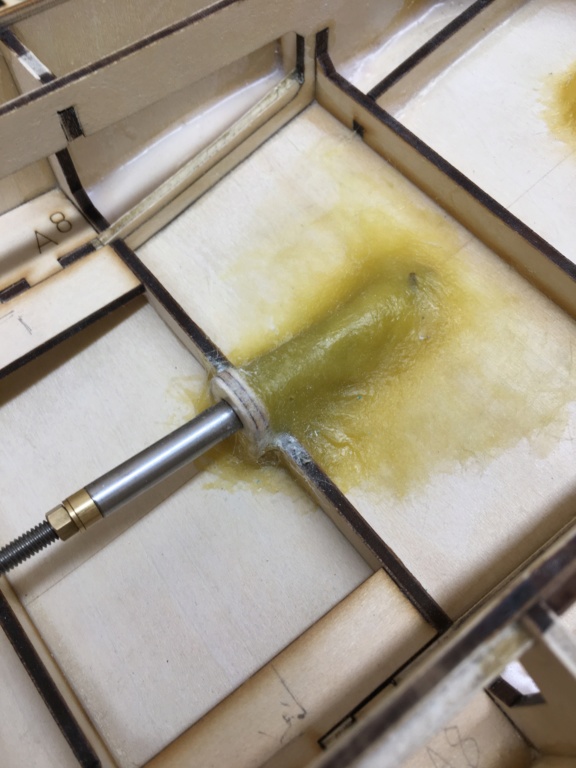 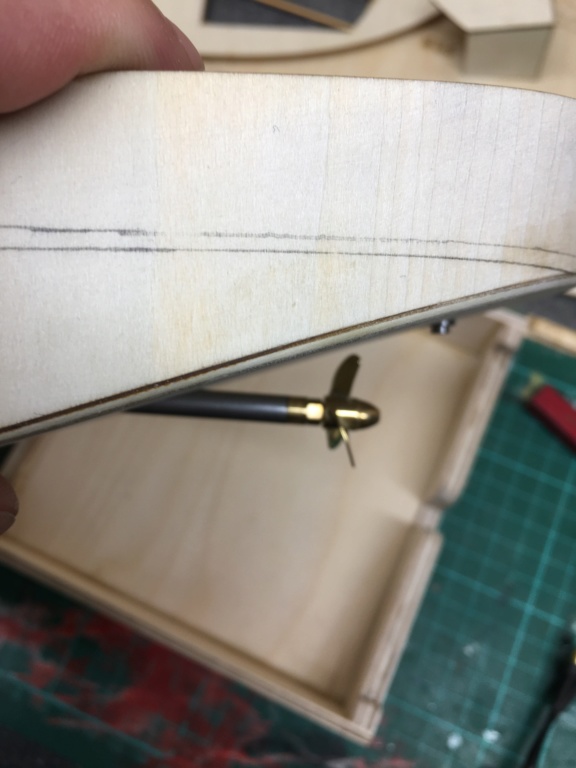 | |
|   | | Roadrunner
Forum Overlord


Posts : 1714
Join date : 2011-06-10
 |  Subject: Re: Chinese mini tug- Q3! Subject: Re: Chinese mini tug- Q3!  Fri Apr 10, 2020 11:05 pm Fri Apr 10, 2020 11:05 pm | |
| Not much done today, spent time with the kids in the garden getting a tan... But this evening I did knock up the rudder, it’s a balanced rudder, simple construction, 2.5mm ply inner section behind and front of the rudder post, which I cut down to finish size, then I gave it a top and bottom edge cap with some lime wood, and gave it a skin coat in 0.4mm ply, after all that dried I sanded it into shape, tapered the front edge etc... The. Finally gave it one last 0.4mm skin and again resanded the shape back in, making the rudder 3.5mm thick but bloody tough as nails! I will epoxy it before painting along with the rest of the hull. I left the rudder post stuck out the base some what for a skeg attachment, I’m adamant at this point I do want to add one, it will tidy up the prop shaft a lot rather than having it just floating out there (although it doesn’t hang out very much) I just think it will be a more tidy look to the running gear long term. The rudder measures 30x30m overall, with a slight top taper to make it look very square to the hull but to also give better clearance when it’s at its maximum rotation, I’m quite pleased how it’s turned out, usually I make rudders out of brass when they are this size just for simplicity, I just fancied doing one more normal looking at smaller scale for a change. 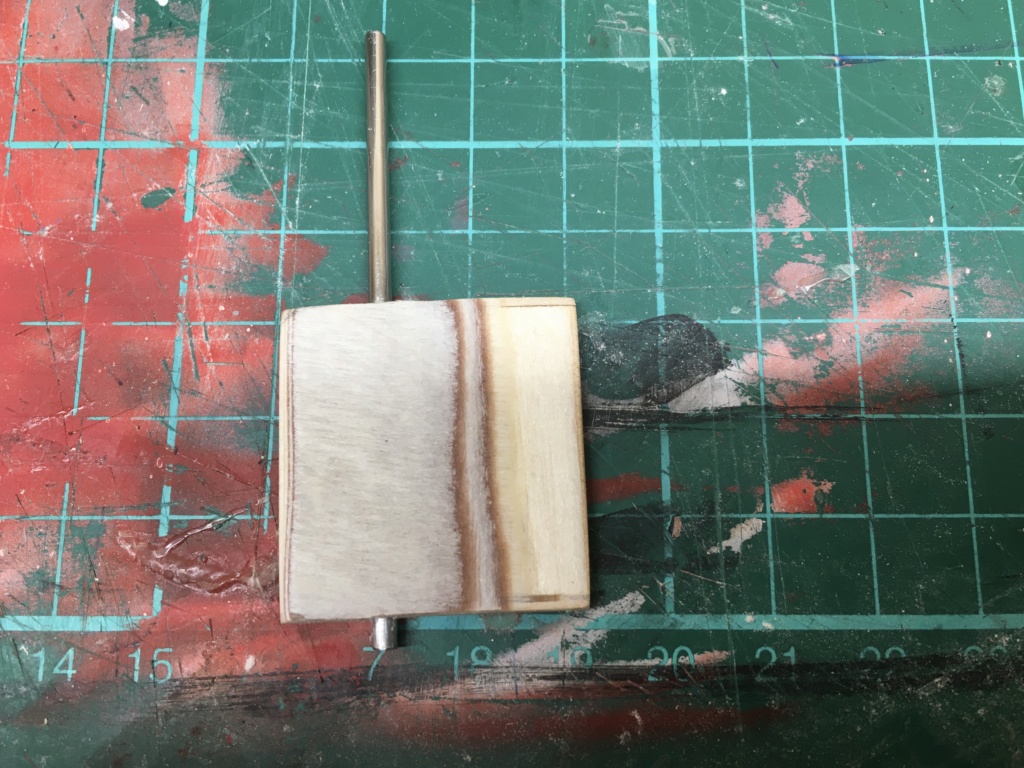 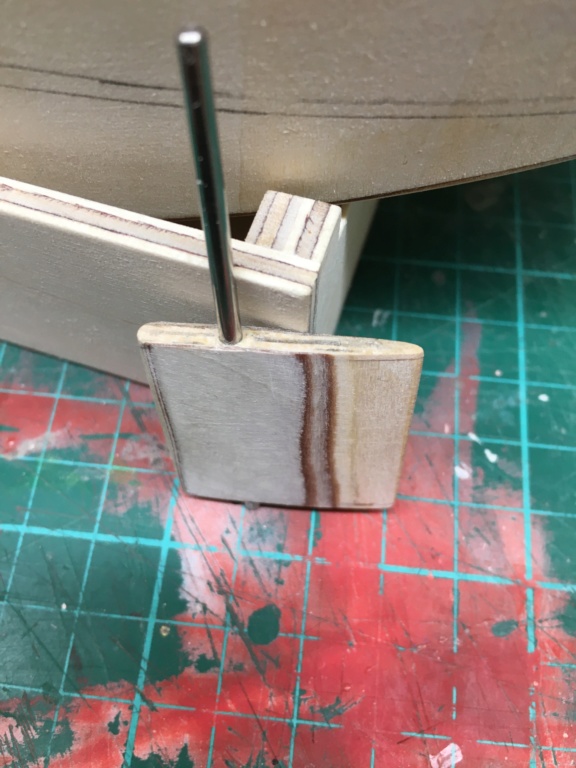 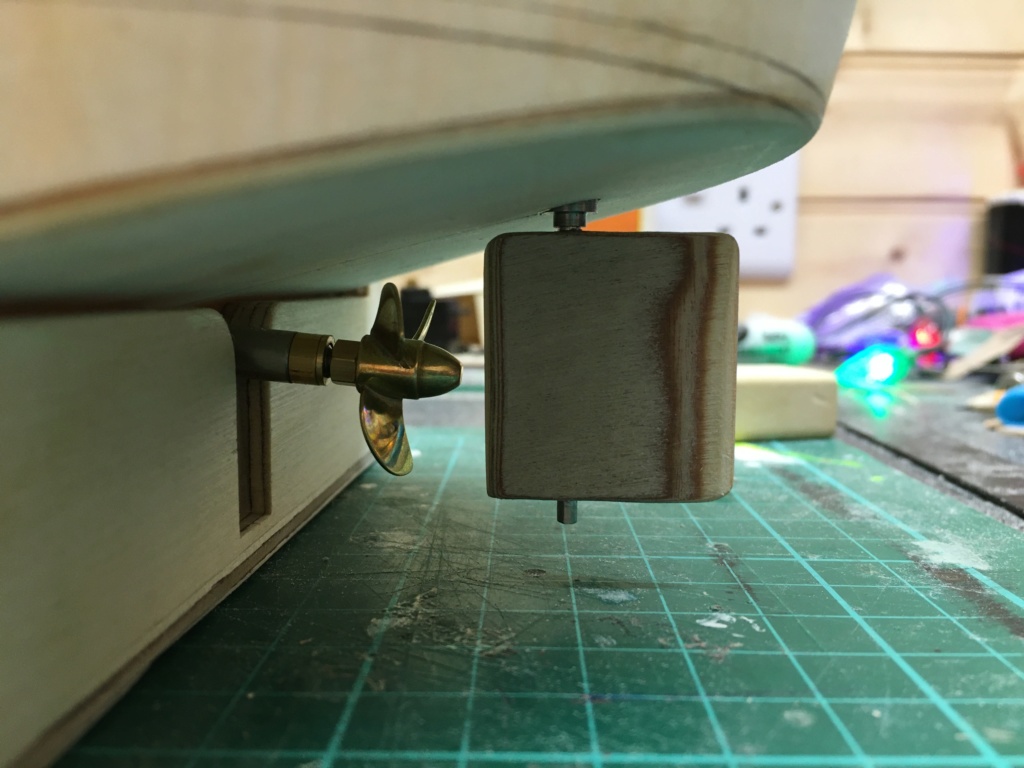 | |
|   | | Roadrunner
Forum Overlord


Posts : 1714
Join date : 2011-06-10
 |  Subject: Re: Chinese mini tug- Q3! Subject: Re: Chinese mini tug- Q3!  Sat Apr 11, 2020 8:11 pm Sat Apr 11, 2020 8:11 pm | |
| This afternoon I started work on the skeg. Believe me it’s been a pain in the backside getting the shape correct and ensuring it was level and the rudder fitted in place, this is just simply due to how small the boat is and how big my hands are... non the less I think I’m at that point where it’s correct... Above The prop shaft I slide a chunk of 6mm ply and squared it up, trimmed etc usual work needed and glued in place to the hull, the rest of the skeg is a lamination of 2 x3mm ply ( the curvature part was to small to risk my fingers at the fret saw using 6mm ply, so a lamination of 3mm was used as a stanly blade did the same job just less risk!) This is the end result, it will be glued to the hull and shaft, and then to hide the shaft inside I’ll give it a skin of .5mm ply which will make it all pretty, finally a bit of p38 to clean up a few minor gaps and a rounded edge from skeg to hull, I still have to make up the detachable part of the skeg for the rudder but that part is just flat work and a few holes, nothing significantly difficult by any means. The skeg is a little taller than planned, as it gives me a little adjustment on the rudder in height and play, I can make up a little stopper once in sure the rudder is in perfect position to the tube to stop any lateral slop, but also I had to account for prop angle as making it fit “perfectly” flush to the hull would have ment binding the prop or risk not having enough clearance should somthing get stuck between skeg and prop( weed, plastic bag, usualy lake rubbish) but for the most part I’m happy with it, I may have to adjust the skeg cutout in the stand as it’s a little taller but the stand has yet to get its foam pads so I will adjust if needs be. 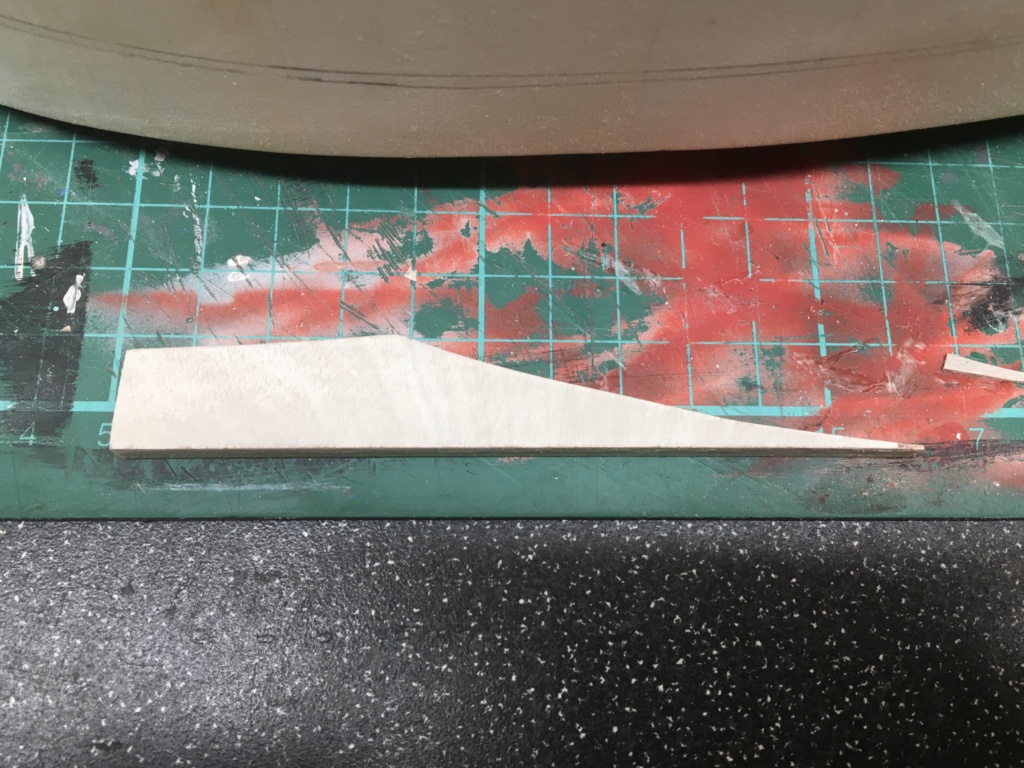 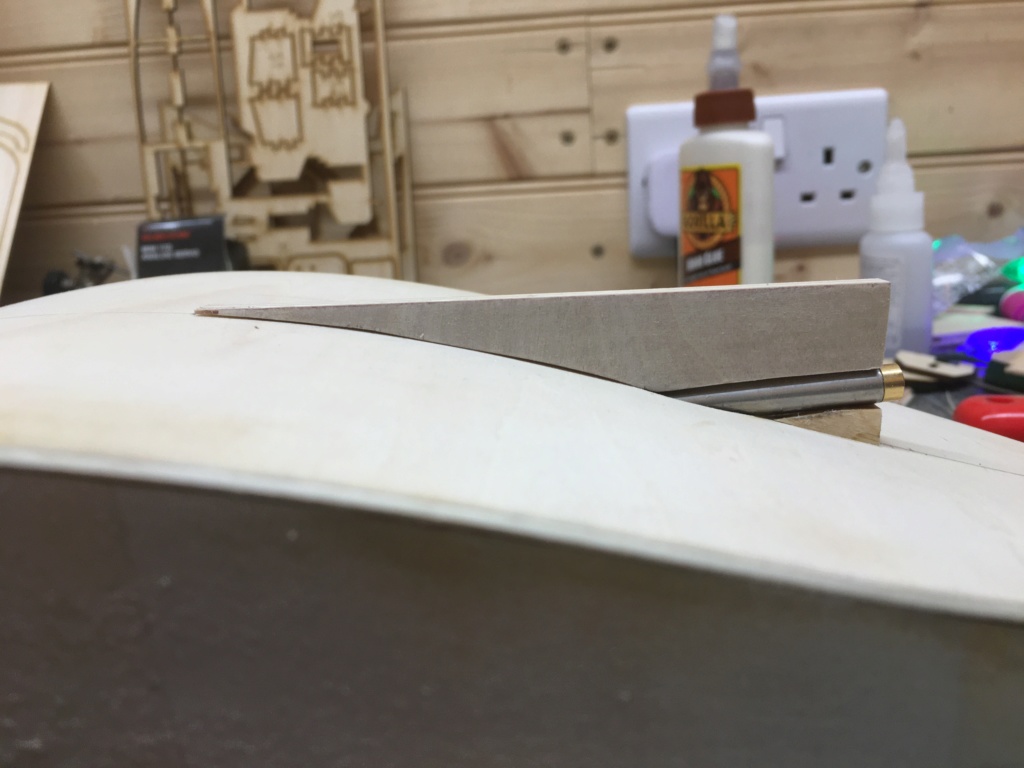 | |
|   | | Roadrunner
Forum Overlord


Posts : 1714
Join date : 2011-06-10
 |  Subject: Re: Chinese mini tug- Q3! Subject: Re: Chinese mini tug- Q3!  Sun Apr 12, 2020 12:00 am Sun Apr 12, 2020 12:00 am | |
| Finally finished the skeg for the most part, there are some seams and a small gap each side from the prop exit hole that need filling but that’s somthing to do closer to paint, but as you can see the skeg lines up correctly to the rudder, it’s currently got a scrap brass strip that I used for alignment, I’ll come up with something better tomorrow, on the whole slow progress but that was giant headache over with, but a good end result. More tomorrow ! 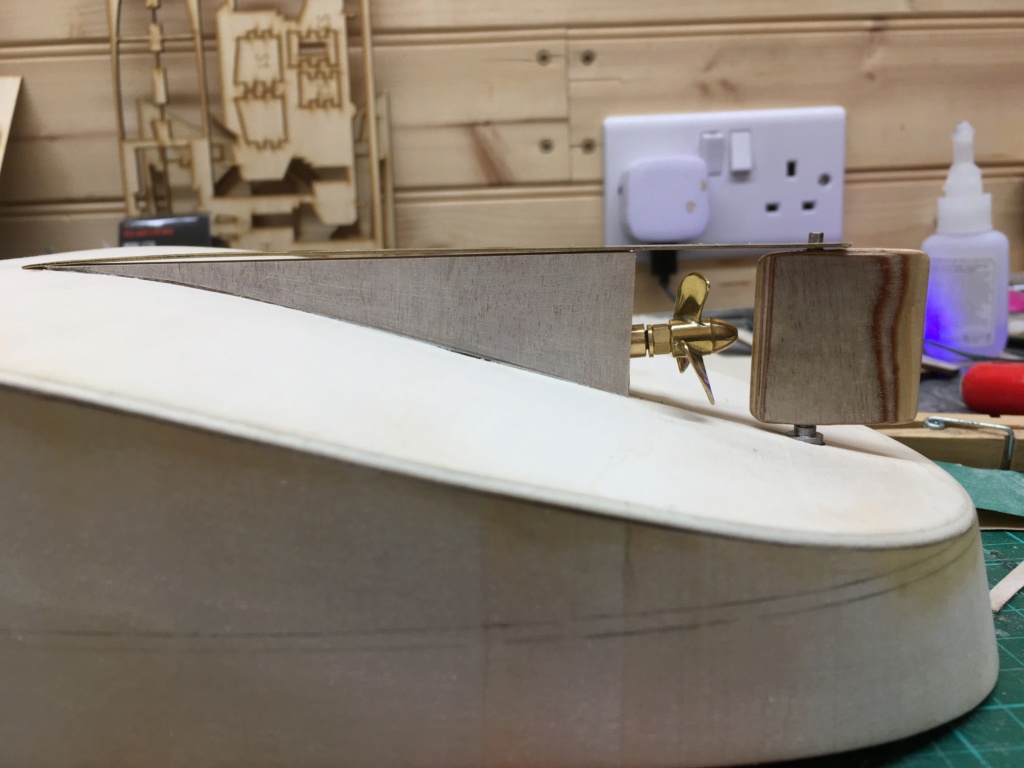 | |
|   | | barriew
Captain (moderator)

Posts : 2631
Join date : 2011-11-26
Age : 83
Location : Thaxted, Essex
 |  Subject: Re: Chinese mini tug- Q3! Subject: Re: Chinese mini tug- Q3!  Sun Apr 12, 2020 6:40 am Sun Apr 12, 2020 6:40 am | |
| | |
|   | | Roadrunner
Forum Overlord


Posts : 1714
Join date : 2011-06-10
 |  Subject: Re: Chinese mini tug- Q3! Subject: Re: Chinese mini tug- Q3!  Sun Apr 12, 2020 6:25 pm Sun Apr 12, 2020 6:25 pm | |
| Been working on the detachable part of the skeg for rudder access today, I had another strip of 6mm brass laying about, but it is very flexible ( I normally use these strips as rubbing strakes on larger boats so flex is good for that job) but here flexibility isn’t suitable so I folded it in half and soldered the joint tight. At the same time I also soldered in one of the brass grommets used to help secure servos, I use these a lot on projects as through holes/washers on boats where small screws are involved. Very useful at stopping me over tightening and tearing out paint. This grommet was drilled out to 2.5 mill (basically a bit of brass stretching) to take the end of the rudder post. I cleaned it up, then backed it with some lime wood, it will help when I finish the skeg capping to get everything level and add a little extra thickness to it. For now I’ve mounted it with some servo screws but I will locate some counter sink brass wood screws in my box a little later to make it much tidier. But for now they work fine for holding the part in place while I work, good news is that I don’t need to adjust the stand either , my “guess” was practically spot on, lucky eh?! *Wink wink* I still need to tidy up the skeg around the shaft as the skin is still oversize, I’ll round this off with a capping edge so the brass bushing is less pronounced, I’ll finish up the rest of the skegs cap, which I think I’ll extend possibly to the bow, and give the boat some sort of keel look, might help with a bit of tracking... I’ll see how it looks first before committing to it. 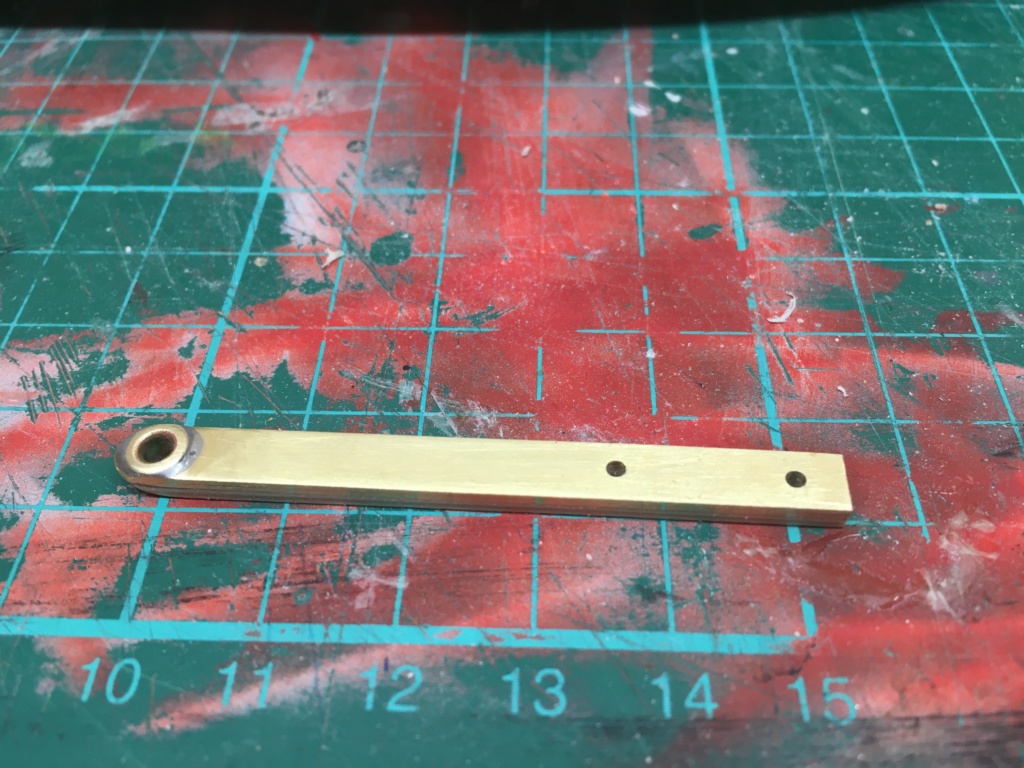 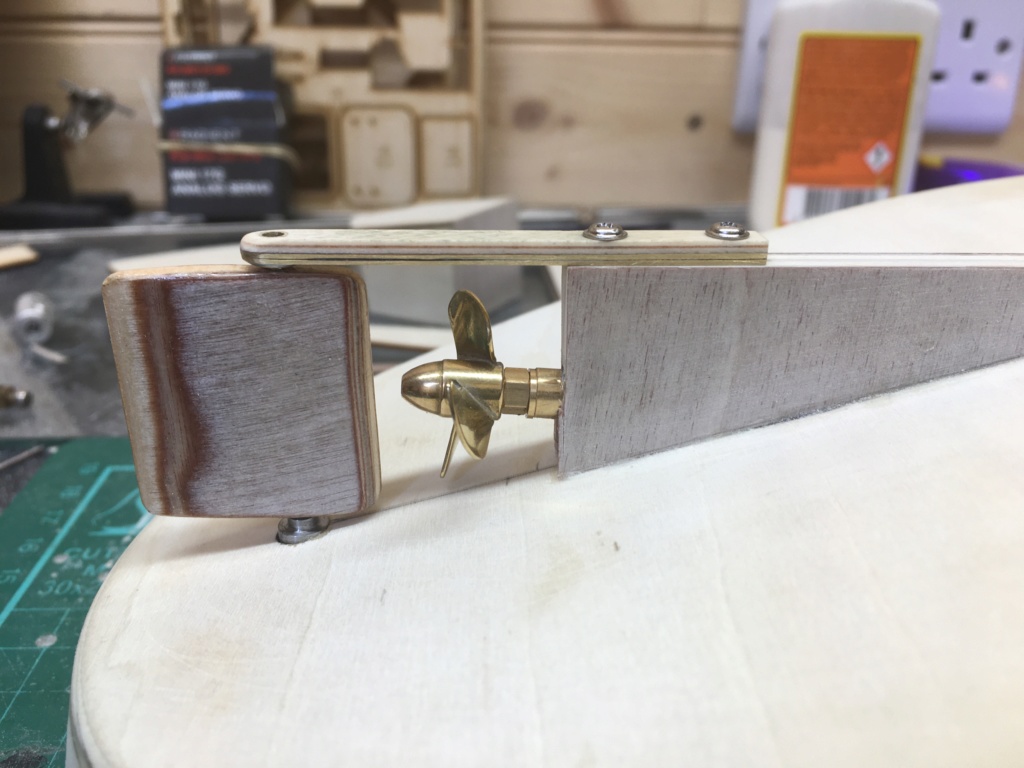 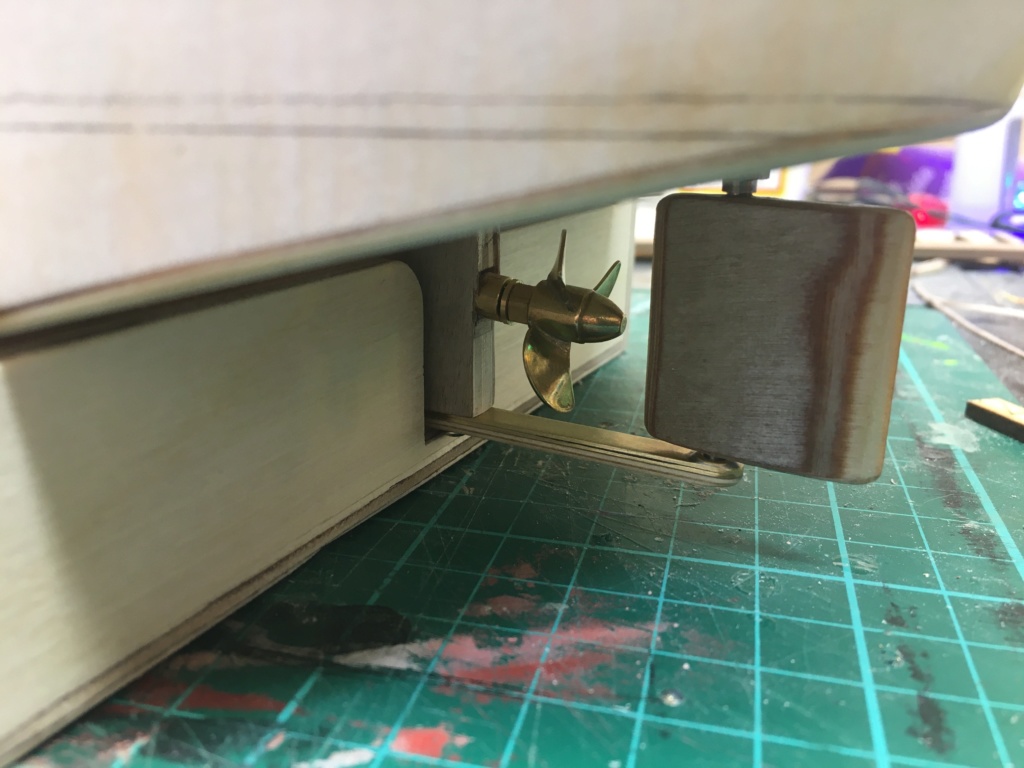 | |
|   | | Roadrunner
Forum Overlord


Posts : 1714
Join date : 2011-06-10
 |  Subject: Re: Chinese mini tug- Q3! Subject: Re: Chinese mini tug- Q3!  Sun Apr 12, 2020 10:11 pm Sun Apr 12, 2020 10:11 pm | |
| Finished up this evening by cutting and shaping the skeg capping strip, it’s tapered at best point on the hull curve although not flush fully with the hull as the skeg itself was, this is due to the rudder height. I opted not to extend this part to the bow, thought it looked odd during test fit. Just needs some p38 on the seams to smooth it all over and to find a couple of stainless screws that fit better than what I’m using currently, I may have to order some, so I’ll add that to my screw order I still have to place for another project. I’ll finish the capping of the prop shaft exit tomorrow and get it all tidied up then commence with the internals before deck. 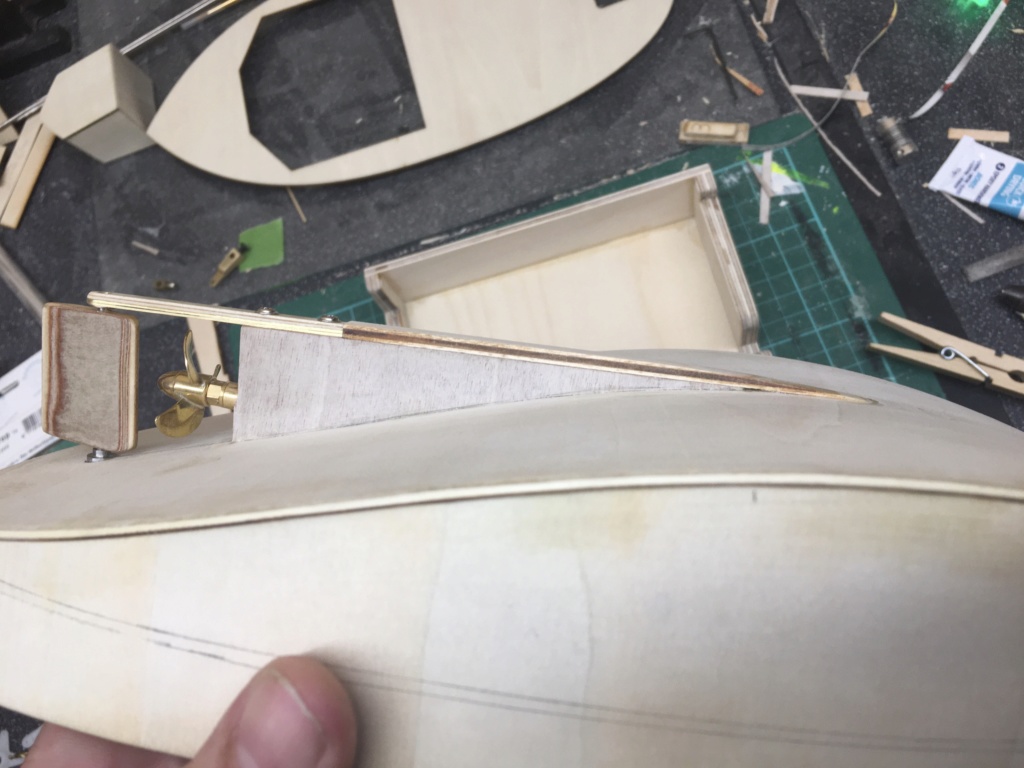 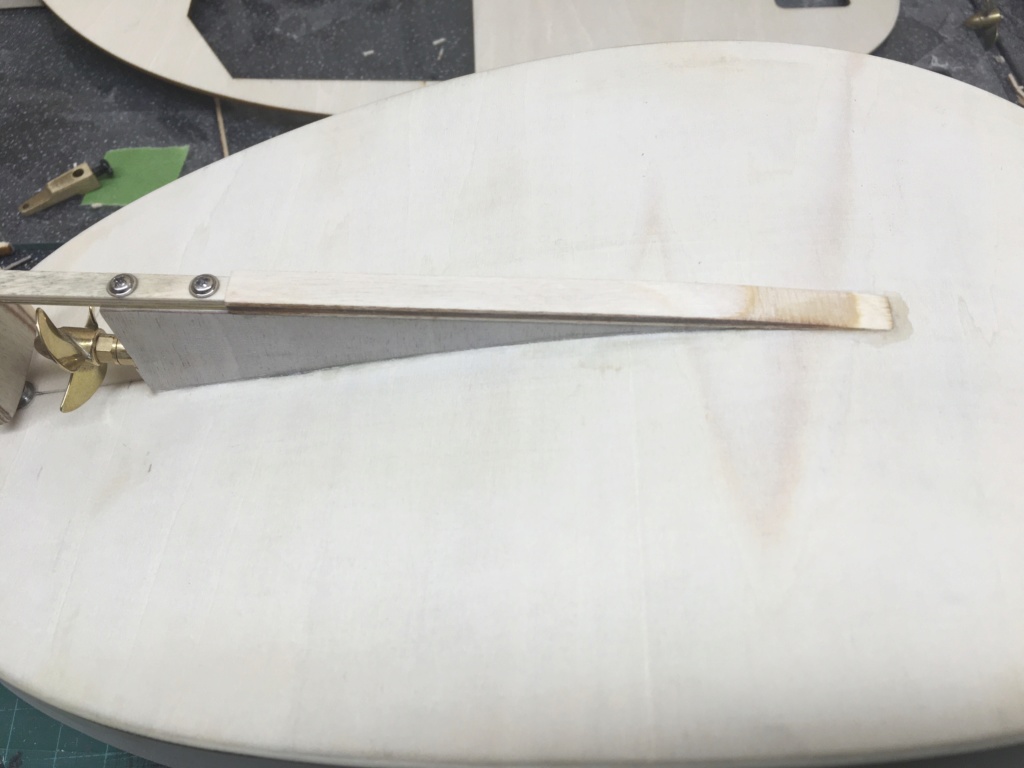 | |
|   | | Roadrunner
Forum Overlord


Posts : 1714
Join date : 2011-06-10
 |  Subject: Re: Chinese mini tug- Q3! Subject: Re: Chinese mini tug- Q3!  Mon Apr 13, 2020 8:03 pm Mon Apr 13, 2020 8:03 pm | |
| My endured battle with the skeg addition to the hull comes to an end finally (not forgetting to p38 seams and such but that’s fine during final hull prep) I’ve added the prop shafts capping plate to the end and profiled it, I’ve also attached some lime wood to the detachable skeg as it’s width was under size, and I’ve profiled those as well to fit the edges of the skeg seamlessly, looks good to be honest, filler and paint will hide the different materials used, now I can move into the running gear fit out inside the hull before deck goes down, this has worked out well for timing as I’m waiting for my M4 taps to arrive (hopefully tomorrow since today’s a bank holiday) with those here I’ll be able to mock up the motors position and angle with a solid state coupling, and also mount the servo. I will need to buy some ball joints for the rudder linkage, given the angles I’m forced to work with, no big deal but I didn’t think that far ahead on purchases, fortunately it’s something I can do later, as I have material I can knock up as a temp to do the job before final fitting. 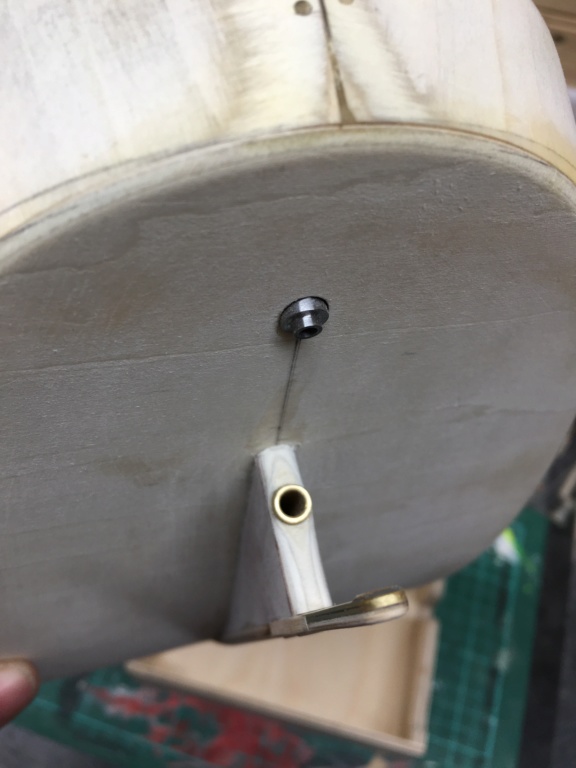 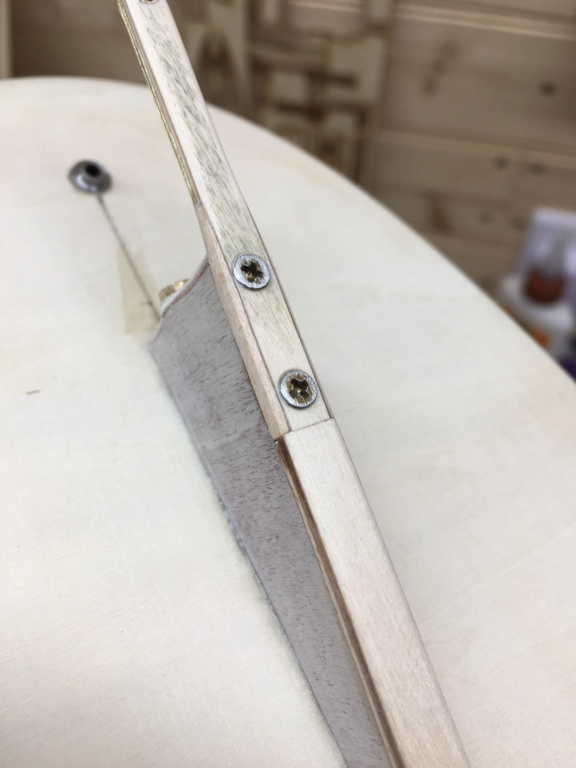 | |
|   | | Roadrunner
Forum Overlord


Posts : 1714
Join date : 2011-06-10
 |  Subject: Re: Chinese mini tug- Q3! Subject: Re: Chinese mini tug- Q3!  Tue Apr 14, 2020 9:17 pm Tue Apr 14, 2020 9:17 pm | |
| Not much done today, ended up having to relign the lathes headstock it was cutting holes at strange angles, I think I hadn’t done the headstock screw up tight enough so the vibrations over time had allowed the head to move slightly, took me a good two hours messing about getting it to realign correctly.... with that said I aimed to make up the prop shaft coupling today and three attempts later I finally made one up that’s spot on... It’s tiny in size 6.5mm in diameter, with motor spindle m3 hole, tapped for grub screws, the photo shows the screws very long.. they are the only spare ones I could find which are 8mm long, I will look in my spares box later for some 3/4mm ones so they don’t sit so pronounced, it’s a minor Thing. Even with them slightly long I doubt it will “unbalance the motor” seeing how there is one each side. And yes I could have made the coupling thicker... but I used a scrap bit of 8mm stainless rather than cutting into my new stock, so it’s diameter was fixed from cleaning up surface marks from the vice. Long as it works all that matters and it was free! (Almost if you discount spending £10 on new taps, I know I will, it will make me feel better. Haha) I’ve yet to tap the internal thread to M4 for the shaft as the taps have still yet to arrive in today lack of postman... I think it’s reduced service at present so I can only shrug as to when I might see them. But the coupling is pretty much done... so I can start mocking up the electronic tray for servo and motor, talking on rudder... I had to order a tiller for the rudder shaft, I literally had no more spares in the box for a 2.5mm shaft, but that worked to my advantage as I also ordered an adjustable linkage set since the servo was to be further to the front than the plan states, so I need to work as a slight angle to get the linkage to work correctly, the linkage set, is not a ball joint system that I would normally use, it’s one of the fast electrics exterior rudder with the spigot on the end, this I think will allow me to fit the linkage almost flat in the boat since I can mount it upside down. Anyway lots of plans very little action... roll eyes.... have faith, my plans usually all come together in the end.. 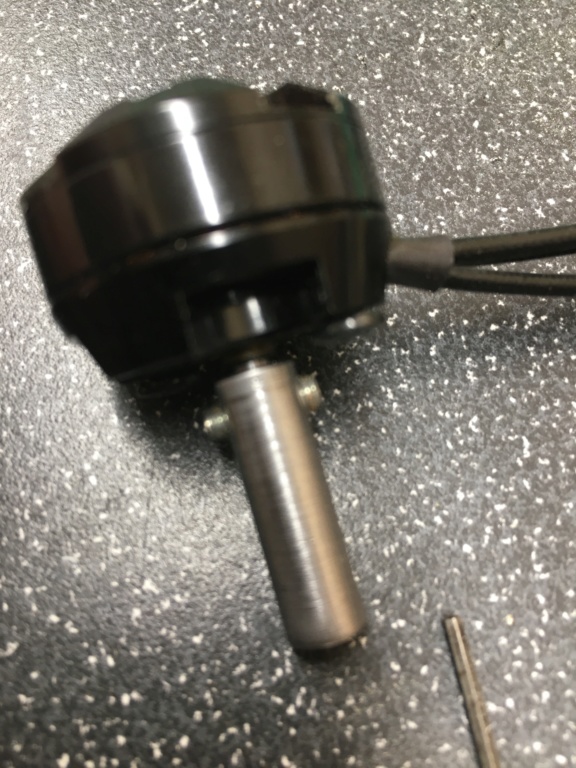 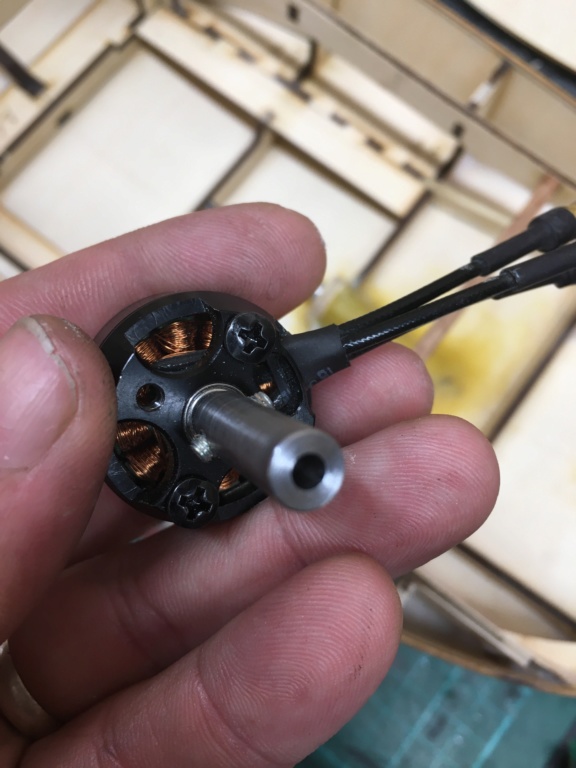 | |
|   | | barriew
Captain (moderator)

Posts : 2631
Join date : 2011-11-26
Age : 83
Location : Thaxted, Essex
 |  Subject: Re: Chinese mini tug- Q3! Subject: Re: Chinese mini tug- Q3!  Wed Apr 15, 2020 6:43 am Wed Apr 15, 2020 6:43 am | |
| RR - don't forget while laying out the motor and electronics that you will need to accommodate quite a lot of ballast. I put 500g into mine and it still wasn't down to the water line  Barrie | |
|   | | Roadrunner
Forum Overlord


Posts : 1714
Join date : 2011-06-10
 |  Subject: Re: Chinese mini tug- Q3! Subject: Re: Chinese mini tug- Q3!  Wed Apr 15, 2020 10:00 am Wed Apr 15, 2020 10:00 am | |
| Couldn’t find any shorter grub screw so I just chucked the whole thing back in the lathe and cut down the ones fitted to the coupling size... nice and tidy now Mwhahaha. And yes the Allen key still fits perfectly well and deep into them! The photo is misleading a little. 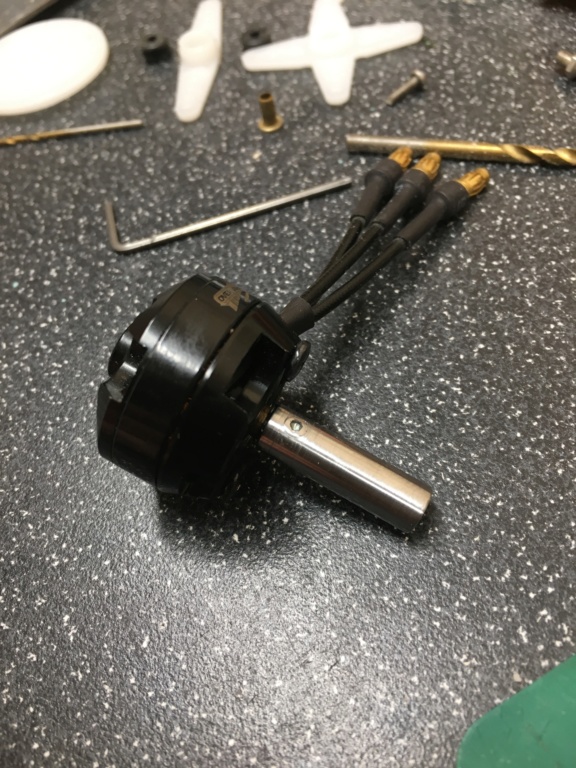 | |
|   | | Roadrunner
Forum Overlord


Posts : 1714
Join date : 2011-06-10
 |  Subject: Re: Chinese mini tug- Q3! Subject: Re: Chinese mini tug- Q3!  Wed Apr 15, 2020 10:06 am Wed Apr 15, 2020 10:06 am | |
| I won’t know about ballast until the hull is sealed and I can sink test this one, to be fair most of my boats never sail so I don’t tend to ballast them unless they are going for a dive, in those cases I use little sand bags to trim up areas, obviously for most of my boats it’s usually only trim weight as I primarily do planing vessels, so I may have actually ballast this one correctly, given it’s working room, thanks for the reminder Barrie, I probably wouldn’t have remembered to do it until much much later!  | |
|   | | Roadrunner
Forum Overlord


Posts : 1714
Join date : 2011-06-10
 |  Subject: Re: Chinese mini tug- Q3! Subject: Re: Chinese mini tug- Q3!  Fri Apr 17, 2020 9:00 pm Fri Apr 17, 2020 9:00 pm | |
| The servo/rudder linkages showed up today... still waiting on my taps to finish the damn coupling, weirdly I ordered the taps a week before the rudder hardware, thinking at this point it’s lost in the post  Anyway since the linkages showed up I was able to mock up the tiller, I had to grind out a groove in the rear bulkhead a little to give me some extra clearance, nothing major, this is more so as cut down the tiller to the middle hole as the end was far to long to even use, I may still move it to the closest hole to the pivot yet, but I won’t know that until I get the servo/motor tray fixed and can test the throw, I have option on the servo arm as is... so right now it’s just positioning at a rough guess, but as you can see this is where I choose to mount the servo, and off the photo you can see I also have access to it fully, the tiller arm can be reached but only the grub screw not the rods adjustment because it’s mounted upside down at present (best clearance, right side up fouls the deck.... this I maybe able to resolve but honestly removing the grub screw and flipping out for adjustment is easy enough since you have full servo access anyway... no biggy but a deck limitation I’m trying to reduce issues with for this...) Nothing else done until my taps arrive *taps foot* more once they arrive which I would bet won’t be until Monday at this rate *sigh* 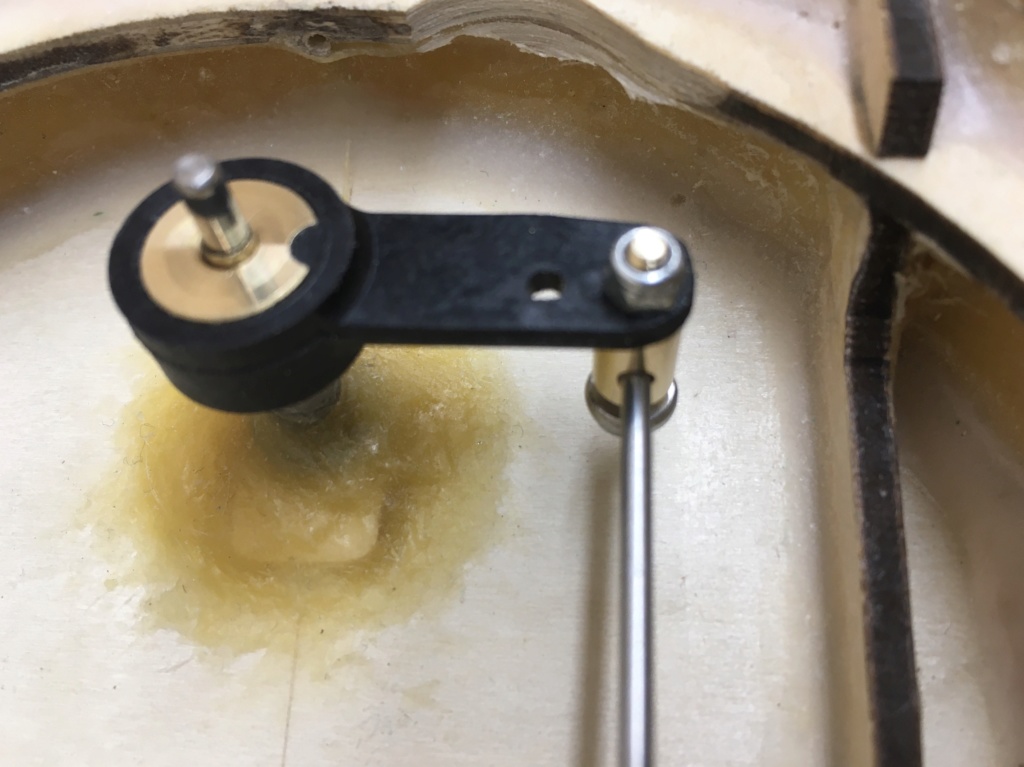  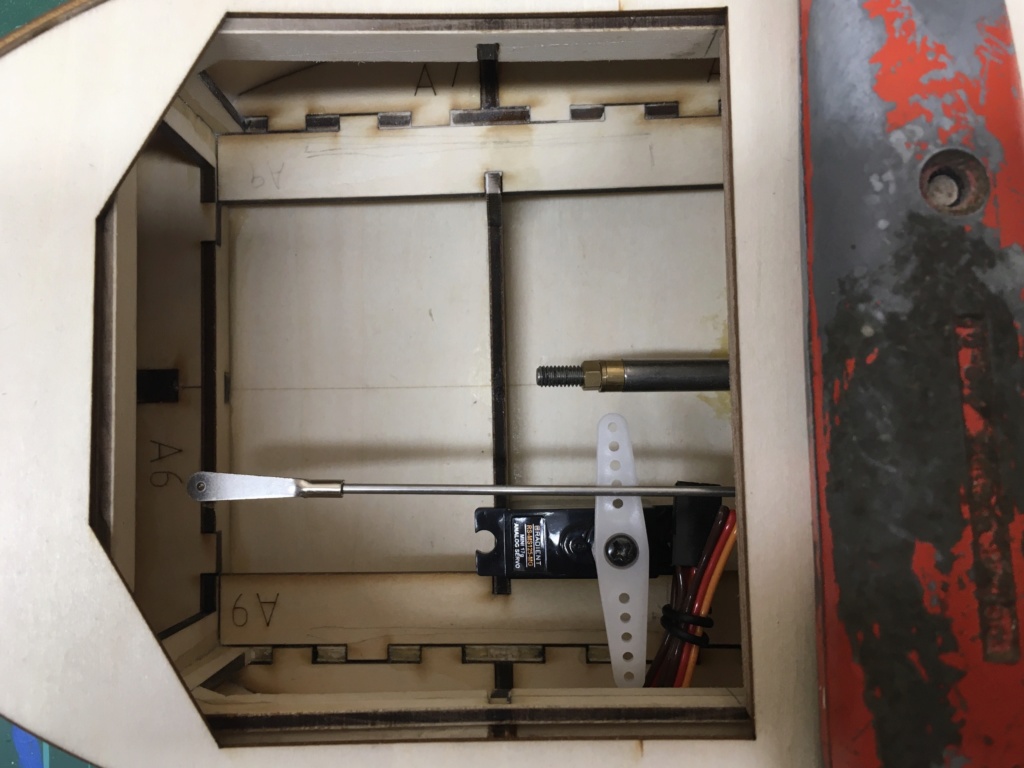 | |
|   | | Roadrunner
Forum Overlord


Posts : 1714
Join date : 2011-06-10
 |  Subject: Re: Chinese mini tug- Q3! Subject: Re: Chinese mini tug- Q3!  Sat Apr 18, 2020 5:24 pm Sat Apr 18, 2020 5:24 pm | |
| Finally my taps arrived in the post, later this evening I’ll tap the coupling!!! Haven’t been able to really progress without this job done... anyway figured I’ll share my excitement over some M4 taps... 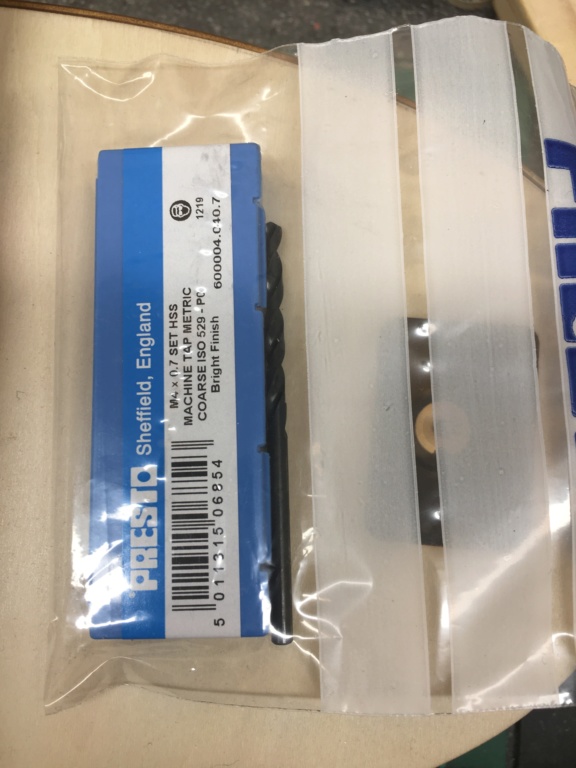 | |
|   | | barriew
Captain (moderator)

Posts : 2631
Join date : 2011-11-26
Age : 83
Location : Thaxted, Essex
 |  Subject: Re: Chinese mini tug- Q3! Subject: Re: Chinese mini tug- Q3!  Sat Apr 18, 2020 5:29 pm Sat Apr 18, 2020 5:29 pm | |
| | |
|   | | Roadrunner
Forum Overlord


Posts : 1714
Join date : 2011-06-10
 |  Subject: Re: Chinese mini tug- Q3! Subject: Re: Chinese mini tug- Q3!  Sat Apr 18, 2020 7:02 pm Sat Apr 18, 2020 7:02 pm | |
| I got my parts from CMB the other day but a week after they were officially posted, I think the post office is just on reduced service at the moment so everything is 2 or 3 days behind unless you pay for DPD delivery (which is what I’ve been doing in some cases recently to get here faster) Anyway made it to the workshop after dinner to cut the damn tap.... Yay me... that was easy! Good quality tap too.. I might get a full set of these for £100 much better than my old ones! Guess it goes to show you get what you pay for, this M4 set was £10 3 taps and the drill bit suited. Anyway drilled the 3.2 mill hole in the lathe depth to suit the thread still on the shaft, normal tap then used bottom plug tap to finish, as the hole for the motor is only 3mm. Both operations I did by hand turning the chuck made light work of the cuts.. and as you can see the threads are very well cut and the coupling now sits on the shaft correctly. The motor at the moment has the kits motor mount plate attached to use as a guide to making up my own motor mount, I may indeed use this front plate from the kit and make side mounts to fit.. seams a waste to not use it anyway now I can finally crack on with the rest of the motor mounting tray. All of which will be detachable and can pop through the deck hatch for easy maintenance and adjustment which will be far better than the kits guide book suggests. More to come very soon now!!!!! 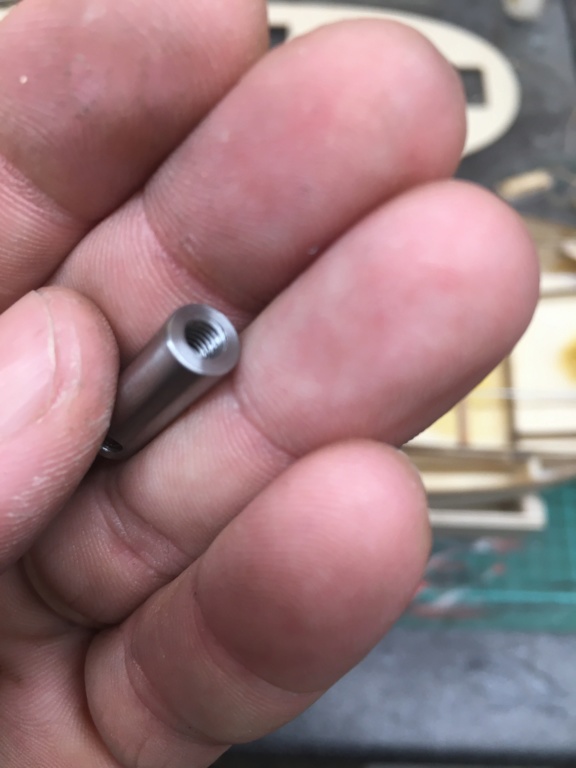 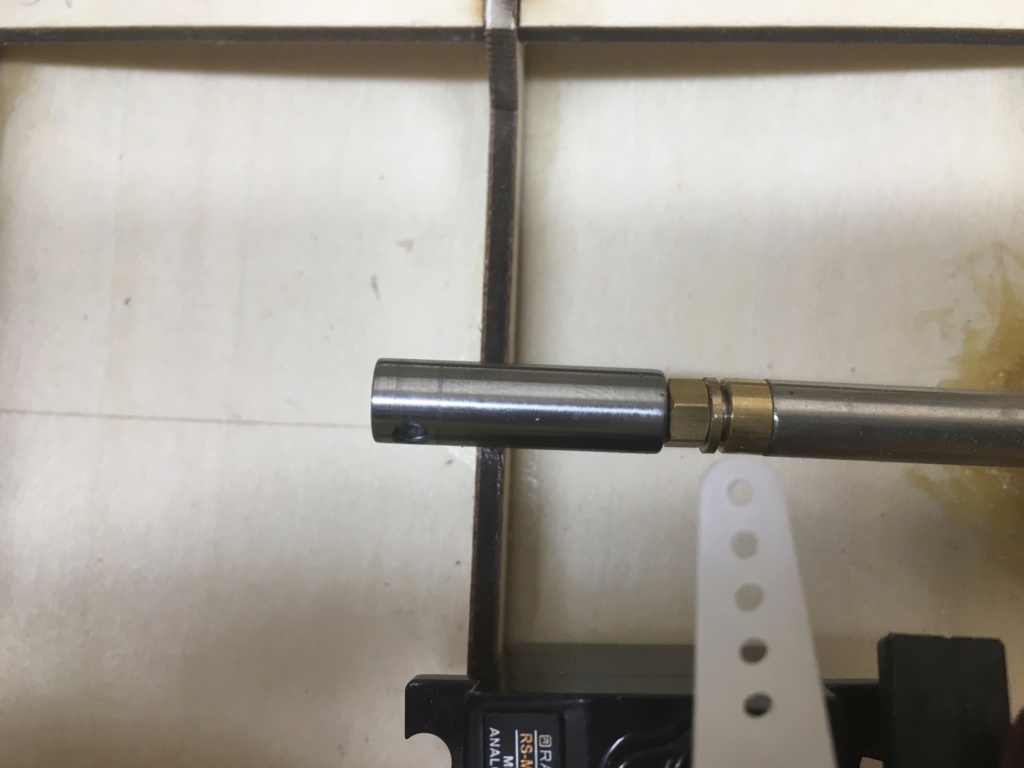 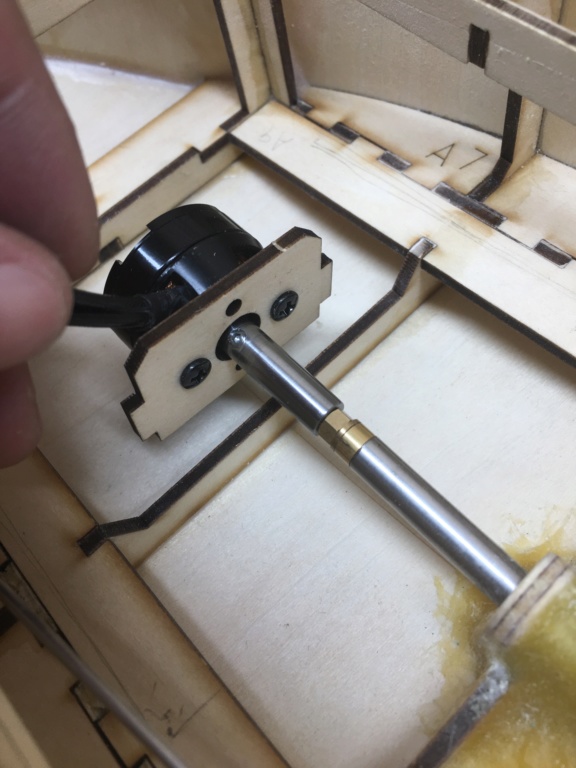 | |
|   | | Roadrunner
Forum Overlord


Posts : 1714
Join date : 2011-06-10
 |  Subject: Re: Chinese mini tug- Q3! Subject: Re: Chinese mini tug- Q3!  Sat Apr 18, 2020 11:09 pm Sat Apr 18, 2020 11:09 pm | |
| I’ve started on the electronics plate to mount the motor and servo to.. the plate is quite long it stretched from the first bulkhead to the 3rd but is only as wide as the hatch with the combing so it can be lifted and slotted out easy enough, I’ve had to also slot the motors side edges to allow it to slide back into the bow so the coupling can be screwed on, which is turn slides the plate forward to its end position which will lock up against some plates on the edge of the 3rd bulkhead, it will need some screws to hold in place but not before I add an edge the plate as a support each side where the electronics are suppose to sit, as you can see I have plenty of room to fit the servo to the tray and the other side for the esc, (the motor is just screwed with wires one side for now, I’ll rotate the motor the other way a little later). The motor mount uses the original kits front mount which was tacked to the main plate in its correct angle, once the superglue went off I was able to unscrew the entire plate with motor and then create and fit some side mounts which have also been reinforced internal side of the motor, I will also reinforce the edges of all joints with some grp, it’s a little overkill but the mount won’t be shaking itself apart any time soon! Tomorrow I will cut the slot for the servo, and also look to create a battery tray between bulkhead 3 and 4 which although is way under the deck I can still slide a 2s or a smaller 3s lipo under with my fingers, I’ll work on that before committing, the other option will be to slide the battery into the bow, but will only be room for a 2s, ( the original plan allows for the battery where the motor currently sits ) I think best option maybe to fit it back depending on rudder linkage clearance which I won’t know until servo is mounted “all very much up in the air at present” but I’ll come up with something appropriate. 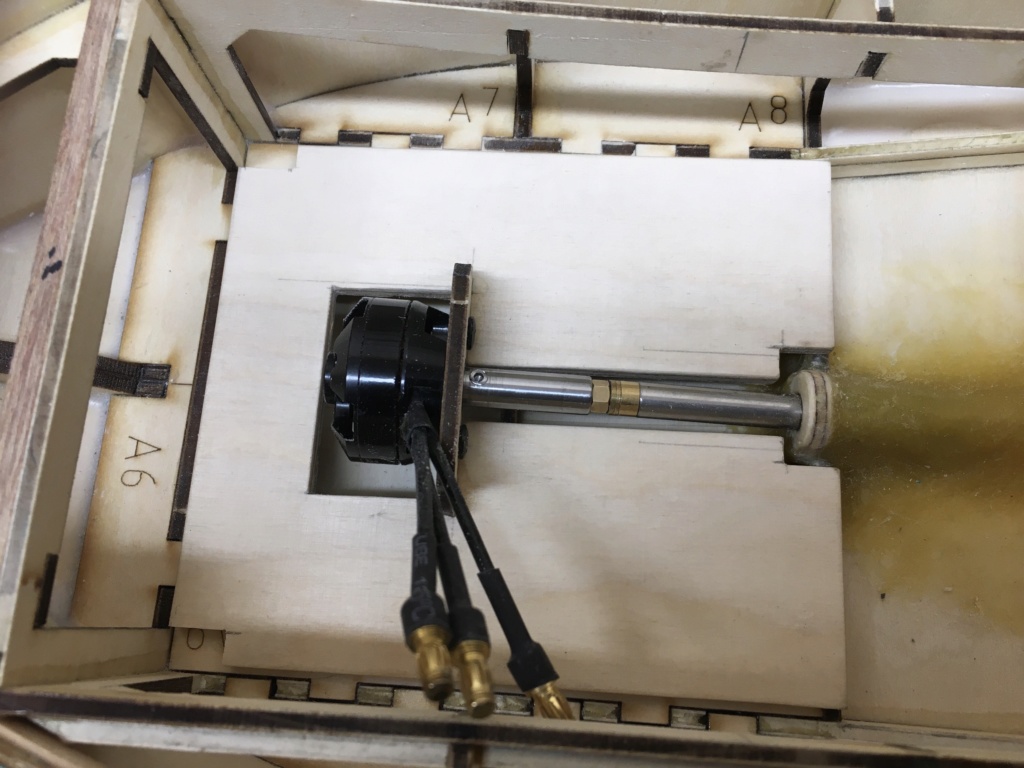 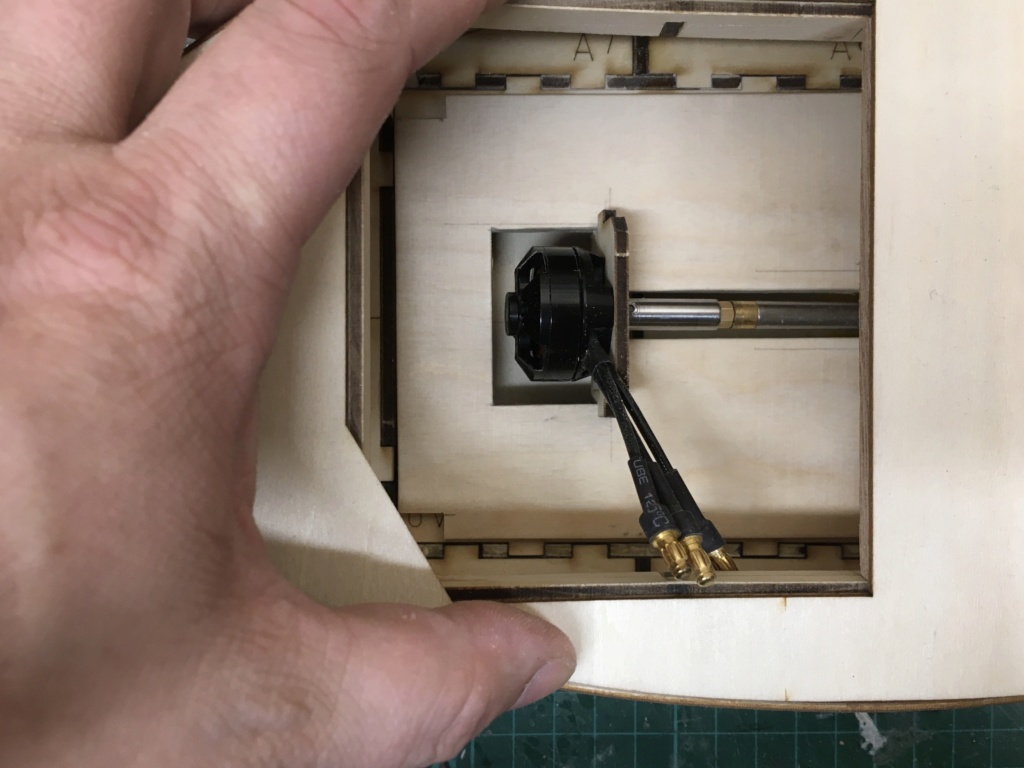 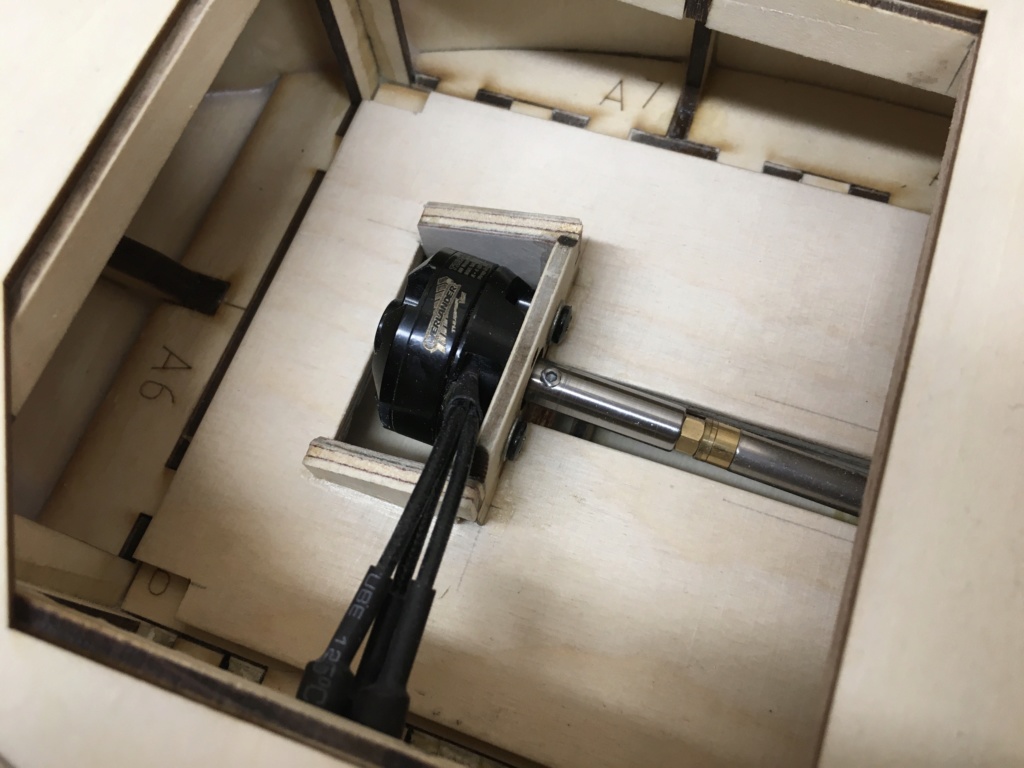 | |
|   | | Roadrunner
Forum Overlord


Posts : 1714
Join date : 2011-06-10
 |  Subject: Re: Chinese mini tug- Q3! Subject: Re: Chinese mini tug- Q3!  Wed Apr 22, 2020 11:46 am Wed Apr 22, 2020 11:46 am | |
| I haven’t done much last couple of days, I’ve been battling a COPD flare up, for those who suffer know it can knock you for 6 at times, for those who don’t.... don’t smoke.... lesson there somewhere I think...anyway I avoided my dusty workshop for a few days instead of aggravating it further. None the less today I got the workshop and cut the slot for the servo. I have had to add a riser block so the servo sits a little higher so it’s not resting on the slope of the hull, this was expected given the servos depth and the location of the plate, but also gave me more material to screw into for mounting the servo. I also drilled a hole for the servos cable as there was no where for it to come out from given the way the mounting plate works. I’ve also decided to keep the cables of the motor to this side just for simplicity. I’ve mocked up the linkage and cut it roughly to length, I still have a good inch of further adjustment if needs be, and I’m opting to have a short servo throw but long tiller throw, as normal testing doesn’t throw the rudder as far a I would like, no biggy normal testing until it’s where I want it. 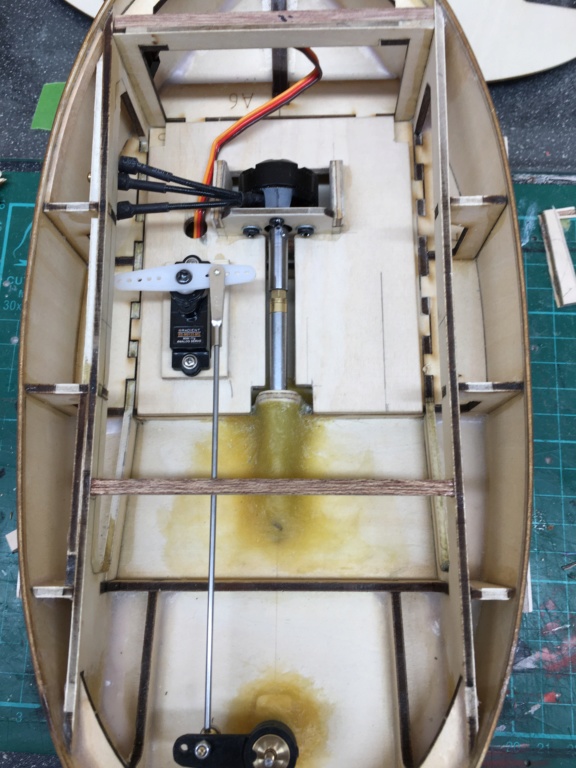 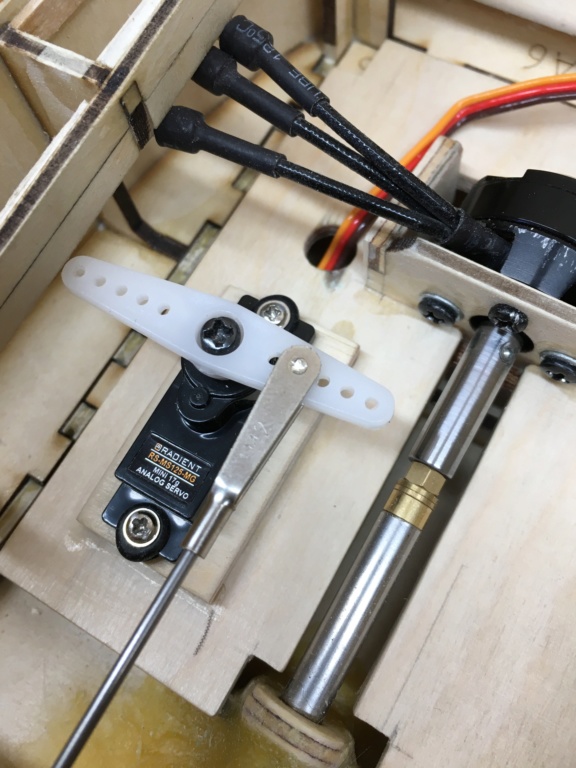 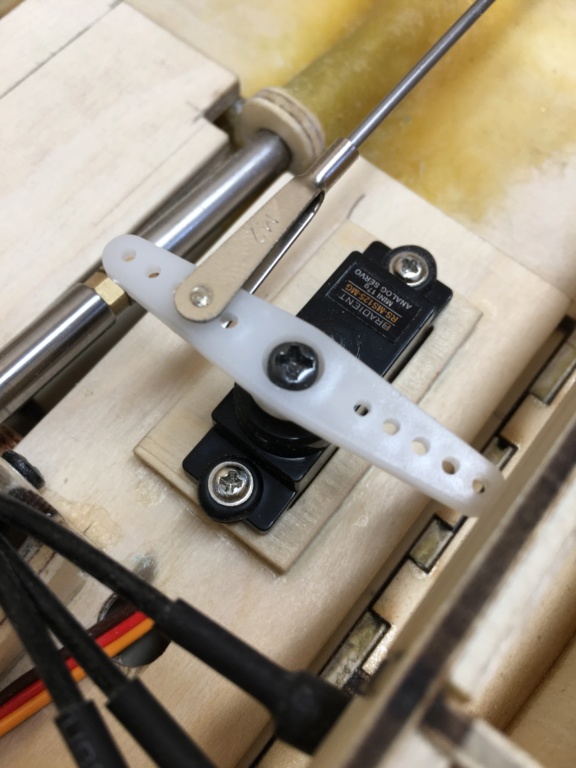 | |
|   | | T33CNO
Gunner

Posts : 152
Join date : 2020-03-14
Location : Leeds
 |  Subject: Re: Chinese mini tug- Q3! Subject: Re: Chinese mini tug- Q3!  Thu Apr 23, 2020 7:24 am Thu Apr 23, 2020 7:24 am | |
| It all looks superbly neat. I hope you're back up to strength very soon | |
|   | | Roadrunner
Forum Overlord


Posts : 1714
Join date : 2011-06-10
 |  Subject: Re: Chinese mini tug- Q3! Subject: Re: Chinese mini tug- Q3!  Sat Apr 25, 2020 2:50 am Sat Apr 25, 2020 2:50 am | |
| You all remember my little issue with the frames at the start of this blog right? Well what I left out when dealing with them was I actually messaged the seller and complained like a true Brit, the reply wasnt fast surprising with a promise to send me replacement frames.. by the time they had said this I had already fixed the issue and moved on... Low and behold today not holding much stock in the promise of replacement parts look what showed up in the post... the two sheets of frames! So I’m at this point where I’m deciding if I want to template out all the parts I haven’t used, and ones I have to make a 2nd boat (It’s only the hull base and sides I’ve used so far so shouldn’t be that hard ) ... maybe in a totally different style to what this will be... suggestions on a post card.... 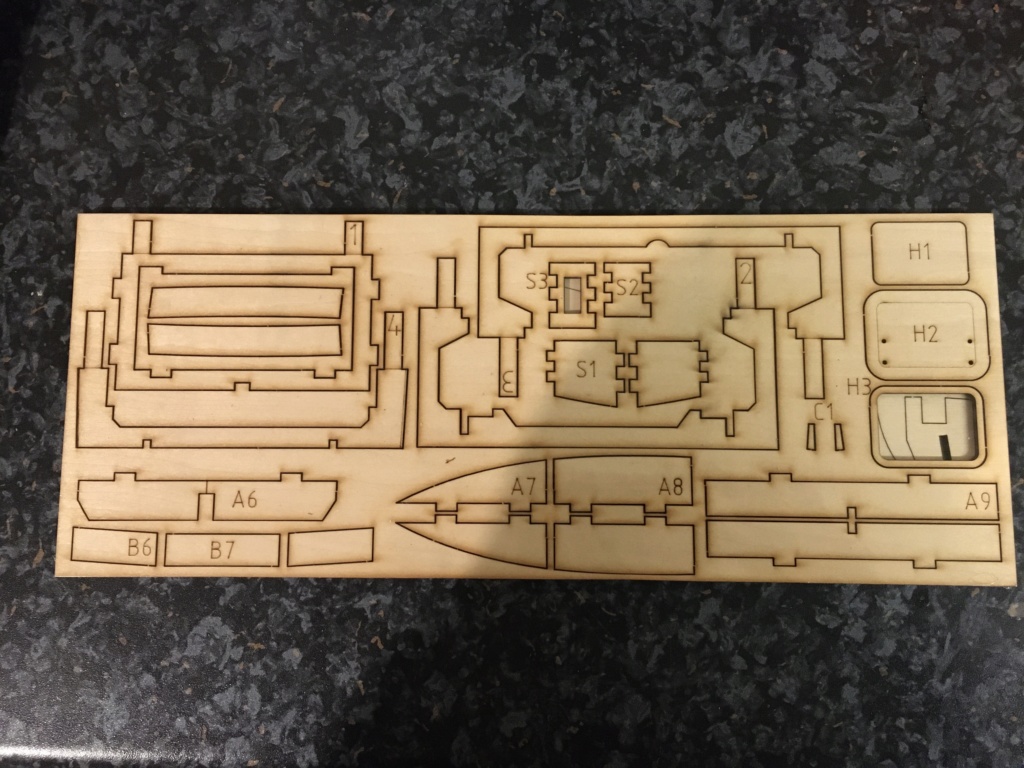 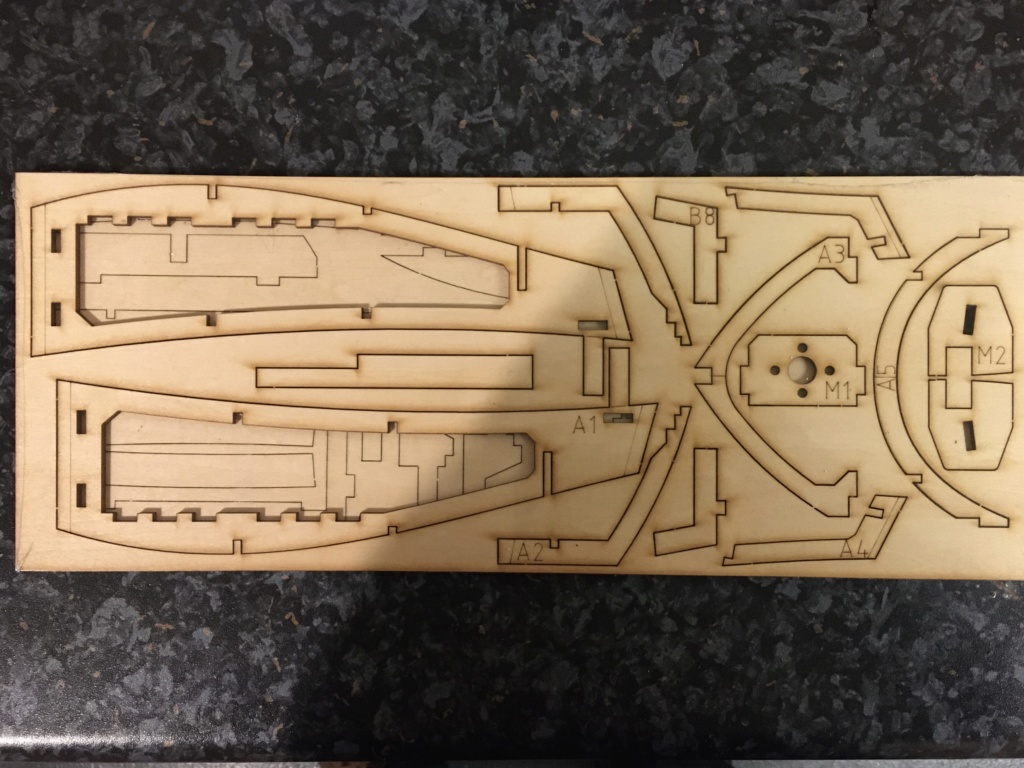 | |
|   | | T33CNO
Gunner

Posts : 152
Join date : 2020-03-14
Location : Leeds
 |  Subject: Re: Chinese mini tug- Q3! Subject: Re: Chinese mini tug- Q3!  Sat Apr 25, 2020 8:31 am Sat Apr 25, 2020 8:31 am | |
| Good result. Logistically slow but I've never yet had an unresolved issue with Chinese sellers and not just because they fear the consequences from Ebay  | |
|   | | Biggs Darklighter
Deck Hand

Posts : 13
Join date : 2020-05-01
 |  Subject: Re: Chinese mini tug- Q3! Subject: Re: Chinese mini tug- Q3!  Fri May 01, 2020 6:36 am Fri May 01, 2020 6:36 am | |
| - Roadrunner wrote:
- So I’m at this point where I’m deciding if I want to template out all the parts I haven’t used, and ones I have to make a 2nd boat (It’s only the hull base and sides I’ve used so far so shouldn’t be that hard ) ... maybe in a totally different style to what this will be... suggestions on a post card....
Roadrunner I registered just to say, TEMPLATE THEM ALL! That, and I was enjoying reading your build today! I have been eyeballing these little tugs for I guess a few years now. Long enough that the eBay listing I saved for later in my cart, had become a hairdryer. I need one for "practical" reasons as a rescue boat for my sailboat issues. I have a Q1 coming sometime next week. I have a silly plan for the power plant that probably won't work, so I am starting my build by templating and importing the whole thing into Design Space for my Cricut Maker. Besides, they ARE Chinese boats... So they have likely been cloned at least 2-3 generations now, as likely evidenced by the original goofy frame bit. So kinda think we owe it to them to continue their tradition eh?!  Anyways, really enjoying the build! | |
|   | | Roadrunner
Forum Overlord


Posts : 1714
Join date : 2011-06-10
 |  Subject: Re: Chinese mini tug- Q3! Subject: Re: Chinese mini tug- Q3!  Fri May 01, 2020 1:34 pm Fri May 01, 2020 1:34 pm | |
| Thanks for the kind words, I haven’t been in the workshop recently to continue, so I may bring it in the house at some point..
The current lock down is it literally causing my kids to act up especially toward their mother so I’ve have to be a lot more attentive to keep them Rained in and keep the peace, it’s basically cabin fever at this point but they don’t really understand why their stuck in doors, computers and tv only go so far, stacks of drawings and doddle are mounting, it’s just one of those things sadly.
Work will continue shortly I’ve been enjoying this build, so I’ve decided that I will template out the parts I’ve used and the outstanding parts for a 2nd build , I had found the mini tug plans online for the full size and some very nice variations, one of which is right up my alley being of a style I enjoy crafting.
But like any hobby family must come first.
Aron | |
|   | | Sponsored content
 |  Subject: Re: Chinese mini tug- Q3! Subject: Re: Chinese mini tug- Q3!  | |
| |
|   | | | | Chinese mini tug- Q3! |  |
|
Similar topics |  |
|
| | Permissions in this forum: | You cannot reply to topics in this forum
| |
| |
| |
