| | AeroKits Sea Urchin |  |
|
+4barriew davidjt troutrunner Roadrunner 8 posters |
|
| Author | Message |
|---|
Roadrunner
Forum Overlord


Posts : 1714
Join date : 2011-06-10
 |  Subject: Re: AeroKits Sea Urchin Subject: Re: AeroKits Sea Urchin  Sun Apr 29, 2018 4:53 pm Sun Apr 29, 2018 4:53 pm | |
| Colour has commenced... I’ve opted to spray a single colour on everything and then go back and add the darkers over the top in there locations, this allows a smoother paint finish and reduced the ridges that build up along the mask line, this also gives a a few more layers of paint on the areas where plank and wood grain are showing in an effort to reduce those. Photos so far, starting with the lighter green top coat... keep watching regular updates on their way! 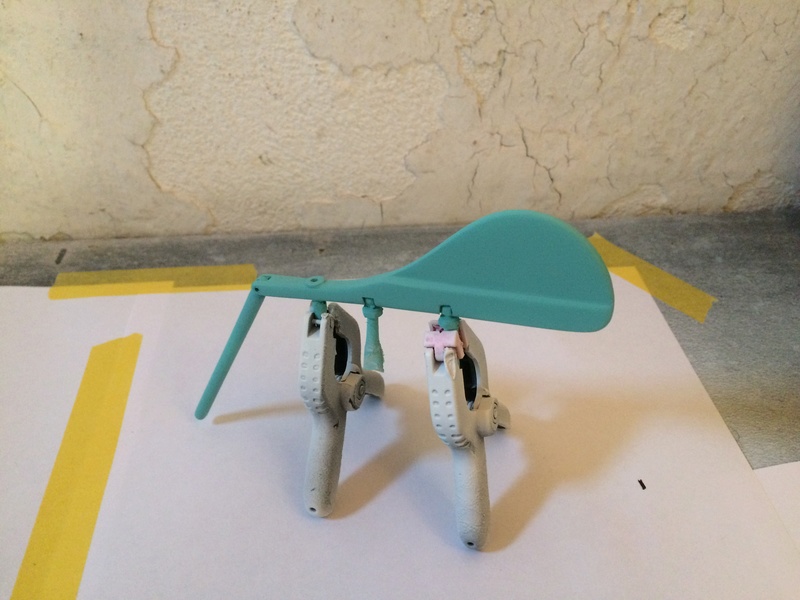 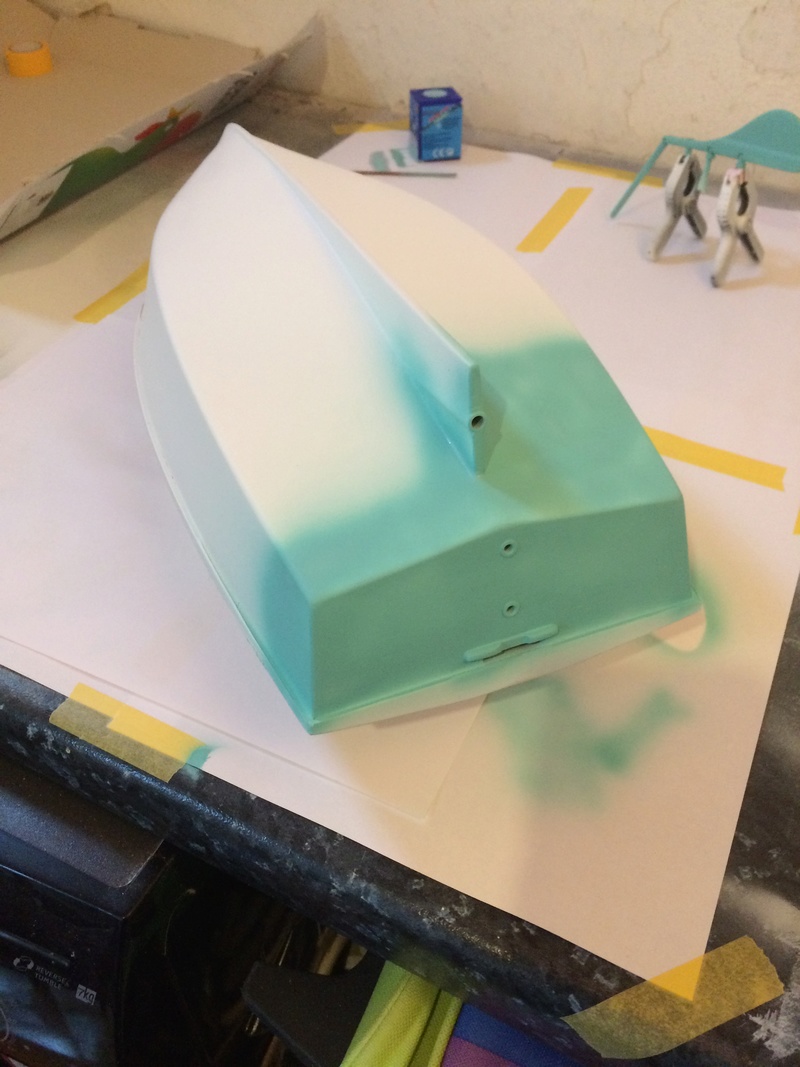
_________________
I'm Not Anti-Social, I'm Anti-Stupid.
| |
|
  | |
Roadrunner
Forum Overlord


Posts : 1714
Join date : 2011-06-10
 |  Subject: Re: AeroKits Sea Urchin Subject: Re: AeroKits Sea Urchin  Sun Apr 29, 2018 8:39 pm Sun Apr 29, 2018 8:39 pm | |
| First full coat went on well, only a few little specs that needed some rubbing off, which I gave the whole boat a light rub down with some 600 grit, and have sprayed the 2nd coat, I expect another coat after another light rub will see the first colour finished, but that will depend if I have an even colour surface with no flecks pulling up from the primer, I hope to have the colour finished by the end of the week and then I’ll do the varnish layers with the wood work. 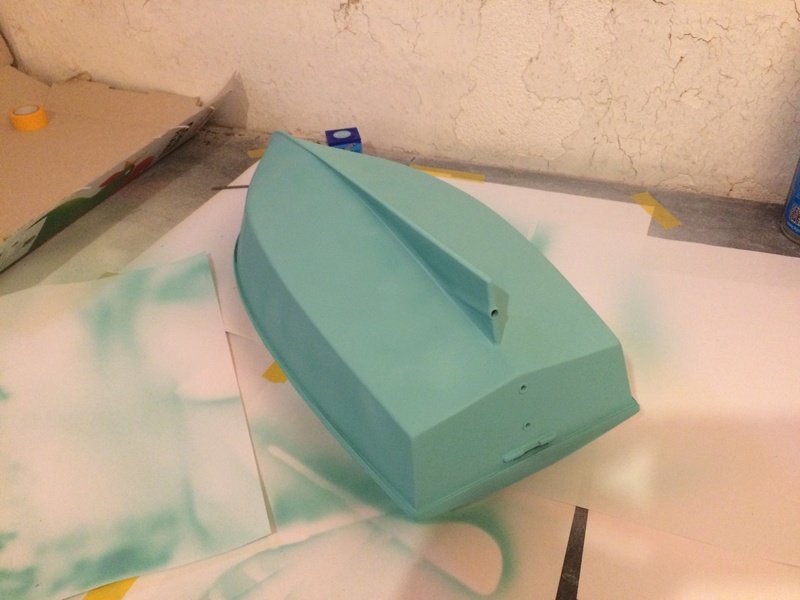
_________________
I'm Not Anti-Social, I'm Anti-Stupid.
| |
|
  | |
Roadrunner
Forum Overlord


Posts : 1714
Join date : 2011-06-10
 |  Subject: Re: AeroKits Sea Urchin Subject: Re: AeroKits Sea Urchin  Mon Apr 30, 2018 5:27 pm Mon Apr 30, 2018 5:27 pm | |
| Start of the 3rd coat of the light green today, as you can see the near side closest in view is less patchy than the other, This is simply the side has been sprayed the other shortly after this post, but the coats are going on much smoother and evenly now due to the rub downs between coats keeping the paint work as flat as possible. I’ll finish up the other side and go for a rub down again and spray a 4th final coat to finish this colour. The rudder requires only 3 coats which I’ll do when I do the 4th on the hull, the rudder has had slightly thicker coats sprayed so coverage is better although a little rough until I give it a light rub down for the final there. 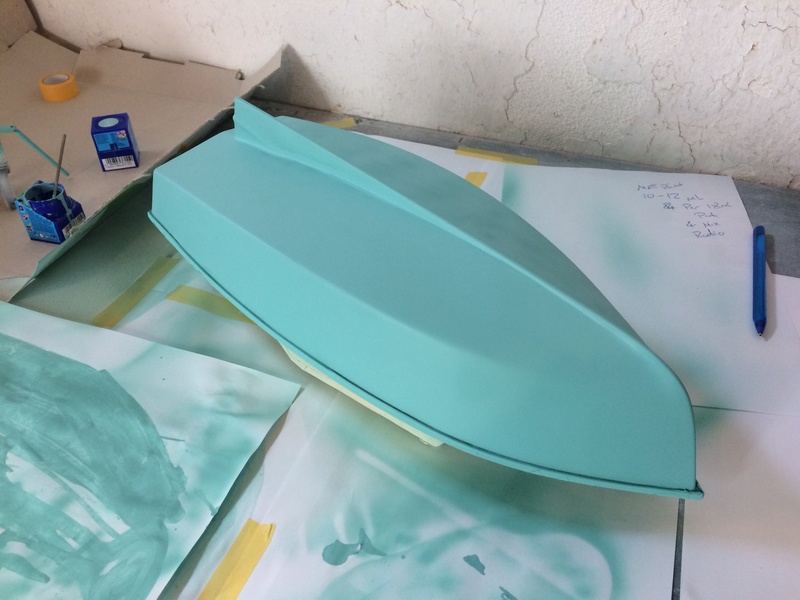 I’m trying to reduce the undercutting of the next spray lines when I mask up so keeping the hull as flat and smooth as possible will help reduce these lines, it’s more for the sake of the boot topping rather than the dark green as bleeding through under the tape is never a easy job to clean up where as prep work now will save me many swear words later. I’ll let this all hardened up for 24 hours before masking up for the dark green hopefully so that the tape will not pull up not quite cured paint, although I use Tamiya tape and very rarely have that issue it’s better safe than sorry. Good news through is that the airbrush can spray in any weather condition so time limits and waiting for nice days are a non issue.
_________________
I'm Not Anti-Social, I'm Anti-Stupid.
| |
|
  | |
davidjt
Forum Sponsor


Posts : 534
Join date : 2013-01-08
Age : 72
Location : n wales coast
 |  Subject: Re: AeroKits Sea Urchin Subject: Re: AeroKits Sea Urchin  Mon Apr 30, 2018 6:08 pm Mon Apr 30, 2018 6:08 pm | |
| | |
|
  | |
Roadrunner
Forum Overlord


Posts : 1714
Join date : 2011-06-10
 |  Subject: Re: AeroKits Sea Urchin Subject: Re: AeroKits Sea Urchin  Tue May 01, 2018 12:55 am Tue May 01, 2018 12:55 am | |
| Had to go up to 5 coats to get good coverage as I was still getting a few tiny specks of white on one corner, no issues 5th coat is done and drying on the heater overnight, rudde had 2 extra coats to bring up to 4 rather than 3. I’m hopeful tomorrow it will be dry enough to mark and mask up the 2nd colour, I’ll do a test on the rudder first as that’s a quick and small part that’s easily sanded and repainted if needs be rather than the whole hull. It took a total of 2x18ml pots of paint for the entire boat to have this base colour, I could have masked up the two colour half’s and saved paint but as I said at the start of painting I’m attempting to revise the masking line build up so I only have to feather a single edge rather than a ridge for the boot topping, on a much larger boat this wouldn’t be an issue sanding a seam between two paints as the boot topping would generally be 5-6mm but this boats should be a lot smaller between 2-3mm meaning sanding a ridge line smooth would risk both colours being sanded back to primer in some places no matter how carefully I tried. As you can see the colour is totally uniform now with no darker patches, a good sign I’ve got it right. 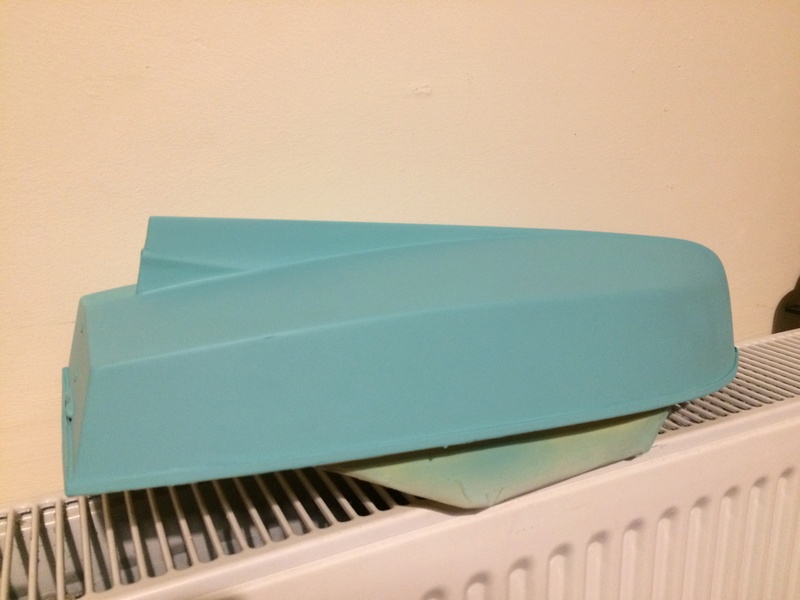
_________________
I'm Not Anti-Social, I'm Anti-Stupid.
| |
|
  | |
Guest
Guest
 |  Subject: Re: AeroKits Sea Urchin Subject: Re: AeroKits Sea Urchin  Tue May 01, 2018 1:17 am Tue May 01, 2018 1:17 am | |
| |
|
  | |
Roadrunner
Forum Overlord


Posts : 1714
Join date : 2011-06-10
 |  Subject: Re: AeroKits Sea Urchin Subject: Re: AeroKits Sea Urchin  Tue May 01, 2018 4:56 pm Tue May 01, 2018 4:56 pm | |
| First coat of dark green has appeared today, I put the coat on with the paint thinned to a much smaller ratio, this should stop any bleed as the thicker particles won’t seep ( also the paint isn’t runny) under the tape edge ( I hope) I’ll thin down the paint a bit more for the next couple of coats after I give he hull another light rub down to remove the extra rough finish. The boot topping will clean the edges up nicely. The bottom of the hulls colour dose not conform to a flat straight line along the hull as most boats have in this Instance when I first laid tape it looked very odd with the bow and stern having much larger sections that the center, this is of course due to the hulls shape so in this instance I reverted back to the original plans waterline which follows the bottom panels join line, to which I’ve loosly added 1mm up to the next panel which will be my feathered edge for the boot topping. As you can see from the photo ( providing you can imagine the tape gone) the light colour isn’t obscured by the dark, and looks pretty accurate. 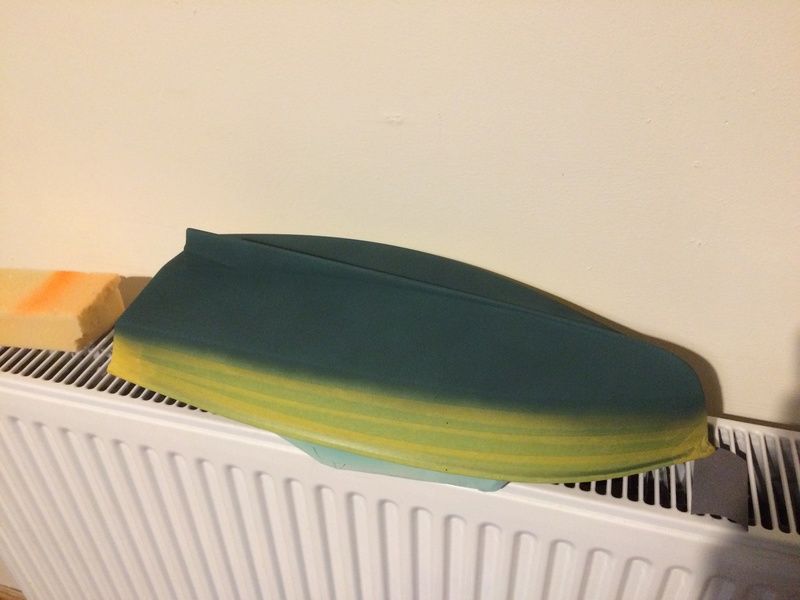
_________________
I'm Not Anti-Social, I'm Anti-Stupid.
| |
|
  | |
Roadrunner
Forum Overlord


Posts : 1714
Join date : 2011-06-10
 |  Subject: Re: AeroKits Sea Urchin Subject: Re: AeroKits Sea Urchin  Tue May 01, 2018 8:44 pm Tue May 01, 2018 8:44 pm | |
| Before and after 2 and 3rd coat, I’ll pull the tape off once it’s had some to e to dry and mask up again if a 4th coats needed, but I think the coverage is good enough although the dark green is vastly tougher than the light on this coat, I expect it’s simply less paint than the previous colour. But we’ll see once the tapes off and if anything needs cleaning up or extra coats needed. 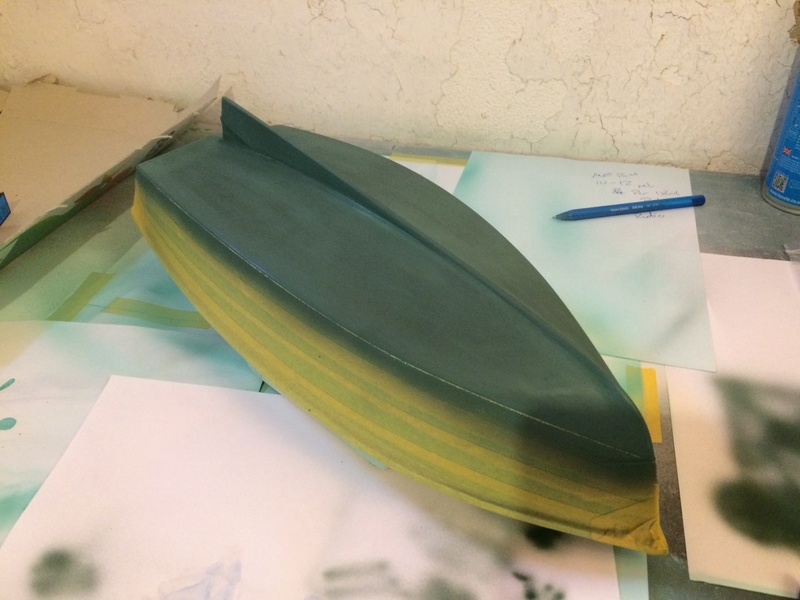 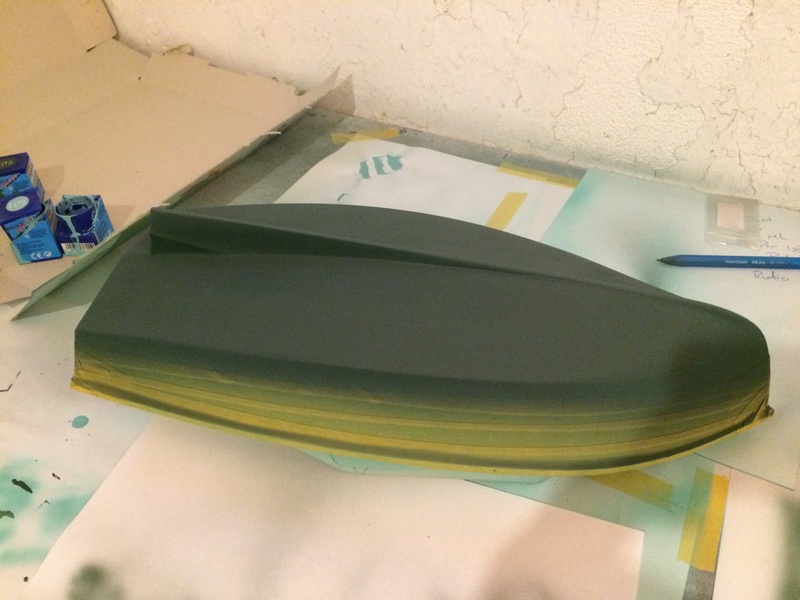
_________________
I'm Not Anti-Social, I'm Anti-Stupid.
| |
|
  | |
Roadrunner
Forum Overlord


Posts : 1714
Join date : 2011-06-10
 |  Subject: Re: AeroKits Sea Urchin Subject: Re: AeroKits Sea Urchin  Tue May 01, 2018 9:16 pm Tue May 01, 2018 9:16 pm | |
| Didn’t need to resort to a 4th coat and no touch ups or tears have occurred from removing the tape, the paint was semi dry when I removed the tape to reduce the risk of paint tear. I’ll leave this to harden off over night and mask up the white boot topping tomorrow if possible and start spraying it, the paint edge is minimimal you can barely feel it with your finger so I’ll acoid furthering the edge and just go straight to mask and paint. This will almost conclude the painting stage, although it will need a gloss coat which I’ll do next week after giving the boat plenty of time to harden up. After the hull is finished I’ll go back and compete the rudder, I would have done the rudder and hull together in regards to masking to get the lines accurate to each other but with the hull masked up I was unable to fit the rudder to get accurate adjoining lines as the tape was covering the rudders mounting holes and I didn’t want extra paint seeping into those as I know I will chip the paint off the brass during this, fortunatly you won’t see that once the rudders I stalled but I do want to recuse how much paint starts going missing so if needs be a paint brush can touch them up with no consequence. Just a note here I k ow the bow colours don’t meet exactly dead center, it looks worse than it really is in the photo however the boot topping will be used to adjust this and make it all central, problem came from the two sides of the hull not quite exact and having to carefully guess the bows line as there wasnt a panel line to follow by this point as the hull went from flat to upright. Nothing to worry about and an easy fix. 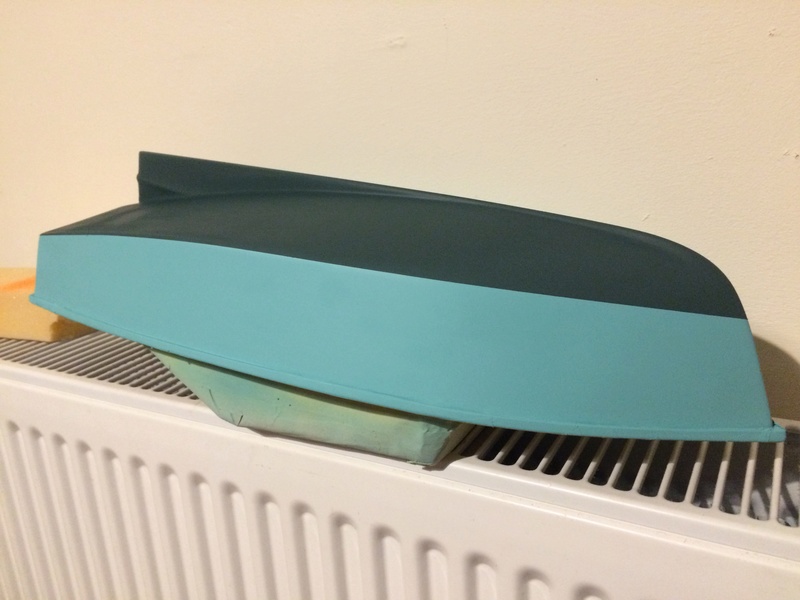  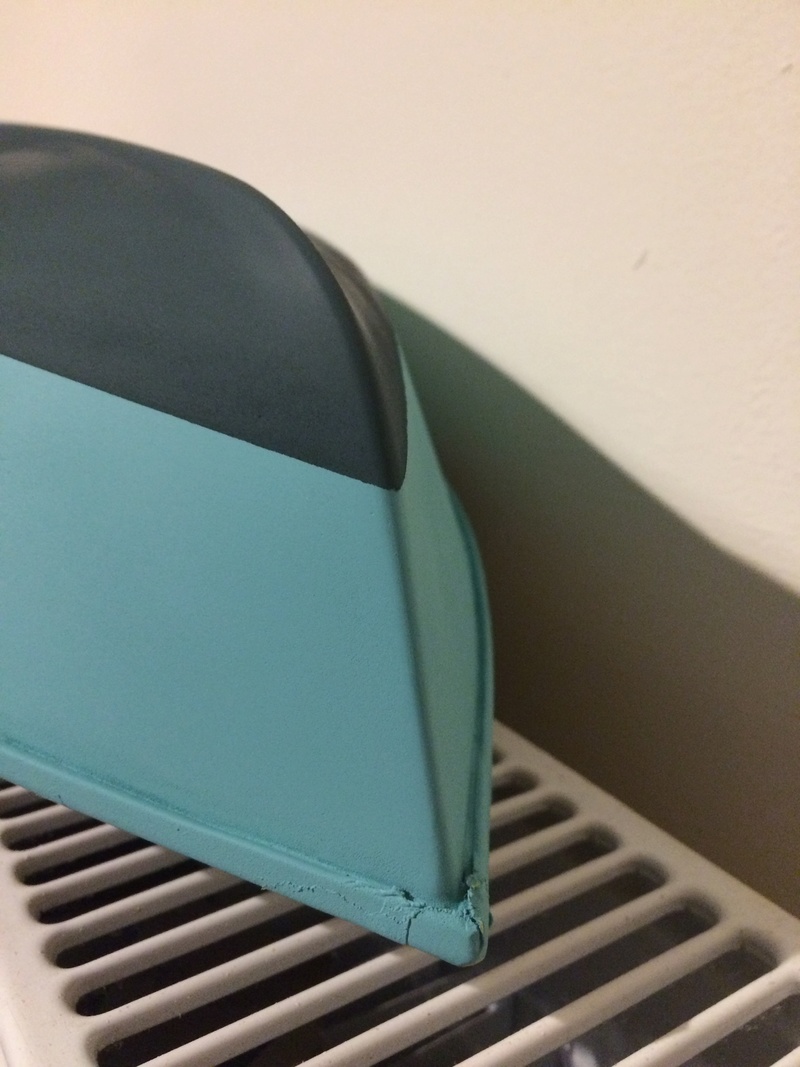
_________________
I'm Not Anti-Social, I'm Anti-Stupid.
| |
|
  | |
Guest
Guest
 |  Subject: Re: AeroKits Sea Urchin Subject: Re: AeroKits Sea Urchin  Wed May 02, 2018 1:32 am Wed May 02, 2018 1:32 am | |
| |
|
  | |
Roadrunner
Forum Overlord


Posts : 1714
Join date : 2011-06-10
 |  Subject: Re: AeroKits Sea Urchin Subject: Re: AeroKits Sea Urchin  Wed May 02, 2018 8:30 am Wed May 02, 2018 8:30 am | |
| Well seeing how my little ones decided to pull and all nighter with theirs screaming because their tired that pretty much by 6am had me wide awake to which I had pondered all night about this water line following the hull contours rather than being accurate so after a few smokes and a cuppa tea I masked up the boat to accurate water line and gave the boats edge a rub down to feather to smooth and gave the rest of the base a light rub. I’ll mix up some more paint and give the new water line 3 coats around the tape mark before giving an extra 2 coats to the entire hull bringing up the paints to 5 coats per colour. I think even masked up you would agree the water lines new position looks better and to be honest I wish I had done it that way to start now. But such is life good news was that at least it’s easier to add dark to light rather than the other way around! Anyway update will come shortly after I’ve given the boat it’s 5th coat, boot topping I expect will be a job for tomorrow or very late this evening depending on what time I end up in bed! 
_________________
I'm Not Anti-Social, I'm Anti-Stupid.
| |
|
  | |
barriew
Captain (moderator)

Posts : 2631
Join date : 2011-11-26
Age : 83
Location : Thaxted, Essex
 |  Subject: Re: AeroKits Sea Urchin Subject: Re: AeroKits Sea Urchin  Wed May 02, 2018 8:50 am Wed May 02, 2018 8:50 am | |
| I like the colour scheme and have to agree the waterline does look better like that. I always have difficulty deciding where it should go - even when marked on the plans.
Barrie | |
|
  | |
Roadrunner
Forum Overlord


Posts : 1714
Join date : 2011-06-10
 |  Subject: Re: AeroKits Sea Urchin Subject: Re: AeroKits Sea Urchin  Wed May 02, 2018 9:36 am Wed May 02, 2018 9:36 am | |
| I got a negative comment of some sarky twit on Facebook who even posted a diagram where it “should” have been, even after explaining that’s not how the boats is supposed to be according to the plan. I knew he was right in regards to where they should be but like many boats it’s not always easy to get it right especially with this boat being small and the hull twists from flat at the rear to the bow very rapidly. That on It’s own did make it difficult the first time I marked up a water line and then I opted for the plans variation to follow the hull lines. After sleeping on this I just opted to put the water line to be more accurate, right now the first coats drying, it needs to have a light rub down as the original mask line is still showing in a few places across the transom and partially on the bow, I’ll have to Just’s keep rubbing down and adding layers till these lines reduce to not be noticed, they are quite prominent in places, this was to be expected changing the line now but fortunatly the boats base colour didn’t have to many coats so it shouldn’t take much work to pull these mask lines out, I’m not overly concerned as the clear coat will blend these lines in should they not be perfect but like normal I rather reduce now to save face later. Some photos of my little issue again the photos make this looks vastly worse than it is you can’t even use your nail to feel the ridge line but up close it’s visually there. 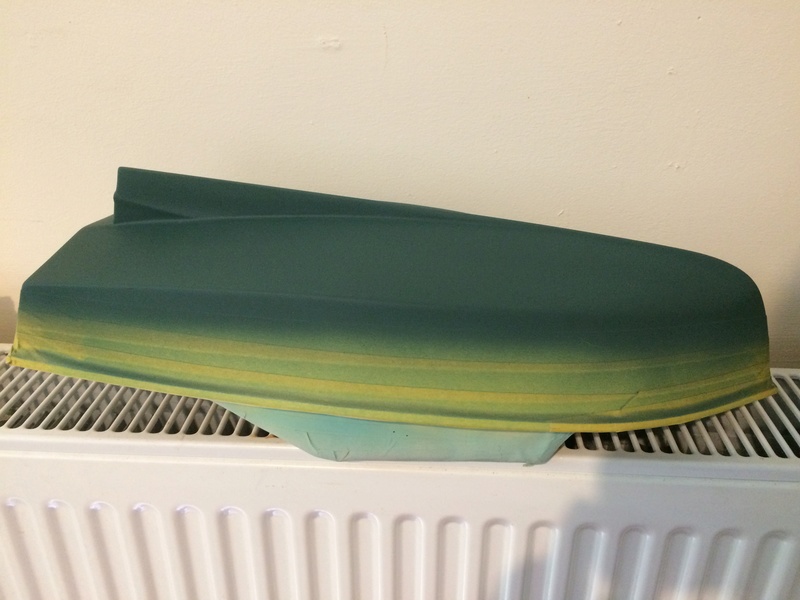 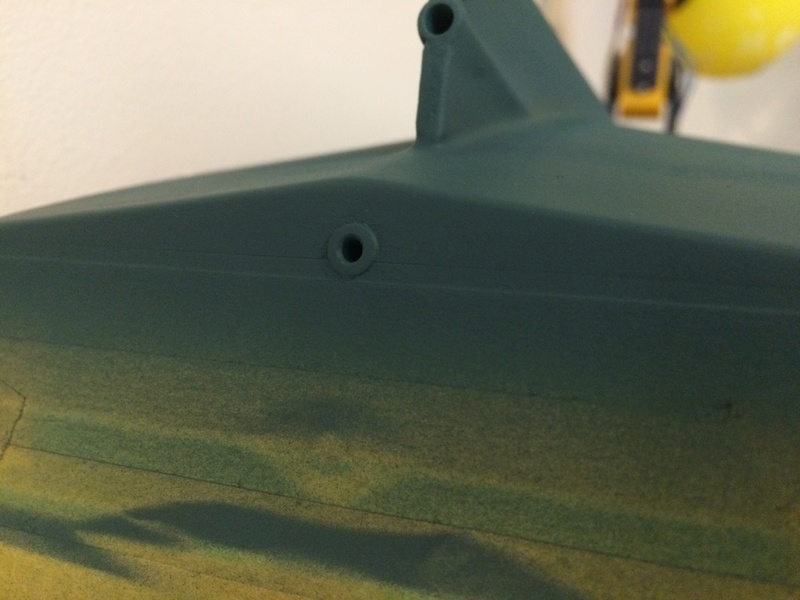
_________________
I'm Not Anti-Social, I'm Anti-Stupid.
| |
|
  | |
Roadrunner
Forum Overlord


Posts : 1714
Join date : 2011-06-10
 |  Subject: Re: AeroKits Sea Urchin Subject: Re: AeroKits Sea Urchin  Wed May 02, 2018 10:12 am Wed May 02, 2018 10:12 am | |
| Well I opted to Heavy sand the ridge lines till they vanished by taking the dark green back to the light top colour, I have two tiny spots now drastically reduced still showing in the top of the bow and around the brass insert that holds the rudder, both of these I can live with but I can honestly say they are so far reduced that a few coats of paint and they will never be noticed, some of which the boot topping will hide anyway as it’s overlaps around the bow top and along the inserts so honestly it’s a job well done, now to mix up a new pot of paint and start spraying. Clearly it’s going to take 5 coats to fix his little mess but I brought plenty of paint so it’s only costing time, to which I firmly belive the end result will be worth it. 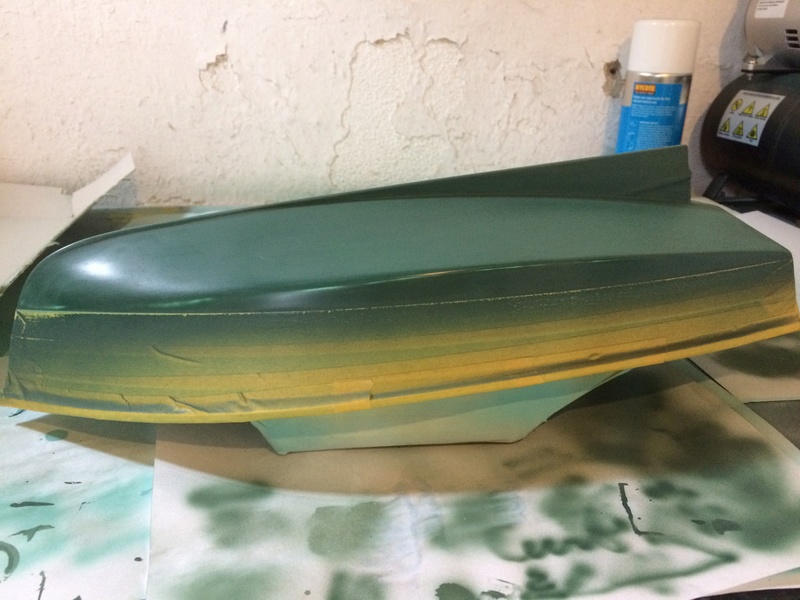 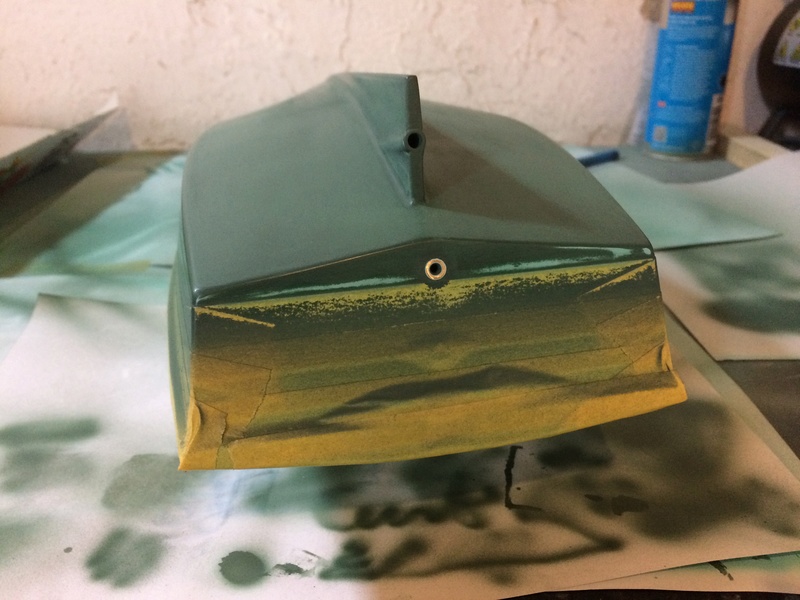 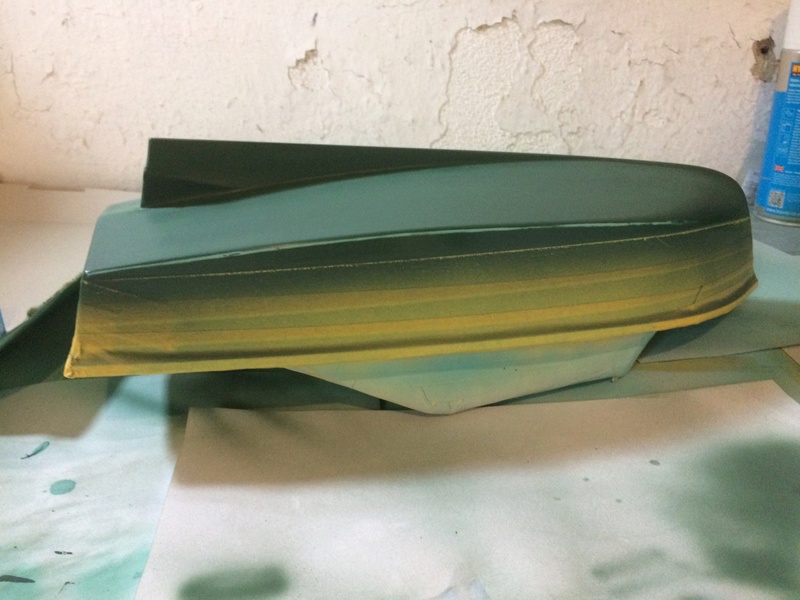
_________________
I'm Not Anti-Social, I'm Anti-Stupid.
| |
|
  | |
Roadrunner
Forum Overlord


Posts : 1714
Join date : 2011-06-10
 |  Subject: Re: AeroKits Sea Urchin Subject: Re: AeroKits Sea Urchin  Wed May 02, 2018 11:48 am Wed May 02, 2018 11:48 am | |
| After the first coat after taking off the seam line this is all that remains of the seam, it’s pretty much nothing and what areas are more exposed will be absorbed over the next few paint layers, but as you can see it’s almost as if this was never an issue. Next update will be later this evening as photos of extra paint t surfaces are just boring lol! 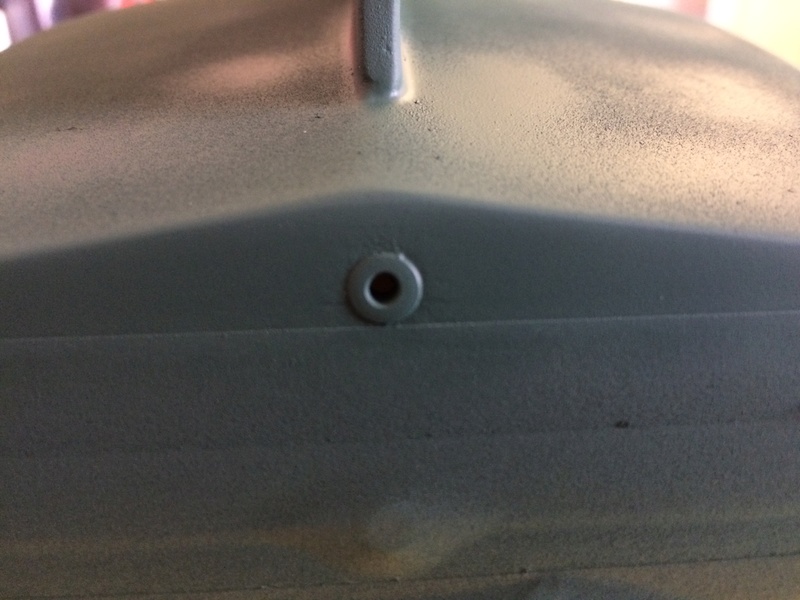 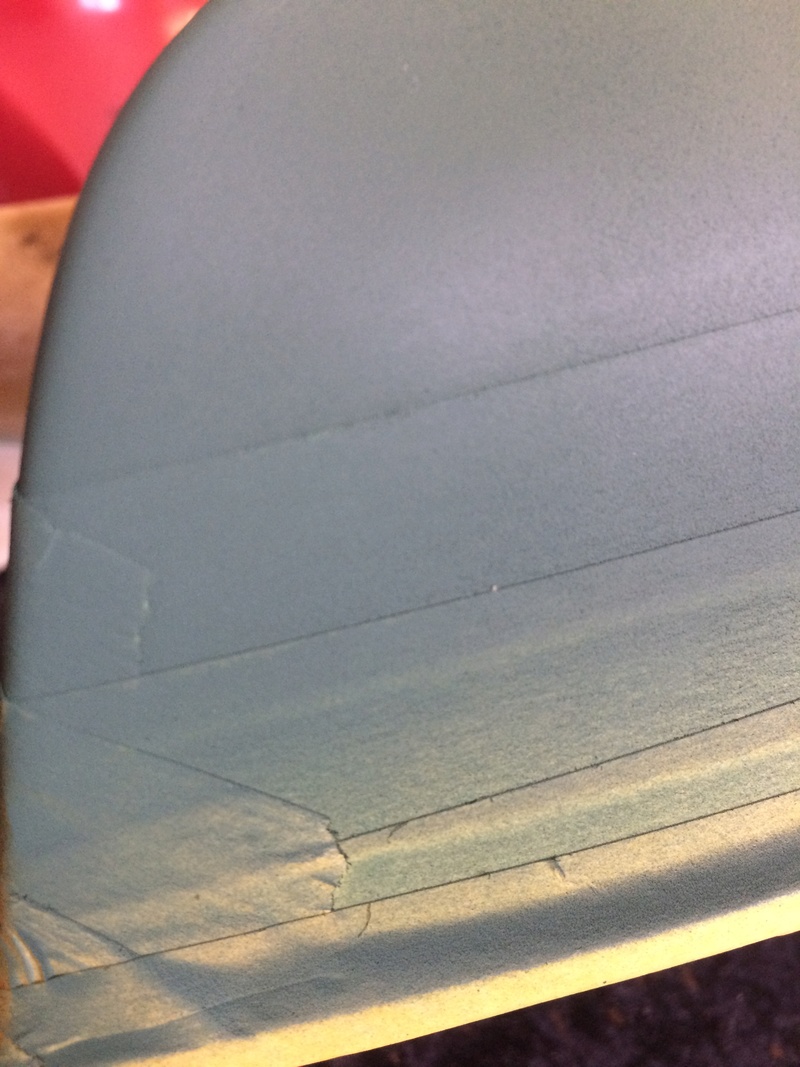 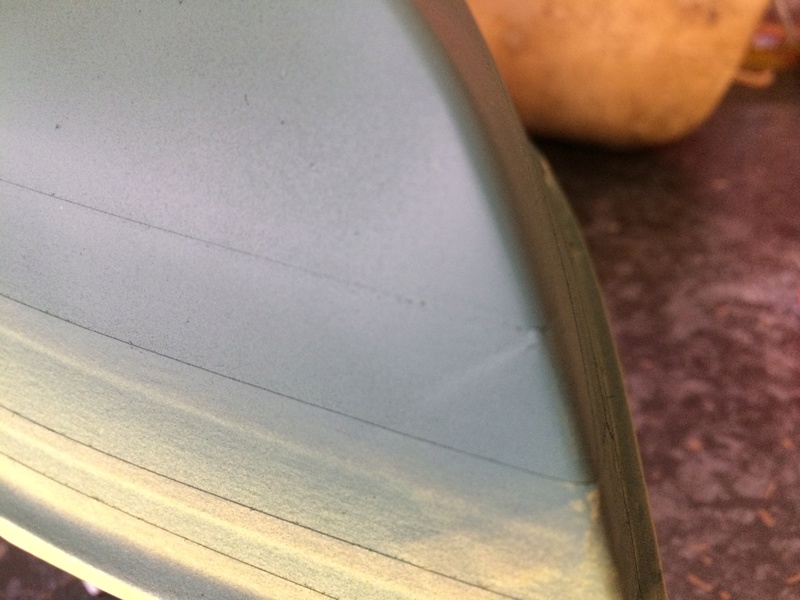
_________________
I'm Not Anti-Social, I'm Anti-Stupid.
| |
|
  | |
Roadrunner
Forum Overlord


Posts : 1714
Join date : 2011-06-10
 |  Subject: Re: AeroKits Sea Urchin Subject: Re: AeroKits Sea Urchin  Wed May 02, 2018 5:57 pm Wed May 02, 2018 5:57 pm | |
| 5th and final coat of the base colour, the rudder has also had 3 coats, once dry I’ll unmask check the lines and leave it to Set over night, then tomorrow I’ll mask up and spray the boot top. If there any issues I have enough Paint of both colours to go back and fix, only thing that may occur would be seepage of the tape to which the boot topping will hide. It’s doubtful this will be an issue to the hull, but I expect there is a bit on the rudder given all its angles and depths on such a small piece. But even with my adjusted water line I’ve had almost no issues thus far. 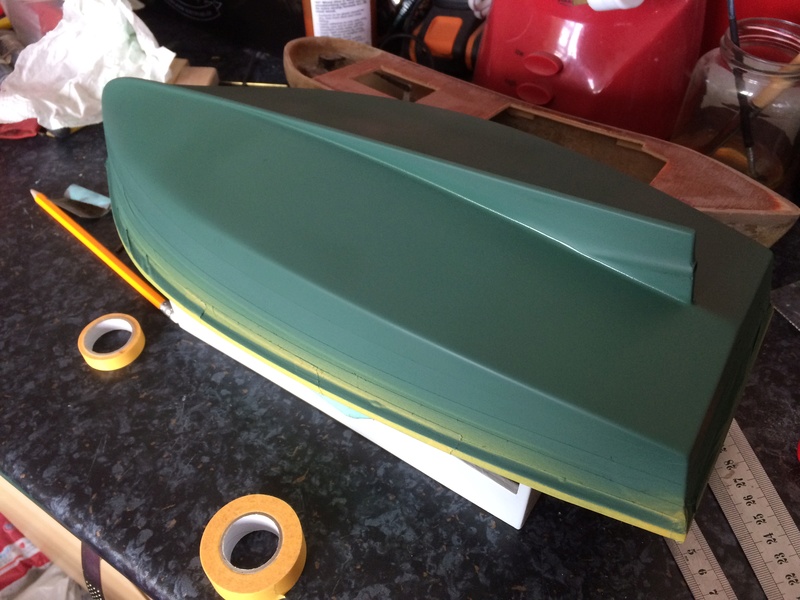 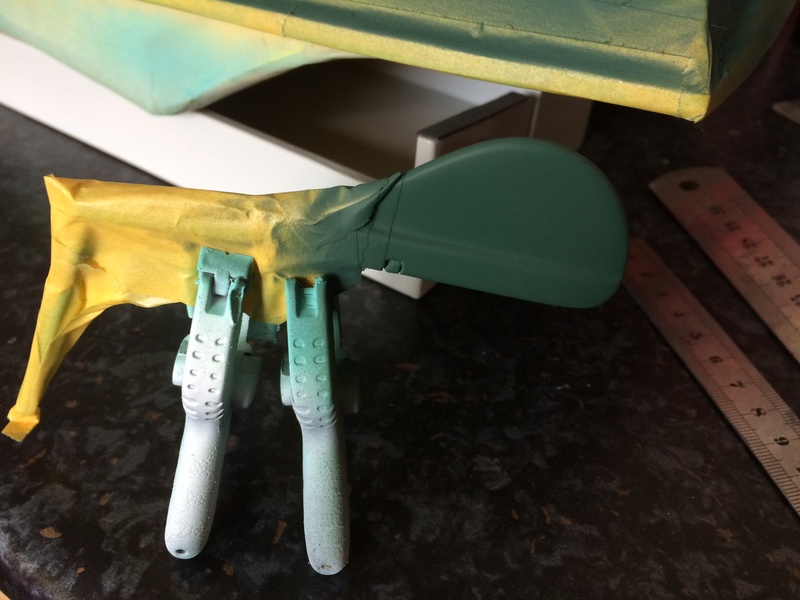
_________________
I'm Not Anti-Social, I'm Anti-Stupid.
| |
|
  | |
Roadrunner
Forum Overlord


Posts : 1714
Join date : 2011-06-10
 |  Subject: Re: AeroKits Sea Urchin Subject: Re: AeroKits Sea Urchin  Wed May 02, 2018 6:24 pm Wed May 02, 2018 6:24 pm | |
| Tapes off! A small amount of bleed in some areas I expected that from the sanding I had to do to remove the original mask line but these will be hidden by the boot top, so absolutely no issues there, I’m pleased with how the new water lines turned out, I’ll post photos of it right way up once it’s had more time to dry so not to leave marks on the paint from the stand. 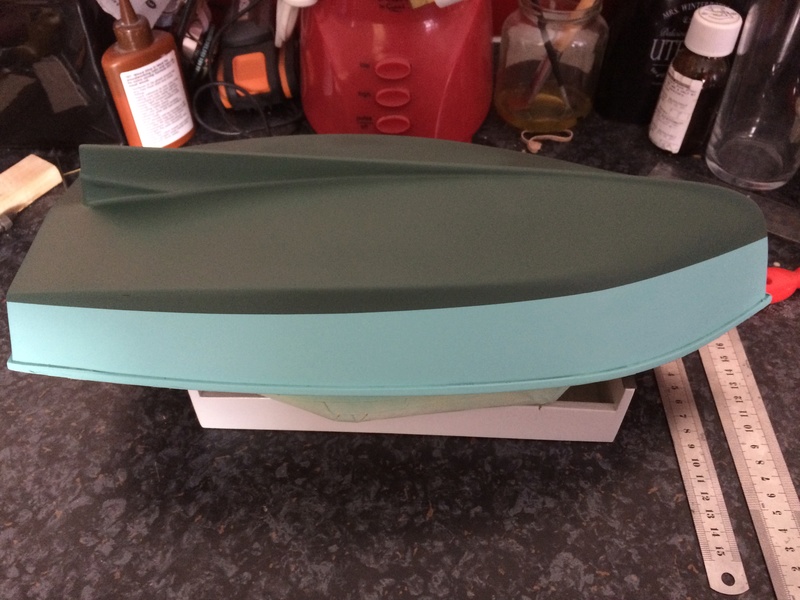 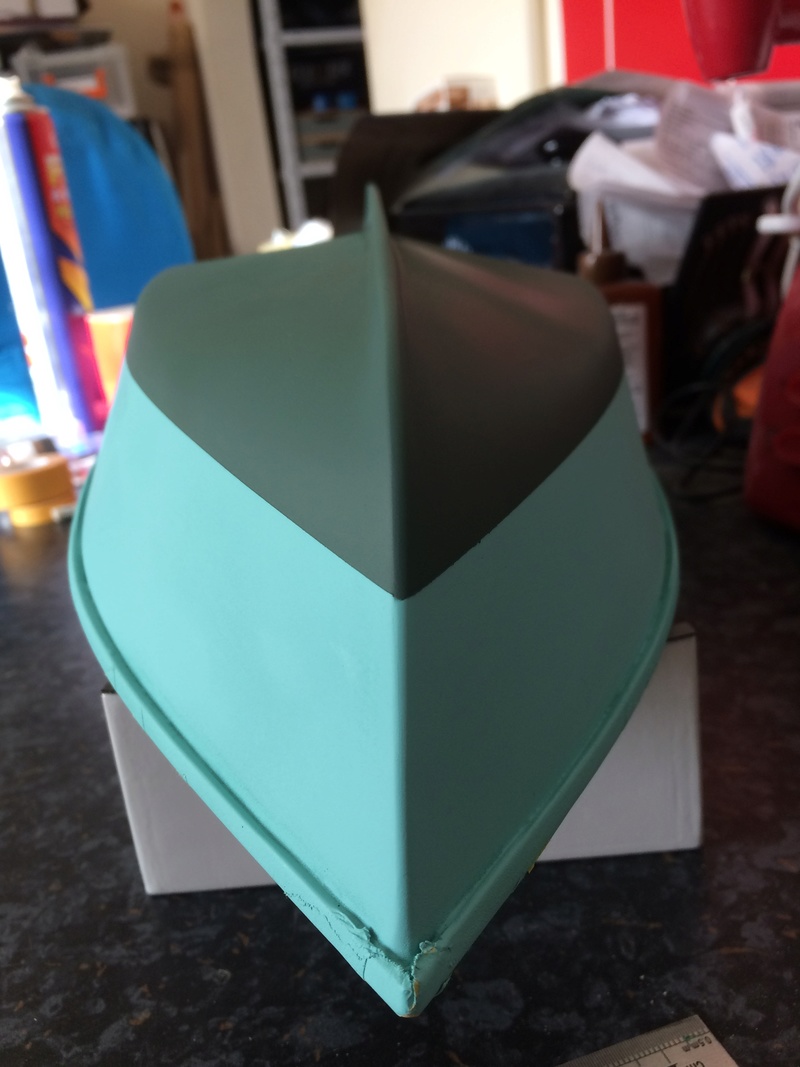 
_________________
I'm Not Anti-Social, I'm Anti-Stupid.
| |
|
  | |
Roadrunner
Forum Overlord


Posts : 1714
Join date : 2011-06-10
 |  Subject: Re: AeroKits Sea Urchin Subject: Re: AeroKits Sea Urchin  Thu May 03, 2018 12:57 am Thu May 03, 2018 12:57 am | |
|
_________________
I'm Not Anti-Social, I'm Anti-Stupid.
| |
|
  | |
barriew
Captain (moderator)

Posts : 2631
Join date : 2011-11-26
Age : 83
Location : Thaxted, Essex
 | |
  | |
Roadrunner
Forum Overlord


Posts : 1714
Join date : 2011-06-10
 |  Subject: Re: AeroKits Sea Urchin Subject: Re: AeroKits Sea Urchin  Thu May 03, 2018 11:24 am Thu May 03, 2018 11:24 am | |
| 1st coat of epoxy went on this morning, the boat will require quite a few coats, it’s hard to judge how many right now but in general 10-15 have been my average for glass finish coatings with this, but I have been known to go up to 25 coats depending on the wood. This is now slow progress as I can only do 2 coats within 2 hours every 24 hours or the previouse melts and crack due to the chemical reaction, this wouldn’t be an issue on bare wood finishes as any issues can be sanded back but to cover a paint finish more care is needed to avoid this, at worse case I may leave it for 48 hours between coats. This is also a labour intensive process as every layer requires wet sanding between coats to remove any particular build up, dust etc. But so far so good this layer should seep into the paint and bond with the sealing coat of epoxy giving one hell of a rock hard finish! Later today I’ll finish up the rudder but for now the hulls in a position to not be moved until the epoxy stops being tacky. I would normally varnish all parts together but given Matt paint can pick up marks quickly I’ve opted to get this first coat on pronto to protect the paint work, it will mean more work when it comes to the rudder but I can live with that over having to fix scratch marks on bare paint. 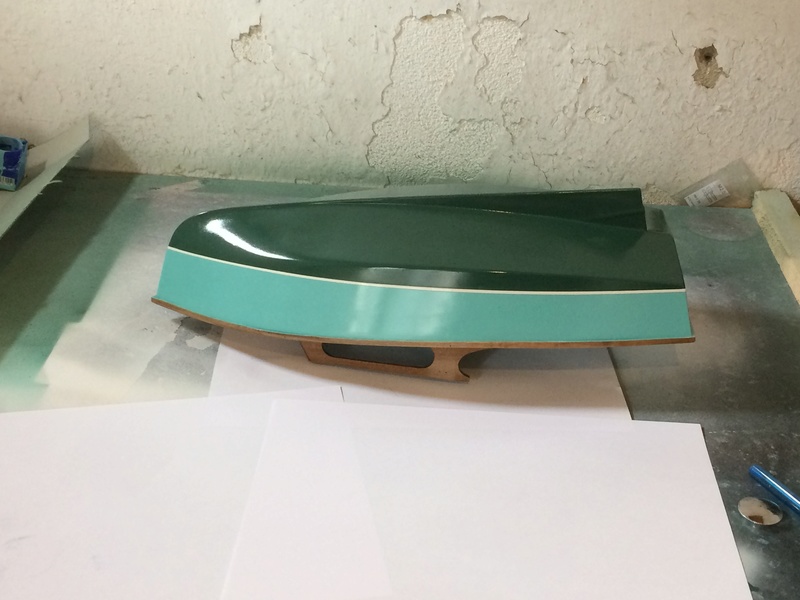
_________________
I'm Not Anti-Social, I'm Anti-Stupid.
| |
|
  | |
Roadrunner
Forum Overlord


Posts : 1714
Join date : 2011-06-10
 |  Subject: Re: AeroKits Sea Urchin Subject: Re: AeroKits Sea Urchin  Fri May 04, 2018 2:24 pm Fri May 04, 2018 2:24 pm | |
| I opted to leave the first coat for 24 hours before sticking the 2nd, which I’ve done today, I’ll add the 3rd coat about 6pm and call it quits for 24 hours. Took a bit of work with some 800 grit with water to get the first coat flat as there were some run build ups and some places the epoxy layer was not as thick so when rubbing I was getting some of the colour rubbing up, this is more to do with Matt paint texture than the epoxy but as the first coat had several imperfections applying a 2nd coat would have sealed these specs of dirt and fine hairs to the hull permantly, the 2nd coat went on much better and more evenly, the 3rd coat will be much better And I’ll class that as the 2nd coat and work up from there during wet and dry prep. I’ve yet to finish the rudder as I’m aiming to focus on getting this hull sealed and varnished and I only have one place to do both jobs so easier to leave the rudder until later this evening once the 3rd coat starts to set and I can bring it indoors once baby’s are in bed. 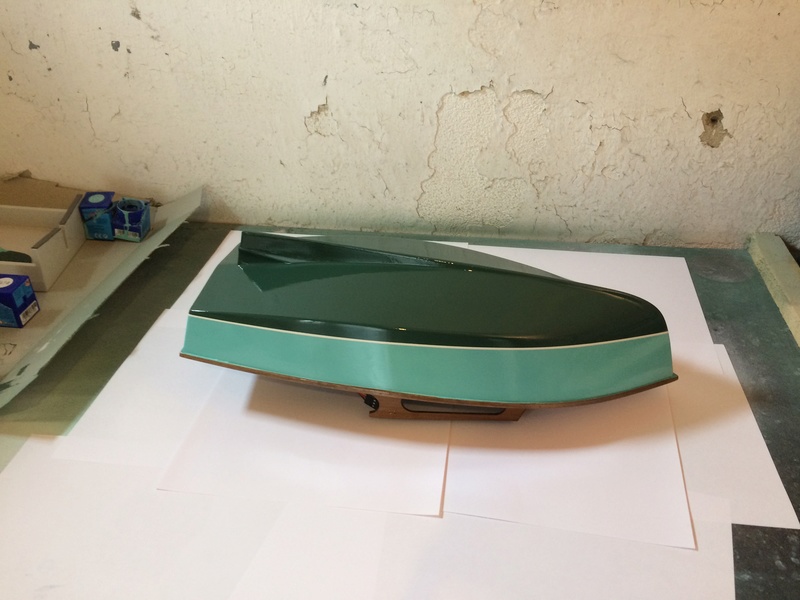 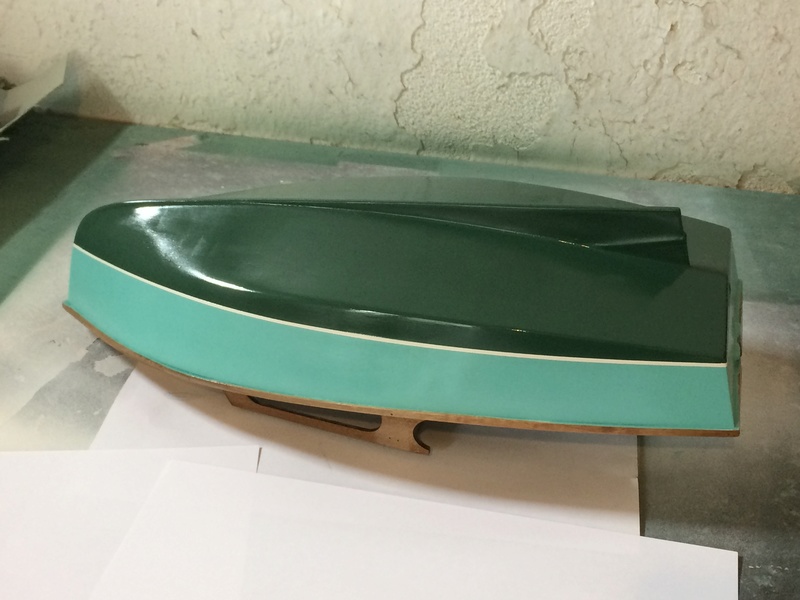
_________________
I'm Not Anti-Social, I'm Anti-Stupid.
| |
|
  | |
Roadrunner
Forum Overlord


Posts : 1714
Join date : 2011-06-10
 |  Subject: Re: AeroKits Sea Urchin Subject: Re: AeroKits Sea Urchin  Fri May 04, 2018 10:10 pm Fri May 04, 2018 10:10 pm | |
| I finished painting the rudder... I’m not happy with the white line however as although it at the right angle to match the hull until the hulls finished I can’t test fit and double check but the boot topping line is angled on the stem which makes it look wonky  I have no idea why that happened I checked the rudders angles multiple times and even test fitted it carefully on the hull before I painted when it was taped up. For this reason I’ll go back and sand the boot topping off, remark and respray the rudders lower sections and boot topping, the top of the rudder and tillar arm are fine tho, I expect it was just some carelessness on my part during masking and I spent more time getting the tape into all the angles and crevasse and forgot to check the stems matched up, Overall the rudder isn’t bad but I should have makes this up better earlier in the paintings stage. Honestly if that was my only mistake is was a small one and not an awful fix just annoying!  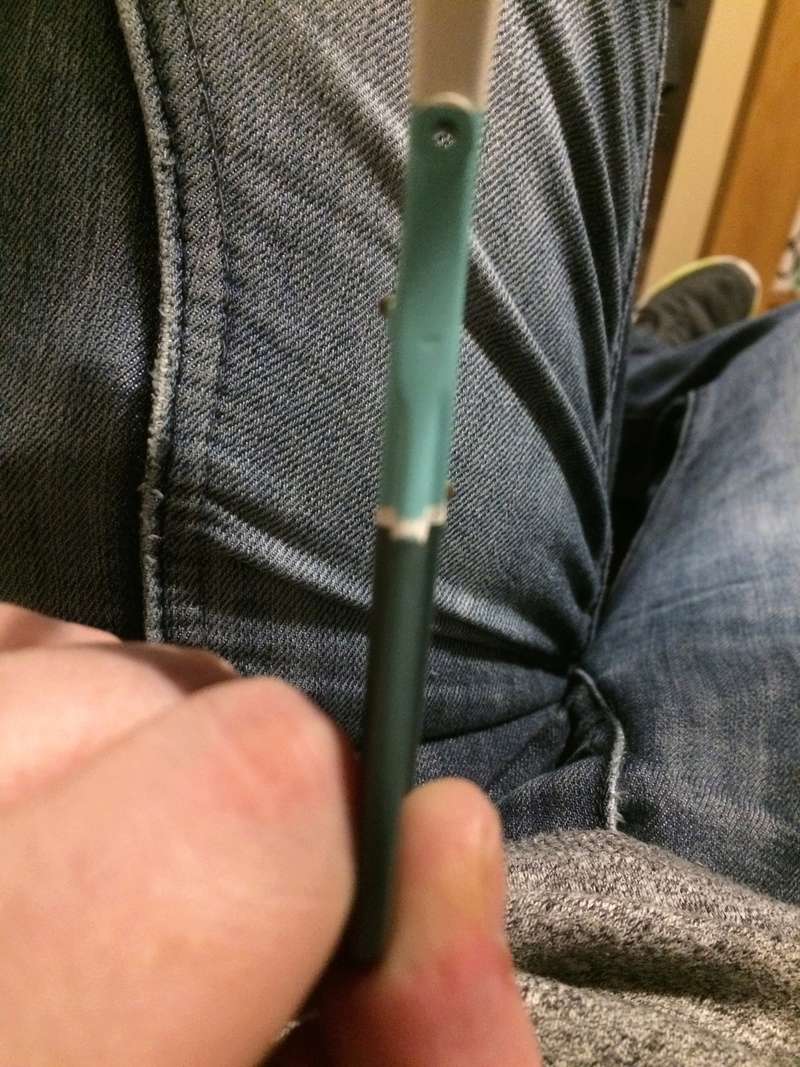 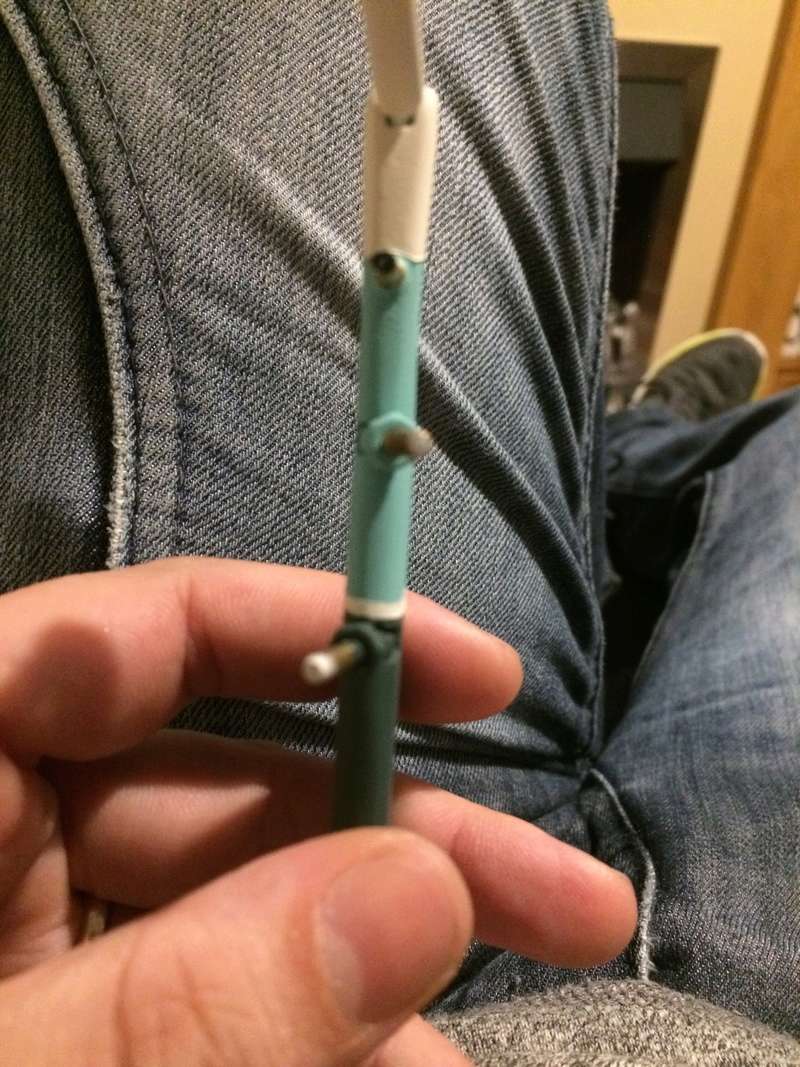
_________________
I'm Not Anti-Social, I'm Anti-Stupid.
| |
|
  | |
Roadrunner
Forum Overlord


Posts : 1714
Join date : 2011-06-10
 |  Subject: Re: AeroKits Sea Urchin Subject: Re: AeroKits Sea Urchin  Fri May 04, 2018 10:31 pm Fri May 04, 2018 10:31 pm | |
| I took a chance and fitted the rudder, Had to drill out the brass insert and chip a bit of paint of the insert, that was expected I had planned to sand those back to brass anyway the chipped paint saves me some work, no damage around the insert or hull so no problem as te inserts get covered by the rudders hinges semi permantly once the boats together. As you can see from the photos the side view the line looks pretty matched up, but once you go the the stern view it’s way off! Good news is the boot topping line is lower than it should be so Sanding it off and raising it up won’t damage the light green I’ll only need to touch up the dark green providing I don’t damage it. Like I said before it’s not a huge deal to respray this part it takes only a few mins to strip it back and repaint, wouldn’t be the first time this week I did that to correct the dark greens angle For the same issue the boot toppings caused it just wasn’t as prominent! Well I’ll get to work fixing My stupidity and should be like it never happen in a Day or so!  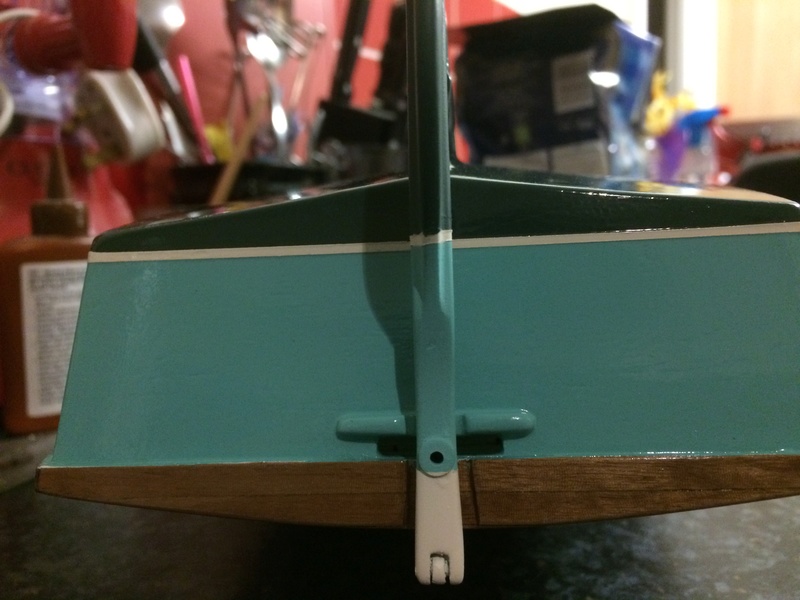
_________________
I'm Not Anti-Social, I'm Anti-Stupid.
| |
|
  | |
Guest
Guest
 |  Subject: Re: AeroKits Sea Urchin Subject: Re: AeroKits Sea Urchin  Fri May 04, 2018 11:13 pm Fri May 04, 2018 11:13 pm | |
| that is the nicest sweetest little boat one could ever wish to build, and even as a young lad when they were but 30 shillings to buy, I have always fancied building one, and the colours you have painted her in really do give her that classic look...........might indulge in one one of these days. |
|
  | |
Roadrunner
Forum Overlord


Posts : 1714
Join date : 2011-06-10
 |  Subject: Re: AeroKits Sea Urchin Subject: Re: AeroKits Sea Urchin  Sat May 05, 2018 12:11 am Sat May 05, 2018 12:11 am | |
| Just for you Neil... You remember a few years ago I started restoring an original dolphin mk2 from aerokits? It’s been my labour of love to which it’s been 8 years and I’m still not past the deck work, however that boat came with the original 1960-70’s advertisement, to which I laminated... 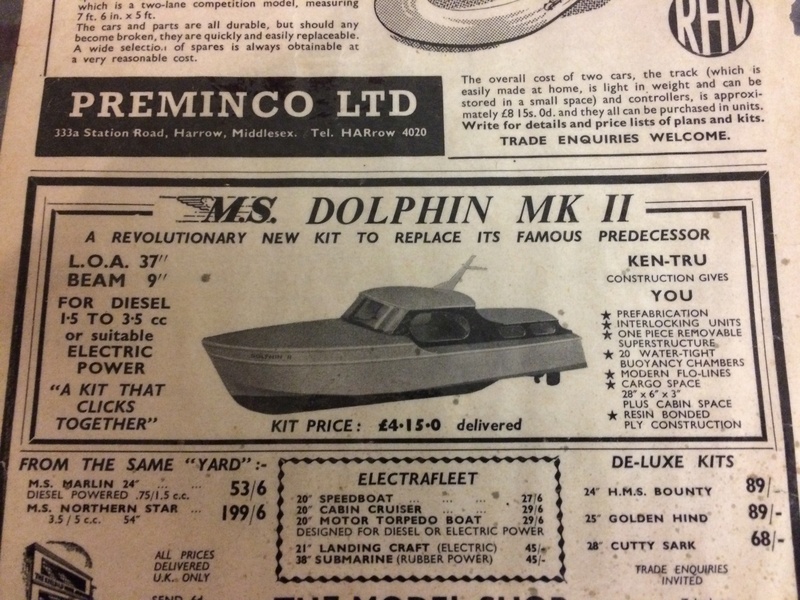 Now since you mentioned it’s price... I’m not old enough to understand old money and honestly it’s not an interest, however on that little advert when I flip it over it contains the other aerokit range at the time, to which I own all but one!, the one I don’t own is one I gave my dad For his birthday last year for him to build! But just for giggles.... you’ll remember this more than me!.. 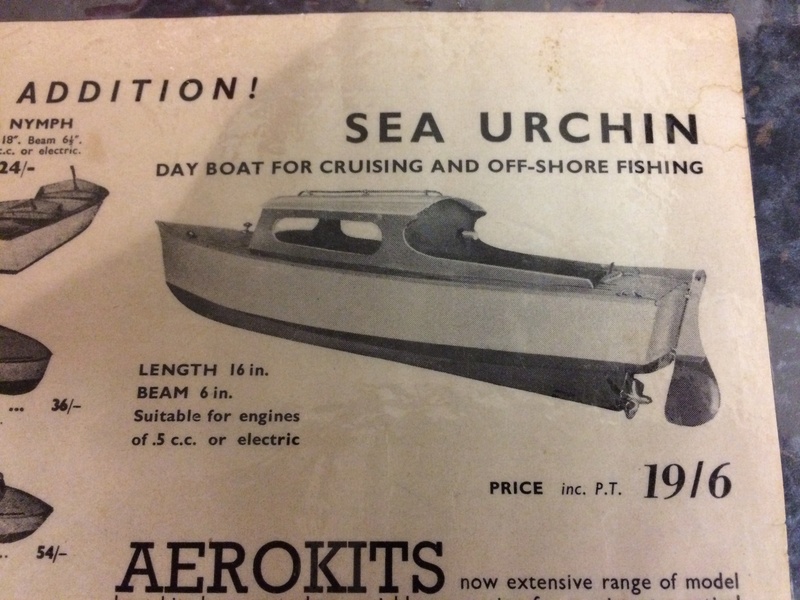
_________________
I'm Not Anti-Social, I'm Anti-Stupid.
| |
|
  | |
Roadrunner
Forum Overlord


Posts : 1714
Join date : 2011-06-10
 |  Subject: Re: AeroKits Sea Urchin Subject: Re: AeroKits Sea Urchin  Sat May 05, 2018 4:02 pm Sat May 05, 2018 4:02 pm | |
| Well I sanded the rudders white line flush and I’ll have to repaint the rudder and touch up the light green as I nicked the paint in a few areas, a paint brush will resolve that. I would do that today given how nice the weather is but instead I took advantage of this summer and mowed the lawn... That wasn’t an issue that came shorty after, I now have the return of the shakes in my hands, it’s not uncommon for me to get this after doing a bit of manual labour, it’s caused by my ME and it’s fatigue priority’s,( last time this happend was last year and it took almost two weeks for my arms and hands to stop shaking!, this was as some know set off a few years ago now when I had kidney failure and was in intensive care for a long period) so all paint and varnish work on hold until this flare up subsides. So for those wanting to see some more work I’m sorry to disappoint but at least the suns out 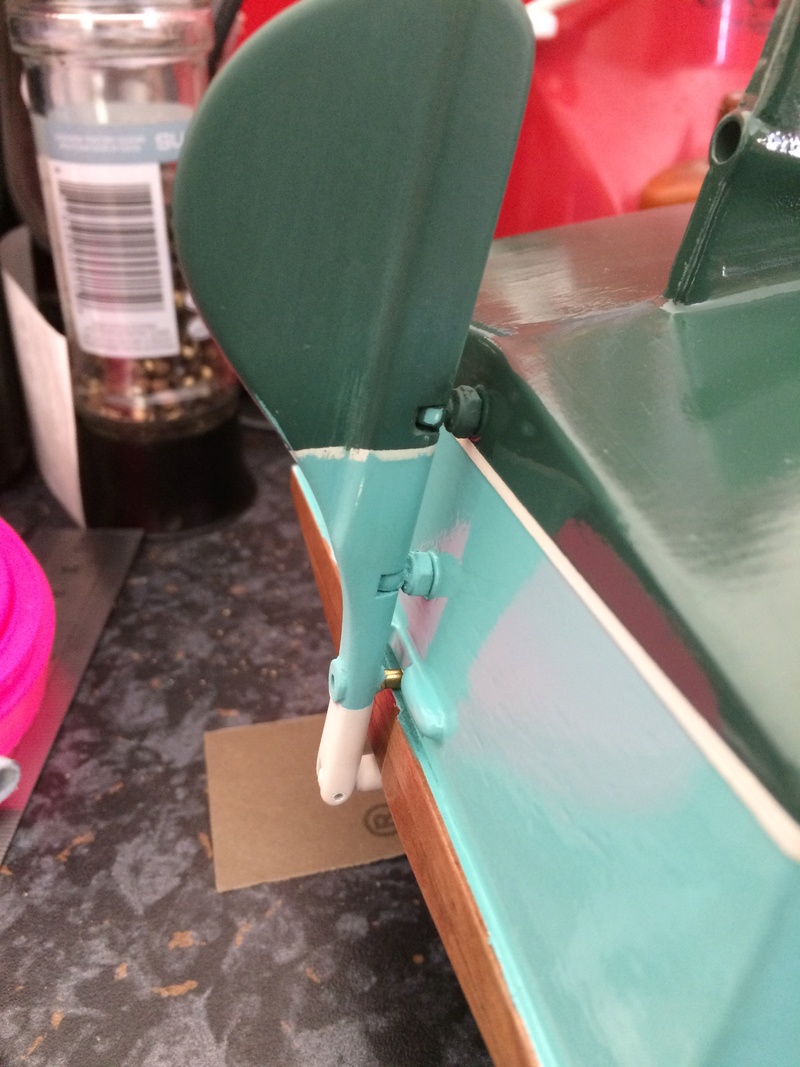
_________________
I'm Not Anti-Social, I'm Anti-Stupid.
| |
|
  | |
Roadrunner
Forum Overlord


Posts : 1714
Join date : 2011-06-10
 |  Subject: Re: AeroKits Sea Urchin Subject: Re: AeroKits Sea Urchin  Sun May 06, 2018 2:27 pm Sun May 06, 2018 2:27 pm | |
| Today I masked up and resprayed the rudder worst areas, as you can see from the photos the new boot topping lines up with the hull almost perfectly, I do however need to go back and touch up some areas again shown in the photos, a little bit of over spray on the inside corners and a little chip of the dark green below it, and I have a little mark of white coming through on the light green. All of which I’ll take the time later this evening to touch up with a brush and call the rudder done. I’ll also wait until tomorrow for all the paint to harden up and give the rudder a coat of epoxy and then start back in the hull, this way the rudders only 2 coats behind the hull in layers but 1 extra day of Varnishing will probably use up the last of the final pot rather than making an extra batch. I’ll post a finished rudder photo with the touch ups once done. Until then here’s the Repair so far. 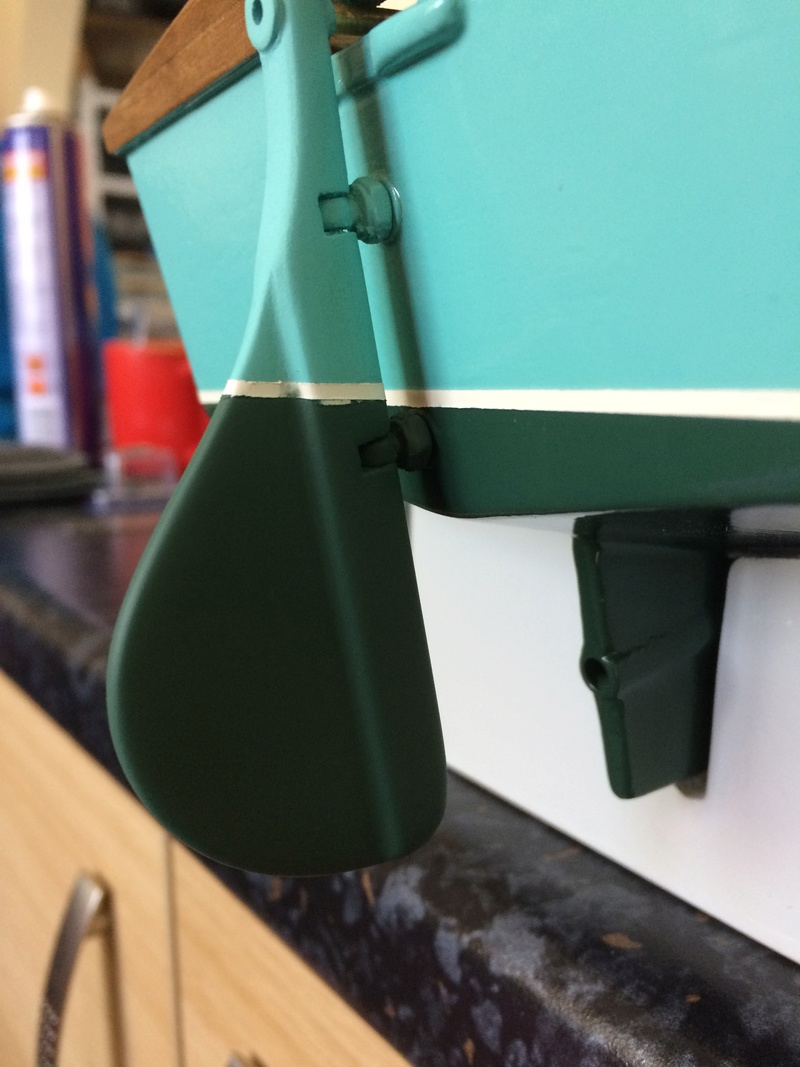 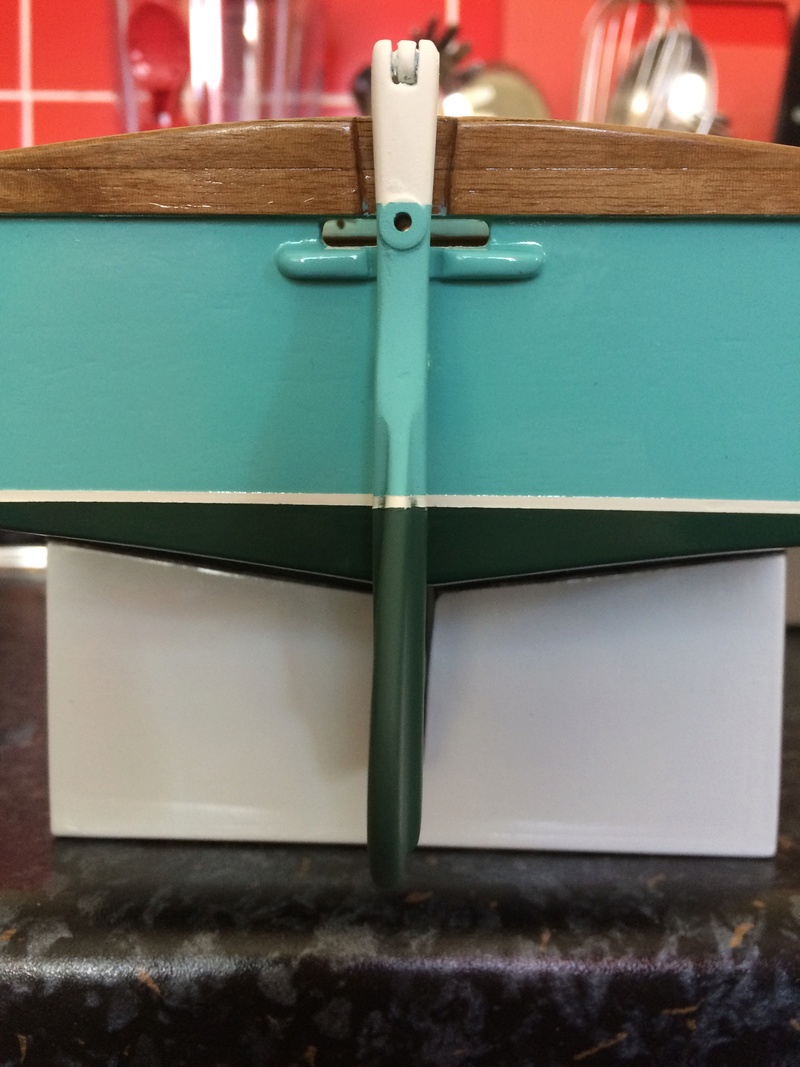 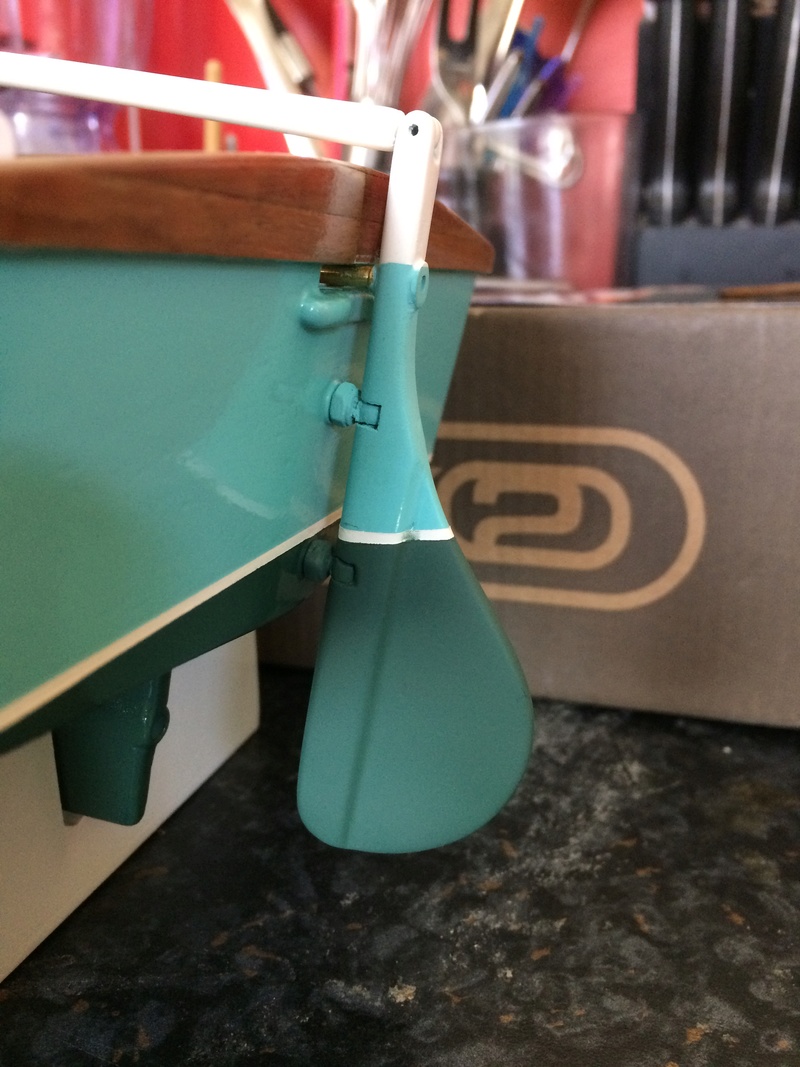
_________________
I'm Not Anti-Social, I'm Anti-Stupid.
| |
|
  | |
Roadrunner
Forum Overlord


Posts : 1714
Join date : 2011-06-10
 |  Subject: Re: AeroKits Sea Urchin Subject: Re: AeroKits Sea Urchin  Sun May 06, 2018 4:34 pm Sun May 06, 2018 4:34 pm | |
| Rudder cleaned up and waiting to dry, it’s now as good as I can get, given this such a fiddly part but I think you can all agree it looks the part and match’s up relatively well. I also painted over the white top section with the original light green, I thought the white top may have looked better given it’s contrast to the wooden rub rails but honestly I didn’t like it, I did however leave the tillar white and honestly it looks a lot better and more in keeping. I’ll leave this to dry and see if I can give it a coat of epoxy later tonight so It can catch up with the hulls epoxy coats. The hull I will not do until tomorrow it’s now far to hot for the epoxy in my little room ( which is actually the laundry room) so the epoxy will start to set to quickly and leave very bad drag lines in the finish to which I’ll need to sand out, the epoxy likes 21 degrees to dry quickly, but I’ve found 18 better for applying it and then heating it up to cure, it flows better and allows me to keep a wet edge easier to reduce brush strokes.  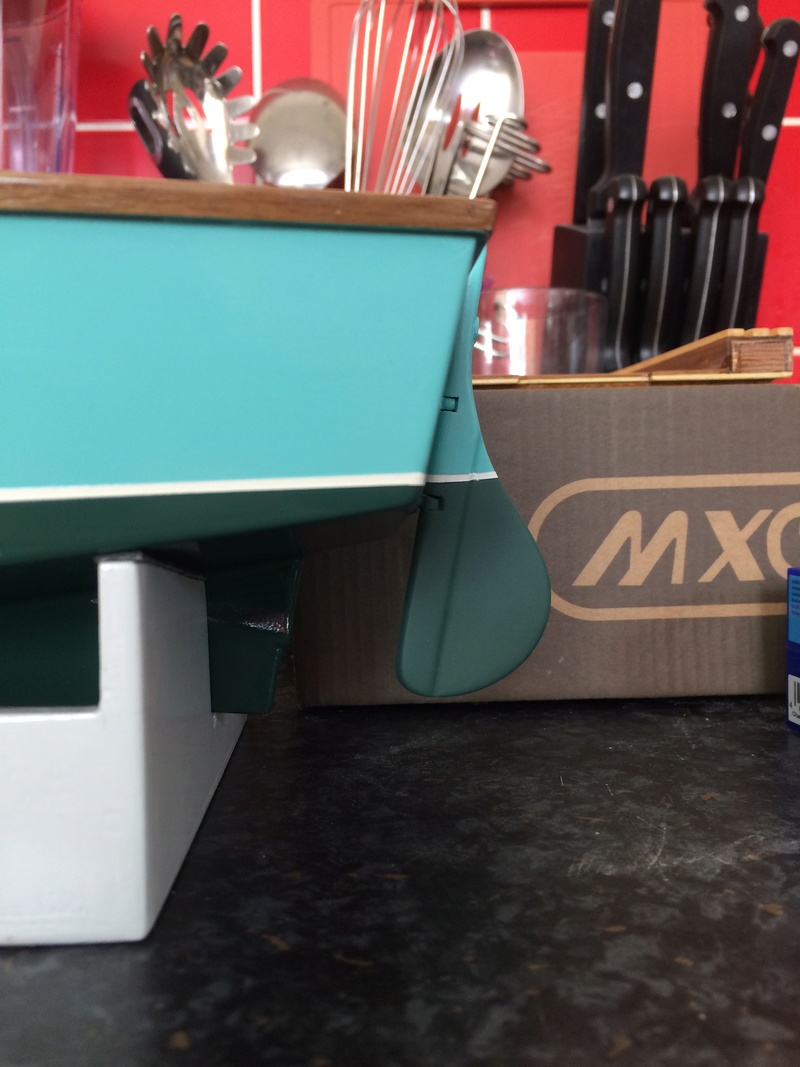 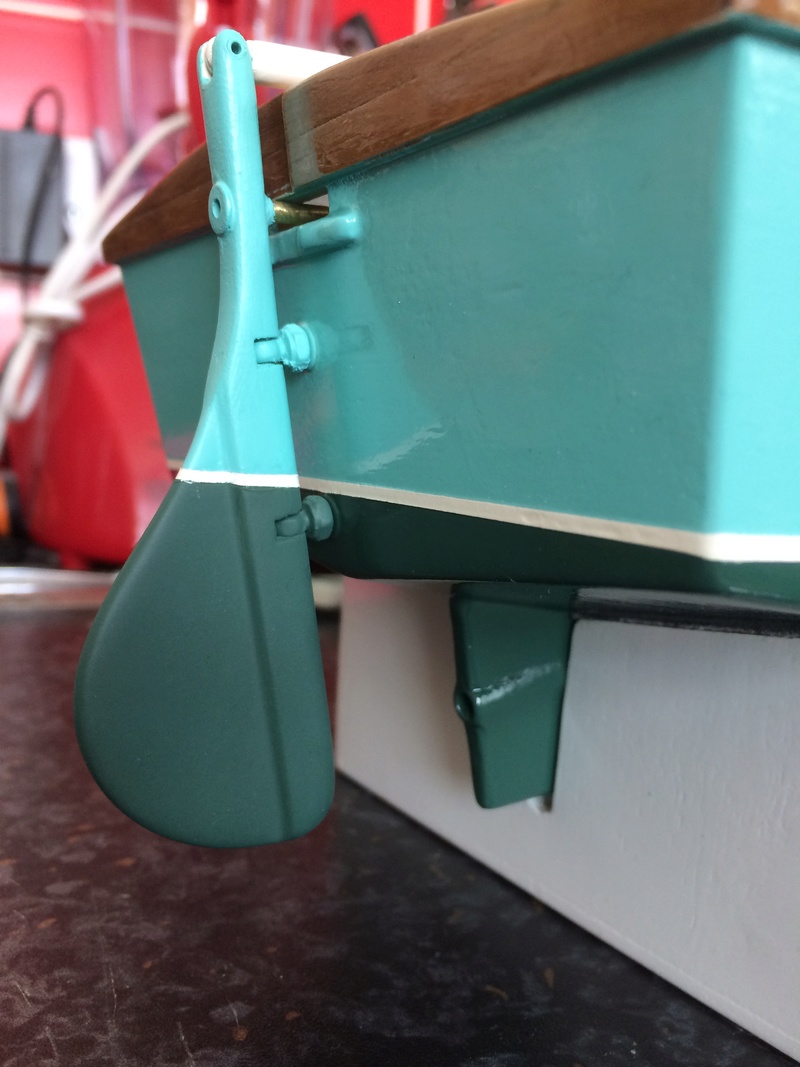
_________________
I'm Not Anti-Social, I'm Anti-Stupid.
| |
|
  | |
Guest
Guest
 | |
  | |
Roadrunner
Forum Overlord


Posts : 1714
Join date : 2011-06-10
 |  Subject: Re: AeroKits Sea Urchin Subject: Re: AeroKits Sea Urchin  Sun May 06, 2018 9:48 pm Sun May 06, 2018 9:48 pm | |
| Rudders has its first coat of epoxy, I’ll have to keep watch on the hinge sections being tight fits the epoxy is trying to bridge the parts I’ll have to take it easy around those so a little caution needed, besides that, rudders had a heavy coat and I’ll let it set over night. 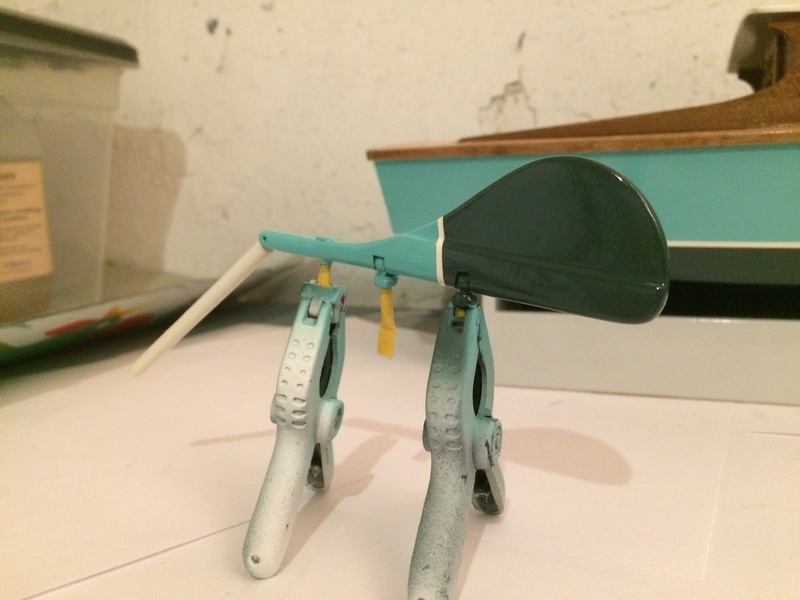
_________________
I'm Not Anti-Social, I'm Anti-Stupid.
| |
|
  | |
Guest
Guest
 |  Subject: Re: AeroKits Sea Urchin Subject: Re: AeroKits Sea Urchin  Sun May 06, 2018 10:31 pm Sun May 06, 2018 10:31 pm | |
| brilliant workmanship.......just superb. |
|
  | |
Roadrunner
Forum Overlord


Posts : 1714
Join date : 2011-06-10
 |  Subject: Re: AeroKits Sea Urchin Subject: Re: AeroKits Sea Urchin  Sun May 06, 2018 10:57 pm Sun May 06, 2018 10:57 pm | |
| Neil, I can’t imagin the price comparison in today money, I’m sure my dad tired to explain it to me at one point but i still never got it.... But honestly it’s a great little boat! I’m only missing the sea scout for the entire collection as thats the one i gave to my dad.... So if Anyone wants to donate me the kit get in touch  If not guess I’ll Have to choke up the cash after the cmb builds if I don’t go bankrupt  I’m running out of space to store these and once my new workshops built I still won’t have much room for many more projects I may have to start clearing out some of my older models... heart breaking doing that I absolutely hate selling my boats and finding out the person trashed it. Anyway kit donations welcome!  
_________________
I'm Not Anti-Social, I'm Anti-Stupid.
| |
|
  | |
Roadrunner
Forum Overlord


Posts : 1714
Join date : 2011-06-10
 |  Subject: Re: AeroKits Sea Urchin Subject: Re: AeroKits Sea Urchin  Mon May 07, 2018 1:28 pm Mon May 07, 2018 1:28 pm | |
| Lots going on today. The rudder has to have to work done to the brass parts, I found the epoxy Bridged a little to much on the hinges, so I’ve stripped off a good amount off the paint and brass, touched up any areas and recoated with epoxy, I’ll spend more time now once the varnish is finished to polish up the brass pieces. It’s unfortunate but it was expected I may have had to do this as paint really didn’t like sticking to brass without a decent etching primer and the epoxy softens the paint until it cures which didn’t help matters, it’s a minor issue and didn’t effect the look of the boat at the end, just saves me having paint flaking off at a later date. 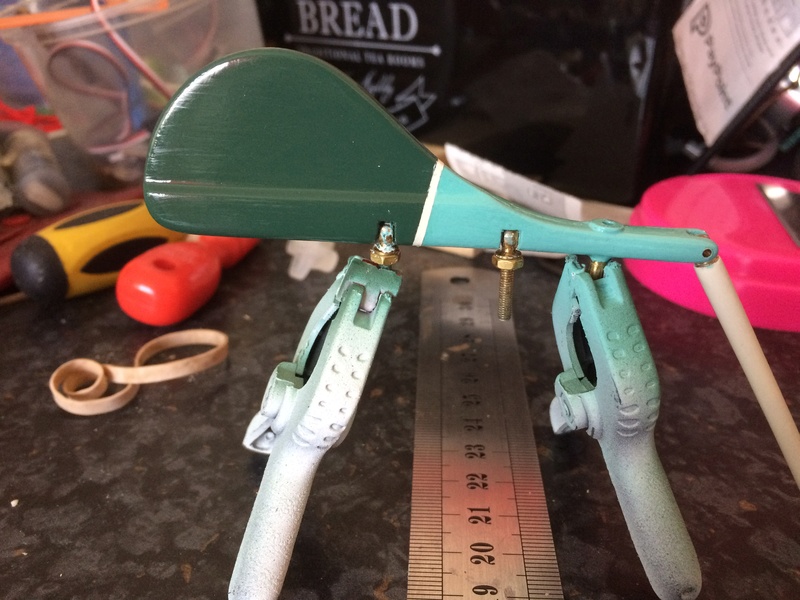 The hull looks awful right now.... Only because it’s been wet sanded to flatten it back, I have got good coverage now on the first few coats as now I’m no longer getting colour pulling up during the wet sanding good news as now I can start putting lighter coats on to build the layers. I’ll let this dry off in the sun and give it it a coat of epoxy once it’s dry. I’ve opted to do singular coats every 24 hours to be on the safe side of it curing so I don’t have any issues so this process will keep going daily now for the next 10 days or so, or until the last coat I wet sand makes the hull uniform white to which a final coat will go on to use as the rubbing compound and polishing layers from 800-3000 grit wet sanding. I wouldn’t expect anymore updated posts for a week or so now as it’s the same process as today but I will post a single photo of the next layer of epoxy to demonstrate the hull being white goes back to clear gloss again after application. Next post after that I hope will once the varnish on the hulls done and I can resume finishing. The deck and back to varnishing on that. 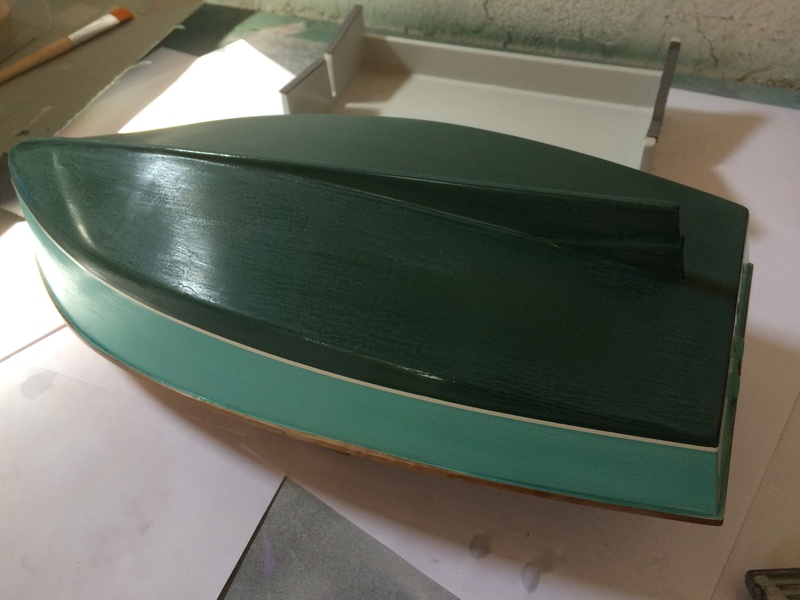  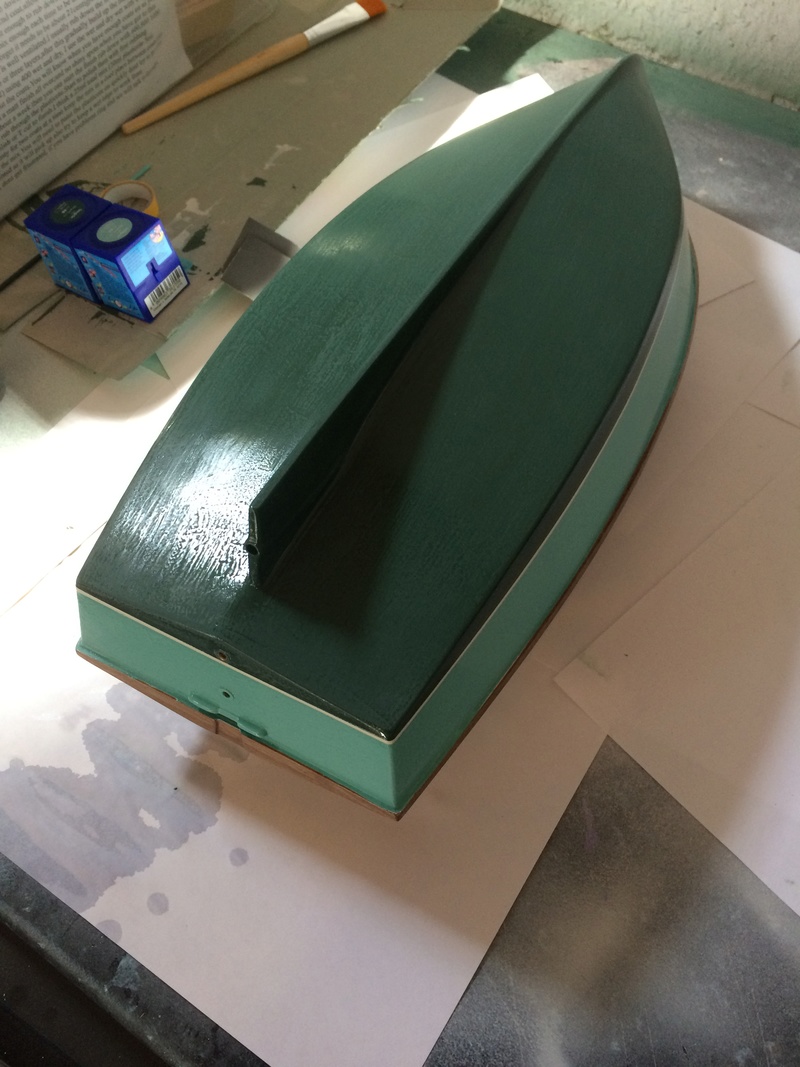
_________________
I'm Not Anti-Social, I'm Anti-Stupid.
| |
|
  | |
Roadrunner
Forum Overlord


Posts : 1714
Join date : 2011-06-10
 |  Subject: Re: AeroKits Sea Urchin Subject: Re: AeroKits Sea Urchin  Mon May 07, 2018 2:39 pm Mon May 07, 2018 2:39 pm | |
|
_________________
I'm Not Anti-Social, I'm Anti-Stupid.
| |
|
  | |
Guest
Guest
 |  Subject: Re: AeroKits Sea Urchin Subject: Re: AeroKits Sea Urchin  Mon May 07, 2018 4:33 pm Mon May 07, 2018 4:33 pm | |
| - Roadrunner wrote:
- Neil, I can’t imagin the price comparison in today money, I’m sure my dad tired to explain it to me at one point but i still never got it....
 i'll base it on the cost of a pint of beer.......I bought my first pint of watneys red barrel at the age of 16 for 1shilling and a penny.............you always remember that, just like your first gallon of petrol for your motor bike [ and that was exactly the same cost as a single record..... 6sh 8d on june 3rd 1967] so beer at 1sh1d.. = 5 1/2p or 1/19th of what the boat cost in the '60s. ....that is 19 times the price of a pint today..........I bought a pint of Timothy Taylors in the local for £3.79p so 19 x 3.79 = £72. 01p £72.01p..............how does that stack up to the price of the Sea Urchin today |
|
  | |
Roadrunner
Forum Overlord


Posts : 1714
Join date : 2011-06-10
 |  Subject: Re: AeroKits Sea Urchin Subject: Re: AeroKits Sea Urchin  Mon May 07, 2018 9:50 pm Mon May 07, 2018 9:50 pm | |
| Expensive pint, boats cheaper  I know which I’m buying...
_________________
I'm Not Anti-Social, I'm Anti-Stupid.
| |
|
  | |
Imcc
Gunner


Posts : 127
Join date : 2016-11-19
Age : 61
Location : Manchester
 |  Subject: Re: AeroKits Sea Urchin Subject: Re: AeroKits Sea Urchin  Mon May 07, 2018 10:10 pm Mon May 07, 2018 10:10 pm | |
| | |
|
  | |
Roadrunner
Forum Overlord


Posts : 1714
Join date : 2011-06-10
 |  Subject: Re: AeroKits Sea Urchin Subject: Re: AeroKits Sea Urchin  Mon May 07, 2018 11:21 pm Mon May 07, 2018 11:21 pm | |
| It’s looking very glossy right now after only 3 decent coats, I’m sure you can imagin what it will be like after 7-13 more! You have to love these 2 pac varnishes, tricky to use on paint surfaces, hence my option to spray with Matt paint, it’s much easier to use on a bare wooden surface, it’s also quite expensive being £40 a litre, but given how many boats I can do within its 5-6 year life span total year worth it. It also dosen’t matter how many layers you put on, it’s as thin as water and drys clear without adding thickness ( excluding around edges) in fact a 3 coat rattle can gloss surface is thicker than 25 layers of this stuff! ( practise gave me that info!) it’s just use with caution on a paint surface, to many coats to soon will craze and bubble the layers, and on paint it will crack pull the paint up, it also softens the paint and other layers for the first 8 hours until it starts to harden, even then.. although workable with wet and dry after 24 hours it’s still soft, it actually takes a full 7-10 days to really harden up but once it dose, surface scuffs, bangs and chips can’t be refilled with this stuff, or simply buffed out! 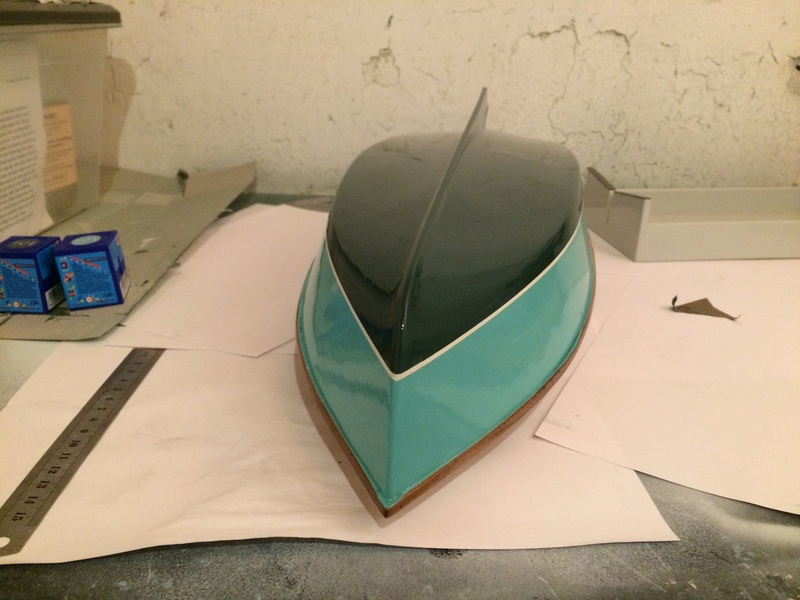
_________________
I'm Not Anti-Social, I'm Anti-Stupid.
| |
|
  | |
Roadrunner
Forum Overlord


Posts : 1714
Join date : 2011-06-10
 |  Subject: Re: AeroKits Sea Urchin Subject: Re: AeroKits Sea Urchin  Wed May 09, 2018 12:56 pm Wed May 09, 2018 12:56 pm | |
| Boats coats are going well, no real problems so far, I will have to put the project down for a couple days now, the epoxy is curing slower so it’s still a little soft on the surface, it’s very workable with wet and dry for the next coat but I’m using caution now as I have a couple of runs from the skeg to the hull which will need a little more attention so rather thank risk any sand through removing those I’ll wait for the epoxy to go rock hard and sand those out which the surface will be tough enough to take without I’ll effects. That was my fault as I put the 4th coat on a little thick but this is a normal occurance so I’m just airing on the side of caution. 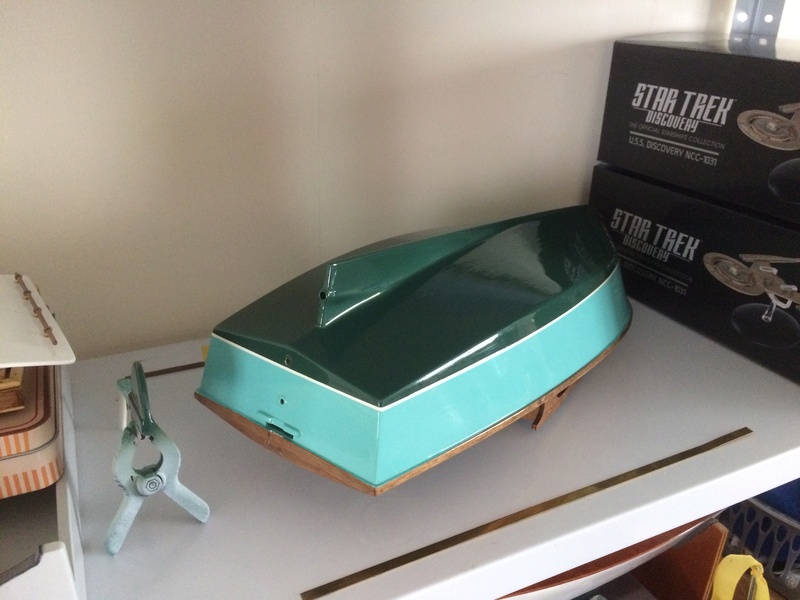 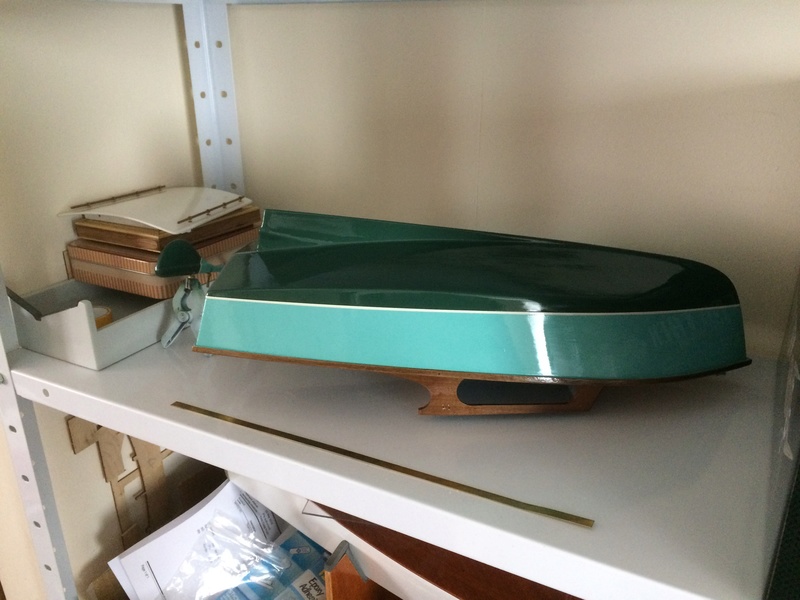 On a side note anyone want a uss discovery? I have a spare! 
_________________
I'm Not Anti-Social, I'm Anti-Stupid.
| |
|
  | |
Roadrunner
Forum Overlord


Posts : 1714
Join date : 2011-06-10
 |  Subject: Re: AeroKits Sea Urchin Subject: Re: AeroKits Sea Urchin  Fri May 11, 2018 4:25 pm Fri May 11, 2018 4:25 pm | |
| Bit of an after thought when it came to the prop shaft, the rudder is a hinderance for general maintenance taking it on an off frequently will result in damage at some point, I’m also concerned about getting the nut on the bottom thread even with my adjustment to allow for this. So going off worse case and I’m forced to glue the rudder in place or use some epoxy to at least aid in securing it right, i came to the conclusion I needed to fit an oiler to the shaft, meaning I can remove the prop without taking the rudder off but also keep the shaft oiled or greased using this method, the shaft and tube are both stainless steel so I’m not worried about long term corrosion, as there won’t be any, unlike brass which is a pain in the backside to keep clean. So I took the afternoon to mod a cast bronze oiler to fit on the shaft, I had to scrape the bulkhead behind the shaft to slide the base part into the exposed shaft, I had pertly of room inside the wheelhouse to fit this but the angle would have made drilling the hole into the shaft difficult if not impossible without damaging something. A good blob of epoxy and bolted the parts to the shaft, once dry I’ll drill out the offending hole to finish the function. I do wish I had thought of this before fitting the shaft in permantly but in this case some perseverance paid off with no I’ll effects. 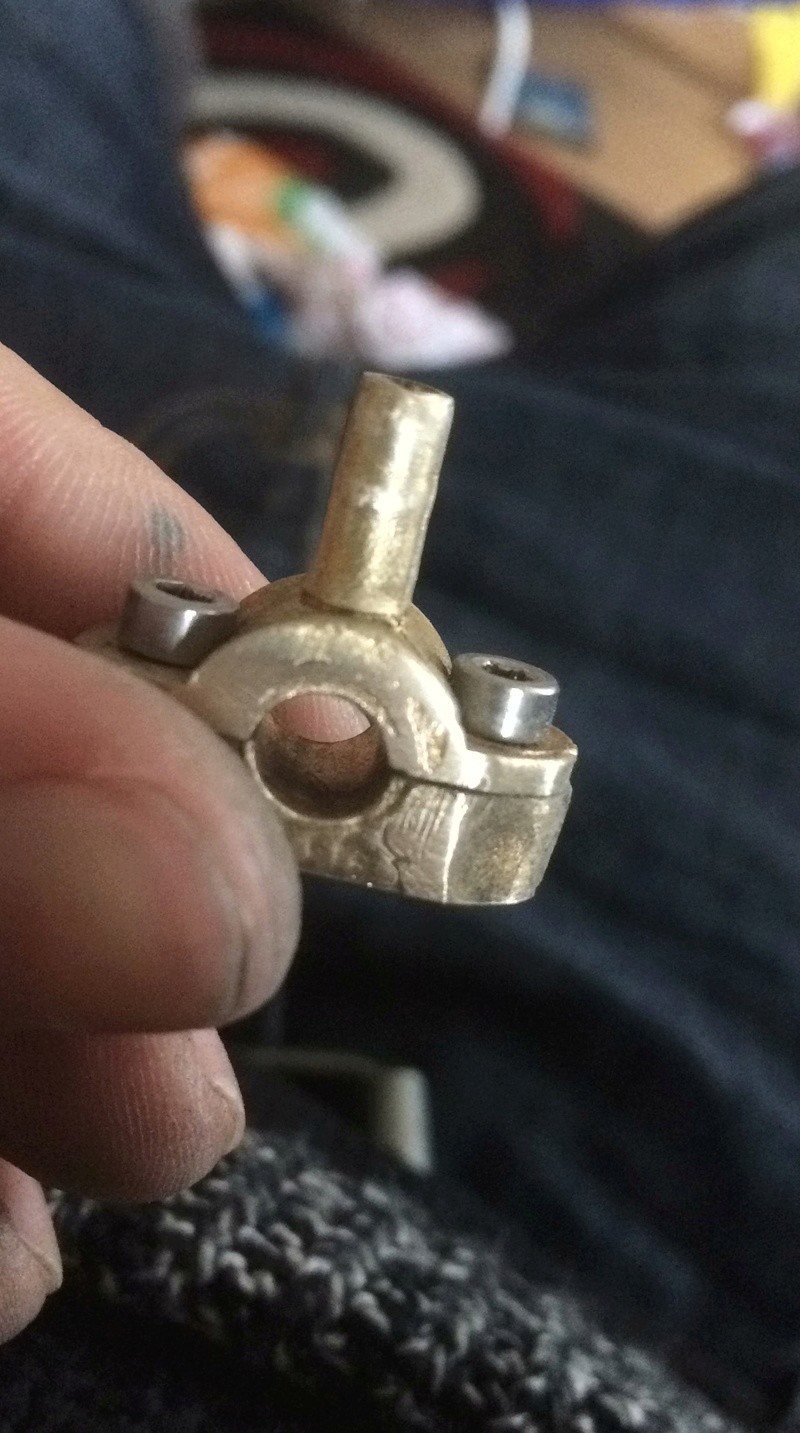 
_________________
I'm Not Anti-Social, I'm Anti-Stupid.
Last edited by Roadrunner on Sun May 13, 2018 12:13 pm; edited 1 time in total | |
|
  | |
Roadrunner
Forum Overlord


Posts : 1714
Join date : 2011-06-10
 |  Subject: Re: AeroKits Sea Urchin Subject: Re: AeroKits Sea Urchin  Fri May 11, 2018 10:13 pm Fri May 11, 2018 10:13 pm | |
| I’m glad I positioned the oiler where I did, it was an absolute pig to drill out the stainless,( it was rock solid!) I ended up blunting two of my good bits doing the job, I think next time adding some cutting fluid would have helped, but it’s not a substance I carry since I rarly use these types of metals, brass, aluminium, bronze all soft metals which I work with regularly never have these issues.
But job is done and cleaned up shaft is still a little stiff as it has been since day one but once the bushings get a bit of wear it will loosen up.
Good result today, tomorrow I’ll go back to wet sanding and more epoxy work, the hull is rock hard and took the abuse of drilling the shaft out on the stand with no damage or marks left on the hull.
_________________
I'm Not Anti-Social, I'm Anti-Stupid.
| |
|
  | |
Guest
Guest
 |  Subject: Re: AeroKits Sea Urchin Subject: Re: AeroKits Sea Urchin  Sat May 12, 2018 1:27 am Sat May 12, 2018 1:27 am | |
| |
|
  | |
Roadrunner
Forum Overlord


Posts : 1714
Join date : 2011-06-10
 |  Subject: Re: AeroKits Sea Urchin Subject: Re: AeroKits Sea Urchin  Sun May 13, 2018 3:52 pm Sun May 13, 2018 3:52 pm | |
| Today I wet sanded the boat, a few places where the wood grain is still making the epoxy not look flat but those will fill out with the subsequent coats, I’ve appkyed a thick coat 5 and will apply coat 6 in a couple of hours and let that set over night and back to wet sanding, these 2 coats will I hope fill the remaining wood grain, to which once sanded smooth should allow for even, smoother coats, This is the same process I use for decks alternating between thick and thin coats between sanding to get the level surface. I think at present I’ll be looking at 15 coats to the hull at this point, usually once I’m up to 5 the surface is usually flatter like it is on deck work. All you can do is keep going until the wet sand gives you a very even Matt and white look with no odd patches of gloss showing. But so far besides a few runs no issues, all get corrected between coats and I’m happy with how this is going. So forgive the photo if it’s showing a few run marks next few coats will start to becomes smoother. 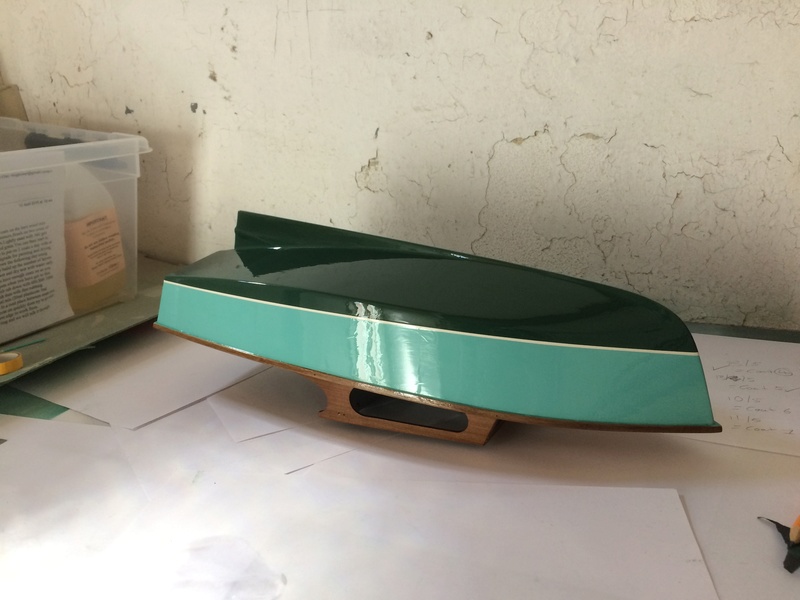
_________________
I'm Not Anti-Social, I'm Anti-Stupid.
| |
|
  | |
Roadrunner
Forum Overlord


Posts : 1714
Join date : 2011-06-10
 |  Subject: Re: AeroKits Sea Urchin Subject: Re: AeroKits Sea Urchin  Sun May 13, 2018 7:49 pm Sun May 13, 2018 7:49 pm | |
| Had to skip doing the 6th coat tonight there were a few specs of dirty or fluff in the 5th coat to which covering and sealing into the hull will ruin a good finish. Nothing major.. annoying as I was hoping to get two thick coats on today for tomorrow, non the less I’ll sand out the imperfections tomorrow and just give the hull a very light rub for the next coat as a grip surface, I’ll also make a good attempt to clean my little area to rid it of any particals floating around.. I expect it’s just fluff from the tumble dryer gripping around the room.. yet another reason I need a dedicated workshop with a spray booth  such is life but thankfully the epoxy is very forgiving. Guess it’s back to my secret project...
_________________
I'm Not Anti-Social, I'm Anti-Stupid.
| |
|
  | |
Roadrunner
Forum Overlord


Posts : 1714
Join date : 2011-06-10
 |  Subject: Re: AeroKits Sea Urchin Subject: Re: AeroKits Sea Urchin  Tue May 15, 2018 4:46 pm Tue May 15, 2018 4:46 pm | |
| Sanded the hull back today and did the job I hate the most, turning a nice hull into a bloody mess! The white line was still in a fair few places not level to the rest of the hull, and with the slower coats going on the hull it was starting to build up to quite a bump! Now I wouldn’t advise doing this too often but in this case it was the only way to level all the paint surfaces, I pretty much poured 20ml of epoxy over the hull and gave it light stroke with the paint brush to even some of the epoxy out before it reached the rub rails of the deck, the rest I’ve let run and sag all over the hull.. You know the old saying “things always look worse before they look better” and in this case it makes me want to weep! However this very thick runny layer one dry and sanded smooth should now remove the ridge of the boot topping, to be as level as the rest of the hull. It is fortunate that this epoxy is easily sanded smooth to allow you to do horrendous acts of savagery, but in this case one that will save me a lot of headaches knowing I won’t sand into the boot topping later or worry that I keep clipping it with lighter coats. I’ll let this harden off for a couple of days now and go at it like a hammer to flatten it all out, it may need a few more areas done the same after the sand to remove the boot topping ridge but I’ll build up to those as and when. The photos show what looks like a gawd awful mess but I can assure you it won’t stay that way for long! I would say enjoy the photos but even I don’t like looking at them, but once again I’ll keep the blog honest and show how I’ve corrected the hulls paint to be flush. Once this awful jobs done I can go back to thin, smooth layers for the last few coats. Fingers crossed only 3 more are needed after this! 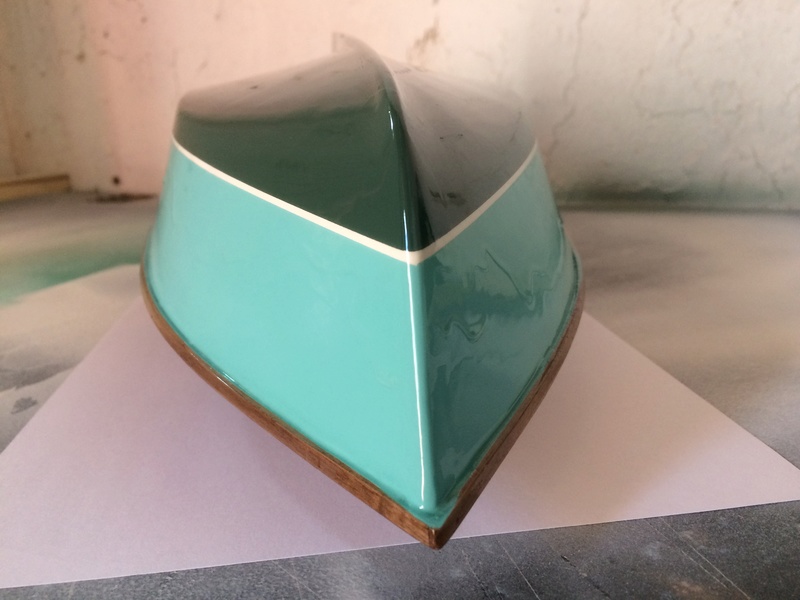 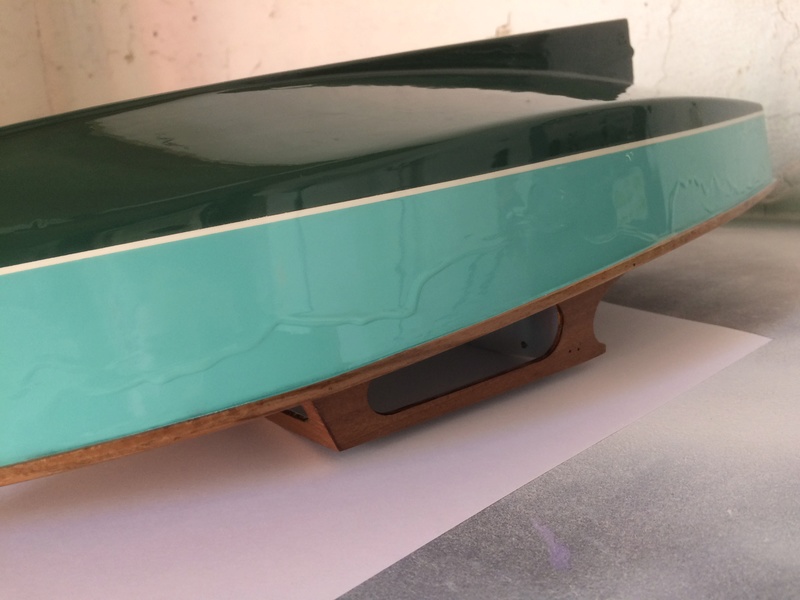 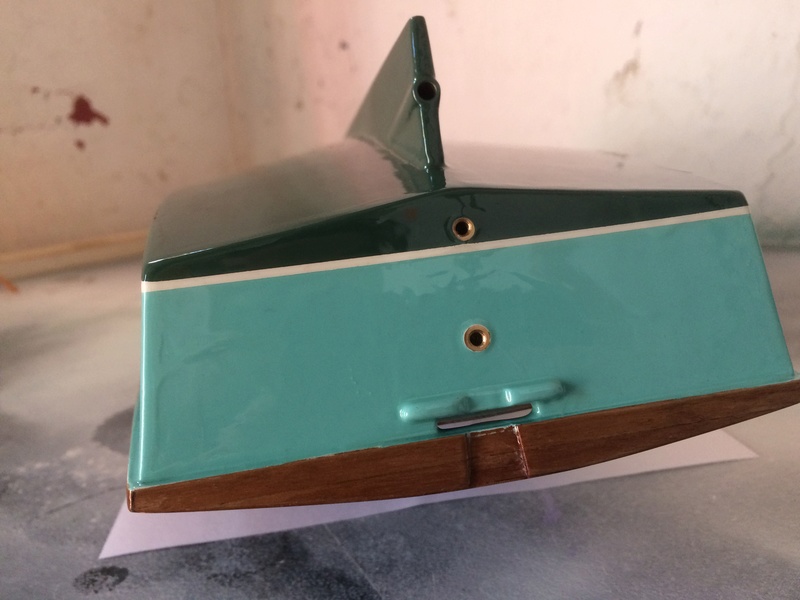 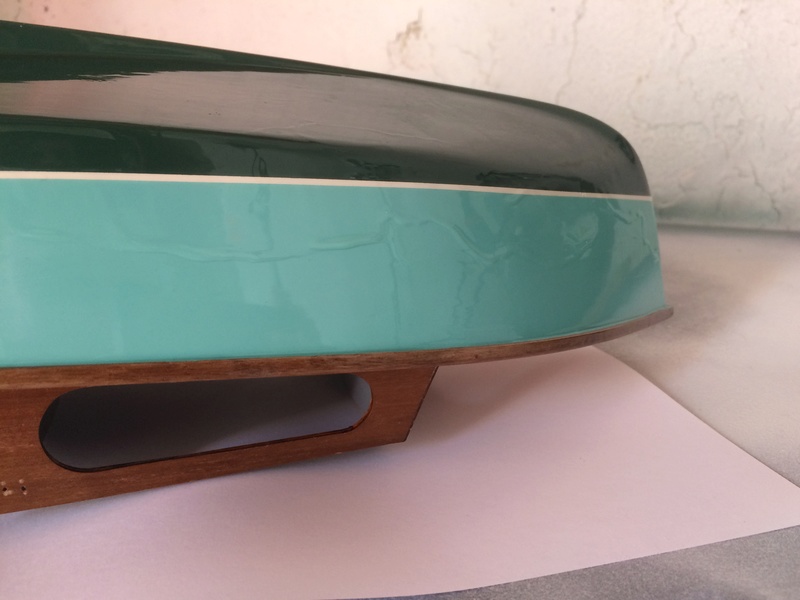 Little update the epoxy is almost cured, and the runs are not as bad as he photos make out now it’s pretty much dry, there are still run ends, but those little ripples will only take a few moments to knock off tomorrow, I was very surprised how flat the epoxy dried with such a heavy coat! Watch for tomorrow’s update.
_________________
I'm Not Anti-Social, I'm Anti-Stupid.
Last edited by Roadrunner on Tue May 15, 2018 9:33 pm; edited 1 time in total | |
|
  | |
Guest
Guest
 |  Subject: Re: AeroKits Sea Urchin Subject: Re: AeroKits Sea Urchin  Tue May 15, 2018 6:11 pm Tue May 15, 2018 6:11 pm | |
| I'd be crying over that matey...............your fortitude is outstanding, and if they had Oscars for boat building......you'd have my vote. |
|
  | |
Roadrunner
Forum Overlord


Posts : 1714
Join date : 2011-06-10
 |  Subject: Re: AeroKits Sea Urchin Subject: Re: AeroKits Sea Urchin  Tue May 15, 2018 9:38 pm Tue May 15, 2018 9:38 pm | |
| It looks awful in the photos but now it’s dry there are only a few ripples on the hull but they are so flat you wouldn’t belive!
But it has resolved the boot topping issues in most places I’ll find out tomorrow during the rub down If I need to do a little more in places but I swear this stuff drys so flat no matter how many runs or how thick you apply it! Crazy!
I will keep going with coats until this hull is as smooth and flat as a mirror then polish it out to be a sheet of glass. And we all know going off my past varnishing projects how those turn out!
I could have clearly opted to laquer the boat but the epoxy finish is so hard once fully cured you can hit it with hammers and it doesn’t even mark!
Ild like to see a car body panel take a large knock and come off better than this stuff!
_________________
I'm Not Anti-Social, I'm Anti-Stupid.
| |
|
  | |
Roadrunner
Forum Overlord


Posts : 1714
Join date : 2011-06-10
 |  Subject: Re: AeroKits Sea Urchin Subject: Re: AeroKits Sea Urchin  Tue May 15, 2018 9:54 pm Tue May 15, 2018 9:54 pm | |
| Just as a little bit of proof how tough the epoxy is this happens to my wee nips deck hatch... My dad dropped a Philips head screw drives from quite a height, and it hit the deck tip first and bounced and hit a 2nd time right next to the first mark... It cracked the epoxy, but didn’t damage the wood surface, I’ve yet to repair it but the white cracking is the epoxy split it will take a little rub down and apply some epoxy to that section and poof polish it out and all fixed! But if that’s all a solid screwdriver could do you an imaging what damage another boat whacking you can’t! I’ll actully make an effort to buff this dent out to prove its worth a little further through this post.. but there is no way laquer could take that damage without chipping up or flaking a chunk out taking paint with it! 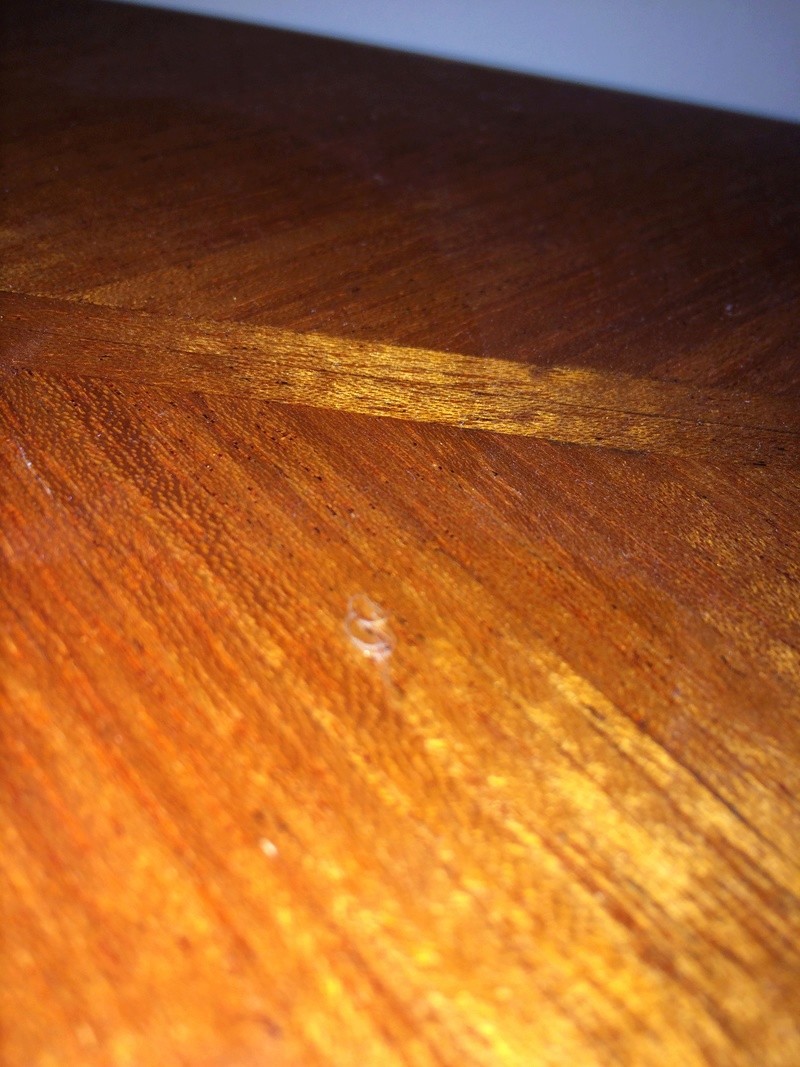
_________________
I'm Not Anti-Social, I'm Anti-Stupid.
| |
|
  | |
Roadrunner
Forum Overlord


Posts : 1714
Join date : 2011-06-10
 |  Subject: Re: AeroKits Sea Urchin Subject: Re: AeroKits Sea Urchin  Tue May 15, 2018 10:11 pm Tue May 15, 2018 10:11 pm | |
|
_________________
I'm Not Anti-Social, I'm Anti-Stupid.
| |
|
  | |
Roadrunner
Forum Overlord


Posts : 1714
Join date : 2011-06-10
 |  Subject: Re: AeroKits Sea Urchin Subject: Re: AeroKits Sea Urchin  Wed May 16, 2018 12:47 pm Wed May 16, 2018 12:47 pm | |
| Ok back to the hull... As you can see from the photo the run marks really did dry quite flat and only a few ripples now shows down the length to which they will be sanded flush to the rest. This is a before and after couple of posts. 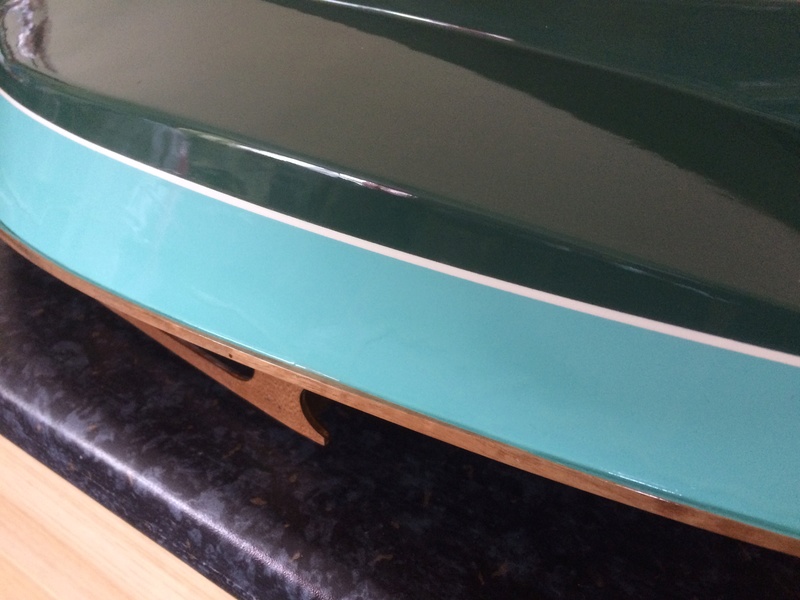
_________________
I'm Not Anti-Social, I'm Anti-Stupid.
| |
|
  | |
Sponsored content
 |  Subject: Re: AeroKits Sea Urchin Subject: Re: AeroKits Sea Urchin  | |
| |
|
  | |
| | AeroKits Sea Urchin |  |
|
