| | Deans MA/SB |  |
|
|
| Author | Message |
|---|
intrepid75
Master


Posts : 271
Join date : 2011-06-11
Age : 68
Location : Bristol, West country
 |  Subject: Deans MA/SB Subject: Deans MA/SB  Sat Jan 21, 2012 6:36 pm Sat Jan 21, 2012 6:36 pm | |
| As described in my picket boat post xmas presents gave a problem of havign two models to build from presents and if I start to build one and not the other I will hear a cry of 'why arent you building mine first?'. My HMS Yarmouth which is virtually just with stanchions left has had to be put to one side as I have been asked already 'when are you going to start my boat?'. So this week I made a start on both my new presents with the aim of building both side by side to protect sensitivities. . The instructions and plans for the MA/SB are a huge improvement on the normal Deans instructions which are usually dire but these seem to be top notch - time will tell no doubt. But well done Deans on the improvement. Contents were checked and there were a couple of parts missing so a quick call and this was resolved very rapidly. First class customer service. Rubbed and washed and holes made were necessary. Tacked in with superglue then clear slow set expoxy applied. Same for the shaft. When this dries FG paste will be used to set it fully and secure it. Meantime because it was cold in the garage and I had the day to myself today I have gone out of sequence and started on the main cabin alternating with the Picket Boat etc. And with the picket boat this model does lend itself to be made out of sequence. I also made up the spare barrel locker and it is starting to quickly take shape. It has gone together over 2 days very quickly and next weekend I will start on the internals RC and fit the deck.         | |
|
  | |
intrepid75
Master


Posts : 271
Join date : 2011-06-11
Age : 68
Location : Bristol, West country
 |  Subject: bigger pics Subject: bigger pics  Sun Jan 29, 2012 5:03 pm Sun Jan 29, 2012 5:03 pm | |
| | |
|
  | |
intrepid75
Master


Posts : 271
Join date : 2011-06-11
Age : 68
Location : Bristol, West country
 |  Subject: Re: Deans MA/SB Subject: Re: Deans MA/SB  Sun Feb 26, 2012 1:50 pm Sun Feb 26, 2012 1:50 pm | |
| After being left untouched for a month, I have turned my attentions back to the MA/SB. So far the build has been back to front, building the cabin and cabin detailing first, due to the fact its warmer in the kitchen on a night than it is in the garage or shed!! But with a little warmer weather over the last few days, and that the picket boat is now at hull painting stage I thought I would use the time to give some attention to the hull. When I left her I had trial fitted the prop shafts throught the cut outs but no more than that. I have now fitted the p brackets and have to say they were pretty rough as cast mouldings. Hard to see where the flash started and finished and the prong that enters the hull is delicate to say the least. First one snapped as soon as I offered it to the hull. The second one I took more care with and that snapped!!! Drilled some holes and inserted some 1mm brass rod instead. The do look better on than they do off so I'm not bothered about the rough shape of them. They will do the job and if anyone wants to turn their heads upside down to look under the hull and comment on the p frames well thats sad isnt it? The prop tubes were covered in with FG paste and the same with the rudder tubes plus a ramin brace against them for any knocks. I have to say, in contrast to the p frames, the vac form motor mounts when sanded down to the exact mould line matched the shaft line almost first time. A really easy job getting alignment. Have yet to decide whether to go with two ESCs without a mixer and two battery packs or a single higher amp ESC. I have the ESCs to hand for both plans so I will think on. I have a few days off this week so assuming I get the kitched decorated the consevatory re floored the oven cleaned I might get a whole day in to get on the with Balsa and Ramin beam and support work.!!     | |
|
  | |
intrepid75
Master


Posts : 271
Join date : 2011-06-11
Age : 68
Location : Bristol, West country
 |  Subject: Re: Deans MA/SB Subject: Re: Deans MA/SB  Thu Mar 01, 2012 11:57 am Thu Mar 01, 2012 11:57 am | |
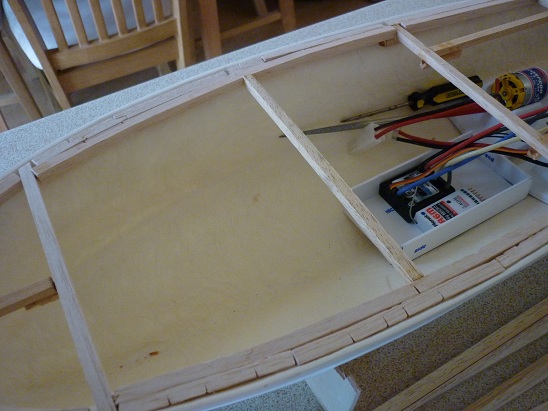
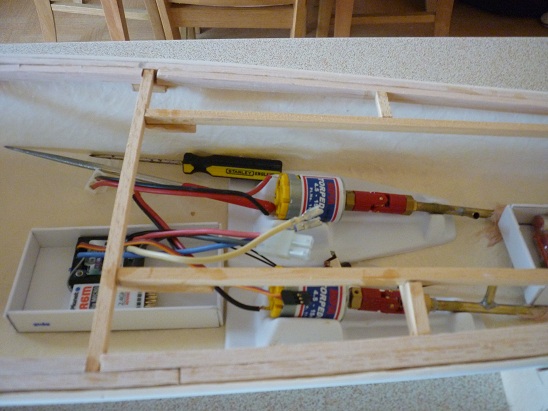
| Well made progress on the MA/SB and the hull. When the hull arrived it had a kink about at 1/4 of the hull length up from the stern. It wasn't in my view a fault in the hull so its not a criticism - I put it down do the fact that although then hull is solid enough it still moulded deliberately thinner which I guess when it comes off the mould means it isn't fully rigid like some thicker hulls. I have seen an ASR build with the same slight kink and this is the same hull so I think my theory could be accurate. It is nothing to be concerned about but if I didn't take care when building the supports and making sure of how the were placed and also placing the deck I was worried could actually make the slight kink worse if I forced the hull in the wrong place. I used a hairdryer lightly just before and after where I thought the kink was mainly focused and then when still warm I used the cross members to eradicate as much as I could. Its hardly noticeable now but when I place the deck on it it should make the hull and deck a rigid unit with the kink fully gone. The side supports are a bit boring to see in terms of a build diary for some people (me included if I'm honest) but I have put a couplet of pics up on the basis someone might be looking to buy a MA/SB or an ASR and if they haven't build a similar craft before it will give them some idea of what work is involved in the hull and deck. It was fairly straightforward but the first side supports needed a real acute angle shaved off the balsa square to make sure they lay flat across the top. Bit of a tedious painful job of cutting and shaving, holding to the side, adjusting, putting to side, adjusting etc etc. But I think I have got them mostly straight and flush but when its all set a careful Sand across the top will make sure. The second side support was straight forward and needed no adjustment which I hope is a sign that I got the first layer right!! After that the cross members in Ramin were placed and with supports underneath each join. It has now made the hull hull nicely rigid and ready to offer up the deck. Next job will be to fit the servo mount and the servo. One thiing I will say is that Deans provided more than enough ramin and balsa for the job - loads of it.    | |
|
  | |
intrepid75
Master


Posts : 271
Join date : 2011-06-11
Age : 68
Location : Bristol, West country
 |  Subject: Re: Deans MA/SB Subject: Re: Deans MA/SB  Thu Mar 01, 2012 7:44 pm Thu Mar 01, 2012 7:44 pm | |
| | |
|
  | |
intrepid75
Master


Posts : 271
Join date : 2011-06-11
Age : 68
Location : Bristol, West country
 |  Subject: Re: Deans MA/SB Subject: Re: Deans MA/SB  Tue Apr 03, 2012 10:33 pm Tue Apr 03, 2012 10:33 pm | |
| | |
|
  | |
phil winks
Master


Posts : 583
Join date : 2011-06-12
Age : 68
Location : Taunton
 |  Subject: Re: Deans MA/SB Subject: Re: Deans MA/SB  Sun Apr 08, 2012 9:15 pm Sun Apr 08, 2012 9:15 pm | |
| I think your surmise that the depth charges are made this way to save weight is prob a correct one mate 10 resin items would add up to quite a lump. Progress is as usual looking good mate | |
|
  | |
intrepid75
Master


Posts : 271
Join date : 2011-06-11
Age : 68
Location : Bristol, West country
 | |
  | |
intrepid75
Master


Posts : 271
Join date : 2011-06-11
Age : 68
Location : Bristol, West country
 |  Subject: Re: Deans MA/SB Subject: Re: Deans MA/SB  Sat Apr 14, 2012 7:55 pm Sat Apr 14, 2012 7:55 pm | |
| | |
|
  | |
Sponsored content
 |  Subject: Re: Deans MA/SB Subject: Re: Deans MA/SB  | |
| |
|
  | |
| | Deans MA/SB |  |
|
