| | HMS Yarmouth |  |
|
+5mattycoops43 Ole Vauger scalloway41 Roadrunner intrepid75 9 posters |
|
| Author | Message |
|---|
intrepid75
Master


Posts : 271
Join date : 2011-06-11
Age : 68
Location : Bristol, West country
| | Subject: HMS Yarmouth Sat Jun 11, 2011 9:29 pm | |
| I started to build HMS Yarmouth Type 12 a few days ago using the Cammett hull and I have taken a few snaps of my progress todate. So far the sandiing and drilling has been done but as I build her (slowly) I will be posting up a build log with some commentary but nothing to detailed. When I get time tomorrow I will start with the photo log and wife willing there will be no gardening and I can do a little more tomorrow. | |
|
| | |
intrepid75
Master
Posts : 271
Join date : 2011-06-11
Age : 68
Location : Bristol, West country
| | Subject: Progress Sun Jun 12, 2011 10:40 am | |
| Well despite taking a number of pics and doing a few hours work this morning - Dog woke me at 5 for a walks!! - I am having trouble uploading pics into the blog.
SO without pics the work so far:
Hull rubbed down and made good where there are imperfections in the hull.
Openings drilled out and filed to size.
Prop shafts fitted
A frames fitted
Rudder posts fitted
gaps filled and now as of this morning sanded down and made good.
Underwater detail such as machinery space grills fitted.
Started to make bilge keels.
Stabilisers ready to be drilled and fitted.
Then SHE called for me.
| |
|
| | |
intrepid75
Master
Posts : 271
Join date : 2011-06-11
Age : 68
Location : Bristol, West country
| | Subject: Help Sun Jun 12, 2011 10:41 am | |
| Topic Tided Up. Photo Upload Issues Resolved.
RR | |
|
| | |
intrepid75
Master
Posts : 271
Join date : 2011-06-11
Age : 68
Location : Bristol, West country
| | Subject: Progress Sun Jun 12, 2011 1:30 pm | |
| Okay this was the basic Cammett Hull before starting.  | |
|
| | |
intrepid75
Master
Posts : 271
Join date : 2011-06-11
Age : 68
Location : Bristol, West country
| | Subject: Progress Sun Jun 12, 2011 1:43 pm | |
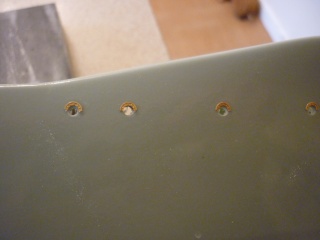
| Although the hull overall was good, as with a lot of hulls it did require some filling and making good in one or two places. So a couple of nights of filling then sanding was required but not too much of a difficult job.  After this started to make the openings. A few scuttles and the shafts, a frame and rudder post openings.  | |
|
| | |
intrepid75
Master
Posts : 271
Join date : 2011-06-11
Age : 68
Location : Bristol, West country
| | Subject: More progress Sun Jun 12, 2011 1:52 pm | |
|  Prop shafts, A Frames and Rudder posts now installed with epoxy and excess space in gaps filled using filler. 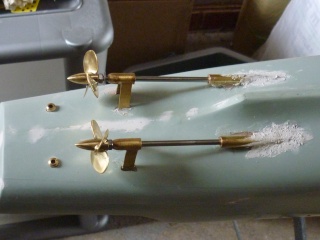 When checking realised a still needed to some more sanding down of the stern as it wasnt as square as I would like it ready for the deck to be attached. Test fitted the rudders and everything looks okay. The thrust collars have been test fitted but arent shown in the pic. The running gear is from G Sitek. And very nice stuff too george.  | |
|
| | |
Roadrunner
Forum Overlord

Posts : 1714
Join date : 2011-06-10
| | Subject: Re: HMS Yarmouth Sun Jun 12, 2011 1:59 pm | |
| Looking good so far, it should encorage me to get back to my build. | |
|
| | |
intrepid75
Master
Posts : 271
Join date : 2011-06-11
Age : 68
Location : Bristol, West country
| | Subject: Todays progress Sun Jun 12, 2011 2:03 pm | |
| Well so far I have posted the work up until yesterday. This morning thanks to an early rising dog I spend a few hous working on the next stages. 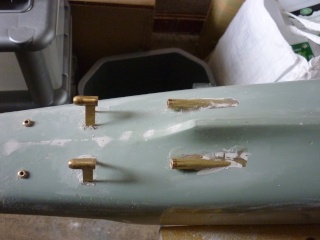 Sanded smooth the excess filler around the shafts and a frames and rudder posts. It may not look it in the pic but it is smooth!! Just didnt clean it up before I took the picture so there is mounds of FG dust around. Started to fit the underwater detail of machine hatch openings as can be seen. I had also started on the stabilisers and bilge keels but before I could do any more there was a pipe for the Permanent Sea Fence Party to close up to fix a fence panel that had just blown down in the wind and rain we are having here in North Bristol. So its the end of todays work. Hopefully I will finish off the underwater bits next weekend and post some more updates then. 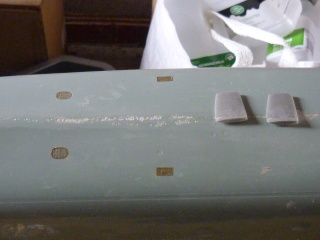 | |
|
| | |
intrepid75
Master
Posts : 271
Join date : 2011-06-11
Age : 68
Location : Bristol, West country
| | Subject: Bilge Keels and Stabilisers Tue Jun 14, 2011 8:42 pm | |
| Have now drilled and pinned the stabilisers to the hull and epoxy in place to hold them in case of knocks. Couldnt quite work out the angle from the plans but they are in the righ positions and the angle if it is wrong will hopefully be a help in keeping her a little stead as this is going to roll I expect. I have cut and shaped the bilge keels using plasticard and will epoxy in place in a couple of nights. Will post photos of this at the weekend. Then enxt job is to make the shelf for the motors battery and esc. Will be running two 540s and using independant VIper 15amps for each motor powered by two 7.2 packs. | |
|
| | |
intrepid75
Master
Posts : 271
Join date : 2011-06-11
Age : 68
Location : Bristol, West country
| |
| | |
intrepid75
Master
Posts : 271
Join date : 2011-06-11
Age : 68
Location : Bristol, West country
| |
| | |
scalloway41
Able Seaman


Posts : 36
Join date : 2011-06-11
Age : 59
Location : coventry
| | Subject: Re: HMS Yarmouth Sat Jun 25, 2011 4:07 pm | |
| looking good.
the brass looks good. how do you join it? is it soldered together ? | |
|
| | |
intrepid75
Master
Posts : 271
Join date : 2011-06-11
Age : 68
Location : Bristol, West country
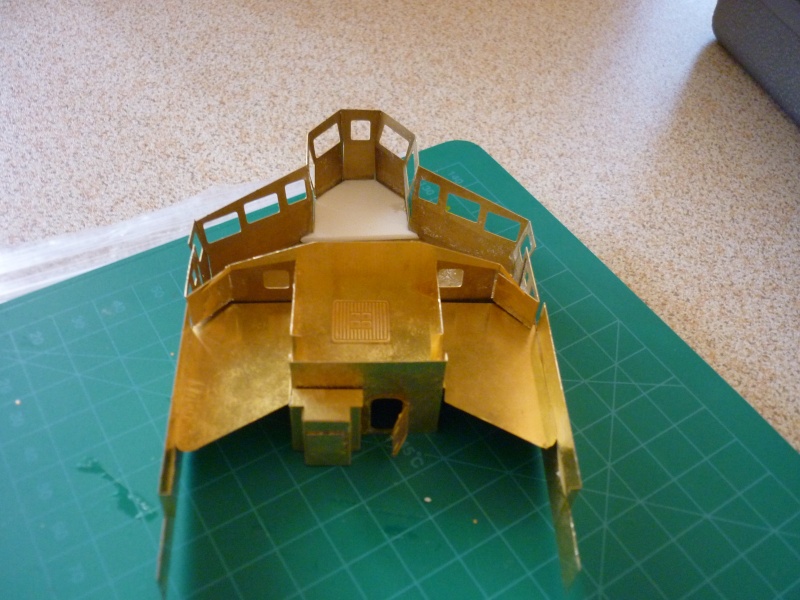
| | Subject: Brass Bridge Sat Jun 25, 2011 6:59 pm | |
| Just bonded with medium super glue. After the initial bond ran a small .25 evergreen strip around inside to increase the bonded area. There are a couple of very tiny gaps between one or two sections so I am going to just tin slightly on the inside so it would fill the small gap and hopefully when painted and filed it will be a clean smooth joint that cant be seen. | |
|
| | |
intrepid75
Master
Posts : 271
Join date : 2011-06-11
Age : 68
Location : Bristol, West country
| | Subject: Todays work Sun Jun 26, 2011 11:48 am | |
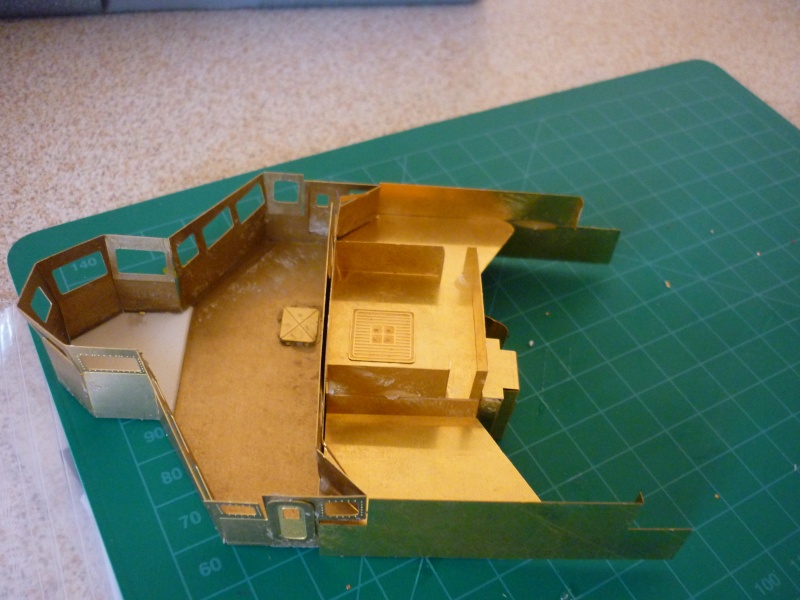
| Motor shelf is now in situ with the motors and couplings in nice and straight but with the battery box only temporary located but I havent bonded the box in yet as I want to do some float testing to make sure its in as good a position as possible for ballast and for access. One access hatch will eb the hangar over coamings and the other will be located by making the deck area around the Maing GWS Director or the GD and Bridge deck removable. Bridge is completed apart from the bridge roof which will be added later at painting stage. I am in two minds whether to furnish the bridge interior or not. It does look neat when completed but once its sealed its a bugger to see anything!! I have also made up the GD platform that butts onto the rear of the bridge. Pics of this latest work will be posted later. | |
|
| | |
intrepid75
Master
Posts : 271
Join date : 2011-06-11
Age : 68
Location : Bristol, West country
| |
| | |
Ole Vauger
Midshipman

Posts : 74
Join date : 2011-06-15
Age : 59
Location : Hvaler Norway
| | Subject: Re: HMS Yarmouth Tue Jun 28, 2011 10:44 pm | |
| Hi Intrepid75
Is reasonably sure it will look good with paint. It looks good now.
Are you going to make interior as well?
or will it be visible in very small degree?
Ole. | |
|
| | |
mattycoops43
Midshipman
Posts : 51
Join date : 2011-06-12
Location : Newport, South Wales
| | Subject: Re: HMS Yarmouth Wed Jun 29, 2011 12:20 am | |
| The boat looks great! Can't wait to see it together!
Don't want to ask a silly question, but those props look huge to my eyes? Is that the recommended size?
Matt | |
|
| | |
intrepid75
Master
Posts : 271
Join date : 2011-06-11
Age : 68
Location : Bristol, West country
| | Subject: Props Wed Jun 29, 2011 8:23 pm | |
| They do look big in the photo yes but they are the right size as supplied by Sitek = pics can be deceaving fromm the angle they are brass 38mm which is the same for Leanders etc | |
|
| | |
intrepid75
Master
Posts : 271
Join date : 2011-06-11
Age : 68
Location : Bristol, West country
| | Subject: Ole Wed Jun 29, 2011 8:25 pm | |
| Ole
Not sure about the interior - as I posted earlier 'I am in two minds whether to furnish the bridge interior or not. It does look neat when completed but once its sealed its a bugger to see anything!!
WIll think about it this weekend. I ahve also started the Main Director Platform as its a kitchen job. | |
|
| | |
Ole Vauger
Midshipman
Posts : 74
Join date : 2011-06-15
Age : 59
Location : Hvaler Norway
| | Subject: Re: HMS Yarmouth Wed Jun 29, 2011 10:03 pm | |
| Well to be honest. If it will be impossible to see what's on the bridge. I would have let it be as it is. Otherwise you would have to tell them that looking at the model, how many hours you have used. In creating the interior. And they will think here it comes again blah blah blah I can not see anything. It is difficult to have an opinion about something you can not see. Regards Ole  | |
|
| | |
Kleban
Midshipman

Posts : 96
Join date : 2011-06-26
Age : 61
Location : Cornwall
| | Subject: Re: HMS Yarmouth Sat Jul 02, 2011 6:51 am | |
| Exellent !!! ..... looking forward to more updates. | |
|
| | |
intrepid75
Master
Posts : 271
Join date : 2011-06-11
Age : 68
Location : Bristol, West country
| | Subject: Progress Sun Jul 03, 2011 12:57 pm | |
| Well made some more progress yesterday. All the internals are now in place - rx, rudder servo, ESC's and Batteries. Everything has been wired up and checked the weight distribution in the bath and its level with the internals placed where they are in the pics. Some little bit of more ballast will be required to get her at the very limit of her waterline but I will do that later. After the float test I stiched her on, set up the ESC's and tried the engines. Relieved that there were no glitches with the ESC's and they worked nicely in unison using the Y lead with one of the BECs disabled. Even feathering the props with just a light touch of ratchet they do turn over equally from an eyesight perspective so hopfully she will sail okay when the props turn over in the water. I havent yet linked the rudders to the servo but that will only take a few minutes. Also need to tidy ub the wires as they are chaos at the moment but nothing a few wire ties wont cure. For access I am going to have a small hatch over the rudder tubes that flits flush on the QD, the hangar will be on a coaming to lift off which will provide access to motors and there will be a further opening on the bridge deck. Havent quite decided on where this will start and end but will figure that out when I start cutting out the deck plastic and try the bridge and GD platform on for position. I have also made a start on the support ramin beams on the foc'sle - I will put a small plastic card lip just under the FG rounded deck edge of the hull to make it a smooth fit and to give a base for any filler required between the joints. 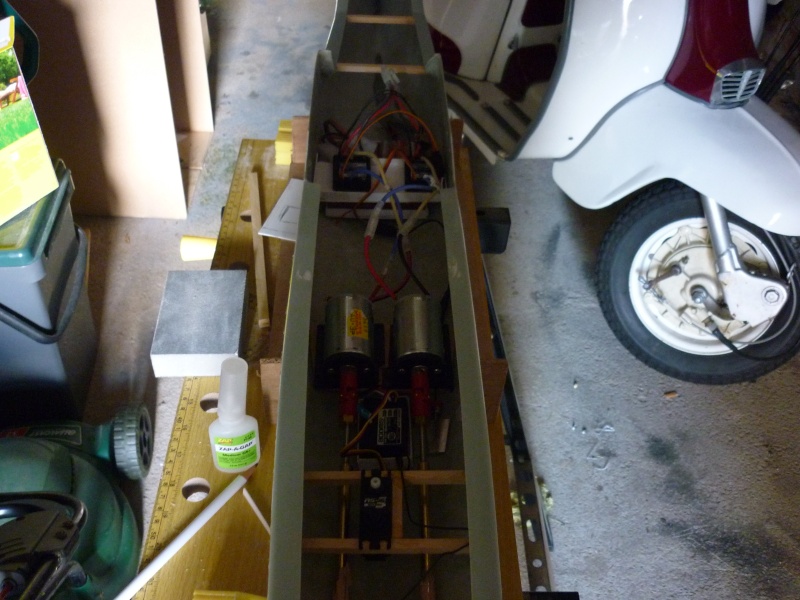 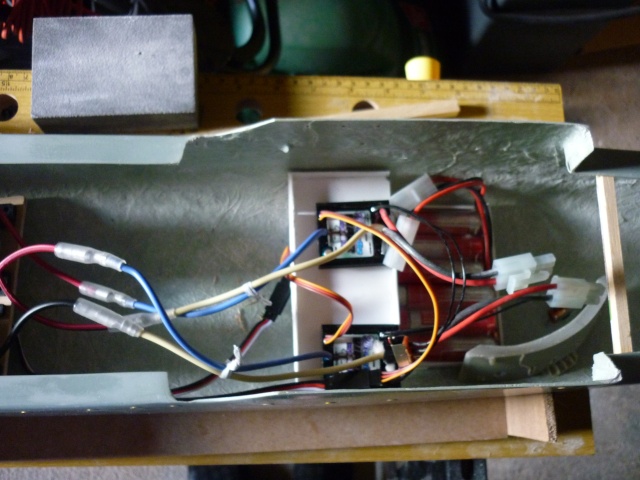 | |
|
| | |
intrepid75
Master
Posts : 271
Join date : 2011-06-11
Age : 68
Location : Bristol, West country
| | Subject: Hangar Thu Jul 07, 2011 8:49 pm | |
| Decided to start to build the hangar but had to give it a lot of thought as it isnt a bog standard 'traditional' square box type housing. There are a lot of angles, nooks and crannys curved edges and so forth. Used the plan to make templates as shown below:  Normally for a square box I would build it round the coamings to get a nice snug fit but the shape precludes this. I have measured the width against the hull and the hangar coamings will be an exact fit against the deck edges of the rounded side of hull moulding if that makes sense so it will be easy to make the deck opening it that makes sense. Well it makes sense to me now but I might have an oh my god what did I do moment later in the build!!! As the plan shows starboard view, plan view, hangar end looking forward but not port of hangar lokoking aft there are some prrts that cant be done by template but will need to be 'sized' as the build progresses. Having cut the templates I have made a start, commencing witht he roof and also internally a former the sahme shape as the roof. Having cut this then attached the first side and so forth. 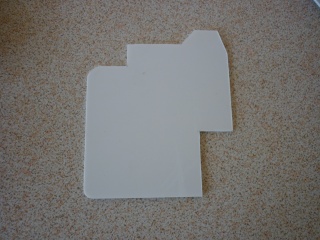  After a few pieces cut and glued the basic shape is starting to come together. 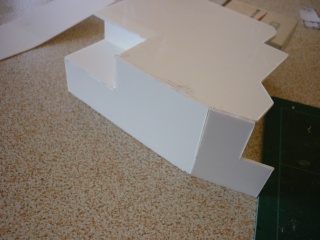 A bit rough and untidy and obviously a lot of sanding and cleaning up to be done but fairly pleased so far. I will leave it 24 hours now to fully set before starting the port side and then forward end of the actual hangar and then the platform that supports the emergency steering position and whip arials. 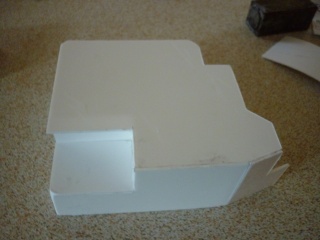 | |
|
| | |
intrepid75
Master
Posts : 271
Join date : 2011-06-11
Age : 68
Location : Bristol, West country
| | Subject: Progress Sat Jul 16, 2011 12:56 pm | |
| | |
|
| | |
intrepid75
Master
Posts : 271
Join date : 2011-06-11
Age : 68
Location : Bristol, West country
| | Subject: Progress Sun Jul 24, 2011 9:52 am | |
| Due to family business I wasnt able to make much progress this week but I did manage to spend a bit of time on her yesterday but the few hours of work I did seem to make her look as if I spent a lot more time than I actually did!! Although the foc'sle and QD were roughly cut they needed a fair bit of timming and I had to finish installing the support beams for the QD. These are now done and the fit isnt too bad - will just need a little bit of filler to bridge any gaps and some sanding to fair in the deck with the edge of the hull. The Midships bridge deck was cut but I hadnt made the cut out aft to wrap around the funnel. This is now done. I still have to make two cut out access openings for the batttery tray and the tiller arms and I will do these over the next couple of nights. Gave her her first float test this morning - watertight which is the first concern. She is also fairly level and stable at this point but obvioulsy riding a little high at the moment sitting below the lower WL marked position and there is a lot of weight to go on yet. However even though this weight of fittings will add to the top weight I think she will have enough margin to be ballasted down to be stable on the water. Time will tell!! Having cut out the decks I have dried fitted all the bits I have done so far and I dont think she is looking too bad so far. Looking more and more like a Type 12 and starting to show some of those gracious lines I always thought the type 12s had.      | |
|
| | |
phil winks
Master

Posts : 583
Join date : 2011-06-12
Age : 68
Location : Taunton
| | Subject: Re: HMS Yarmouth Sun Jul 24, 2011 10:30 pm | |
| Hi Intrepid quite an inspiring build mate. just one small safety point I spotted, you mentiond that some of the brass is superglued and you intend to tin the slight gaps you have, please be aware as you heat the glued area with a soldering iron the superglue will vapourise and the resultant white smoke is 1stly very irritating to the eyes and resportary tract and 2ndly is toxic to some degree so bucket loads of ventilation is required, and I'd recommend a desk fan infront of you blowing away from you (preferably out of an open window) to remove the smoke before it harms you!! (we are talking serious stinging eyes at least and possible temp blindness) | |
|
| | |
intrepid75
Master
Posts : 271
Join date : 2011-06-11
Age : 68
Location : Bristol, West country
| | Subject: Vapours Mon Jul 25, 2011 8:12 pm | |
| Yeah thanks for the warning Phil. I was aware - I found this out a number of years ago with my first attempt at soldering when I thought it was a clever idea to hold to bits of brass with superglue and then tin!!! Ahem, shall we say I learned my lesson but I appreciate your warning - shame I didnt have it 10 years ago might have saved myself a few tears caused by my dumb naivety. Didnt half feel a bit of a wassock. The small gaps I have are devoid of glue and I will be attired protected and fanned when the time comes. | |
|
| | |
phil winks
Master
Posts : 583
Join date : 2011-06-12
Age : 68
Location : Taunton
| | Subject: Re: HMS Yarmouth Wed Jul 27, 2011 8:38 pm | |
| Painfull init mate! sorry my warning didn't come in time still hopefully someone else who didn't know may now be able to avoid the danger completely. Keep the good work coming mate | |
|
| | |
intrepid75
Master
Posts : 271
Join date : 2011-06-11
Age : 68
Location : Bristol, West country
| | Subject: Decks Thu Jul 28, 2011 8:30 pm | |
| Decks finally trimmed to as close as I can get so the epoxy will be out early Saturday morning and will be bonded to the supprts and main hull. Also painted the lower red lead hull and the boot topping so will post piccies at the weekend as by then she will be looking like a grey funnel line proper but in refit!!
Last edited by intrepid75 on Thu Jul 28, 2011 8:30 pm; edited 1 time in total (Reason for editing : typo) | |
|
| | |
intrepid75
Master
Posts : 271
Join date : 2011-06-11
Age : 68
Location : Bristol, West country
| | Subject: Progress Update Mon Aug 29, 2011 5:01 pm | |
| Havent had the chance to do too much over the last 3 or so weeks due to other commitments but the last week has given me the chance to make more progress. All the decks are fully done now. The funnel is permanently in place and the deck housing and watch station for'd of the funnel is made and in place and the bulkheads around the waist and funnel boxed in. Breakwaters are now in place and anchor chain handling plates are on. The limbo well deck is now being boxed in with only the starboard side to do which I will complete tomorrow. I will also make a start on the mast fittings tomorrow and do some further detailing of the hangar. The mast is a bit daunting as there is a large amount of brass work on it for yards and ECM arrays and ladder rungs etc but hey ho I will see how it goes. All in all its starting to look more and more like a ship in refit and is becoming more and more recognisable as a Type 12 Frigate. Not ever going to be museum quality I know as I fall into the category that someone a lot more talented than me said was the 90% of modellers who blame suppliers for faults rather than themselves!!      | |
|
| | |
intrepid75
Master
Posts : 271
Join date : 2011-06-11
Age : 68
Location : Bristol, West country
| | Subject: Foremast Sat Sep 17, 2011 3:48 pm | |
| | |
|
| | |
phil winks
Master
Posts : 583
Join date : 2011-06-12
Age : 68
Location : Taunton
| | Subject: Re: HMS Yarmouth Sat Sep 17, 2011 5:26 pm | |
| Some truly lovely work going on here mate! just what this forum needs please keep on posting I for one am very keen to see her completed | |
|
| | |
AlanP
Master

Posts : 278
Join date : 2011-06-11
Age : 80
Location : South Cumbria
| | Subject: Re: HMS Yarmouth Sat Sep 17, 2011 10:15 pm | |
| Nice to see you back on the build Intrepid, it's looking good with a lot of nice brass work.
Alan | |
|
| | |
intrepid75
Master
Posts : 271
Join date : 2011-06-11
Age : 68
Location : Bristol, West country
| | Subject: Progress and setbacks!! Sun Sep 25, 2011 1:03 pm | |
| Well one step forward and two steps backwards!! I have put a couple of hours or more in over the last week and added some more detail and so forth. Hatches, WT doors, Limbo well detail, scupper foot rails, flight deck tie downs etc and thought it was making progress. Then disaster. An Irish Setter did what Argy Mriages and Skyawks couldnt and destroyed the fore mast!! Much remedial work to be done as etched brass and a hard floor dont mix. Careful straightening and bending back into place is required. The wife would have gone if it was her but I do love my dog so thats life.      Subject to mast repairs will progressing to main hull and SS painting over the next two weeks or so | |
|
| | |
phil winks
Master
Posts : 583
Join date : 2011-06-12
Age : 68
Location : Taunton
| | Subject: Re: HMS Yarmouth Sun Sep 25, 2011 1:38 pm | |
| Aint it a pain when little (or not so little) set backs like that occur. still it will keep you of the streets for a little longer She is definately looking good mate perhaps you could educate us non naval boat types here ! you refered to the limbo earlier just what is that  | |
|
| | |
intrepid75
Master
Posts : 271
Join date : 2011-06-11
Age : 68
Location : Bristol, West country
| | Subject: Limbo Sun Sep 25, 2011 1:58 pm | |
| Limbo was the ASW Mortar that followed on from the Squid and was fitted mainly to Leanders, Types 14 and 15 Frigates, Tribals, Whitbys, Rothesay and Bristol.
http://www.leander-project.homecall.co.uk/Type%2012.html
Couple of others also had it - Scorpion to name one. | |
|
| | |
phil winks
Master
Posts : 583
Join date : 2011-06-12
Age : 68
Location : Taunton
| | Subject: Re: HMS Yarmouth Sun Sep 25, 2011 2:22 pm | |
| There you go every day's a school day thankyou mate a very informative link there | |
|
| | |
intrepid75
Master
Posts : 271
Join date : 2011-06-11
Age : 68
Location : Bristol, West country
| | Subject: Latest work Sat Oct 08, 2011 4:10 pm | |
| Well a few other bits and bobs done here and there but the main progress is starting on the main painting. I know some people like to go for the exact chip colours for exact likeness and hard to knock that but me being a bit of a philistine I always think that Halfords Grey Acrylic is close enough for me to resemble grey funnel line ships. Just got to the first coat of the main hull but its coming on and looks better even with just one coat. The mast, Hangar, and Director will be painted seperately. The decks will also get the Halfords Acrylic Gre treatment but then will be over painted with darker Humbrol Acrylic Dark Sea Grey to be as close to a 1970s 80s deck colour as possible and will hand brush this on. The remaning fittings will be painted then added. Another few weeks and she should be completed. I think!! I hope!!!
https://i.servimg.com/u/f49/15/89/66/50/p1010110.jpg
https://i.servimg.com/u/f49/15/89/66/50/p1010111.jpg
https://i.servimg.com/u/f49/15/89/66/50/p1010112.jpg | |
|
| | |
phil winks
Master
Posts : 583
Join date : 2011-06-12
Age : 68
Location : Taunton
| | Subject: Re: HMS Yarmouth Sat Oct 08, 2011 4:50 pm | |
| Very Nice mate coming along a treat | |
|
| | |
intrepid75
Master
Posts : 271
Join date : 2011-06-11
Age : 68
Location : Bristol, West country
| | Subject: Re: HMS Yarmouth Sat Oct 29, 2011 2:33 pm | |
| | |
|
| | |
phil winks
Master
Posts : 583
Join date : 2011-06-12
Age : 68
Location : Taunton
| | Subject: Re: HMS Yarmouth Sat Oct 29, 2011 7:31 pm | |
| That (IMHO) is looking just perfect mate!! Keep it coming | |
|
| | |
intrepid75
Master
Posts : 271
Join date : 2011-06-11
Age : 68
Location : Bristol, West country
| | Subject: Update HMS Yarmouth Tue Nov 15, 2011 1:39 pm | |
| | |
|
| | |
AlanP
Master
Posts : 278
Join date : 2011-06-11
Age : 80
Location : South Cumbria
| | Subject: Re: HMS Yarmouth Tue Nov 15, 2011 6:49 pm | |
| It's looking very nice intrepid
Alan | |
|
| | |
intrepid75
Master
Posts : 271
Join date : 2011-06-11
Age : 68
Location : Bristol, West country
| | Subject: Re: HMS Yarmouth Tue Nov 15, 2011 7:03 pm | |
| Its getting there. I did a couple more hours since then but havent taken any pics - will put up at the weekend. Seacat missiles now painted and in situ, Oerlkons now painted and in situ. Fittings such as cable reel and motor winches all painted and in situ and flight deck markings now painted on. Printed off deck markings for turret and seacat launcher on decal paper so will put that on tomorrow night. Liferafts, ships boats and davits, corvus fitting and painting at weekend is the plan. Then jsut leaves the birdcage top of the mast and the stanchions and we are just about done. Oh and the brige roof and glazing at weekned. | |
|
| | |
phil winks
Master
Posts : 583
Join date : 2011-06-12
Age : 68
Location : Taunton
| | Subject: Re: HMS Yarmouth Tue Nov 15, 2011 8:24 pm | |
| Truly this lady is a credit to you matey she's looking so good | |
|
| | |
Guest
Guest
| | Subject: Re: HMS Yarmouth Wed Nov 16, 2011 8:52 am | |
| - AlanP wrote:
- It's looking very nice intrepid
Alan it certainly is......I always feel sad when I have to cover brass work up with paint, , but your model is looking really lovely. neil. |
|
| | |
intrepid75
Master
Posts : 271
Join date : 2011-06-11
Age : 68
Location : Bristol, West country
| | Subject: Re: HMS Yarmouth Wed Nov 16, 2011 8:21 pm | |
| Thanks for the very kind feedback. I have seen a lot better builds than what I can do with my limited skills but I am happy with how shes turning out. | |
|
| | |
Guest
Guest
| | Subject: Re: HMS Yarmouth Wed Nov 16, 2011 9:51 pm | |
| - intrepid75 wrote:
- Thanks for the very kind feedback. I have seen a lot better builds than what I can do with my limited skills but I am happy with how shes turning out.
that's the main thing,............as long as you are satisfied with what you have done.it matters not a jot what others think in the long run. build for yourself and your own satisfaction and you will never be disappointed. neil. |
|
| | |
intrepid75
Master
Posts : 271
Join date : 2011-06-11
Age : 68
Location : Bristol, West country
| | Subject: Re: HMS Yarmouth Sun Nov 20, 2011 6:38 pm | |
| | |
|
| | |
phil winks
Master
Posts : 583
Join date : 2011-06-12
Age : 68
Location : Taunton
| | Subject: Re: HMS Yarmouth Sun Nov 20, 2011 9:23 pm | |
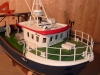
| Looks tremendous mate love the wasp helicopter and that alone dates the ship for me as a bit of a aircraft fan. it also shows just how skill full a navy pilot has to be putting a helicopter on to such a tight flight deck that would be rolling in even a moderate swell. am I right in thinking they used a net stretched over the flight deck to help stop the chopper from rolling across the deck in a heavy swell. something some might not know is that the wasp and its land based equivalent the scout were the 1st helicopters to have a negative pitch ability specifically developed for the wasp to assist in pinning it to the deck on landing and in theory made it capable of flying upside down though I believe no pilot was ever brave enough to try it on that aircraft for some reason  | |
|
| | |
Sponsored content
| | Subject: Re: HMS Yarmouth | |
| |
|
| | |
| | HMS Yarmouth | |
|


 .
. 


