Actually. truth be told, most of my larger model projects to finish are still packed up and will remain that way until i can get a working workshop sorted.
In the mean time however i do have a large dining room table to utilize of an evening, leaving me to ponder which sort of trouble can i get into next.
'Oh i know .....' famous last words...
1:12 scale rowing boat that actually rows!!!
To be honest I've always loved the Rc rowing boats all those mechanical cams and pulleys some clever bugger in his shed spent months scratching is ass over... and even those are not beyond my ability.. i actually have a working plan of how the ''graphner's Tina'' mechanical rowing mechanism works, and even formulated a plan to build such a device into a 13" hull!
Wait there's more.....
I was doing some research online and actually saw some very impressive 1:6 scale rowing boats using 4 servos and using some smart micro controller such as the audrino boards got those working very smoothly but that's a big pain in the ass for me, i can do many things with a computer but writing a computer code to program servos to run in a rowing motion using my Transmitter, beyond me!
That said i have been in contact with a very nice guy who makes little smart machines to do that very job, so i'm waiting for the arrival of this little box of black magic and hopefully i can get my little boat running. (details of this very clever man will be revealed once my box arrives or you can PM me for contact details.)
So Here we go where to start?
No plan .. Check.....
Half ass most of it .... check.....
google a lot ..... check .....
ebay.. bingo..!
Orion moldings on ebay 13" clinker style hull 1:12 scale 20 smackers, perfect. ( they do an 18" version to which is closer to 1:8/6 scale i suppose for 35...)
But sticking with 1:12 not only makes this model different by being smaller but also allows me to utilize the use of the heavy duty micro servos and the dolls house shop for decorative parts to 'hide' stuff!
Anyway after a few days of messing about and about £150 later I've started to collect a range of materials for this project!
So better make a start....
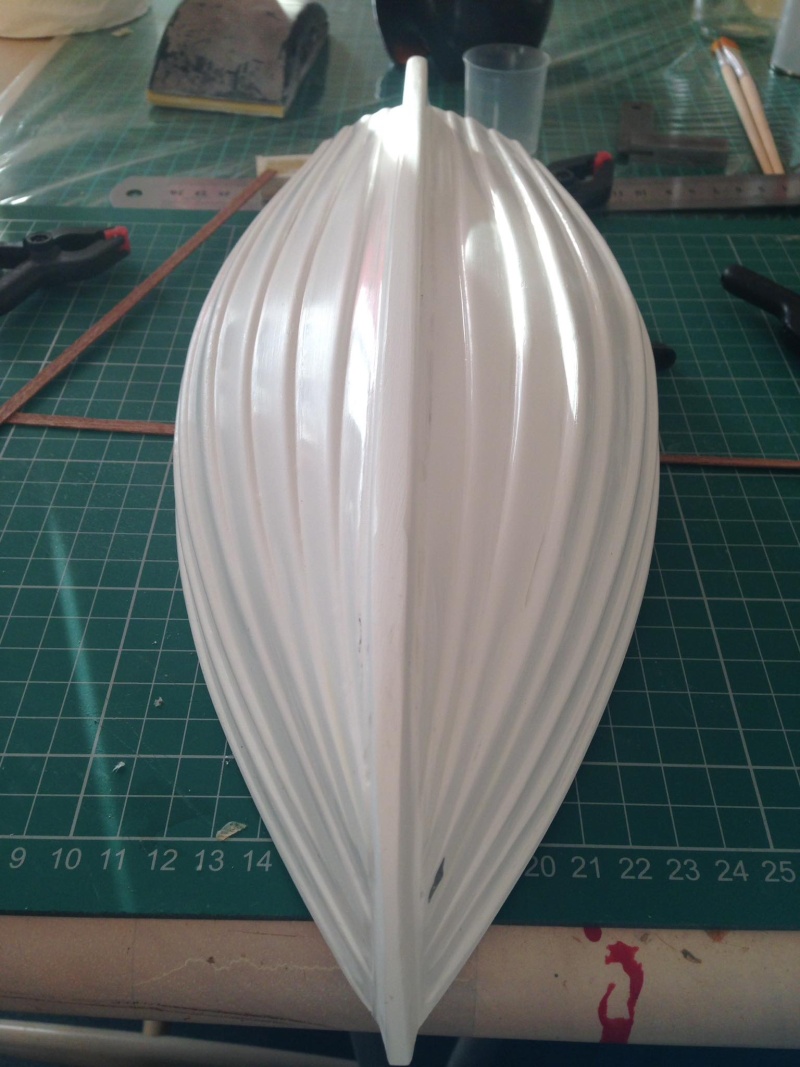
Hull... this build will be built entirely without a plan, and i will work with google images for 'likeness' as i do believe most of this will become a matter of what fits and whats practical! so anyone looking here to watch me build a real scale replica your going to be disappointed
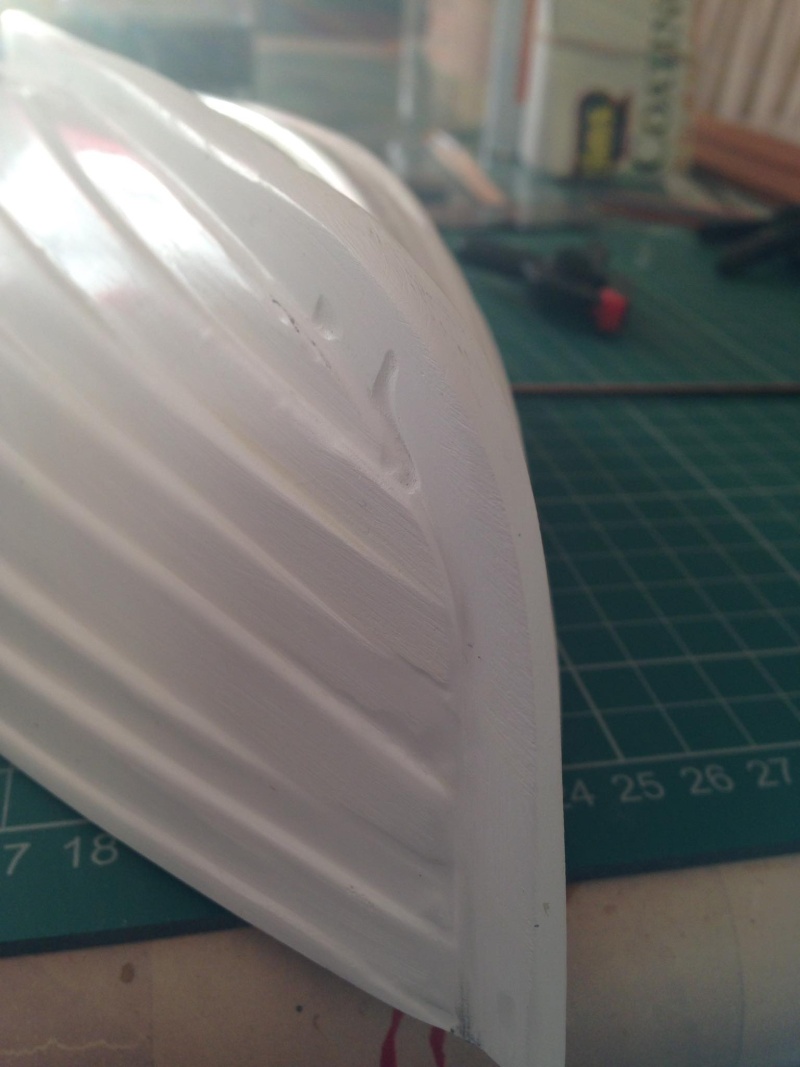
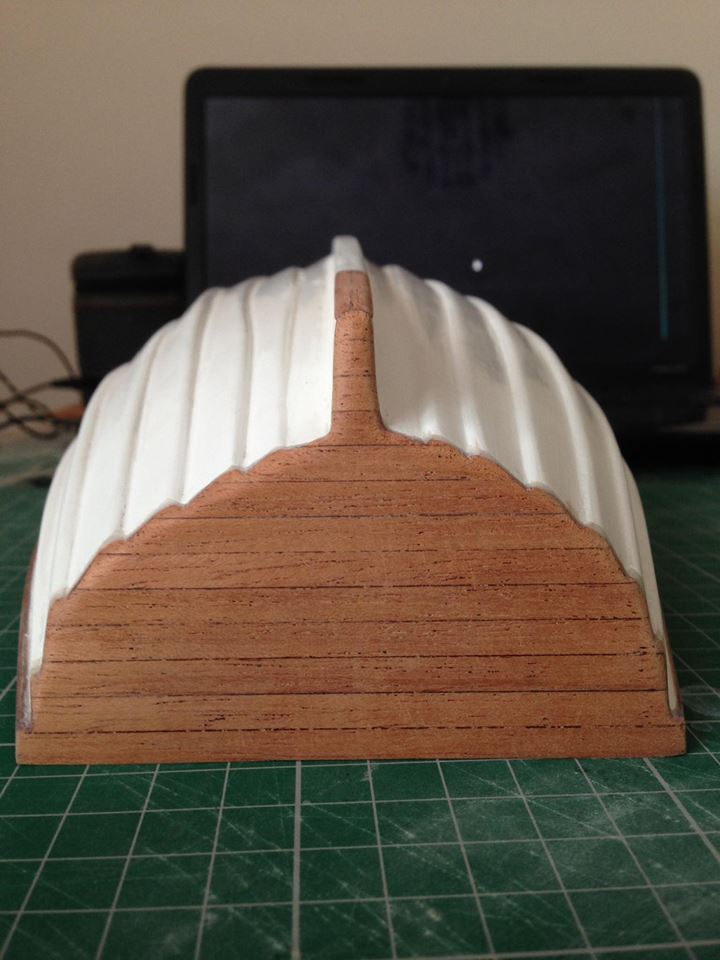
It wasn't in bad shape but being a clinker the planks looked very off at the bow and its taken a lot of work to get them almost right, i will have to live with how some look as the fiberglass hull is very thin at the bow now after my sanding efforts to fix, but i have a solution to pretty it all up so to be less noticeable. I've also had to flatten the transom, as the radius was way off to one side so it look a load of fiddling with 80 grit to pull it all about right, its never going to be 'perfect' but its pretty dam close to symmetrical as i can get, overall, after a couple of hours sanding very pleased with my efforts..
Next up is to start tarting up the outside (pointless to start the inside till all the magic parts arrive, and i know what i'm actually going to start placing what, where!)
Anyway Photos so far... hull all cleaned up ready for some wood mwhahahahah!
_________________ I'm Not Anti-Social, I'm Anti-Stupid.
Guest Guest
Subject: Re: Row Row, Row your Boat....! Wed Apr 06, 2016 2:20 am
With the gel-coat in the imperfections the fault was on the original plug very poor form from the producer of the hulls.
barriew Captain (moderator)
Posts : 2631 Join date : 2011-11-26 Age : 83 Location : Thaxted, Essex
Subject: Re: Row Row, Row your Boat....! Wed Apr 06, 2016 6:47 am
Hi DamienAron!
Here is a 'rower' from my club. I believe this uses the mechanism that you are talking about.
Barrie
Last edited by barriew on Wed Apr 06, 2016 7:09 am; edited 1 time in total
Guest Guest
Subject: Re: Row Row, Row your Boat....! Wed Apr 06, 2016 6:55 am
That looks good Barrie but this is Aron's build thread lol
Last edited by Damien on Wed Apr 06, 2016 7:06 am; edited 1 time in total
barriew Captain (moderator)
Posts : 2631 Join date : 2011-11-26 Age : 83 Location : Thaxted, Essex
Subject: Re: Row Row, Row your Boat....! Wed Apr 06, 2016 6:58 am
Sorry Aron and Damien, it very early for me!!
Barrie
Guest Guest
Subject: Re: Row Row, Row your Boat....! Wed Apr 06, 2016 7:08 am
No probs from me mate.
Roadrunner Forum Overlord
Posts : 1714 Join date : 2011-06-10
Subject: Re: Row Row, Row your Boat....! Wed Apr 06, 2016 11:23 am
Yup that's it Barrie all servos!
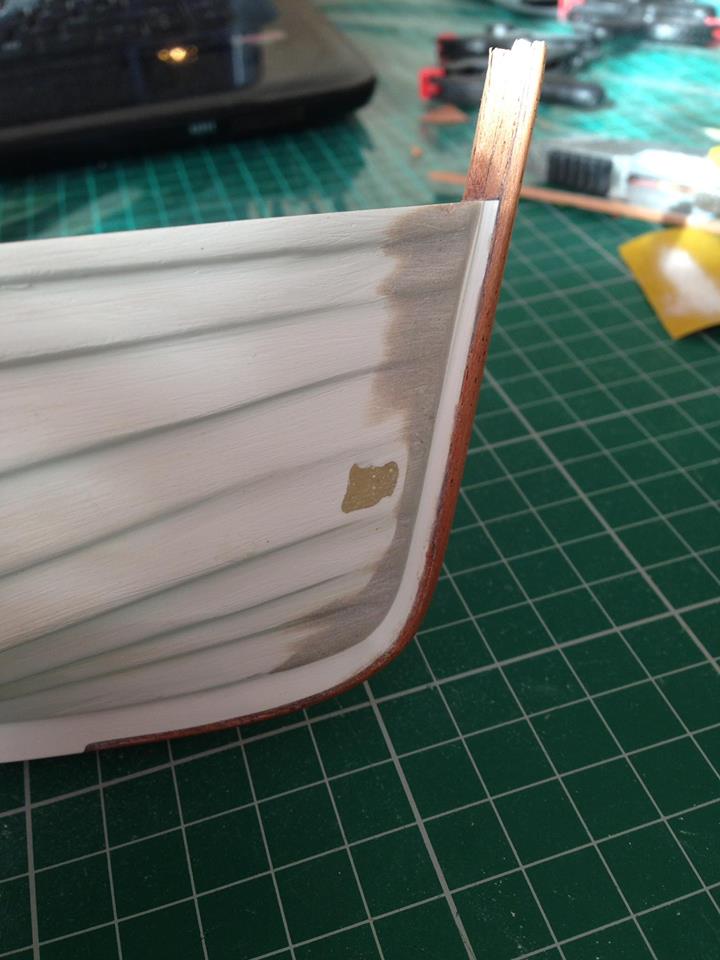
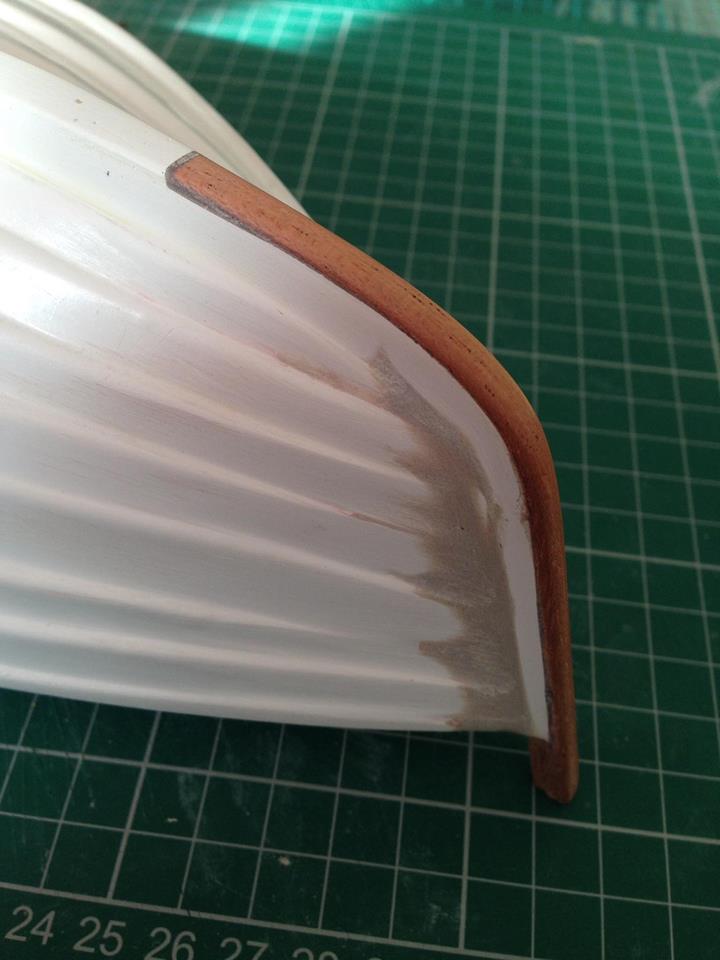
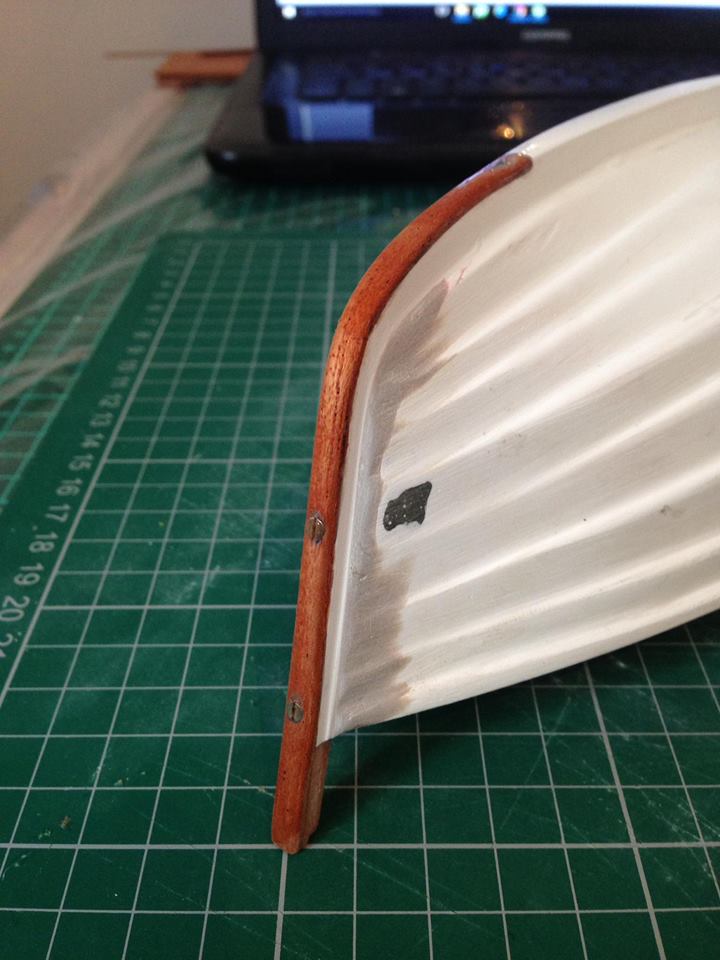
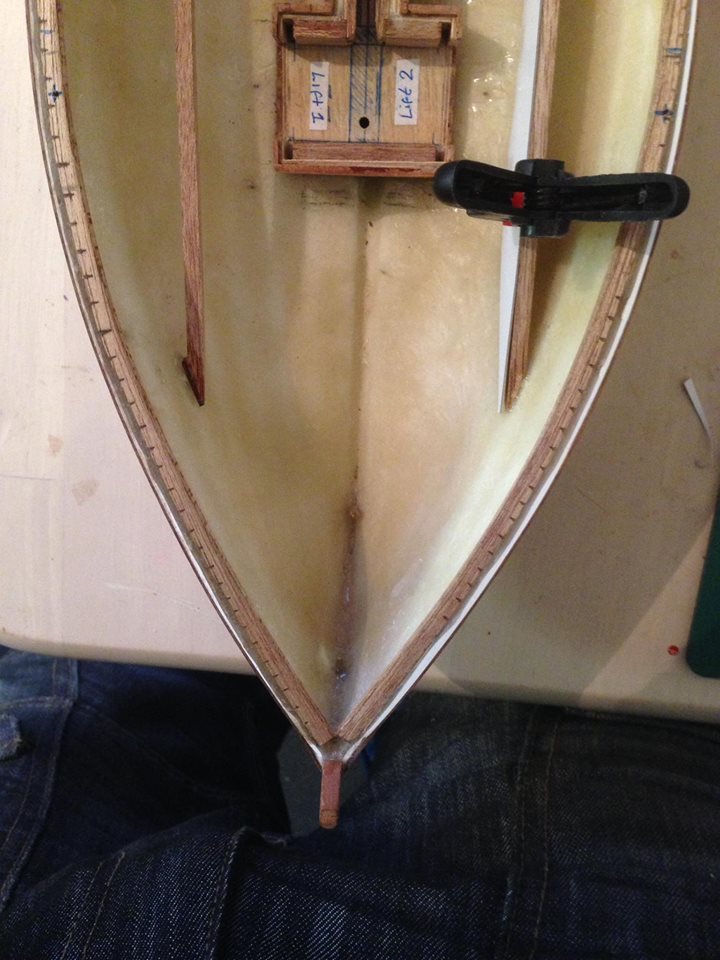
back to building, today i have experimented with adding a full wooden keel/stem but after some tacking down of parts is looked very chunky and really not right, so after some more experimenting, i came up with cutting out part of the gel coat at the bow and inserting a 2x5mm strip to create a new stem which will finish up the boat nicely at the end.
oh and the body filler, that was to fix some of the planks since they were annoying me!!
..!
_________________ I'm Not Anti-Social, I'm Anti-Stupid.
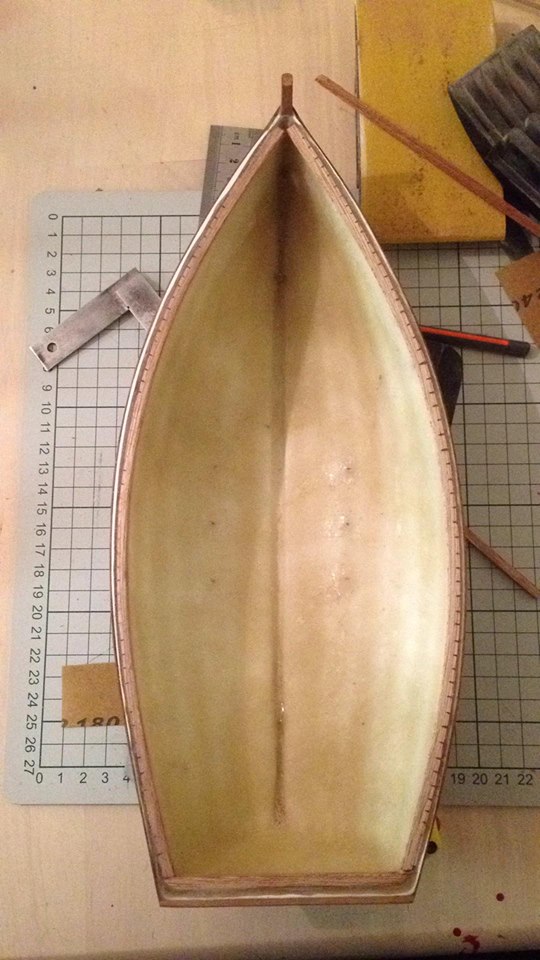
Lot more progress since last night and today, waiting for epoxy to dry is what slows down this process but its the only sure way to make sure wood dose not pull of the fiberglass.
i've added some rubbing strakes which will form part of the top rail, and a wooden transom as well as screwing in both the stem and transom keel strip, nice touch but also there to stop the wood pulling out over time.
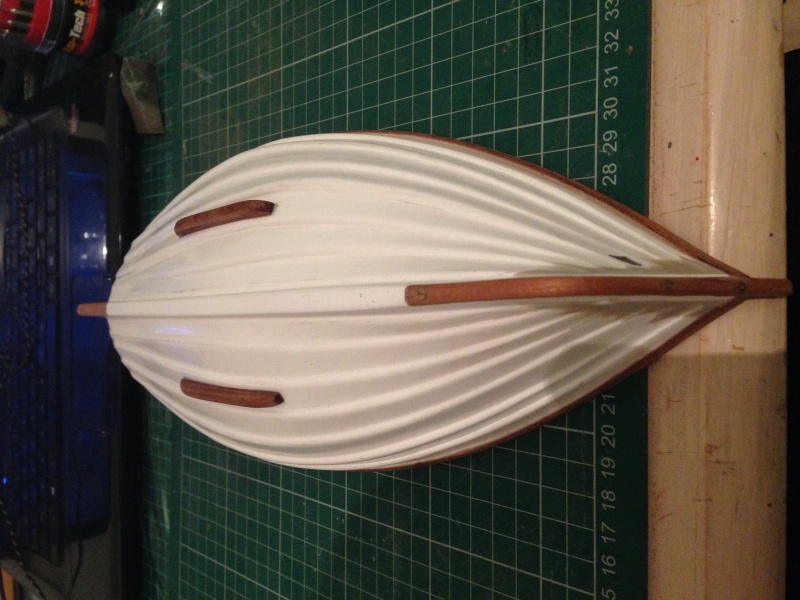
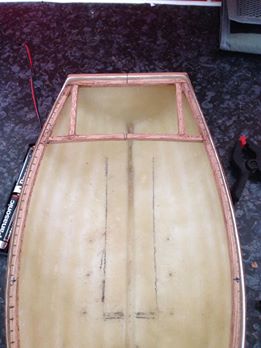
I've filled as many mistakes as possible but as you can tell from the bottom hull photo the molding is still off in places so i''ll have to take some time to pull those mistakes out best i can. I won;t get to fixed up on some of the defects this will never be a perfect hull but some of them i can fix of pull back to a more acceptable level.
I will be looking to add some bilge keels to the hull to aid in some stability and reduce rolling, its unknown at present if a false keel will be needed with this model, i am hoping for that to not become part of this build but its an unknown factor i can;t predict right now.
Forgive the wood its still in pretty rought shape at present, all will be cleaned up once i'm happy with the look.
_________________ I'm Not Anti-Social, I'm Anti-Stupid.
Roadrunner Forum Overlord
Posts : 1714 Join date : 2011-06-10
Subject: Re: Row Row, Row your Boat....! Fri Apr 08, 2016 1:38 am
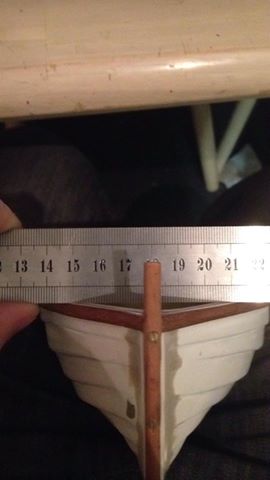
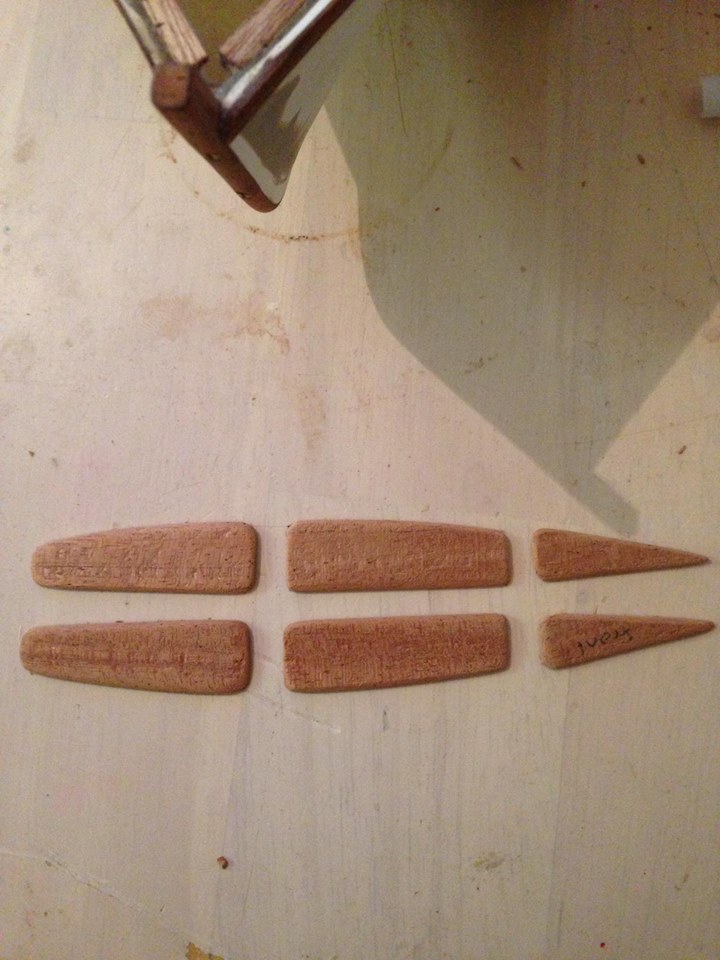
Working on the bilge keels,
They are made up of a laminate of 3x1.5mm cut down to 5mm in height and profiled to shape both hull side and top. Then drilled 3x 0.5mm holes and counter sunk with a 1mm bit to accept some 0.5mm brass nails, which have a flat head, corresponding holes drilled through the hull then epoxied in place. few hours work on those parts but i do believe they should keep the hull stable as well as adding some more realism to the model.
Final sanding of these parts will take place at the same time I clean up the glue joint.
_________________ I'm Not Anti-Social, I'm Anti-Stupid.
Roadrunner Forum Overlord
Posts : 1714 Join date : 2011-06-10
Subject: Re: Row Row, Row your Boat....! Fri Apr 08, 2016 2:59 am
Both bilge keels all finished, sleep time!
_________________ I'm Not Anti-Social, I'm Anti-Stupid.
Guest Guest
Subject: Re: Row Row, Row your Boat....! Sat Apr 09, 2016 9:15 am
Roadrunner Forum Overlord
Posts : 1714 Join date : 2011-06-10
Subject: Re: Row Row, Row your Boat....! Sun Apr 10, 2016 12:34 am
Not much work last couple of days, but I have now sorted all the linkages out ready to start mocking up the electrical layout, this will dictate the entire of the internals, from bulkhead stringers to any covering, sealed box areas etc etc. I have a feeling this may be more or a false floor, with everything tucked under or many ' fiber glass' effect compartments, to hide the electrics..
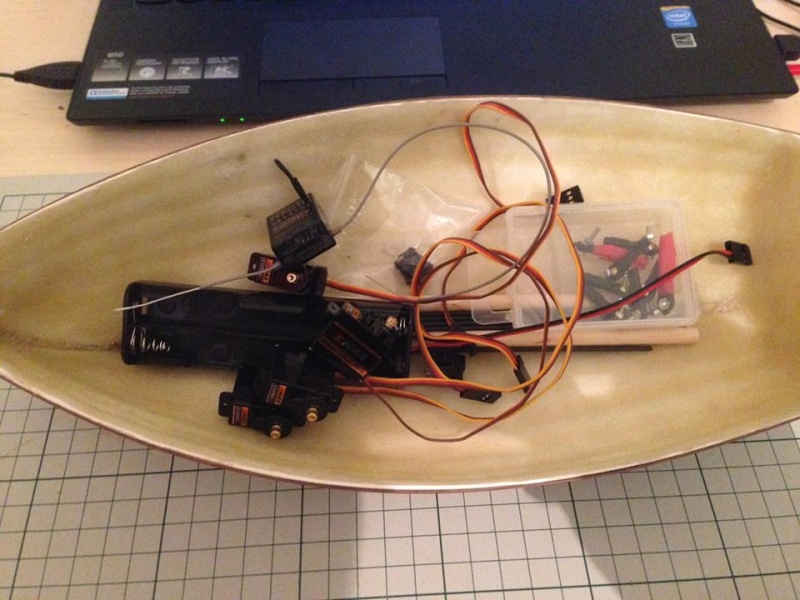
So far I have to fit all this.... into that!
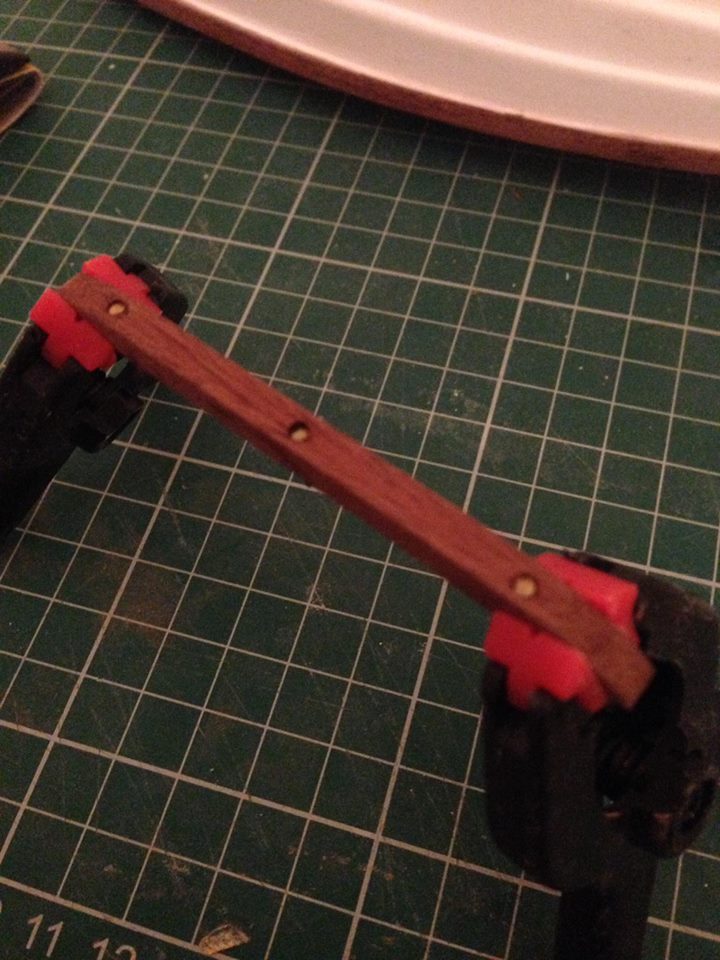
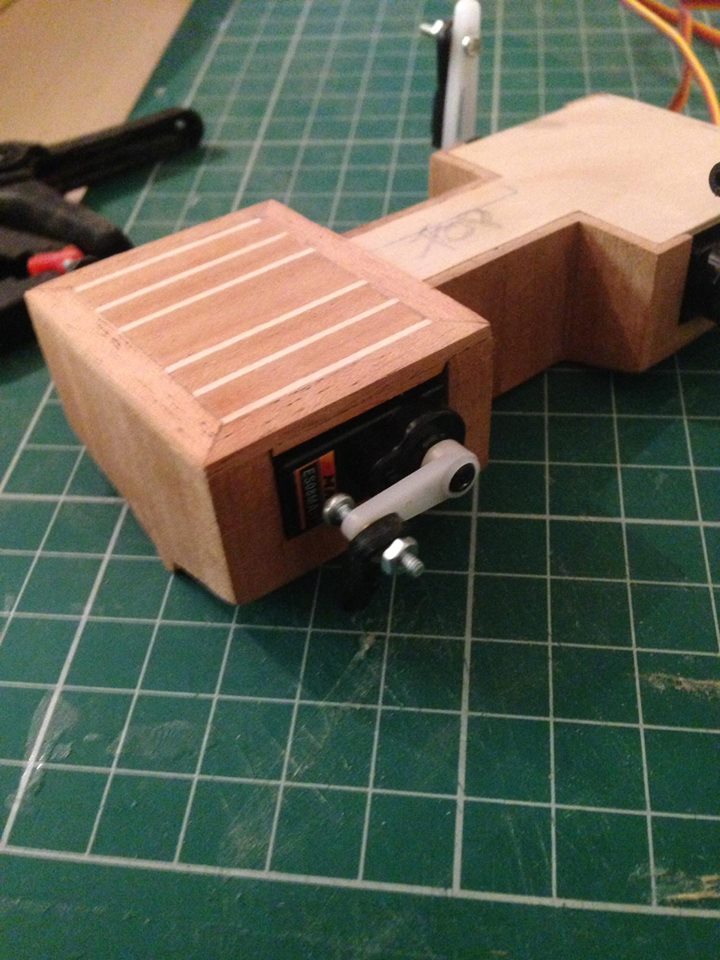
Now here's the parts to make this all work, its missing the microcontroller I'm awaiting it's arrival so its size is pretty much and unknown but I'm basing off the information I have its around the size of 2 full sized servos give or take a little, which gives me some scope to work out a rough layout
So here we have ...
4 cell AA slim line battery tray
Mini switch
4 x Emax high speed metal geared 12g servos, each rated at Torque 1.6/2.0kg cm ( should be more then enough for a 13" model)
2mm carbon fiber rod
1 Receiver unit
and 8 x 1.9mm track and ball linkages with all the plastic ends drilled to 2mm ( to accept the carbon rod) and the two marked up in red tape have had the bronze ball drilled to 2mm to accept the carbon rod, theses two linkages are the only ones to not require the use of a m2 nut and bolt through the hole.
The only thing can I can do next is to finish the top rail which I can then mark up the position of the rower and where the oars are to row from, sadly I wont be able to do the really nice hollowed out effect most of these row boats have as the rail wont have enough material to be strong enough to accept the forces applied upon it, should things bind up, catch etc etc.
_________________ I'm Not Anti-Social, I'm Anti-Stupid.
Little bit more done today, just waiting for the '5min epoxy' to set after 2 hours.... something not right there....
Top chine rails are installed and once the glue dies i can sand then flush to the hull and straighten up the insides which will allow me to cap the top which gives me scope to look at installing the ore mount, either through this section chine or on small outriggers.
ZZZZZZzzzzzzz don't buy ebay epoxy lol!
I'm not so worried about the transom rail, although it looks very thick, i will have scope to decrees its width later should it be required but at present i'm thinking i may need to make up a false deck at the transom to store the electronics. which i can cover over later with some decorative items, so have left it bulky for a glue surface should this be the case.
_________________ I'm Not Anti-Social, I'm Anti-Stupid.
Roadrunner Forum Overlord
Posts : 1714 Join date : 2011-06-10
Subject: Re: Row Row, Row your Boat....! Tue Apr 12, 2016 1:13 am
Finished the chine rail and sanded back till straight and level. The little slice marks are there for two reasons, I pre-steamed the 4x4 timber to give it some shape, but given how tight the curve is the wood was highly stressed and fear of cracking or the glue pulling way was a serious possibility, so I opted to make small cuts to take the stress out of the timber, which allows for a clean bend as well as giving the epoxy more surface areas to grab onto. This will take the finishing Top part covering the slots and again given more glue surfaces for the wood to grab when its epoxied in place. Looking at the size of the rail, its 8mm in depth and given the curvature of the hull it looks like i will have to add internal oar mounts, no biggy in fact i think it will make the model nicer overall, as well as helping to offset the linkages later down the line so tomorrow i will attempt to carve out those parts and find a way to mount and support then in place hopefully.. if not plan B ...
I will have to slim down the transom chine at the rear its 2mm wider then the rest of the rails (that's because of the fake wooden transom on the hull making the model 2mm longer at that section, which makes the back look extremely oversize)
Regardless of what i do, i'll cut down that part now as 8mm is still a lot of glue surface regardless of what i stick there and it will give me a better idea of what i want to do and how to use that part, from full cover decked section or open rear.
As you can see there is a lot of ''what if's'' and indecision as what to do with areas until the black magic box arrives, so i'm making progress on known areas that do not effect anything else, but aid me in moving forwards. Using google i'm able to use parts of different real boats and combine elements to help keep it as realistic as possible while keeping it practical my only hope it all pays off, if not my option plan is to make this model in the 1:12 from scratch!!! lets just hope that's not the case!
_________________ I'm Not Anti-Social, I'm Anti-Stupid.
Guest Guest
Subject: Re: Row Row, Row your Boat....! Tue Apr 12, 2016 2:04 am
Roadrunner Forum Overlord
Posts : 1714 Join date : 2011-06-10
Subject: Re: Row Row, Row your Boat....! Sat Apr 16, 2016 1:47 pm
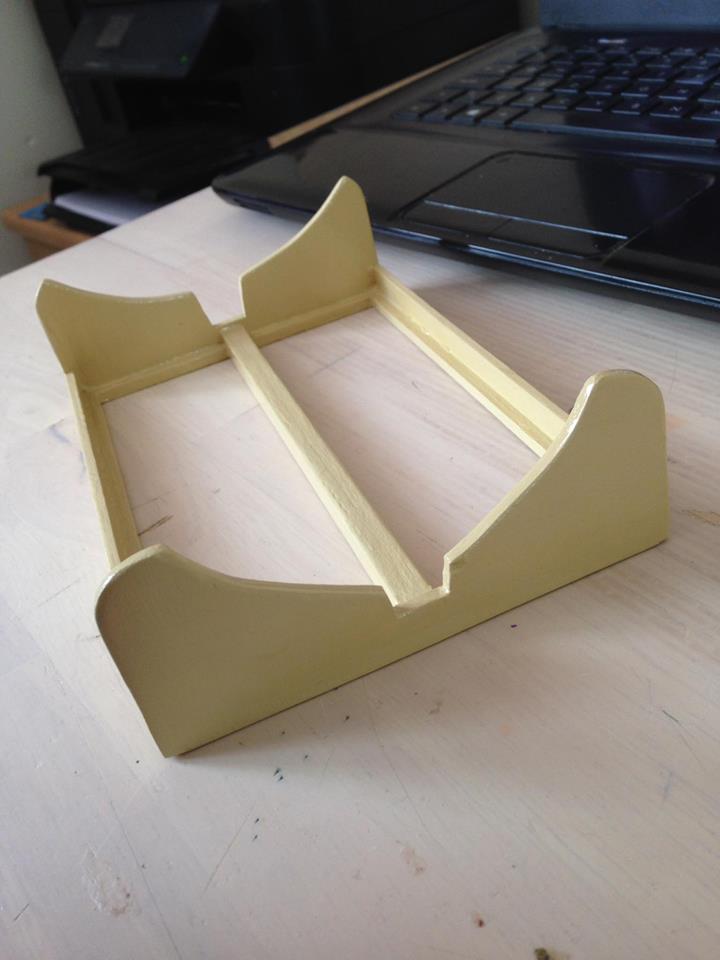
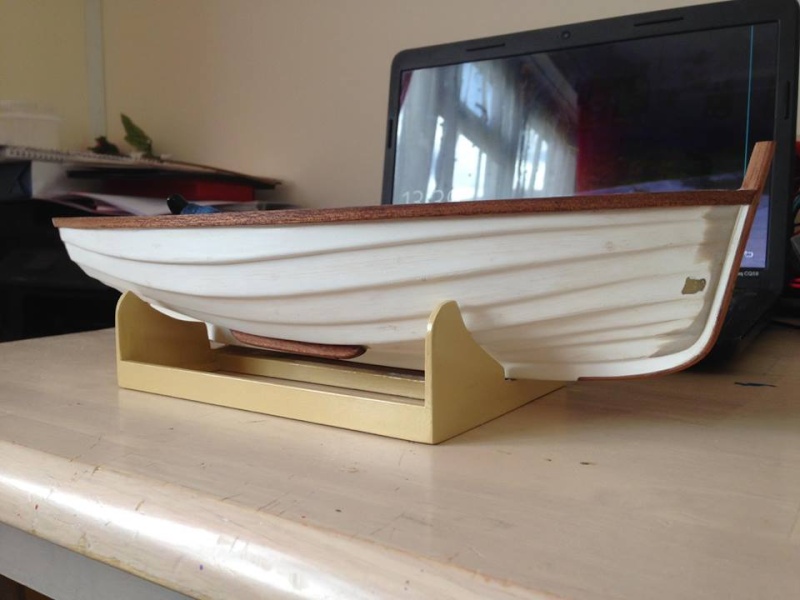
I haven't done any work to the boat over the last 2 days, instead i have made up the boat stand from some 4mm ply and some 4x4 strip wood for strength ( this boat is never going to be a monster in weight so the 4mill ply is more then substantial enough to support this model), painted using a beige colour & then varnished. I'm just awaiting to fully dry before i add the pads.
I've had to build up the stand now as so much work is required on the inside its a pain to keep the boat in place without one during this critical stage.
_________________ I'm Not Anti-Social, I'm Anti-Stupid.
Guest Guest
Subject: Re: Row Row, Row your Boat....! Sat Apr 16, 2016 2:32 pm
Looking good.
Roadrunner Forum Overlord
Posts : 1714 Join date : 2011-06-10
Subject: Re: Row Row, Row your Boat....! Sun Apr 17, 2016 4:12 pm
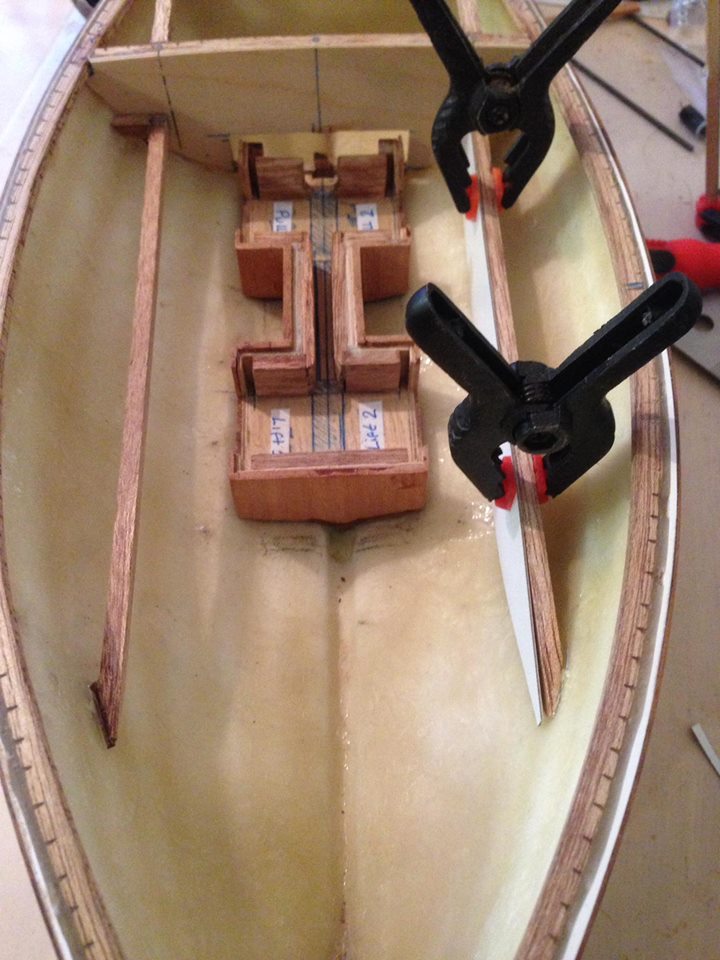
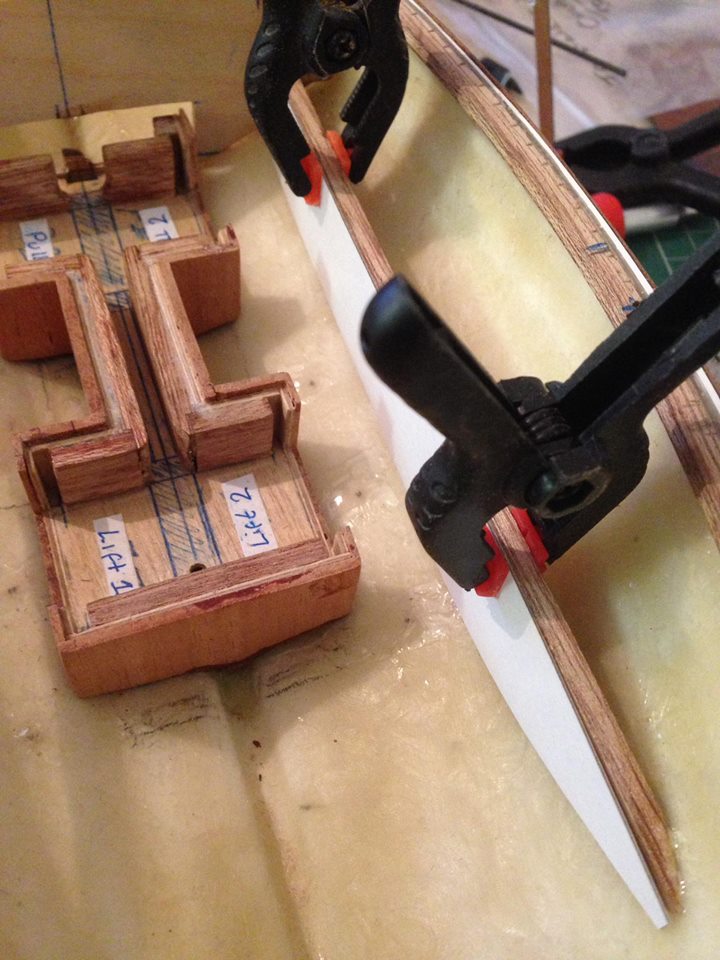
ok here we go i'm mocking up some of the fixed placement of the internals, my plan is to slot the servos sideways against the side of the hull and give them a box area to live in with a nice topping to offset it, its not unusual for rowing boats to have compartments around their sides so this works well for the idea... something like this below but connected from the seating down to the rear compartment.
I've fixed in the rear compartment frame work which will house the brain of the machine and the receiver, its curved to give the model a little more interest. The servos in their boxes down the sides and the man in the middle should keep the front of the boat open enough to not make it look so bulky and 'busy' I've also created a battery box which will have a cap on the top later, as well as allowing me to work out what room i have left for the servos, I am left with only 2-3mm clearance in some places which is still clearance non the less going by my rough measurements, i am hoping i can get the servos to work this way, i don't foresee any issue but given that this is totally hit and miss and my space to keep things tidy is very limited i can only hope that it all pans out.
_________________ I'm Not Anti-Social, I'm Anti-Stupid.
Roadrunner Forum Overlord
Posts : 1714 Join date : 2011-06-10
Subject: Re: Row Row, Row your Boat....! Sun Apr 17, 2016 9:43 pm
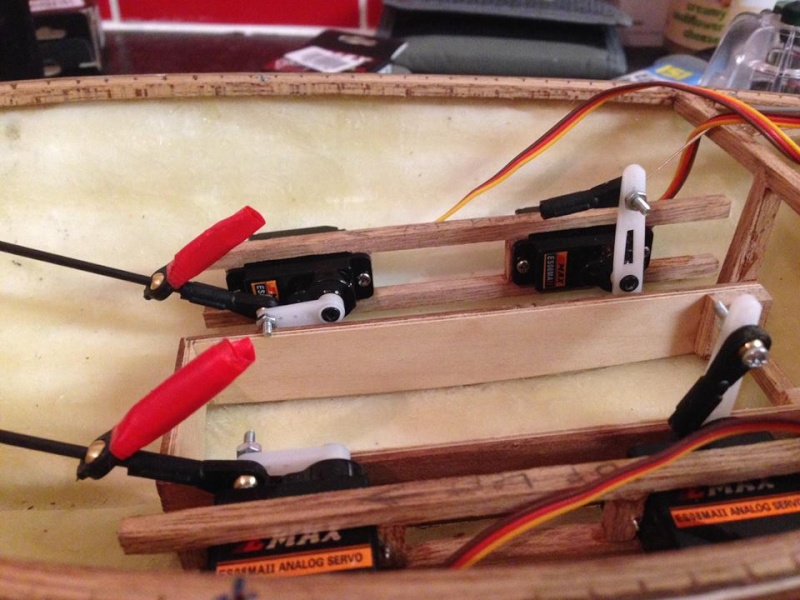
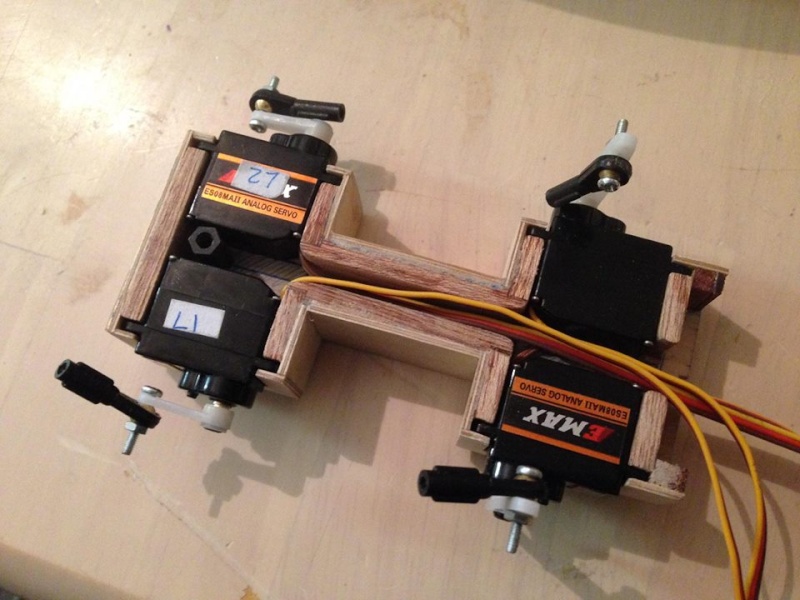
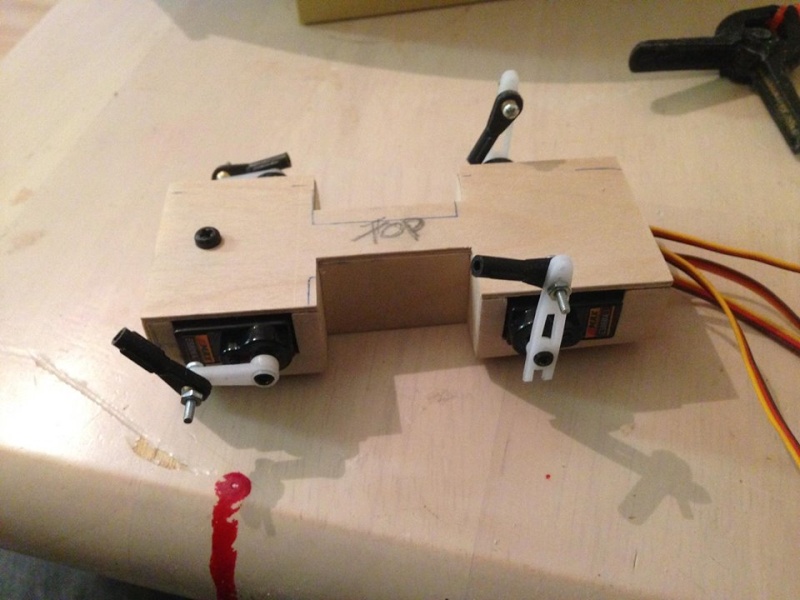
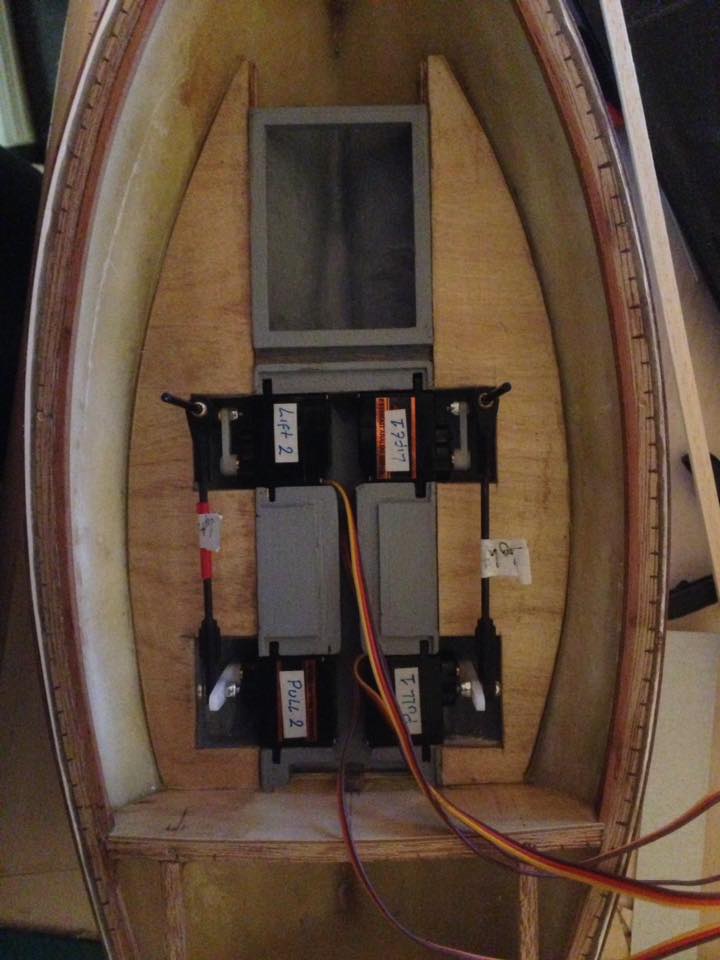
I've mocked up the servo mounts for testing the servo motions, i'll hot glue them in place once I've made up the linkages and do a test to see if it all works as designed, right now i'm having a few issues keeping the servos as low as possible and i haven't got enough room to keep them right at the base.
Now if this mock up fails to do as i need it i will pull up the battery tray and mount the servos lift servos under the 'seat' and the pull servos either side at the rear all with the horn straight up and arm outwards towards the sides.
Right now i'm feeling this may be the best solution rather then what i would like to do its literally the height issues, now i know it sound a bit daft about servo height, but in truth its actually keeping the linkages from binding up, which is my main concern as well as allowing for a better motion hence a mock up right now to see if what I've done will work as planned. should i have to change my servo locations, then i will have to find an alternate battery source as the flat pack will not fit anywhere else, if this is the case i'll have to look at the 4 pack, packs and making up a bow compartment to store it in.
so here's where i am right now, as you can see i am very high with the servos this is to allow me to swap them out given the height of the battery tray so right now i don't think its going to work as planned.
N:B after i posted this i actually altered my plan so now the servos are to be places low into the boat maximizing the servo movements. Not much to say apart from at least i tried to do something different. only good thing to come from this will be that the model should work flawlessly as well as allowing me to still making up side boxes, this time they may become battery compartments or just decorative, i guess when there is no plan for a model such as this then its a lot of trial and error, so far this has been the biggest but hence mocking up before committing to material.
This may be a pain in the butt but i'm basically back at the post previous to this. Next time make it 1:12 scale!
_________________ I'm Not Anti-Social, I'm Anti-Stupid.
Guest Guest
Subject: Re: Row Row, Row your Boat....! Mon Apr 18, 2016 2:02 am
Aron may I suggest you do a plan and sell it to Model boats or Marine modelling Int.
I'm sure there'll be a lot of interest in this quirky little model.
Making a plan of how to build this is not an easy feat... just hopefully this build blog would be enough to inspire others to try their hand.
anyway round 2....
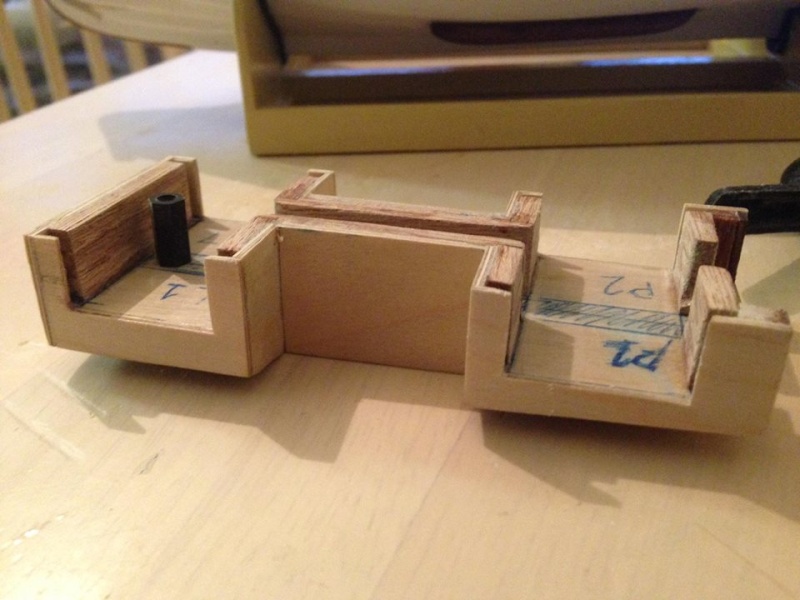
I've fitted a 1mm bitch ply cover to the sealed off section at the rear today, and cut out a access for the cables to run, although now it needs altering in the center slightly due to the way i've made up the servo tray. The cover panel will have a mahogany finish in the end to clean it up. The servo tray is in production and is in rough form at present once finished that will also be capped with mahogany to clean up and will have a top cover, its in an 'I' shape this allows me to sit the rower properly rear facing and keeping his feet on the floor, there is a center strip in the middle which runs the front cables down so although not part of a normal boat its small enough to be obscured by the rowers feet, as well as if i have worked it out correctly, i may be able to fit a 2nd seat in front of the cover plate for a 2'nd person 'maybe' if not, then i can use that center section to make it look like a 'free board' slot which isn't uncommon although more for sailing dingy's i know, but still its something to be over looked or ignored, i have done my utmost to reduce where cables go, i just hope this will be enough to keep any water out of the electronics.
_________________ I'm Not Anti-Social, I'm Anti-Stupid.
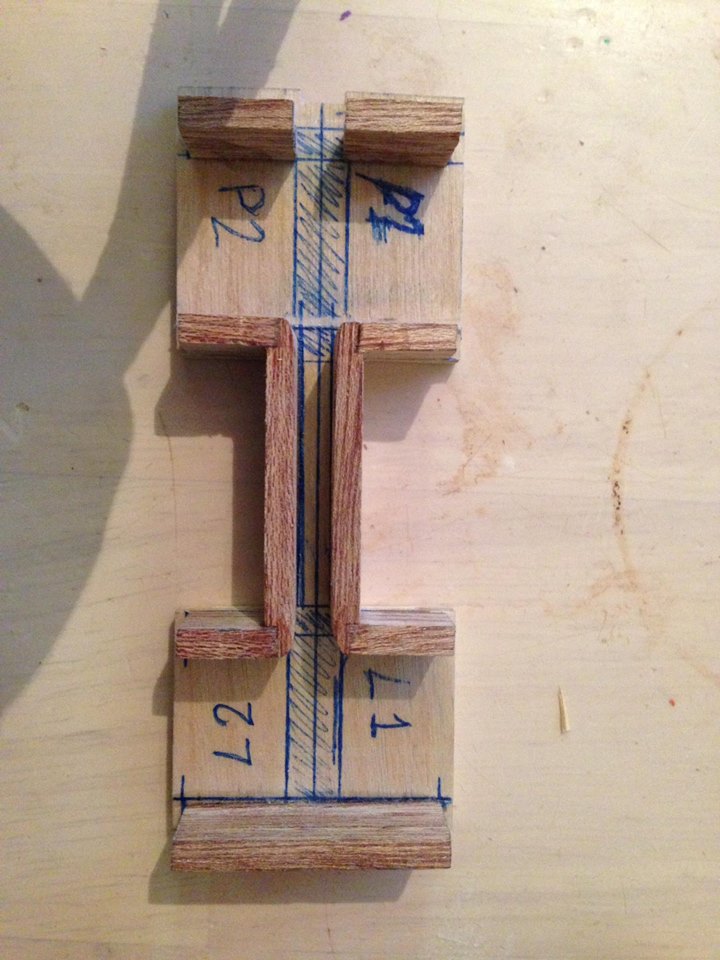
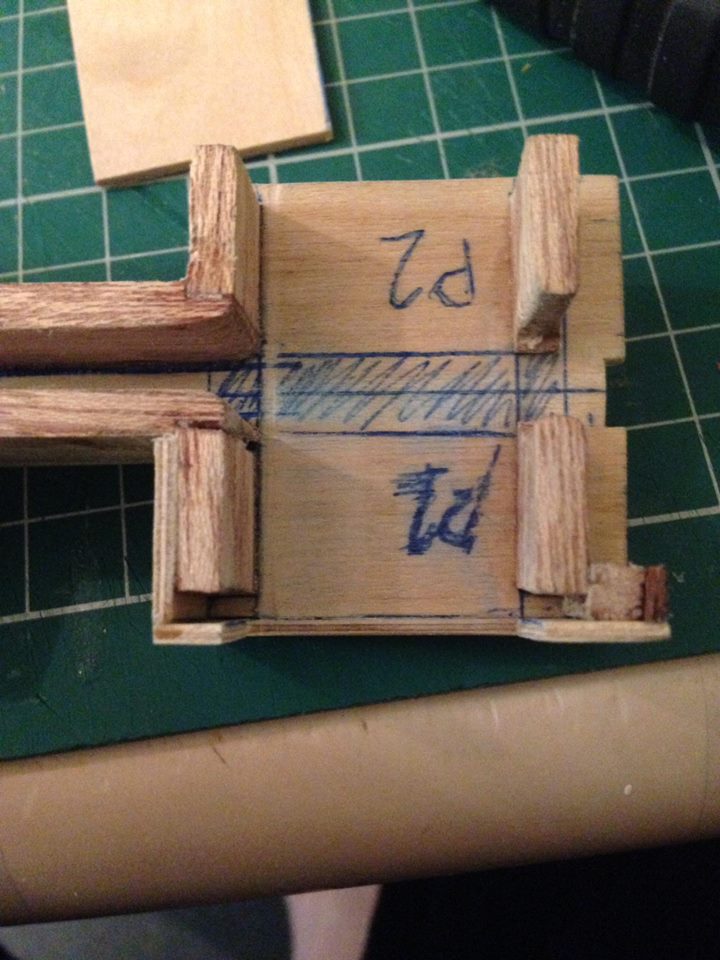
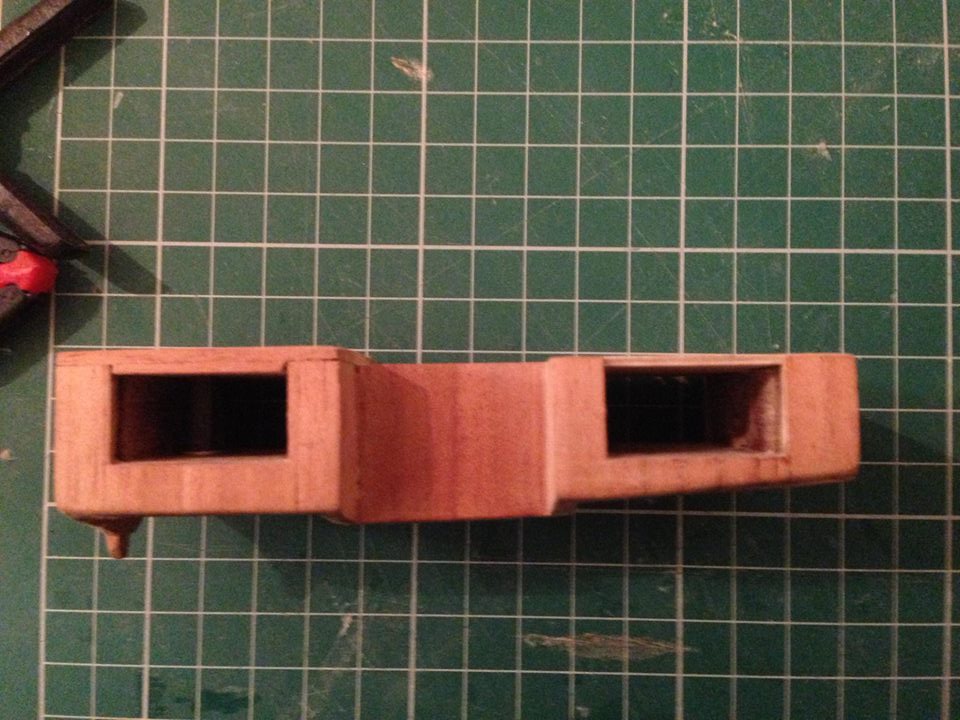
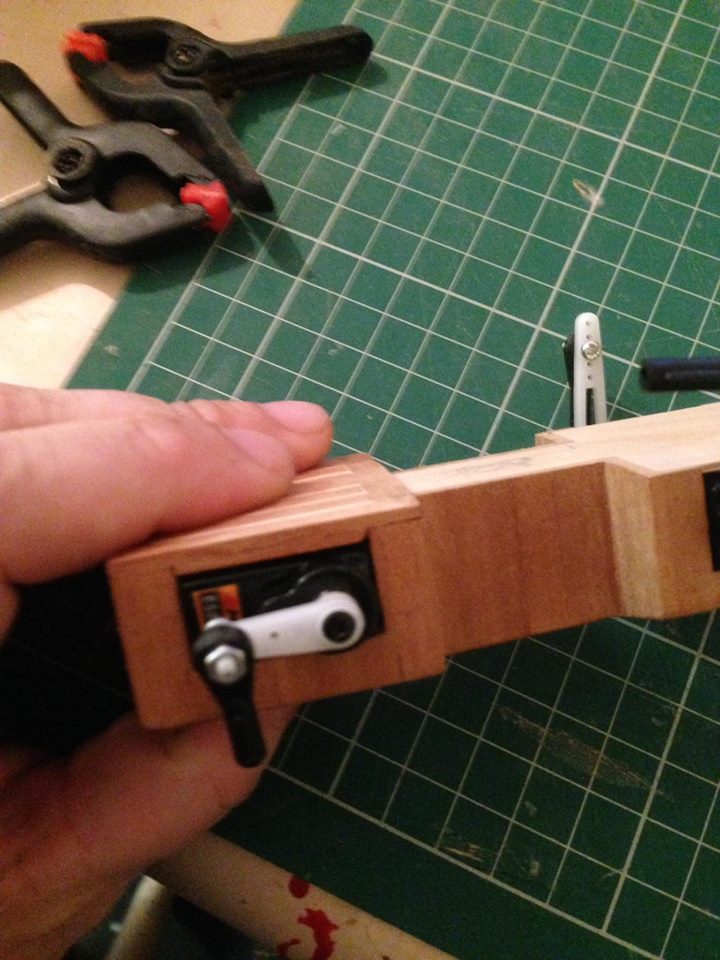
On to skinning the servo tray, first up is to finish the servo tray with 1mm birch ply, this is for two reasons, one is to match the contours of the hull giving me a decent glue surface for the mahogany, and also i need the ply and the mahogany to finish the slots for the servos, this is very clear as to why from the photos...
for those a little confused as to why I've done this, its really simple, once the servo tray is glued into final position,( A removable servo tray is a bad idea given all the alignments needed to make this work smoothly) I wont be able to use the screws to hold the servos in, so i'm making up the servo tray to lock the servos in place in all axis, (once the lids on that locks the top)
This not only keeps the servos in place but also makes it very easy to swap the servos in and out, for adjustments as well as replacements should they be needed over time, nothing worse then fixing in a servo to not be able to get at it later.
This photos below show the start of the skin/lock & and hull contouring... remember at this point it still requires the mahogany skin to make it rock solid!
_________________ I'm Not Anti-Social, I'm Anti-Stupid.
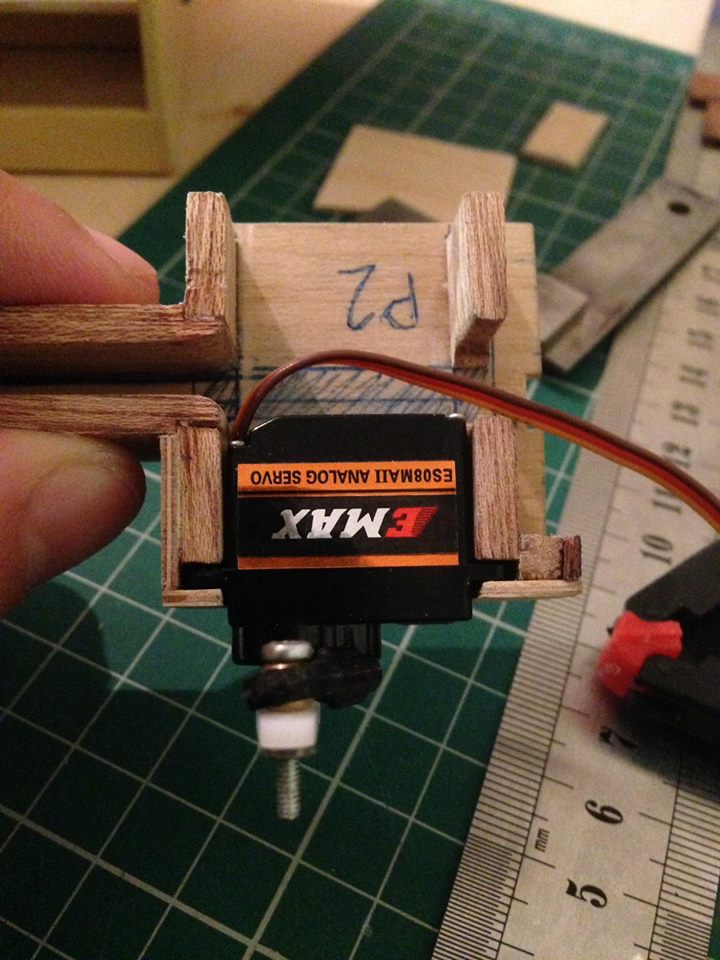
Servo tray has been skinned in 1mm birch, now it just gets its decorative mahogany skin to finish. I've added a stand off for a screw to hold the cap on, the rear will actually hook into the transom at a later point keeping the top secure and aligned, as you can see its a tidy job and a reasonable way to mount the servos allowing for a rower to sit correctly once his real seat is made up.
_________________ I'm Not Anti-Social, I'm Anti-Stupid.
Guest Guest
Subject: Re: Row Row, Row your Boat....! Wed Apr 20, 2016 12:27 am
troutrunner Master
Posts : 573 Join date : 2014-01-23 Location : Lincolnshire UK
Subject: Re: Row Row, Row your Boat....! Wed Apr 20, 2016 7:22 am
I like this build, very interesting to see how to tackle such a small scale build
nivapilot Deck Hand
Posts : 19 Join date : 2016-04-18 Age : 72 Location : Southampton
Subject: Re: Row Row, Row your Boat....! Wed Apr 20, 2016 7:53 am
Interesting to see the thought processes being integrated into the build....loving it....I really need to build one.
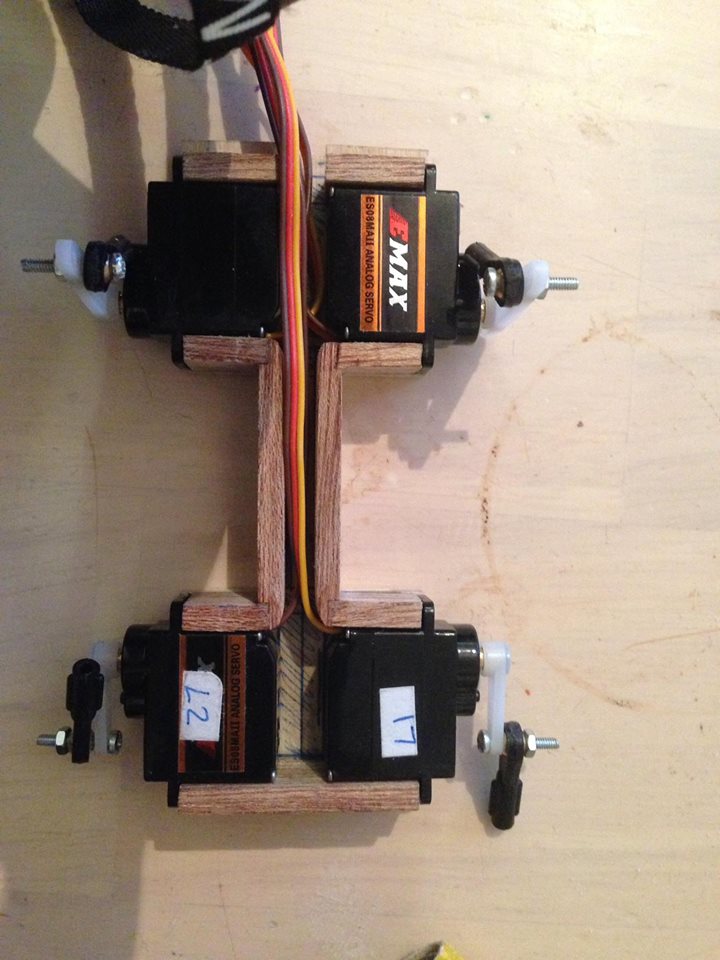
Today I've started to skim the servo tray with the finished material and adding a decorative inlay to the top since this will be seen, it all needs final sanding but its looking the part now. I've also taken the time to re align the servos since their rotations had changed due to the new tray mount, which took some working out to ensure that it should go to plan..Its really not simple to work out in your mind whats happening at a given moment when running the servos as they work in a constant motion with no pauses. This however although i'm 99% confident its right, its still not 100% right until i can get the oar mounted in a way to test, once the servo tray is secured in place, i'll mock up on the top rail some posts for the oars and do a test before continuing to mount seating and the finishing rail on the top.
_________________ I'm Not Anti-Social, I'm Anti-Stupid.
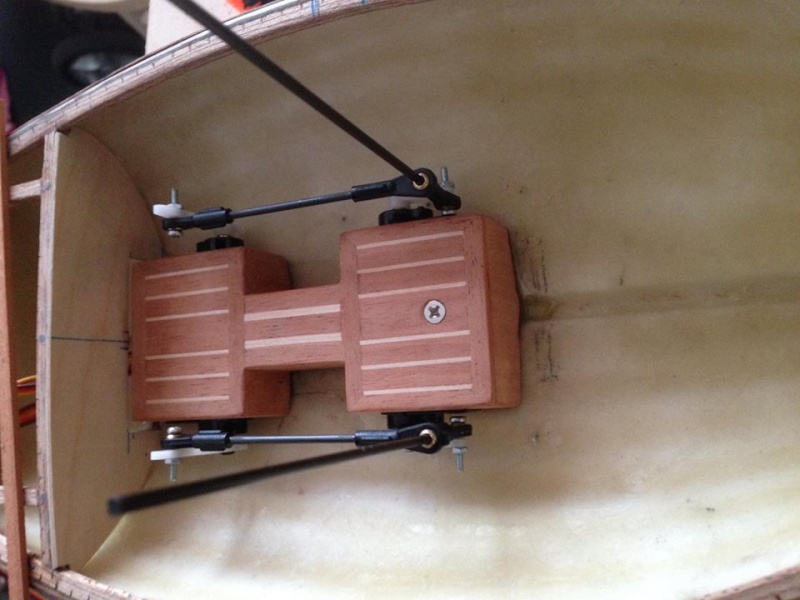
Today I've finished up the servo tray, and glued into its fixed position. I've also rigged up the linkages, only the link between servos is glued up as they are a fixed position, the verticals i still have to work out once all the finishing work is done as this dictates their overall height.
At the moment everything looks fine, i may have to scoot the push servos down a notch on the arm to reduce the throw slightly it looks a little to drastic.... that may be due to the rod lengths deceiving how ti really is i'm getting around 3/4" throw between the center marks. which isn't all that bad and even putting the guy roughly in places looks ok at present.
So right now i'm happy enough to continue with the build without any changes or drastic alterations. i also took a short vid of the linkages excluding the oars to show i'm getting no binding with this setup.
_________________ I'm Not Anti-Social, I'm Anti-Stupid.
Roadrunner Forum Overlord
Posts : 1714 Join date : 2011-06-10
Subject: Re: Row Row, Row your Boat....! Fri Apr 22, 2016 12:58 am
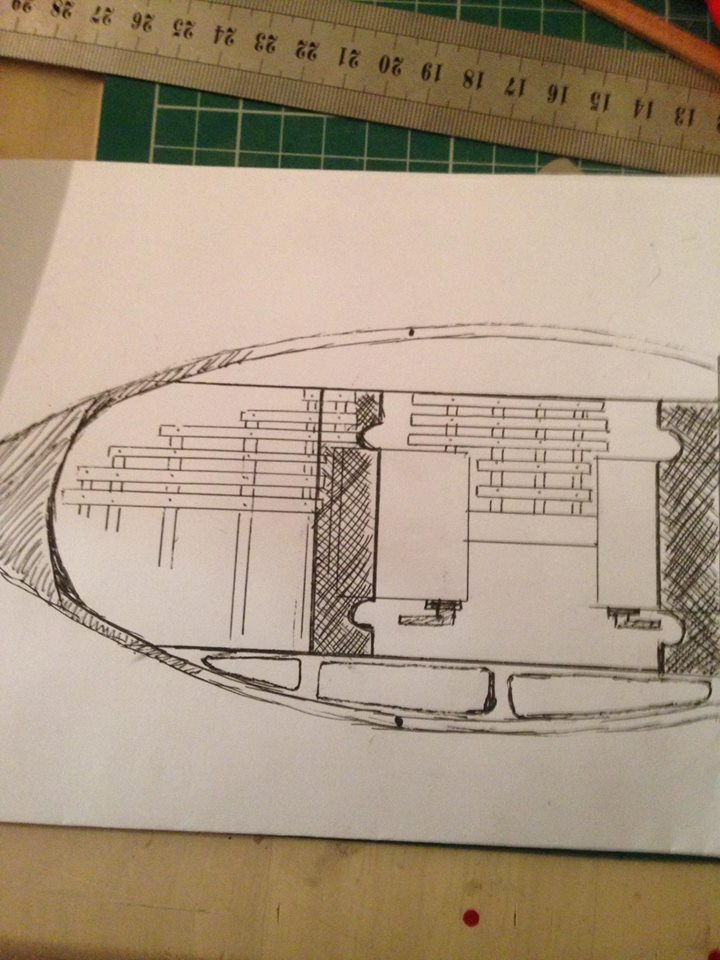
just thought i would mention about my design for the boats internals, i have drawn out a sketch since starting the servo tray, which should help me decipher what is going where, it also gives me some general features i want to incorporate into the boat to keep it a realistic as possible.
So from my little sketch you can see the servo tray, a front and rear seat ( rear seat may get scrubbed yet i'll see how things look as it progresses) , side boards around the servo tray with little pads, possibly a leather pad. These are there because i like the idea of the extra storage compartments and also will help hide the servo tray in some respects by taking your eyes away from it, as well as i'm able to add some foam to which will give the boat some buoyancy should it capsize which should stop it sinking.
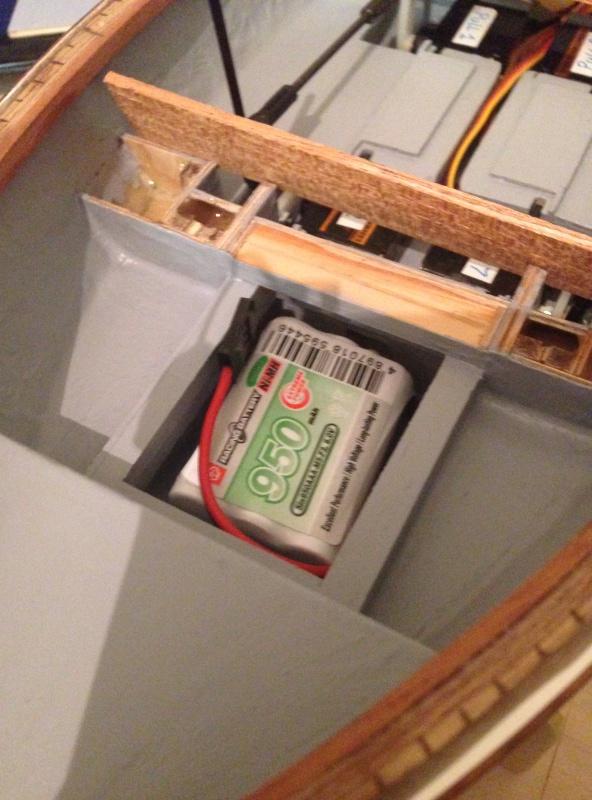
Finally some floor footings to match the contouring of the hull. The bow will have a similar section as the transom for which i hope to install the battery using maybe a hump receiver pack.
Worse case.. the battery will have to sit in the front space on the floor and i'll make some sort of cover 'blanket' to keep it hidden during use as i'm still unsure if i want the bow of the boat to have another large section sealed off. It would do no harm to have the battery exposed although not a neat solution but space is getting limited at this point and bulking up the model will start to make it unattractive, the rear is busy enough!
Details missing off the drawing are the ribs which i'll form after the installed blocked parts to tidy up edges and also use as guides for the floor footings where they would realistically bolt onto.
It's going to look rather busy in the boat and a lot of space taken up but i think the main focus will be on the rowing itself.
_________________ I'm Not Anti-Social, I'm Anti-Stupid.
Guest Guest
Subject: Re: Row Row, Row your Boat....! Fri Apr 22, 2016 2:49 am
I've started work on the side storage, which will dictate the seat height for the rower. Making templates for each side of the hull as they are not symmetrical, no big deal given its a GRP hull this is expected so i have to do as much as i can to reduce how one side is bigger then the other in depth, i think once i fit a some running boards to the floor this should tidy up any seen oddness. I've also sourced a 6v hump pack battery in AAA size so that can fit in a new front compartment linked to the servo tray, I'm going to remake the servo tray lid now to support the seat (making it detachable for access to the servos) and also to make it look right when i cap the top of the battery tray should it go to plan. I wasn't overly happy with it once it was finished it look rather off or maybe the lime inserts were a bit to much for the part, i'll be able to now go back and add some depth to it when i rebuild parts higher to support the seat(s) giving it more depth and hopefully pulling away what i think it an ugly part. Right now my main focus is to finish the side compartments and go from there.
_________________ I'm Not Anti-Social, I'm Anti-Stupid.
Roadrunner Forum Overlord
Posts : 1714 Join date : 2011-06-10
Subject: Re: Row Row, Row your Boat....! Sun Apr 24, 2016 8:25 pm
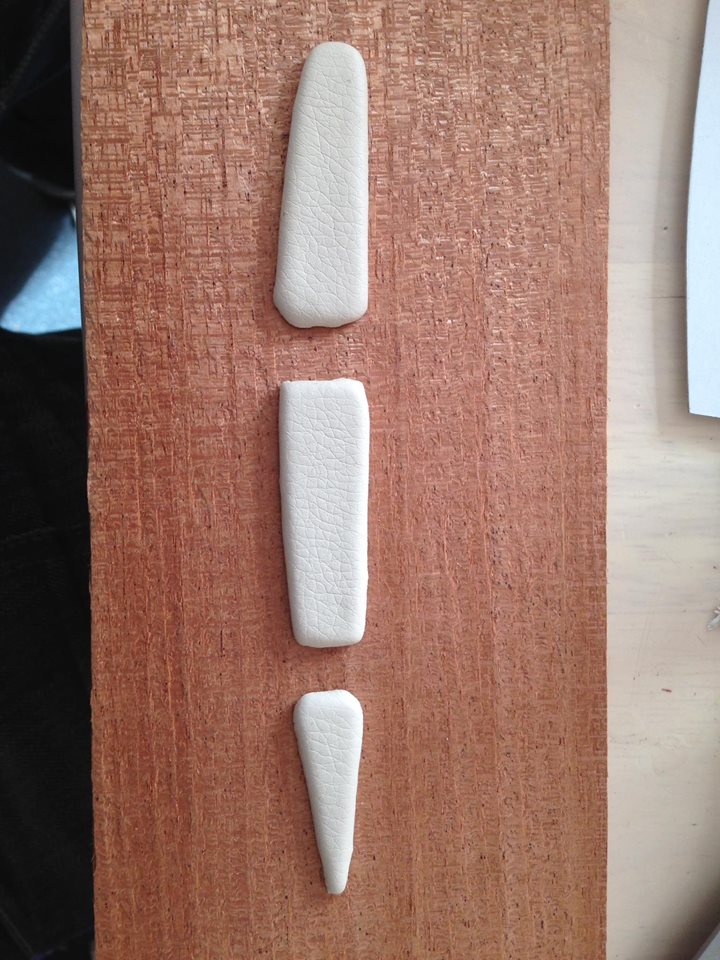
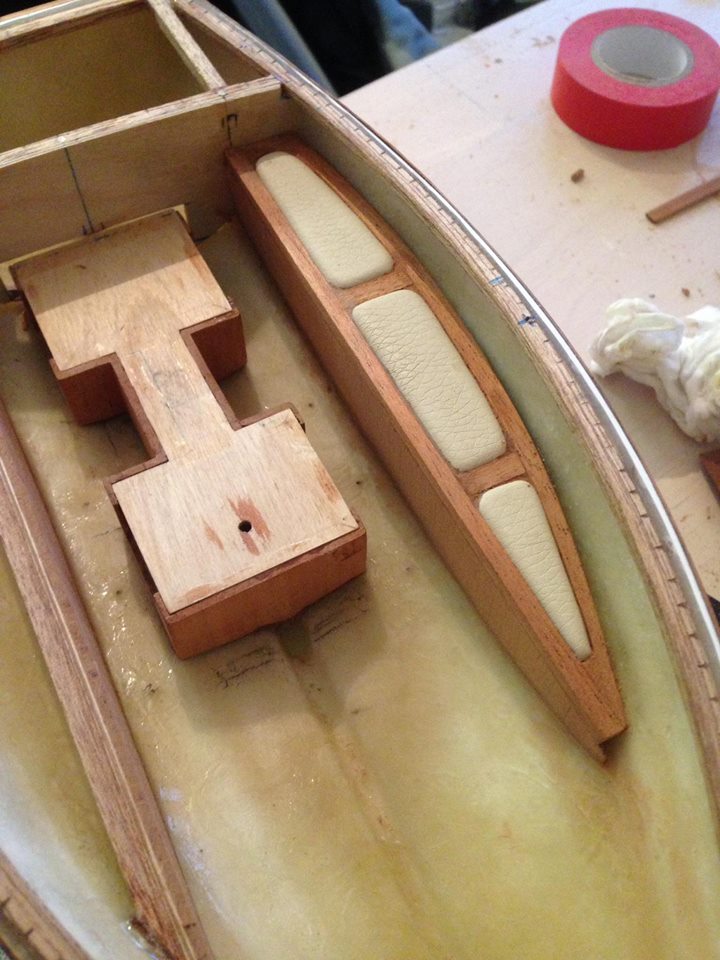
Almost finished the side compartments, i've taken some seat pad shapes and covered them in a faux cream leather. I've then stuck them to a base and then formed around the seats to give a decent 'inset' these parts are so small and the wood is rather fragile to cut to exact shape ( i tried many times !!) , so i'm using the old method of wood glue and sand shavings of the material to form a wood paste and filled the gaps left, once they dry i can sand them smooth and once varnished you'll never know they were there.
_________________ I'm Not Anti-Social, I'm Anti-Stupid.
Guest Guest
Subject: Re: Row Row, Row your Boat....! Mon Apr 25, 2016 12:45 am
Well after many attempts to start sorting the internals out i started to feel very unhappy with the layout, basically it was just way to cluttered with fat to many things going on inside such a small vessel, after much googling and looking at similar GRP clinker built hulls i have come to the conclusion that i was going about it all wrong and attempting to build details in that are generally never there on a boat this size,. (also the padded seats really pissed me off after i sand sealed the wood to see how the varnish would take, and they looked BAD!)
Basically i've scaled down on the details to keep it more realistic and that's ment stripping out everything accept the servo tray and partition at the transom.
Again although that sounds horific its not all bad its a trial and error situation, fortunately my mistakes haven't cost a fortune but to have something pratical as well as nice looking i have to compromise on my usual all out style. In no way do i want this model to be compromised in details however in this case i will scale them down to be more acceptable as a real working scale model rather then a fantasy build, there is a lot i have to live with in regards to not looking perfect as this model is unique in so many ways and after experimenting in this way i understand now why so many people opt to put down a floating floor even in their 1:12 scale versions, and i'm working at half that scale!
I'm not overly concerned, the point is to make this model not only work but to look pleasing to not only myself but to others too. this is something i've never attempted before in complexity and certainly something i rarely do by not following a plan of some sort, most of what i've got so far is all cut from different boats to keep the practicality of this model.
So sorry guys no posts for a few days while i sort out cleaning up the mess i made!
_________________ I'm Not Anti-Social, I'm Anti-Stupid.
Guest Guest
Subject: Re: Row Row, Row your Boat....! Wed Apr 27, 2016 1:32 am
troutrunner Master
Posts : 573 Join date : 2014-01-23 Location : Lincolnshire UK
Subject: Re: Row Row, Row your Boat....! Wed Apr 27, 2016 9:19 am
I'm sure you will sort it and it will still look good, anyways not all have such a discerning eye as you do
Roadrunner Forum Overlord
Posts : 1714 Join date : 2011-06-10
Subject: Re: Row Row, Row your Boat....! Thu Apr 28, 2016 1:50 am
Your know what they say," your you're own worst critic! " but now I have a solid plan and the boat seams to have stopped fighting me at this point! For now anyway.. So here's where I am , stripped out everything and started to build up a battery tray and a flooring sub frame at the base, this will make all sense as I progress but I've found the floor to be vastly more helpful in getting things right on this boat, thought I could get away with doing it but really you can't and I doubt you could even at a larger scale.
_________________ I'm Not Anti-Social, I'm Anti-Stupid.
barriew Captain (moderator)
Posts : 2631 Join date : 2011-11-26 Age : 83 Location : Thaxted, Essex
Subject: Re: Row Row, Row your Boat....! Thu Apr 28, 2016 8:55 am
I think you are heading in the right direction now RR. In my experience (limited and from quite a few years ago) rowing boats were usually fairly spartan affairs without too many creature comforts.
Aye your not wrong there Barrie, I have no idea what I was thinking at the start I guess a bit more enthusiasm then forthright was driving me for a while. But feeling much better about this new direction now then where I was previously heading, all I can say is thank god it's a grp hull to take the abuse of ripping stuff out during my my trial by fire stage!
_________________ I'm Not Anti-Social, I'm Anti-Stupid.
Roadrunner Forum Overlord
Posts : 1714 Join date : 2011-06-10
Subject: Re: Row Row, Row your Boat....! Sun May 01, 2016 12:08 am
after a few days of fixing the damage heres where i am now, floating floor fitted and a battery tray made up, the grey is primer from where i sealed gaps between the new and older parts to ensure there were no areas water could leak into since all the electronics are stored in these areas. Next up is the bow section compartment and the seating/hatch covers ( i'm hoping to make those into a one piece fitting) i'm keeping this very simple so once those items are made i'll hand paint the internals with a light grey and use varnished mahogany trim for running boards and small details which should offset the model in having a nice contrast, and in keeping with a realistic 'GRP formed clinker'
It all looks very messy but sadly until the paints on theirs not much i can do about looks at present on these parts.
_________________ I'm Not Anti-Social, I'm Anti-Stupid.
Guest Guest
Subject: Re: Row Row, Row your Boat....! Sun May 01, 2016 1:31 am
Aron are you steering with oars or rudder? If rudder it'd be neat feet operated and attached to the oarsman's feet.
Looking good mate.
Roadrunner Forum Overlord
Posts : 1714 Join date : 2011-06-10
Subject: Re: Row Row, Row your Boat....! Sun May 01, 2016 11:41 am
It steers by oars. The little box allows you to steer while moving forwards by slowing down one oar, like tank skid steering and also has the ability to move both oars in opposite directions to spin it on the spot with just the transmitter rudder input
_________________ I'm Not Anti-Social, I'm Anti-Stupid.
Guest Guest
Subject: Re: Row Row, Row your Boat....! Sun May 01, 2016 1:26 pm
Roadrunner Forum Overlord
Posts : 1714 Join date : 2011-06-10
Subject: Re: Row Row, Row your Boat....! Thu May 05, 2016 9:18 pm
Lots more progress since last post, both hatches made with seat units, the paint again is ensuring areas are sealed after p38 and epoxy seams are created around internal units and give a more realistic ' GRP ' formed boat with fixed in units. The seat units need capping with the finished seating after final painting the seating frames have cut outs for the linkages to move freely i will only need to cut slots in the seating to allow the linkages to move between them. All thats left now is to make up the front raised compartment, capping the stern and rail with a finished trim, adding the running boards internally, final spraying and varnishing and then the oar assembly.
Overall i'm much happier with the way this ones turning out now, but i do expect once this ones finished to make a 2nd but in the 1:6 scale allowing for much better representation of a working rowing boat, this is always an issues when experimenting with new ideas now i have a good grasp this model is a good basis for making something more my style rather then making do with best i can, but this one will be a fun one for the kids to play with!
_________________ I'm Not Anti-Social, I'm Anti-Stupid.
Roadrunner Forum Overlord
Posts : 1714 Join date : 2011-06-10
Subject: Re: Row Row, Row your Boat....! Sun May 08, 2016 2:38 am
Front raised section fitted and painted with primer, I've also used some scrap lengths of wood to represent the seats to give you all and overall look how the boats internals will be finished, I still have to put the running boards in place after final internal painting then the finished seating with the cutouts for the hatch and linkages, next job is to final paint the internals and give it a coat of varnish to seal, then I'll work on the top cover rail and transom hatch at as 2 half piece. The external painting will be done at the very last stage before final assembly as its a mix of paint and epoxy varnish, so extra work is needed to keep the two painted surfaces level as the epoxy will eat the acrylic paintwork if I do a couple of coats too early during the curing process, epoxy on top of each normal layer causes no issues but it works by melting the previous surfaces during the bonding/curing process, only other option is to laqure finish the external wood with the acrylic paint finish which actually now typing this may be the best solution, leaving only the top surfaces for varnishing. Something to sleep on for a couple of days. I do need to make a new battery tray hatch as the old one no longer fits with the rasied combing and the seating position for the rower, I looked at many ways to access the battery with the rower fixed in place but i found it near impossible to make it secure and accessible for easy battery changes including the battery cable! so the 2nd photo shows the modification. so here's where I am with a photo.
_________________ I'm Not Anti-Social, I'm Anti-Stupid.
Roadrunner Forum Overlord
Posts : 1714 Join date : 2011-06-10
Subject: Re: Row Row, Row your Boat....! Wed May 11, 2016 11:27 pm
Internals paintwork all finished and varnished, i have kept it the primer grey as it gives a nice contrast to the wood once it darkens with varnish.
I have built a new battery hatch which secures down with a hatch tab under the seat section and will eventually have a couple of mini magnets to keep it pulled down tight. the servo hatch will be screwed down eventually after i finish the trimming work for it.
Right now i'm starting to add the internal details such as seating and the floor and bow runners, those running boards are epoxy in place over the paint work and i've drilled a 1mm hole in the ends/ corners and inserted with some wood glue a walnut 1mm square stock, and sanded smooth, its hard to see them at present, but will be visible after varnish. Reason to add the walnut is to help keep the glue joint strong over time as glue on top of paint is never a good idea as well as making it look more realistic being held in place with wooden doweling, or screw caps (which ever you prefer to believe in) After those are done i will be working on the top rail with transom hatch and the oar running gear, after final painting and electronic installation.
_________________ I'm Not Anti-Social, I'm Anti-Stupid.
Guest Guest
Subject: Re: Row Row, Row your Boat....! Thu May 12, 2016 3:32 am
Coming together Aron.
Roadrunner Forum Overlord
Posts : 1714 Join date : 2011-06-10
Subject: Re: Row Row, Row your Boat....! Sat May 14, 2016 12:28 am
More progress since yesterday, i've installed the final runners and the forward seat with its cutout section for the servo tray lid section and the linkages, i did attempt to make the linkage cutouts more rounded at the ends but the material just couldn't take the drill and cuts as i had to repair the smaller tabs twice as they snapped and fractured due to the longer grain running in my flat stock ( not the best stock but all i have at present) however when i cut them out i found that the linkages moved better within the square gaps in the outter corners, so happy accident!
I've also given all the wood work 10 coats of the epoxy varnish, which onces dry i'll polish to a semi gloss finish ( i would go full gloss but again the flat stock i used on the seats i cant get super smooth through sanding, I was getting flakes pull up during sanding at 240 and 320 grit which isn't good!)
I haven't done the rear seat yet as i may need to make a slot in the rear seat section to hide the switch under the seat itself, hence why their was always a hollow box in the rear of the servo tray lid seating box, sadly its one of those last parts to make up which is kinda annoying but not much i can do until i'm closer to final install with the cables.(don't want fixed cables running through the hull until im sure i've done all cutting or adjustments especially when all the important parts end up in the transom)
Oh and i've added a brass rail as a hatch pull. i may add a couple more around that section to give it some sort of storage look, right now i'm leaving until i'm sure that what i want cant repair holes if i change my mind at this point without remaking the whole part! So heres a couple of photos enjoy.
_________________ I'm Not Anti-Social, I'm Anti-Stupid.
nivapilot Deck Hand
Posts : 19 Join date : 2016-04-18 Age : 72 Location : Southampton
Subject: Re: Row Row, Row your Boat....! Sat May 14, 2016 6:39 am
beautiful.
Just add water Gunner
Posts : 169 Join date : 2015-05-02 Age : 70 Location : Down the boozer.
Subject: Re: Row Row, Row your Boat....! Sat May 14, 2016 2:45 pm