| | | Wee Nip Build |  |
| | | Author | Message |
|---|
Roadrunner
Forum Overlord


Posts : 1708
Join date : 2011-06-10
| | Subject: Wee Nip Build Wed Mar 26, 2014 9:54 pm | |
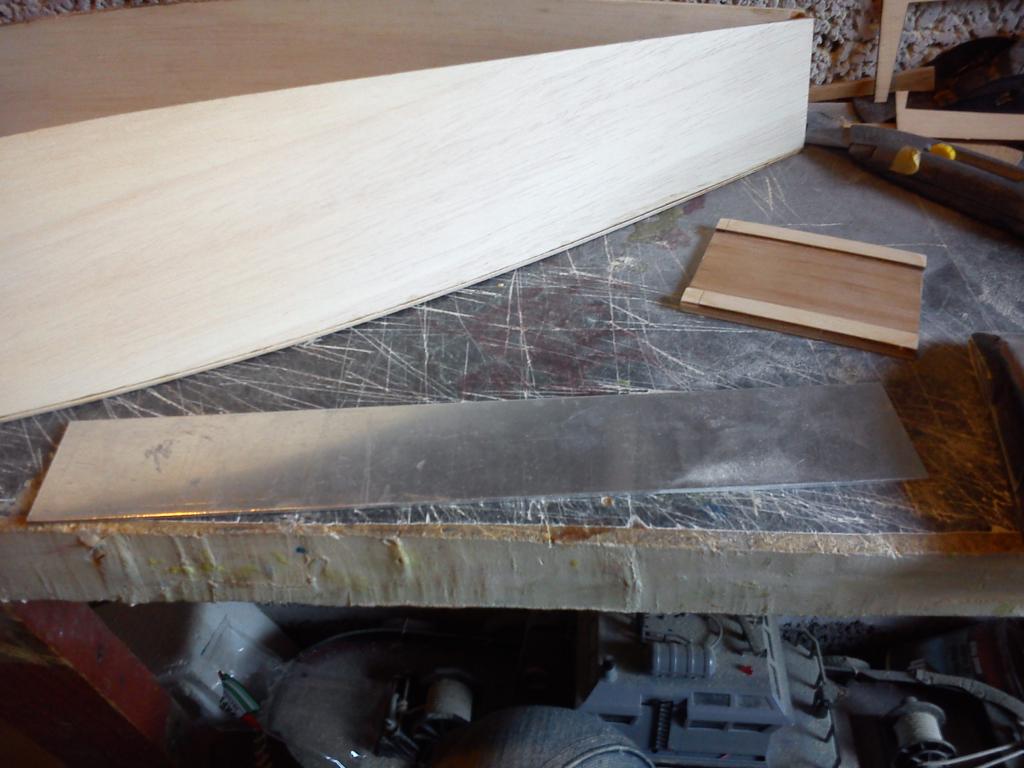
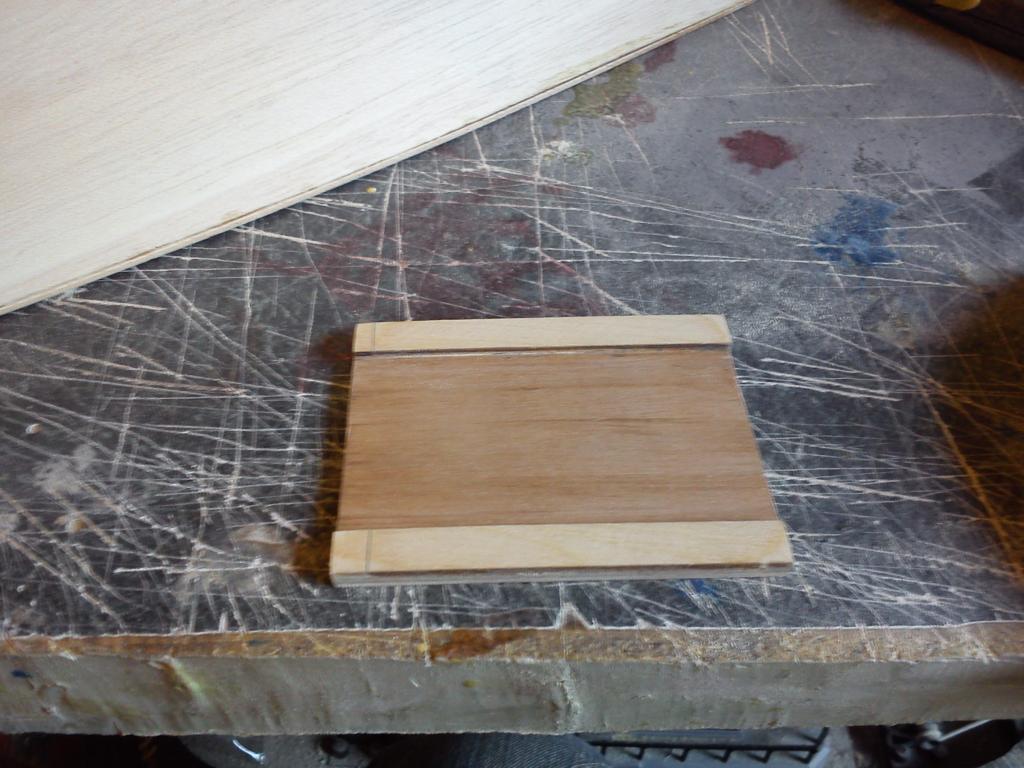
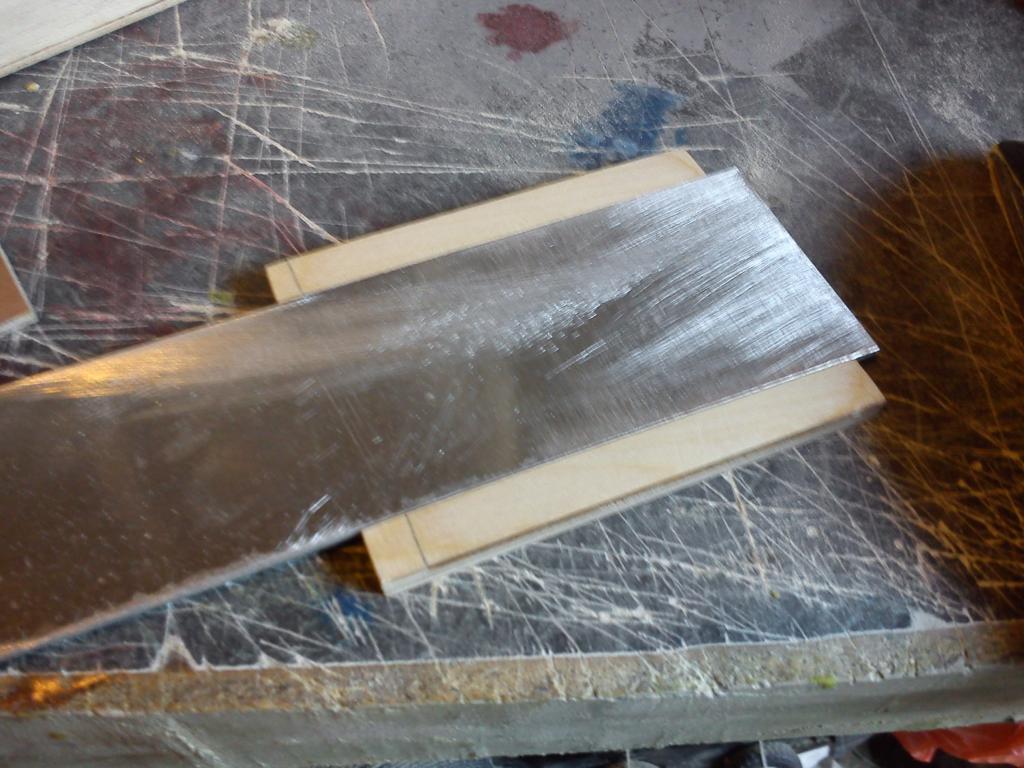
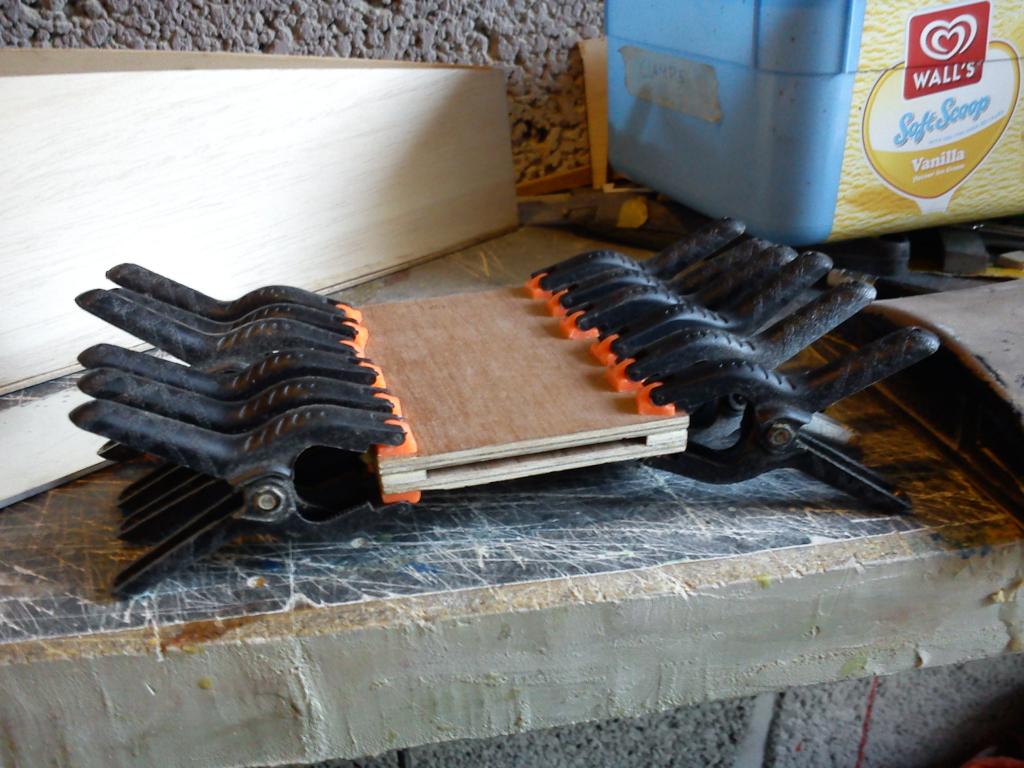
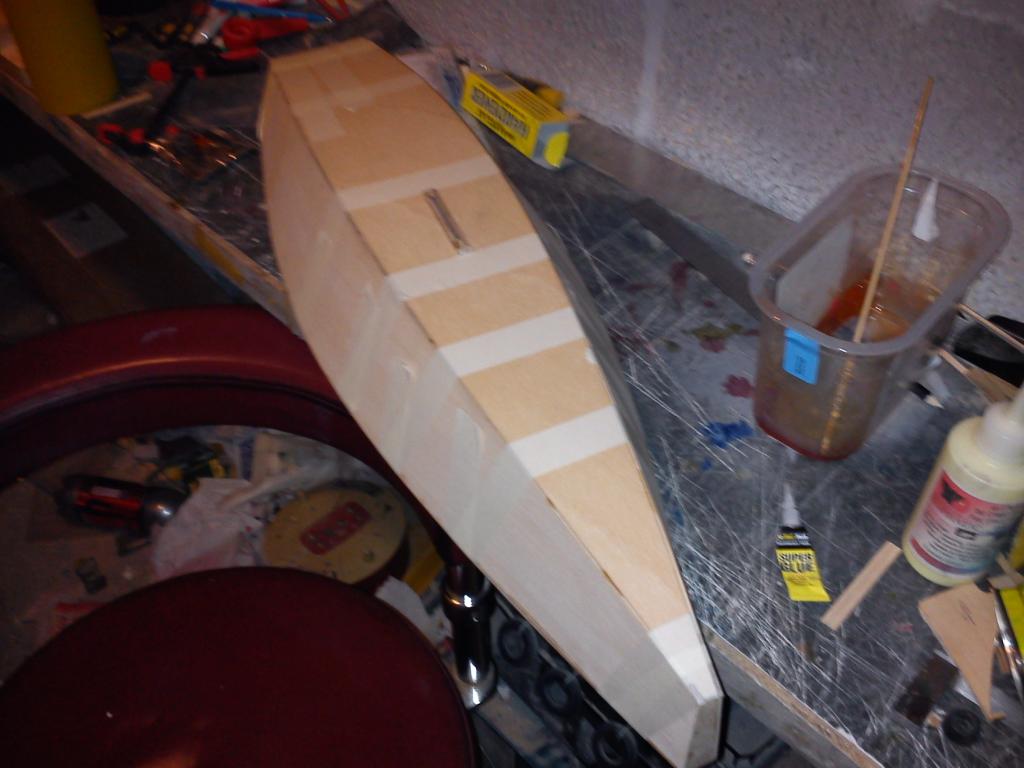
| While i Await the varnishing and paint part of the classic build to get done, figured I'll start on my 2nd build of the year, for those wondering what's going on with the dolphin, well shes benched waiting for the summer months to get painted properly also i'm researching interiors of motor boats of that period to detail the inside so lots of work still to do on her... Anyway back to the new build.. A wee nip is a small lightweight racing yacht with its own class, popular around my location for racing regattas and relatively cheap to build for under £100 you are able to buy the wood pack and plans for around £45 from here http://gb.trapletshop.com/wee-nip-set There are a few parts you will have to make from scratch such as the sail, keel bulb, booms, mast but much is explained on the plan, this boat kit if however not for the 'newbiee' it dose require some skill and some interpretation of the plan to progress as well as a few skills the novice boat builder may not have, such as casting molten lead, and sail making... This build will be on and off over a period of time, as my Father and I are doing them at the same time, (team pair) so its a joint effort to create parts such as the keel bulbs and other items for these boats.. so don't expect any mega fast progress on this one.. however... saying that  ..... All the main parts are pre lazer cut in 3mm light ply, the keel, rudder and some of the supporting areas such as the keel box are made of 3mm heavy weight ply and the hull construction gose together relatively simple and fast... in fact to prove how quickly you can put a hull together heres what i've achieved in just over an hour with some glue and resin! First things first cut out the parts from the lazer cut ply sheets and sand down the edges to kill the black crap left from the cuts. These boats start from the Deck Down... so next up glue the 2 deck halfs together and fit the mast reinforcer in the center where instructed. 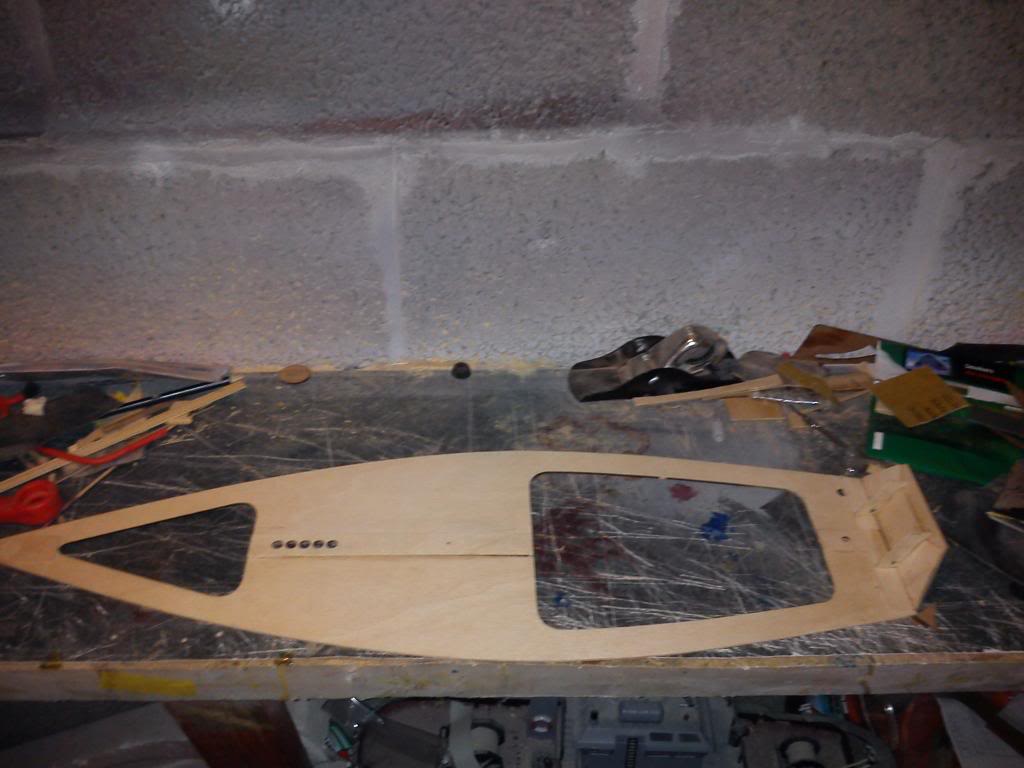 Stick the transom on at the correct angle according to the plan, also dry fit and check this with the precut side panels, in my case i made 2 vertical reinforcement bars which located the transom at the correct angle.   Next i tacked one of the side pannels to the deck with superglue getting the shape of the pannel correct, then runnign resin down the seam to seal, glue and reinforce it  Then i did the same to the other side  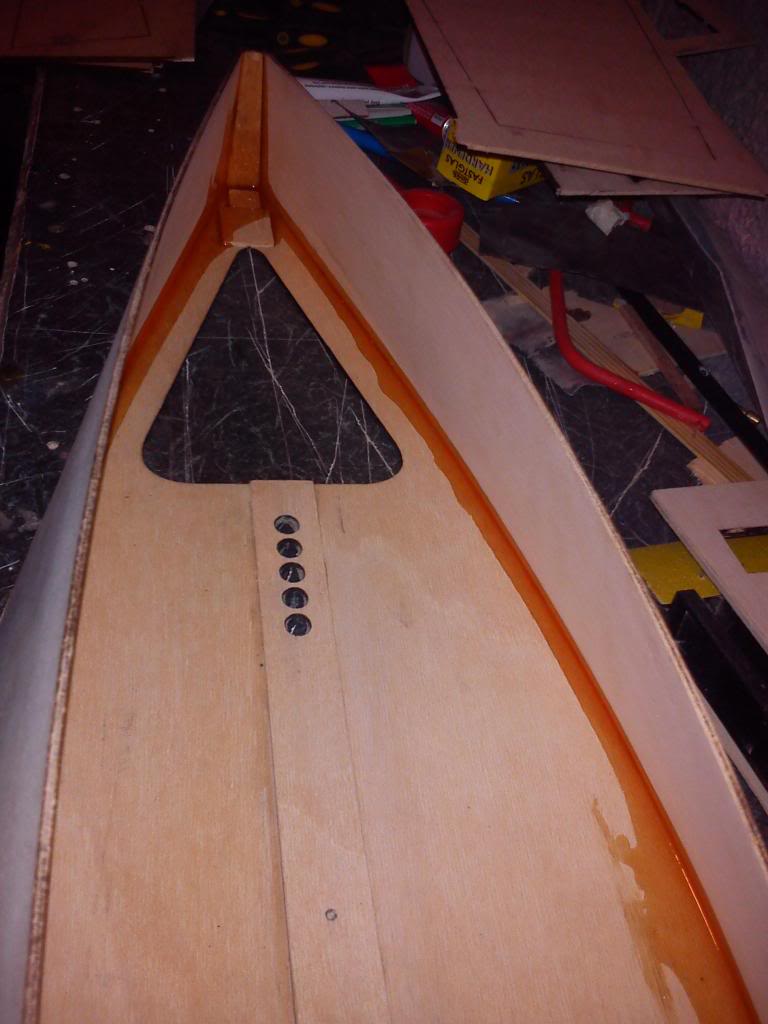 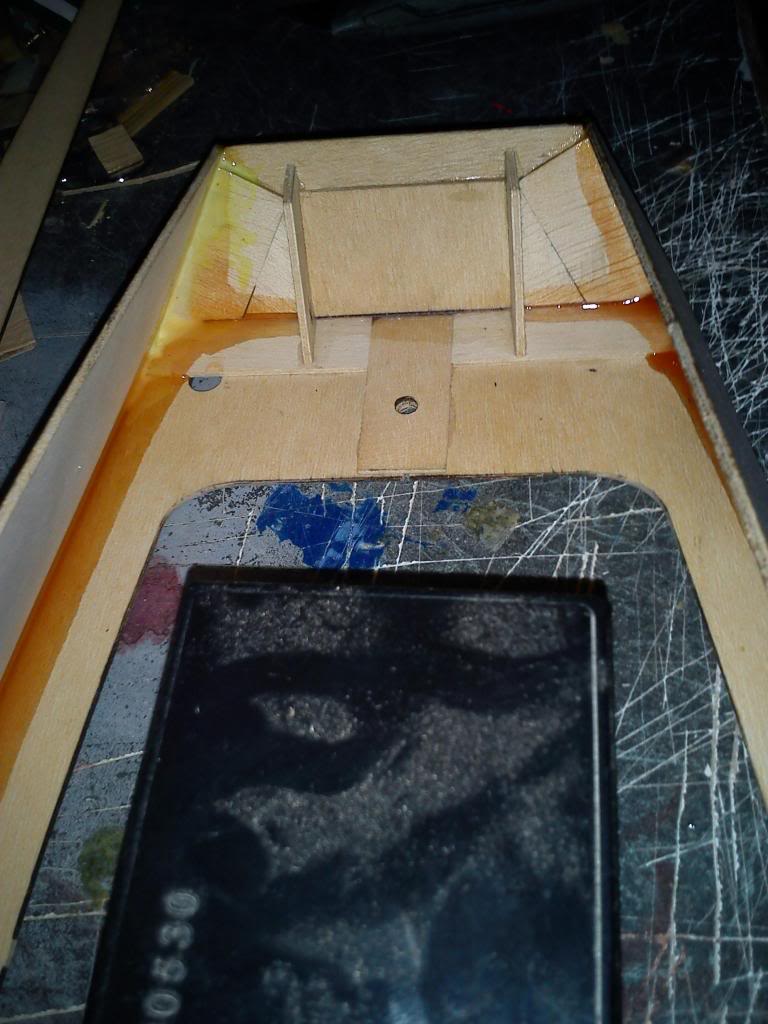 While the resins is going off i put the boat back down flat on the desk and wighted it with some LA batteys,at this point you have to keep the deck flat or the hull will warp out of shape, the deck will end with a slight camber once the base panel is fitted but this will be much later in the build. As you can see dead flat and no twist  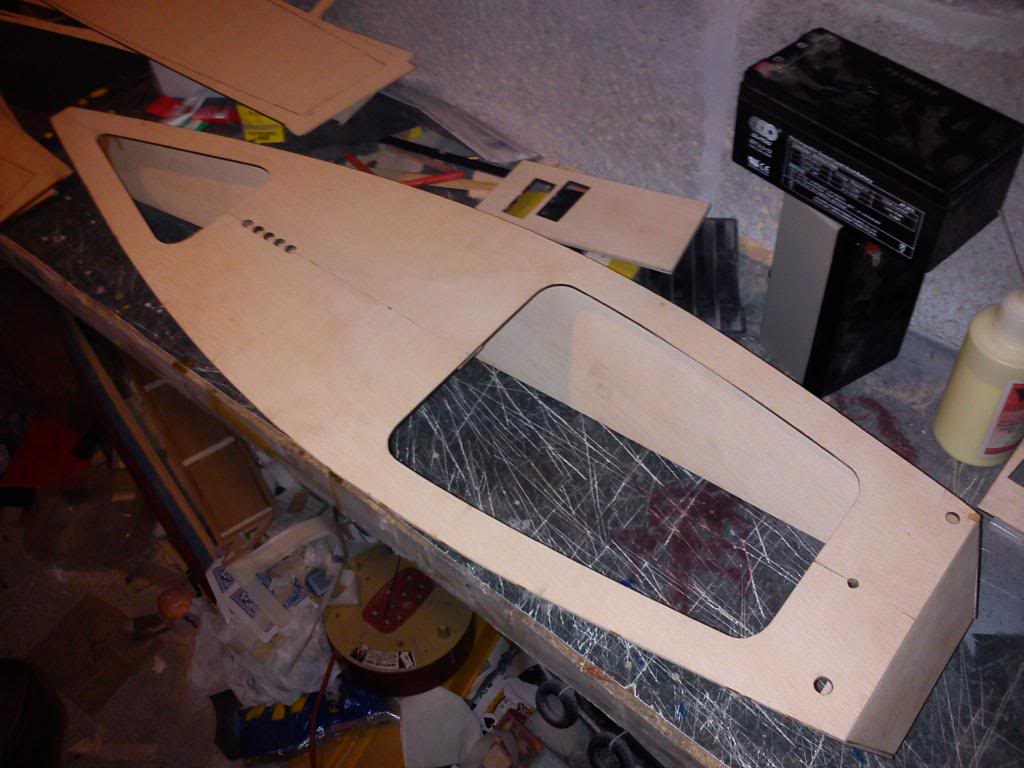 Then gave it a quick rub down to clean up the seams. This boat will be GRP'ed over the top of the hull skins in the end for the strength, although not required on the plan its a preference in my case. Basically i hate fixing boats once i've built them so strong solid builds leads to an easy life later down the line, and since these are going to be raced, its going to take some beatings along the way I'll rather just polish out the scratches then watch it sink with a hole in the side!
_________________
I'm Not Anti-Social, I'm Anti-Stupid.
| |
| | | | Roadrunner
Forum Overlord
Posts : 1708
Join date : 2011-06-10
| | Subject: Re: Wee Nip Build Thu Mar 27, 2014 8:39 pm | |
|
_________________
I'm Not Anti-Social, I'm Anti-Stupid.
| |
| | | | Roadrunner
Forum Overlord
Posts : 1708
Join date : 2011-06-10
| | Subject: Re: Wee Nip Build Sun Feb 22, 2015 9:21 pm | |
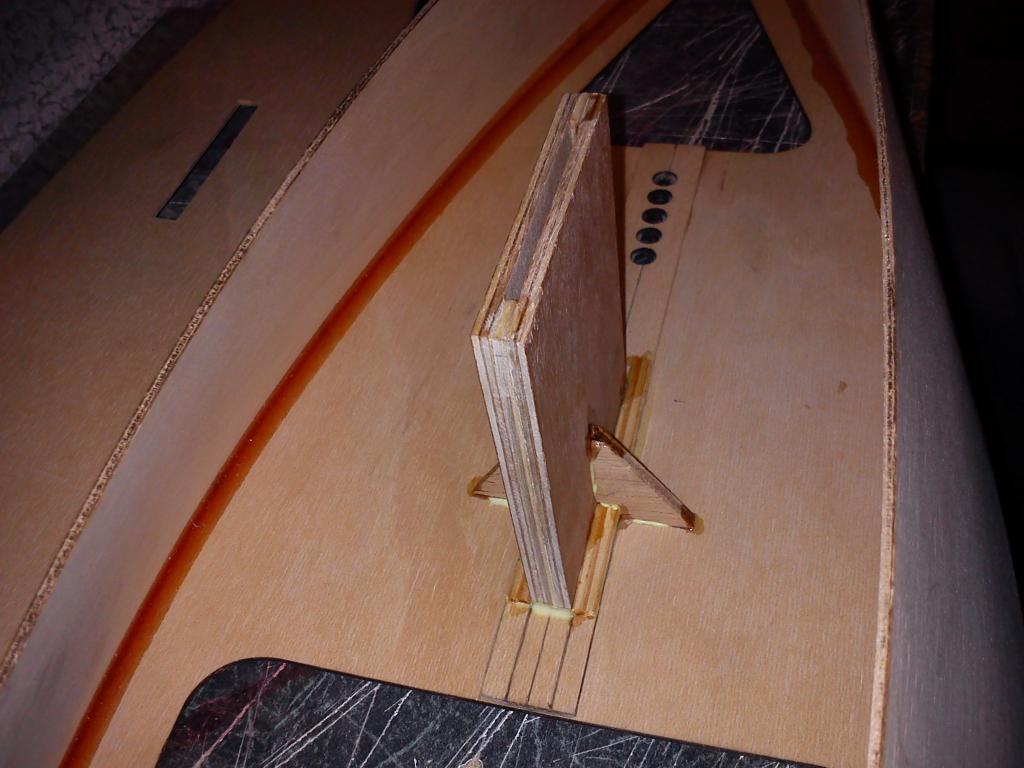
| I won't lie, i got really lazy with this build. however i have worked out that this year i can ger probably 4 new boats on the water and 3 nearly at the same time! So the wee nip never stopped getting worked on it was just VERY slow! The only thing that remains for this model is the deck to get planked ( material on order ) and then painted, wired up and done. So here's what you guys have missed since last time.... The creation of the stand, the deck fitted, the 2 mast points with brass sliding guides fitted to retain the mast ( and allow adjustments to sail position) and a big brass rudder.  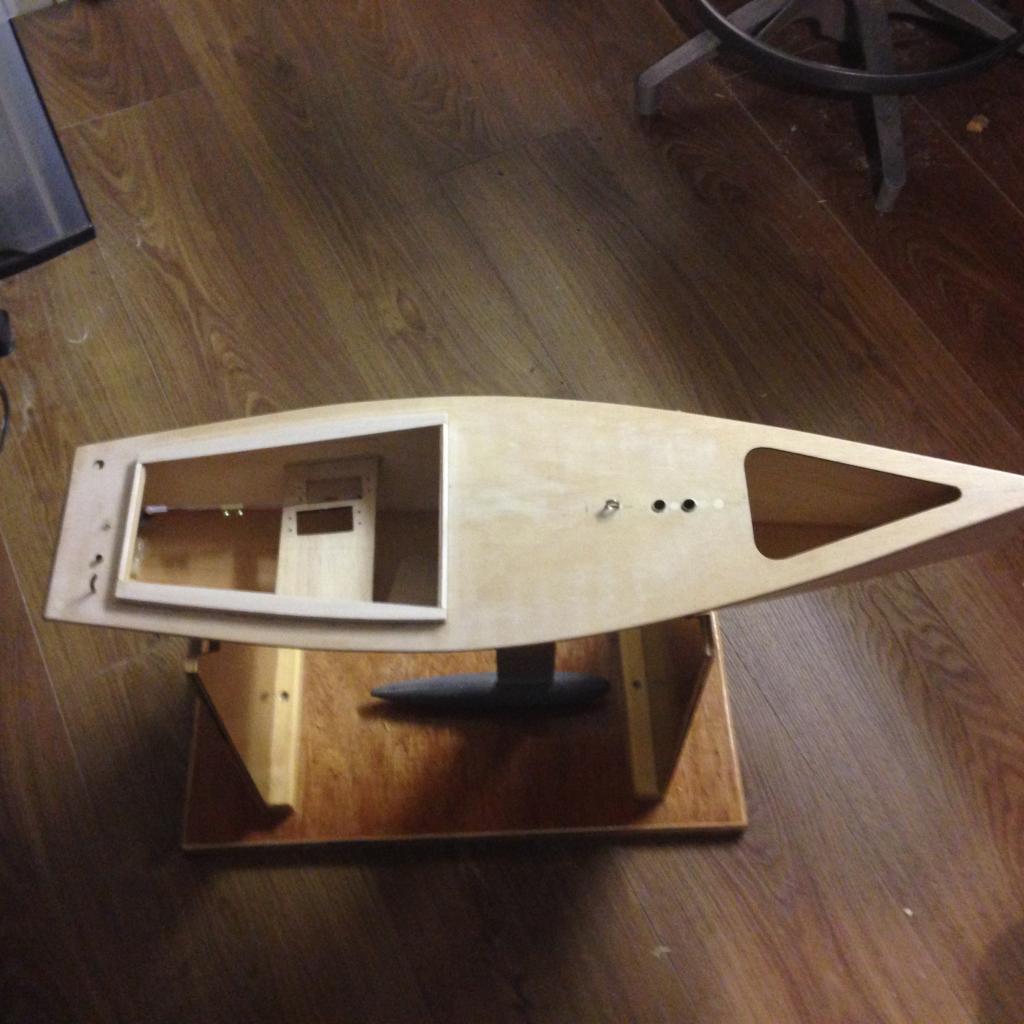 The Keel and the moulded lead keep bulb... the keel is made from 2mm sheet aluminium and keel bulk bolted to it.  The hatch sides ( just needs the top when i plank the rest of the boat)  The mast and boom L section, this is a lamination of 50 layers of fiber glass which i then shaped on the belt sander and then drilled out the holes for the mast and boom. ( i actually made 2 from the lamination one is used on my dads Wee nip) 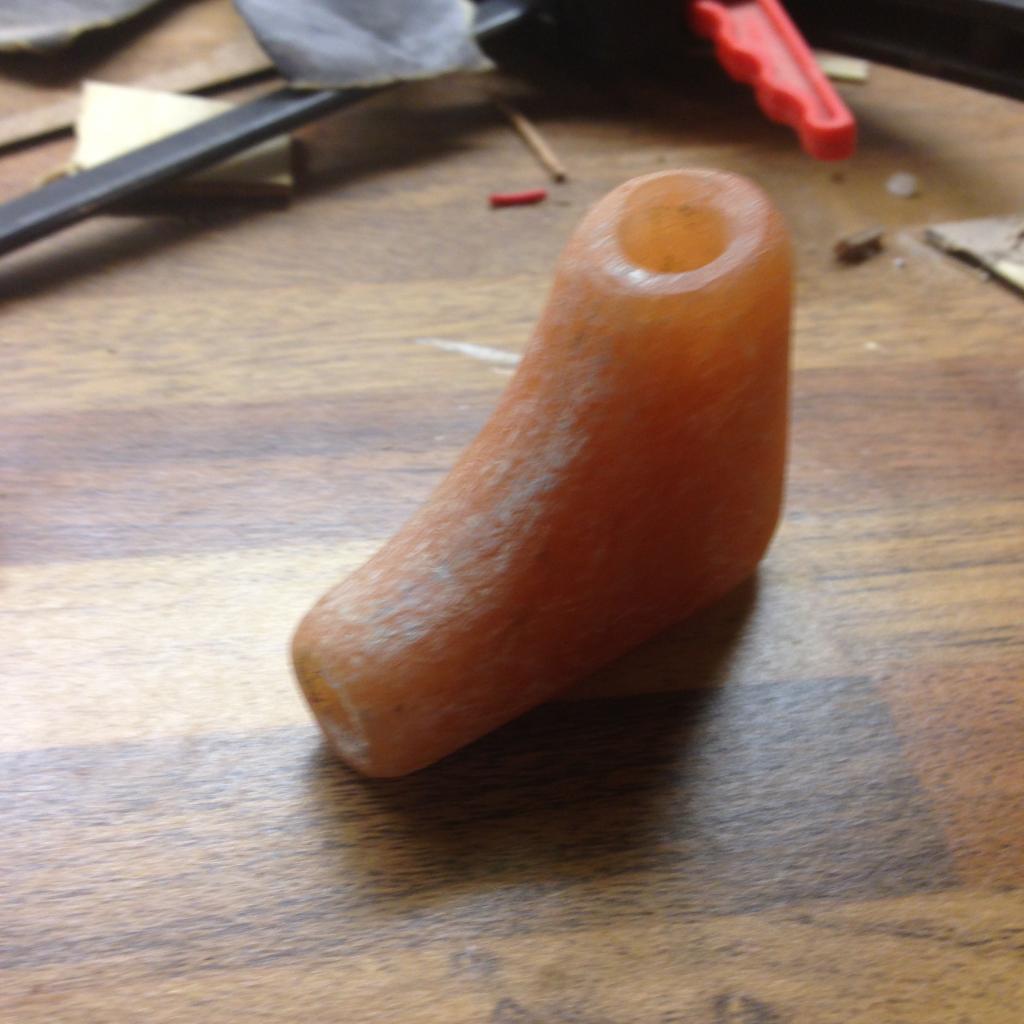 The boom & mast are made from carbon fiber... 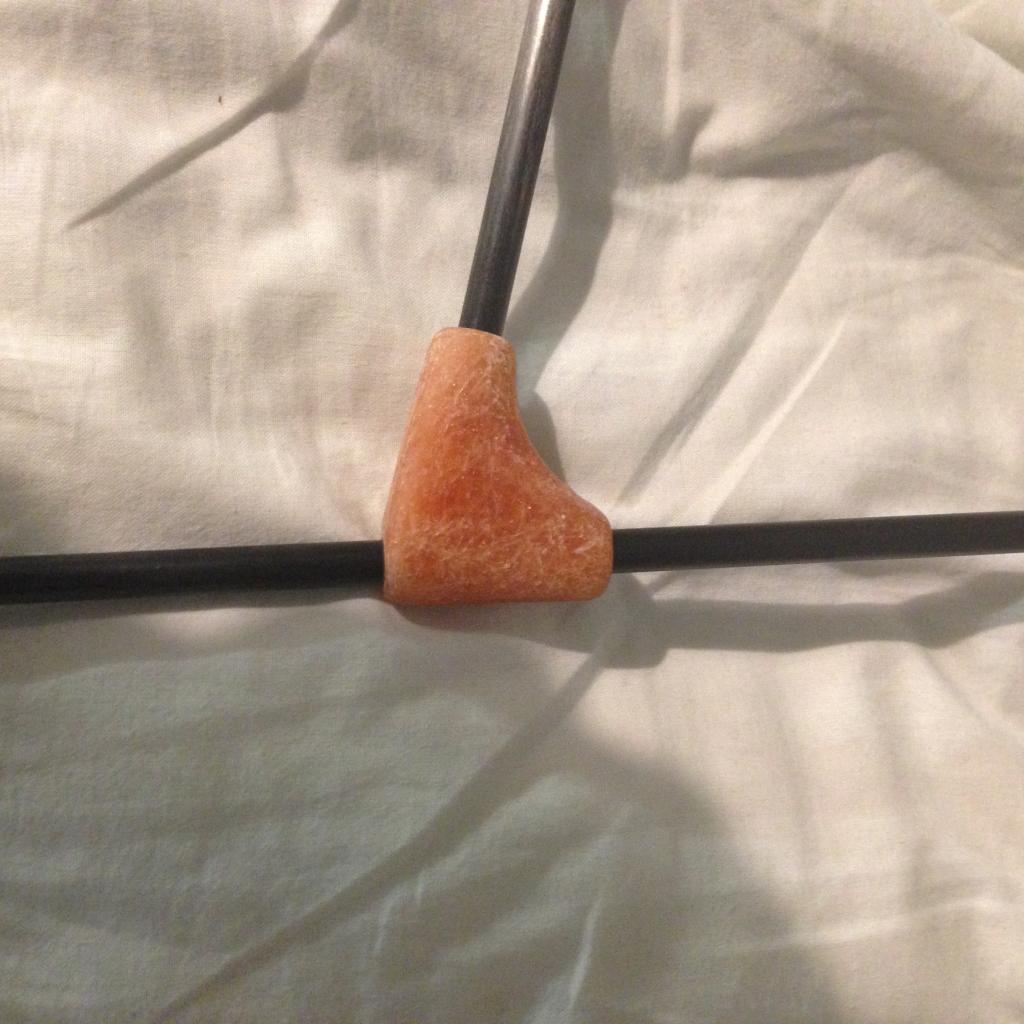 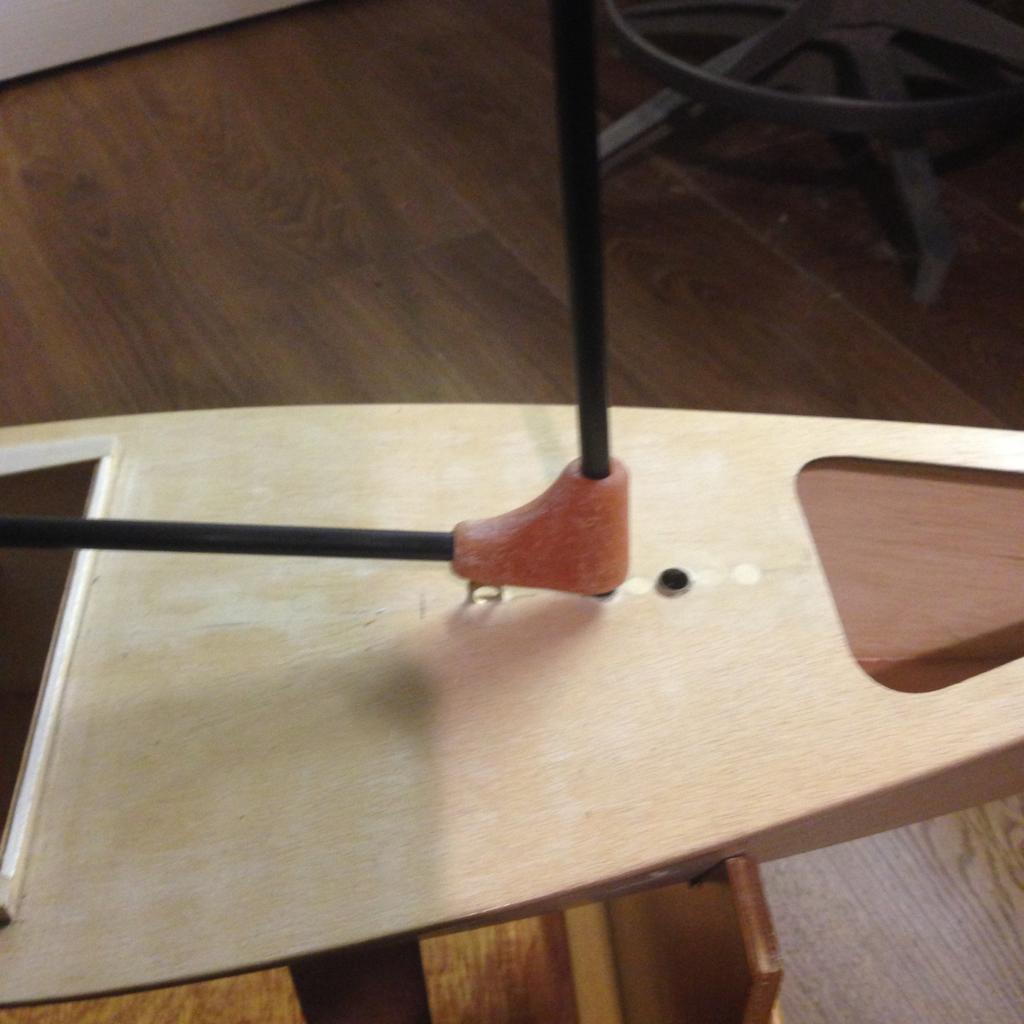 The sail is made from ripcore material and the supporting taped edges for re-inforcment. 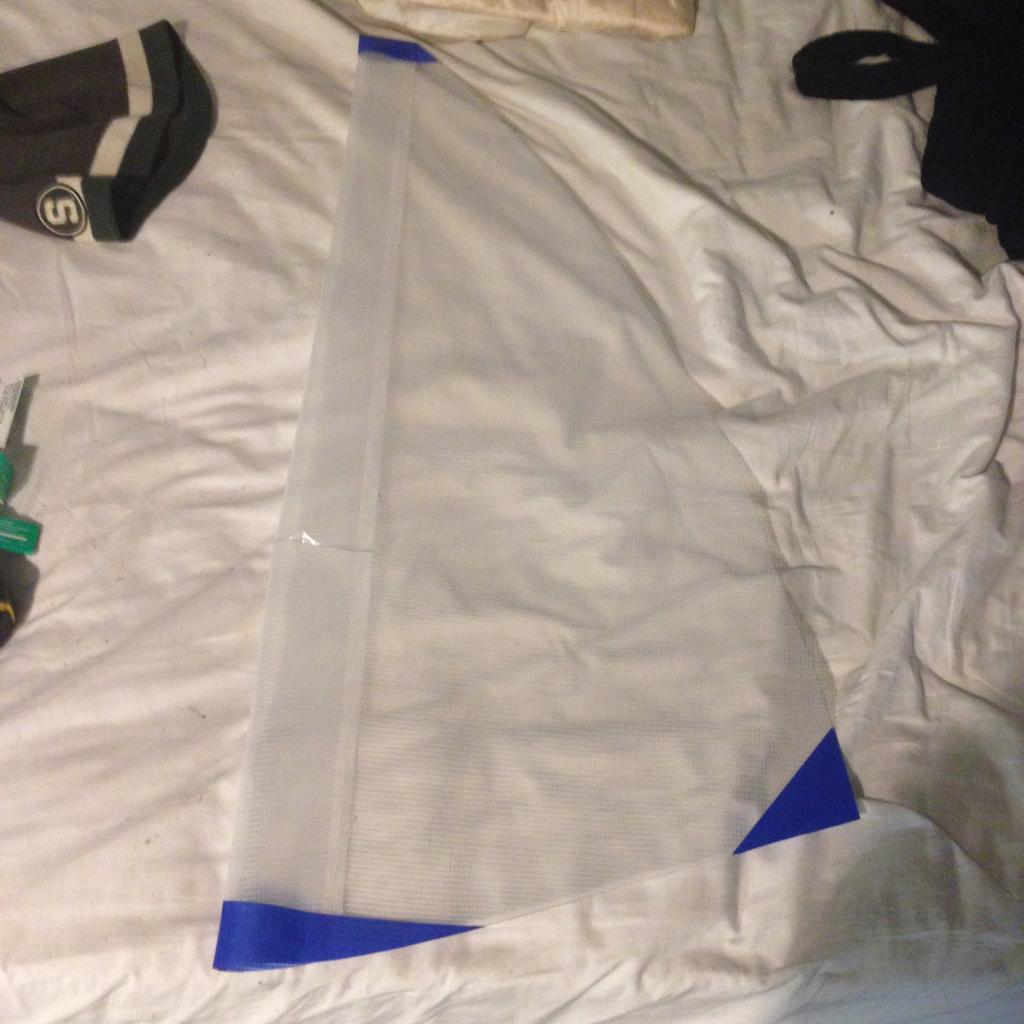 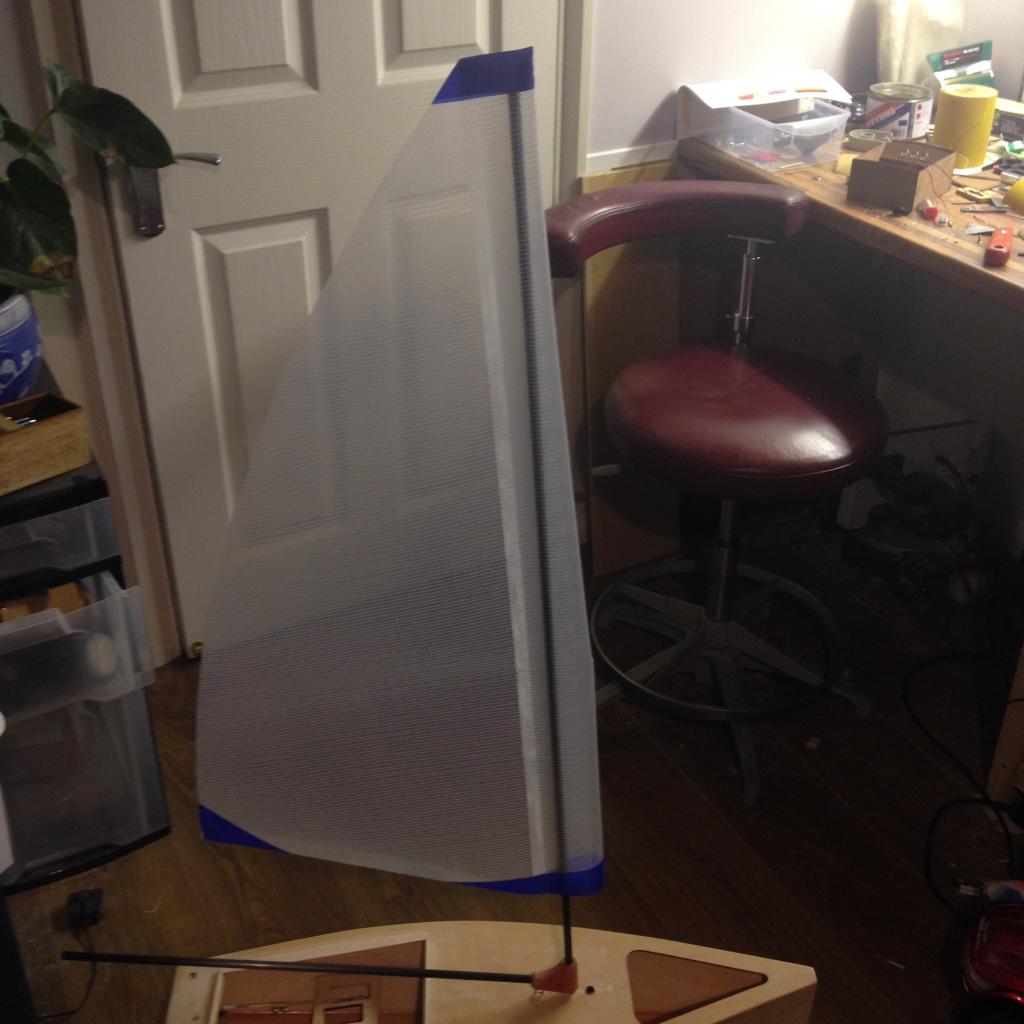 Only thing left is as i said, deck planked, painted, and wire the bugger up and shes ready to go!
_________________
I'm Not Anti-Social, I'm Anti-Stupid.
| |
| | | | Roadrunner
Forum Overlord
Posts : 1708
Join date : 2011-06-10
| | Subject: Re: Wee Nip Build Wed Feb 25, 2015 12:22 am | |
| I'm a little side tracked from doing the Jenny, so while i prep up the next parts to the build, im back on the wee nip, and to be honest this is always my fav part of any build, planking  So ok, here i'm going to do very simple planking, no cut-in's but im going to use a 10mm king plank as the central line and then diagonal planking for the decorative feature, finished off with a smoother over lap on the outer edge in 2mm.. First off i'm going to start with the hatch, top, the sides i wi'll do as i work back on the main deck due to the thickness of the material, i want to set a slot down the hatch edge so it acts as a 2 layer type combing, as the hatch combing is only 5mm in hight it dos'nt leave a lot to keep the hatch sealed, so this will maximized that sealing effect, until i can work out a way to keep the hatch down with out unsightly fixtures on the deck. So as you can see from the photo, the king plank is laid, its 2x5mm mahogany strips,, now to start the diagonals its very hard to judge your planks to give you a great finish, you may end up with odd plank edges in areas which can be unpleasing to the eye.. so in this instance i've set the planks edge point to the tip of one of the corners of the hatch frame work, now i could measure from the top to the bottom in 5mm intervals to work out a 'perfect' plank layout, however perfection comes from imperfections, so' i'm opting to do this basically from eye. (this no way means this is the right way, but seeing how this boat is not to any scale it dos' I've also cut up a 1mm ply 45 degree angle template to allow for the fixture of the first few planks to ensure they are perfectly laid this will aid me in keeping the opposing sides level (nothing worse then seeing a deck with planks starting to spread out) The template will also aid me in doing the deck planks so that they are also as the Exact same angle as the hatch. 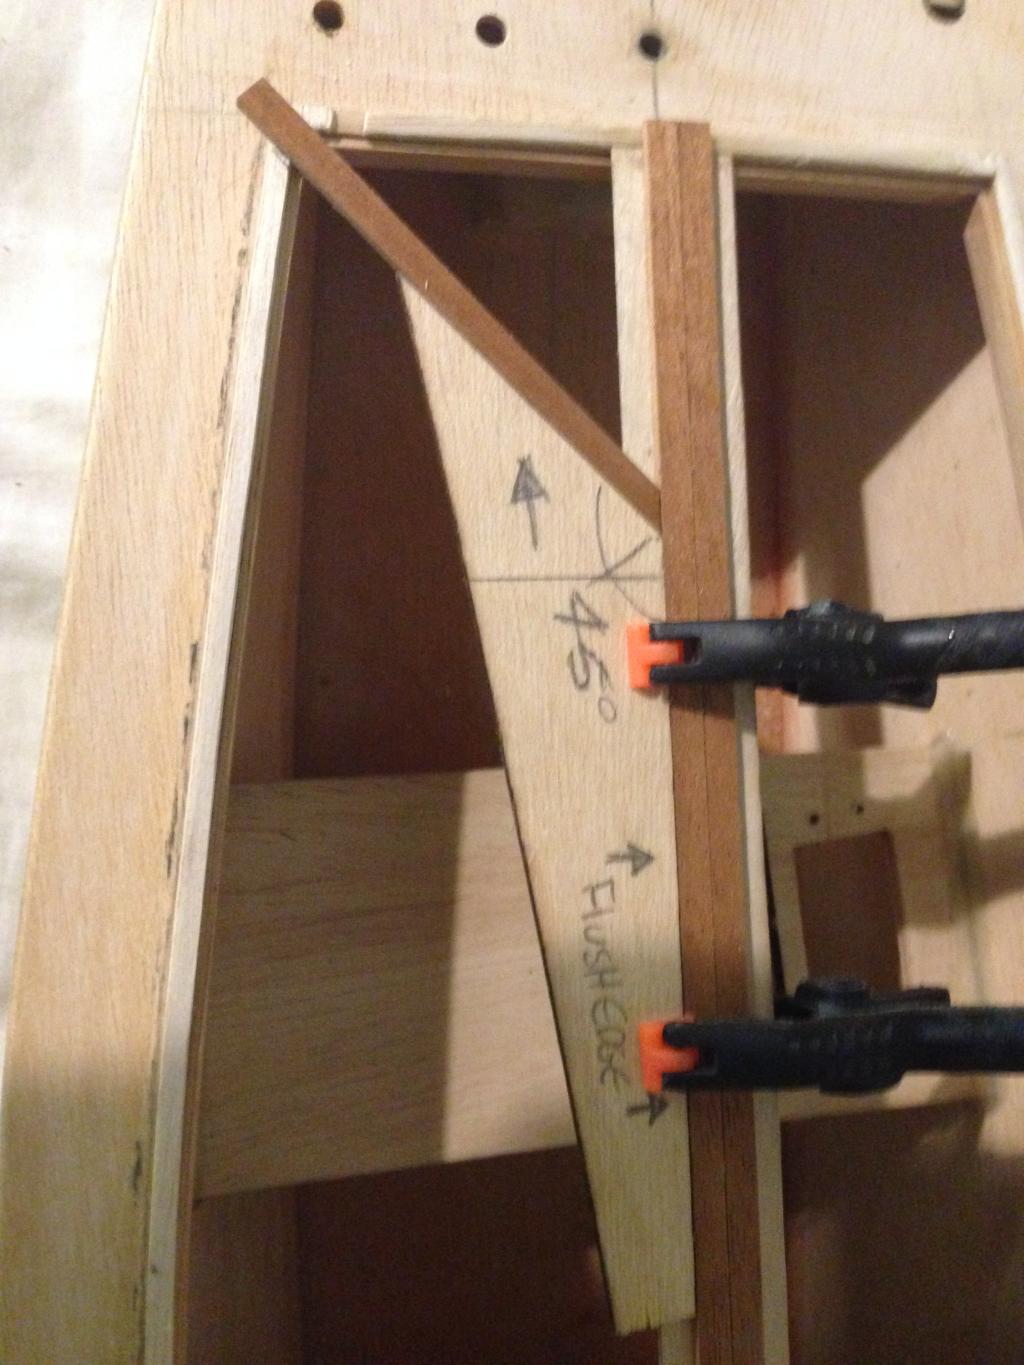
_________________
I'm Not Anti-Social, I'm Anti-Stupid.
| |
| | | | Roadrunner
Forum Overlord
Posts : 1708
Join date : 2011-06-10
| | Subject: Re: Wee Nip Build Wed Feb 25, 2015 3:56 am | |
| Well this is the result for 2 hours work, given up for the night to let the glue set before i hammer the rest of it tomorrow. 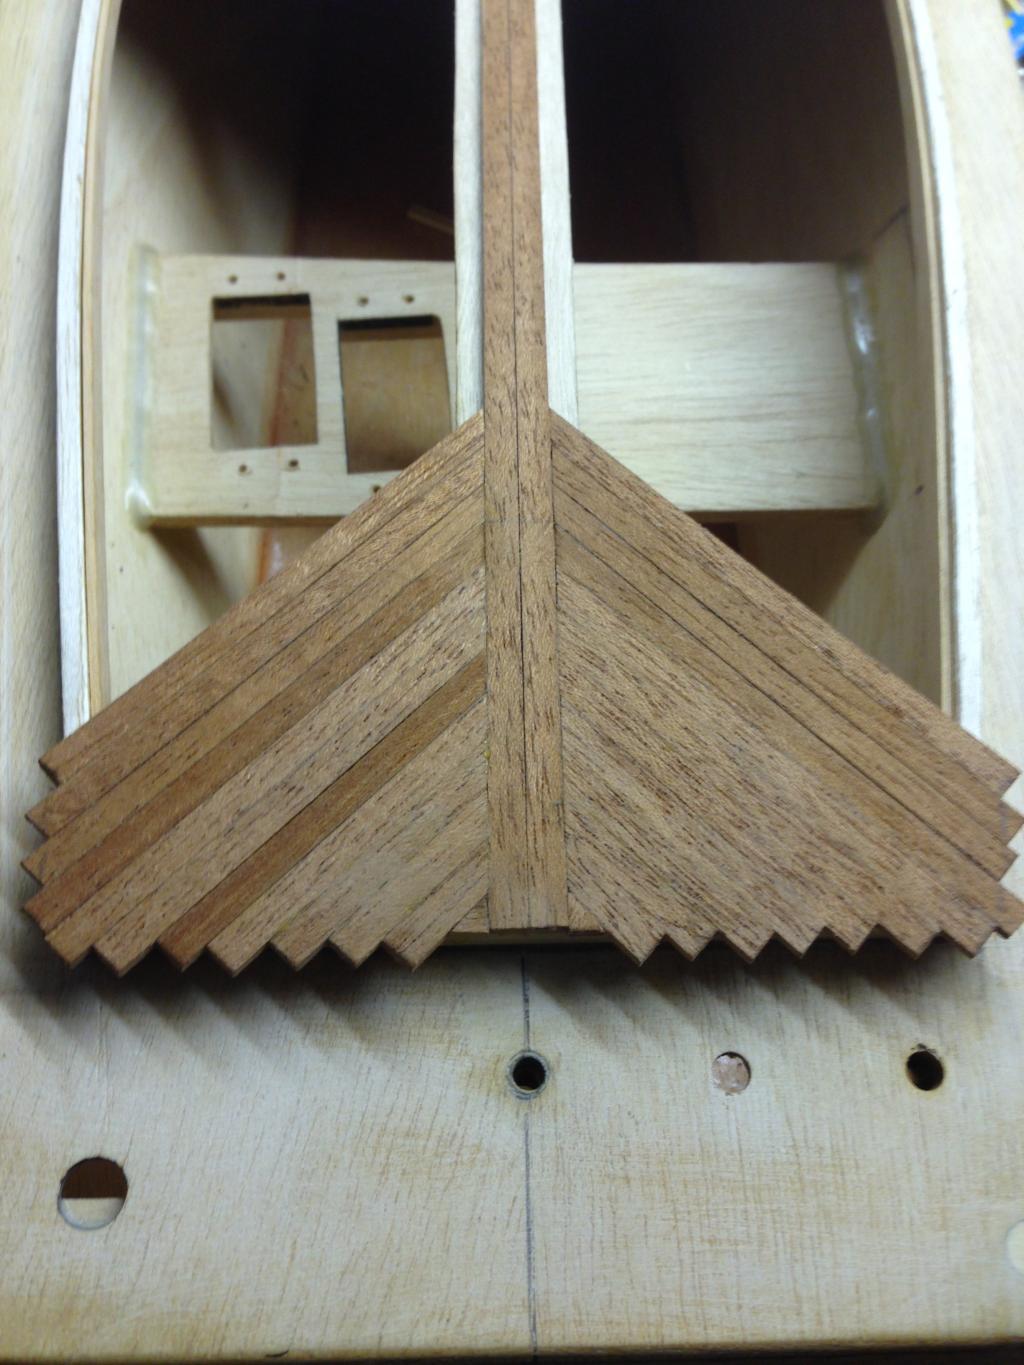
_________________
I'm Not Anti-Social, I'm Anti-Stupid.
| |
| | | | Roadrunner
Forum Overlord
Posts : 1708
Join date : 2011-06-10
| | Subject: Re: Wee Nip Build Wed Feb 25, 2015 6:21 pm | |
| Half the hatch done me lovies planking 
_________________
I'm Not Anti-Social, I'm Anti-Stupid.
| |
| | | | Roadrunner
Forum Overlord
Posts : 1708
Join date : 2011-06-10
| | Subject: Re: Wee Nip Build Wed Feb 25, 2015 9:09 pm | |
| Hatch finished. (almost!) 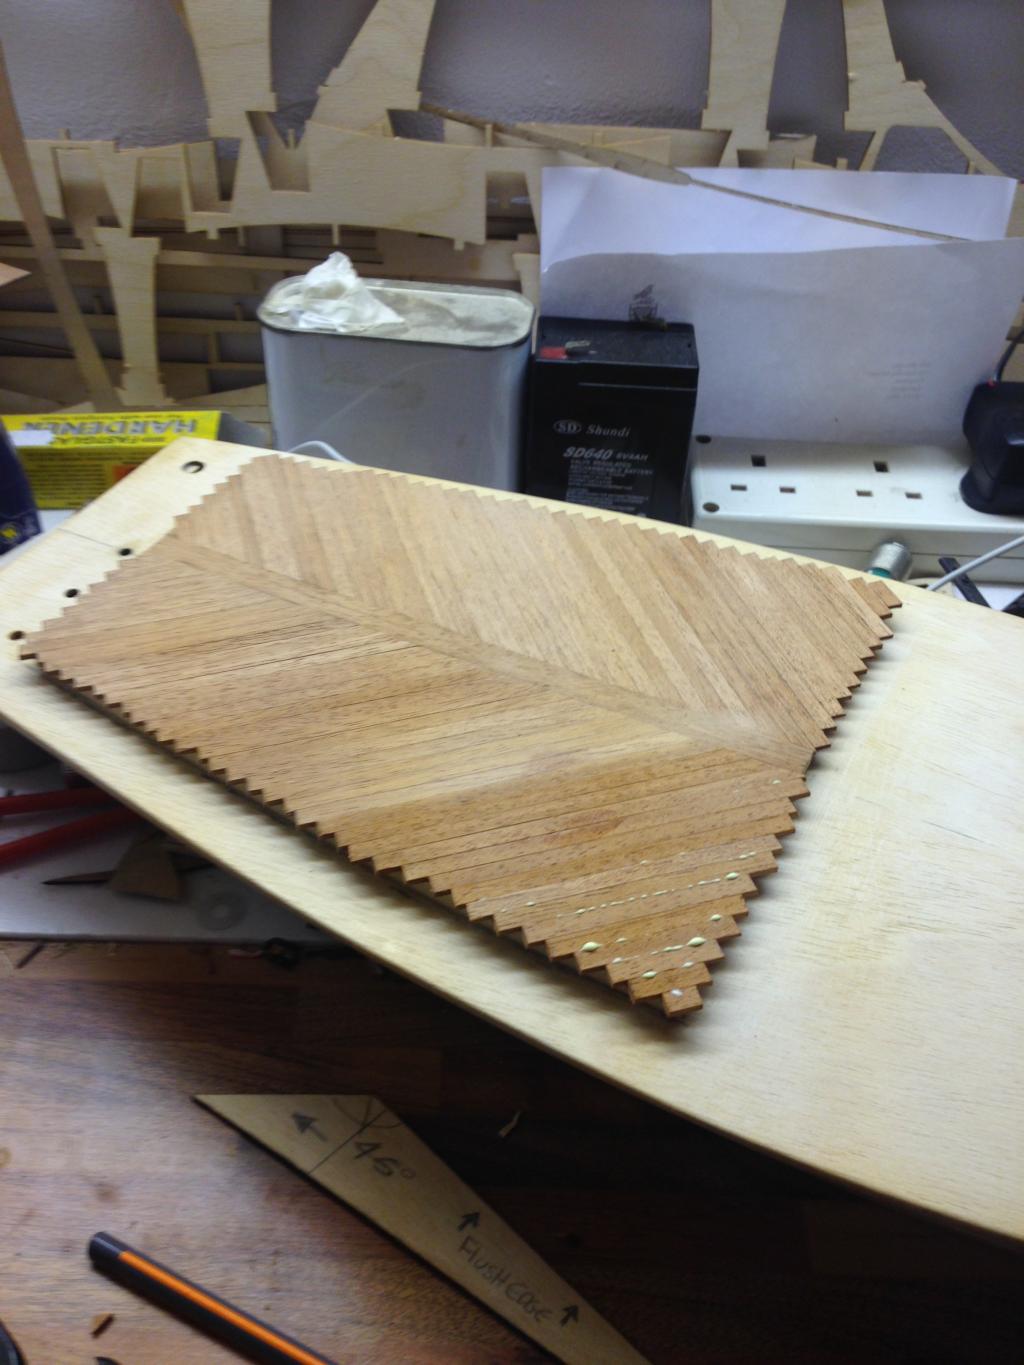
_________________
I'm Not Anti-Social, I'm Anti-Stupid.
| |
| | | | davidjt
Forum Sponsor

Posts : 534
Join date : 2013-01-08
Age : 71
Location : n wales coast
| | Subject: Re: Wee Nip Build Fri Feb 27, 2015 3:00 pm | |
| looking good  i was going to build this years ago, never got round to getting the plans though nice boat design. david | |
| | | | Roadrunner
Forum Overlord
Posts : 1708
Join date : 2011-06-10
| | Subject: Re: Wee Nip Build Fri Feb 27, 2015 10:24 pm | |
|
_________________
I'm Not Anti-Social, I'm Anti-Stupid.
| |
| | | | Roadrunner
Forum Overlord
Posts : 1708
Join date : 2011-06-10
| | Subject: Re: Wee Nip Build Fri Feb 27, 2015 10:32 pm | |
| - davidjt wrote:
- looking good i was going to build this years ago, never got round to getting the plans though nice boat design.
david you can pick up the plan and wood kit from Trapet for around £40 if i remember, the ply is not really hard enough it marks extremely easily, for the price its fine, although if buying the wood pack I would strongly recommend a dope coat to harden the surfaces. with all the other materials including the mast (carbon fiber) and the sails material, tape from Nylets, 2 servos ( 1 a 15kg heavy duty servo) you overall cost for the build works out around £150 finished. this ones a bit over that price with the planked deck, you can do it cheaper if you want, i tend to not worry when it comes to model cost, i count the pennys and budget, but always aim for a look or style and spend accordingly.
_________________
I'm Not Anti-Social, I'm Anti-Stupid.
| |
| | | | Roadrunner
Forum Overlord
Posts : 1708
Join date : 2011-06-10
| | Subject: Re: Wee Nip Build Tue Mar 03, 2015 10:43 pm | |
|
_________________
I'm Not Anti-Social, I'm Anti-Stupid.
| |
| | | | Roadrunner
Forum Overlord
Posts : 1708
Join date : 2011-06-10
| | Subject: Re: Wee Nip Build Mon Mar 09, 2015 3:14 pm | |
| Planking all finished now to spend the next week sanding and finishing for the varnish coats over the weekend. Starting with 240 grit to 380, 600 then 1000 for the varnish surface. 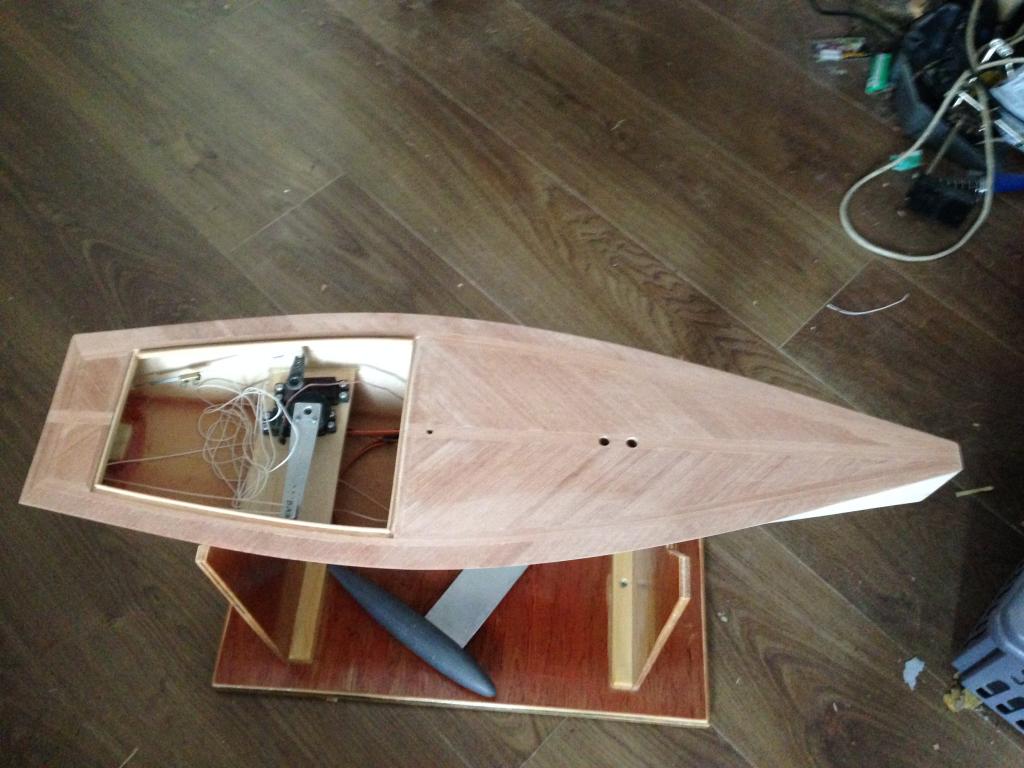
_________________
I'm Not Anti-Social, I'm Anti-Stupid.
| |
| | | | Tug--Kenny
Lost But Never Forgotten R.I.P

Posts : 284
Join date : 2011-06-11
Age : 82
Location : Newport, South Wales,UK
| | Subject: Re: Wee Nip Build Wed Mar 11, 2015 10:57 am | |
| A very nice job you've made of that planking. A pleasure to watch the progress.
Well done indeed.
Cheers
ken | |
| | | | Roadrunner
Forum Overlord
Posts : 1708
Join date : 2011-06-10
| | Subject: Re: Wee Nip Build Wed Mar 11, 2015 1:52 pm | |
| Thanks for that Ken, nice to see you bud, hows life?
_________________
I'm Not Anti-Social, I'm Anti-Stupid.
| |
| | | | Tug--Kenny
Lost But Never Forgotten R.I.P
Posts : 284
Join date : 2011-06-11
Age : 82
Location : Newport, South Wales,UK
| | Subject: Re: Wee Nip Build Wed Mar 11, 2015 8:52 pm | |
| Life is still good at the moment. Signs of age creeping in but I do like to keep busy. I hope that you and the family are doing well. I am at present attempting a scratch build of the Seabex one. To me it epitomises everything that can be added to a model boat . That's why I appreciate others workmanship as I'm still learning, even after 22 boats. I shall be planking soon so how it's done is always useful info. Can't wait to see your next varnish job as I could never achieve the finish that you get. Cheers for now ken | |
| | | | Roadrunner
Forum Overlord
Posts : 1708
Join date : 2011-06-10
| | Subject: Re: Wee Nip Build Wed Mar 11, 2015 9:34 pm | |
| Thats quite a model to undertake Ken, good luck,
If your going for a planked hull, i would suggest double diagonal planking, 2 layers, first diagonal set one direction (usually a substandard wood like balsa)2nd final 'skin' ( a more dense wood, like lime or cedar) opposite direction more like cross hatching, The reason i suggest diagonal planking it allows for easier curvatures of planks through the boats shape and the 2nd layer allows for overall strength, then once all done, glass the inside and dope coat the outside. this keeps the hull reasonably light weight, but very strong.
_________________
I'm Not Anti-Social, I'm Anti-Stupid.
| |
| | | | Tug--Kenny
Lost But Never Forgotten R.I.P
Posts : 284
Join date : 2011-06-11
Age : 82
Location : Newport, South Wales,UK
| | Subject: Re: Wee Nip Build Fri Mar 13, 2015 8:03 pm | |
| Thank you for the help. I'm not quite at this stage yet, but hope to be soon. You're right, it's quite a monster and I really am enjoying working out the problems.
As an aside, I've just noticed the Adverts running along the top of the page. Mine today was showing Ebay and it recommended the scale people for my latest build that I researched last night. I feel as if I'm being followed all over the Web. Anybody else notice anything like this before.
Cheers
ken | |
| | | | Guest
Guest
| | Subject: Re: Wee Nip Build Fri Mar 13, 2015 11:38 pm | |
| |
| | | | Roadrunner
Forum Overlord
Posts : 1708
Join date : 2011-06-10
| | Subject: Re: Wee Nip Build Sun Apr 05, 2015 1:55 pm | |
|
_________________
I'm Not Anti-Social, I'm Anti-Stupid.
| |
| | | | Guest
Guest
| | Subject: Re: Wee Nip Build Sun Apr 05, 2015 2:27 pm | |
| |
| | | | emrys
Able Seaman

Posts : 35
Join date : 2015-02-18
| | Subject: Re: Wee Nip Build Mon Apr 20, 2015 10:37 am | |
| | |
| | | | Guest
Guest
| | Subject: Re: Wee Nip Build Mon Apr 20, 2015 1:19 pm | |
| beautiful beautiful work.................you are a true master of timber Aron............the finish is superb |
| | | | Tug--Kenny
Lost But Never Forgotten R.I.P
Posts : 284
Join date : 2011-06-11
Age : 82
Location : Newport, South Wales,UK
| | Subject: Re: Wee Nip Build Mon Apr 20, 2015 8:07 pm | |
| Gorgeous effect. A lot of work has gone into this. Well done  ken | |
| | | | Roadrunner
Forum Overlord
Posts : 1708
Join date : 2011-06-10
| | Subject: Re: Wee Nip Build Tue Apr 28, 2015 11:42 pm | |
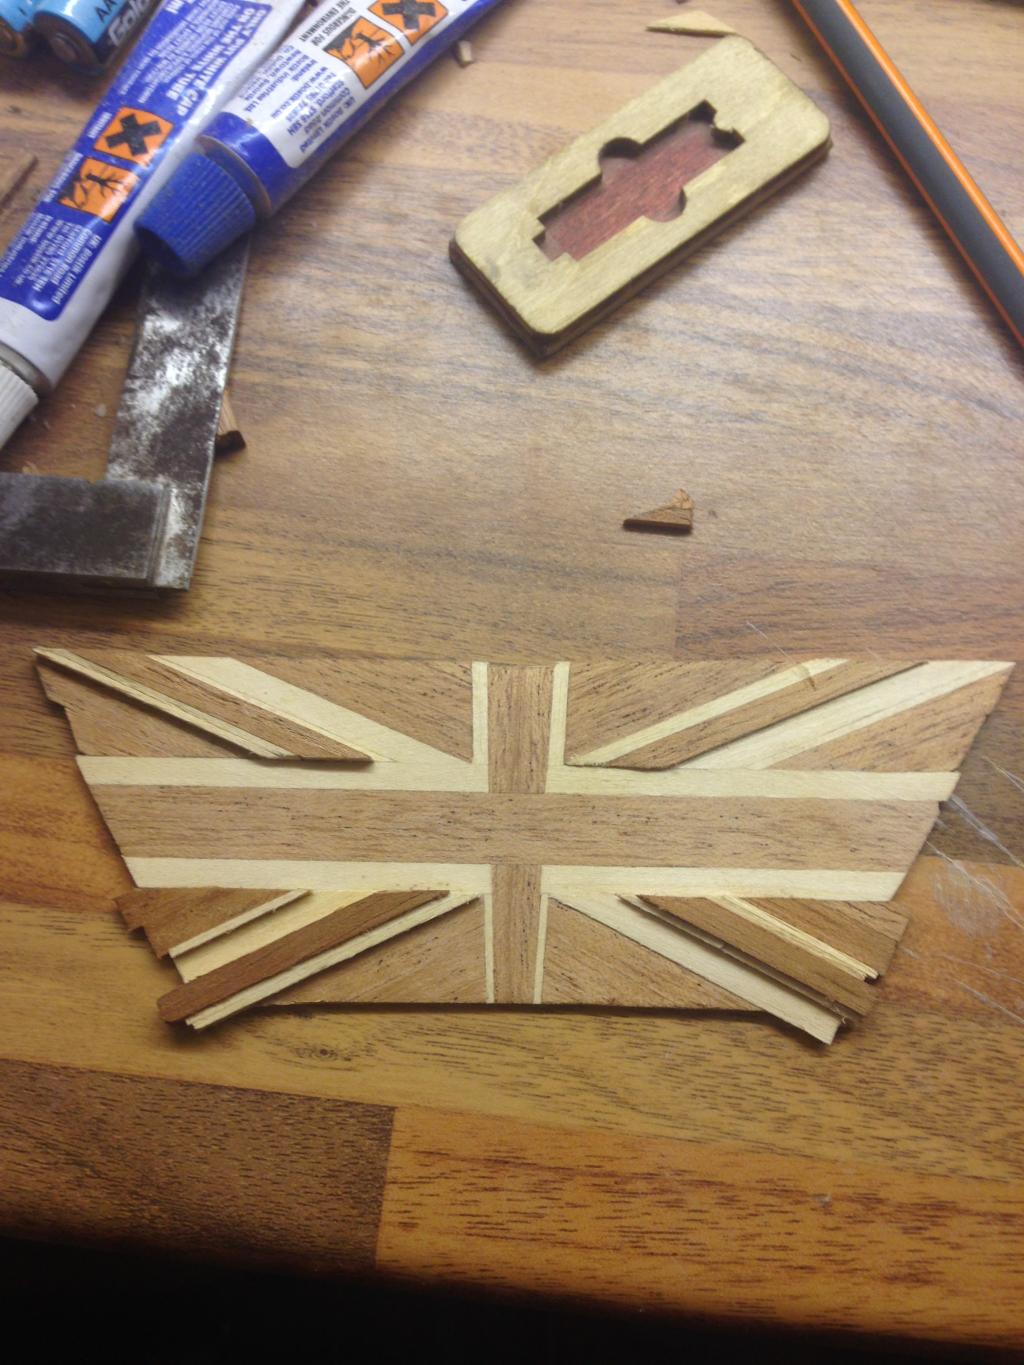
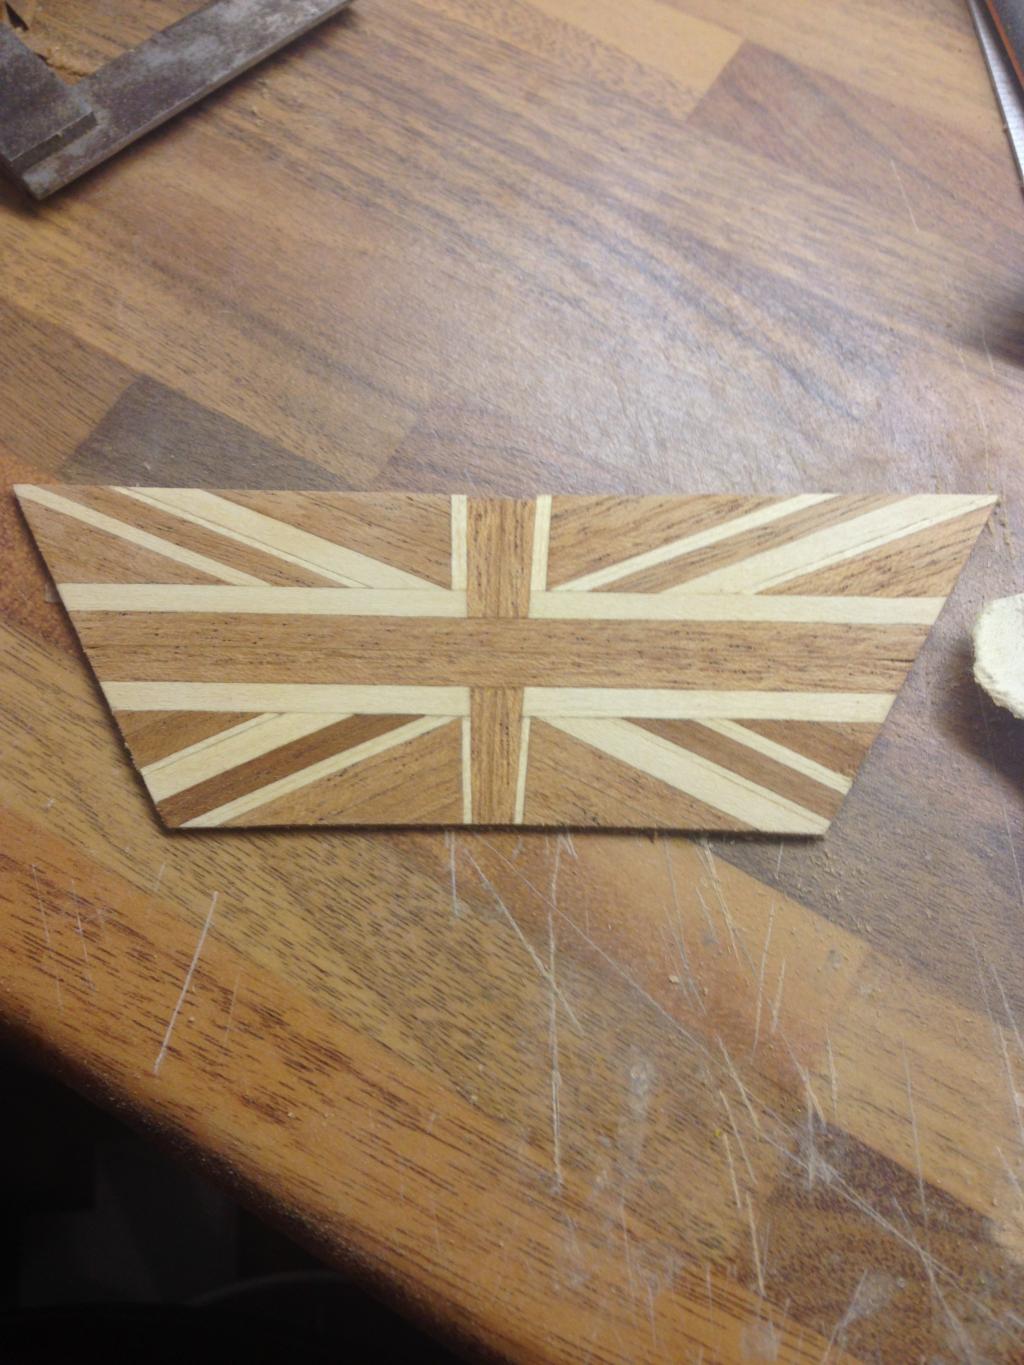
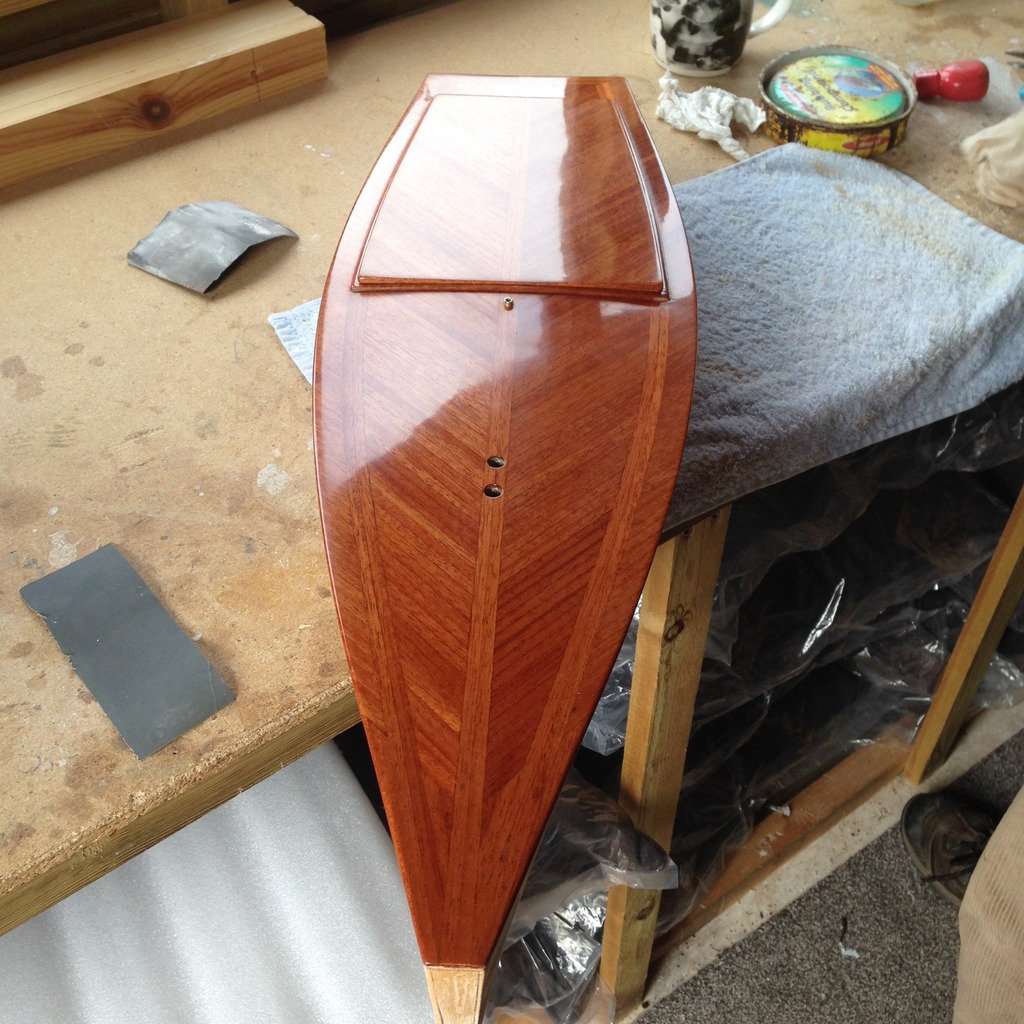
| Thanks guys for all your kind comments, work is progressing kinda slow given my illness at present but progress is coming none the less, over the past 3 weeks the hull has been painted and set aside for 2 weeks in the sun to bake, now allowing for final rubdown and polishing, also the hatch has been finished, a final set of stainless steel nuts and bolts to bolt down the hatch sitting in a brass sleeve. Sadly the hatch started to warp badly, simply due to there being no real structure on its underside, i knew this was a risk when i started the hatch but given the limited space with the coving to water tight the hull, as well as the hight of the servos, arms and other parts inside there was no real space to create a hatch form to keep its shape, so now it rely's purely on the 4 hatch screws to keep its shape its not all bad but when the hatch is off and in the sun it starts to move around. The hatch nuts are secured into corner ply cut outs which are glued to the underside of the coving corners. Although not what I was aiming for its still a tidy finish and dose not really ruin the overall look.   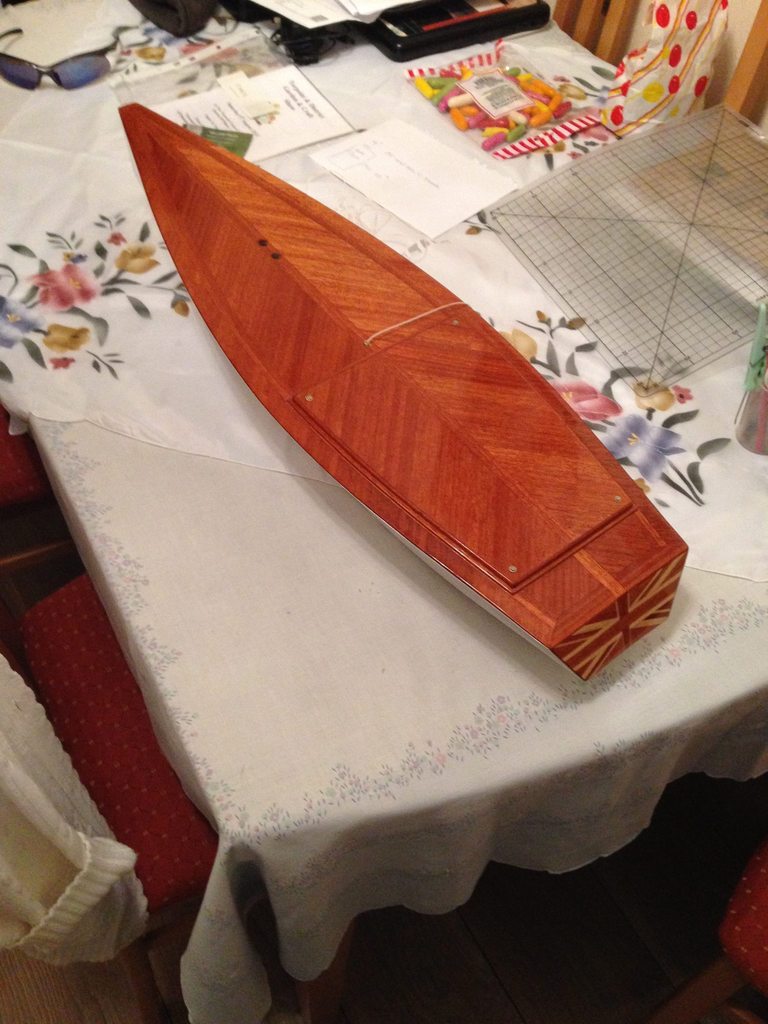 only remains jobs on this project is finishing off the keel shaping, and paint, a rubber nose bumper, rigging up and final polishing of the boat. I'm aiming to see if i can get a sail this weekend, but thats subject to the getting the keel painted. RR
_________________
I'm Not Anti-Social, I'm Anti-Stupid.
| |
| | | | Guest
Guest
| | Subject: Re: Wee Nip Build Wed Apr 29, 2015 1:07 am | |
| |
| | | | Roadrunner
Forum Overlord
Posts : 1708
Join date : 2011-06-10
| | Subject: Re: Wee Nip Build Wed Apr 29, 2015 11:28 pm | |
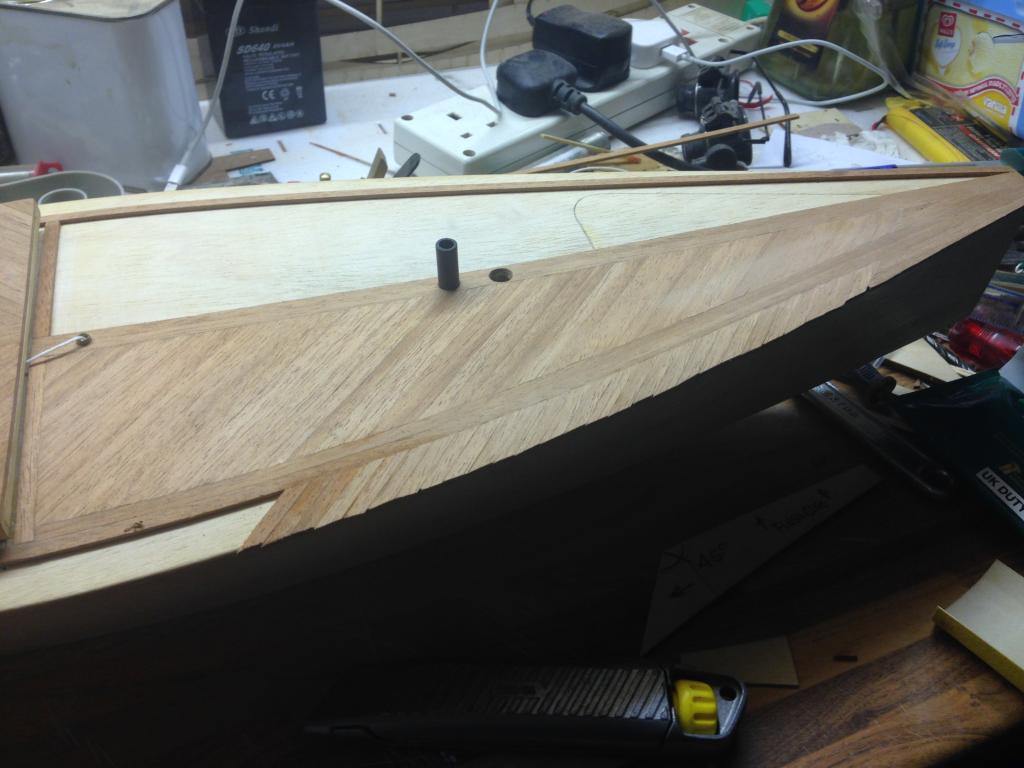
| Today works progressing at more of a pace, simply as the finishing line is in sight now, not much left to do to get this boat ready for a sea trial. So today I've sprayed up the keel and bulb along with the mast and boom knuckle, those are left over night in the airing cupboard to harden off to be final fitted to the hull tomorrow, the battery tray has been mounted inside awaiting the battery tray, and other last electrical items to be fixed in place. Those were the smaller jobs, leaving me only to create a bow bumper, final rub down of the hull and polish the boat, and rigging up the boat. But today i wanted to finish all the detailing on the deck. This involved a bit of lathe work, creating 2 brass 8 mm sleeve/guides for the mast holes, if some of you are wondering the wee nips have more then 1 mast positioning hole in there decks, the original kit provides you with 5, 1/2" spacing options, however after much trial with other wee nips from the club we have found the first 2 forward holes provide the best positions of the sail maximising speed as well as reducing duck diving, as you can see from my deck i have opted to only leave the first 2 mast holes open and these hole need tidying up. 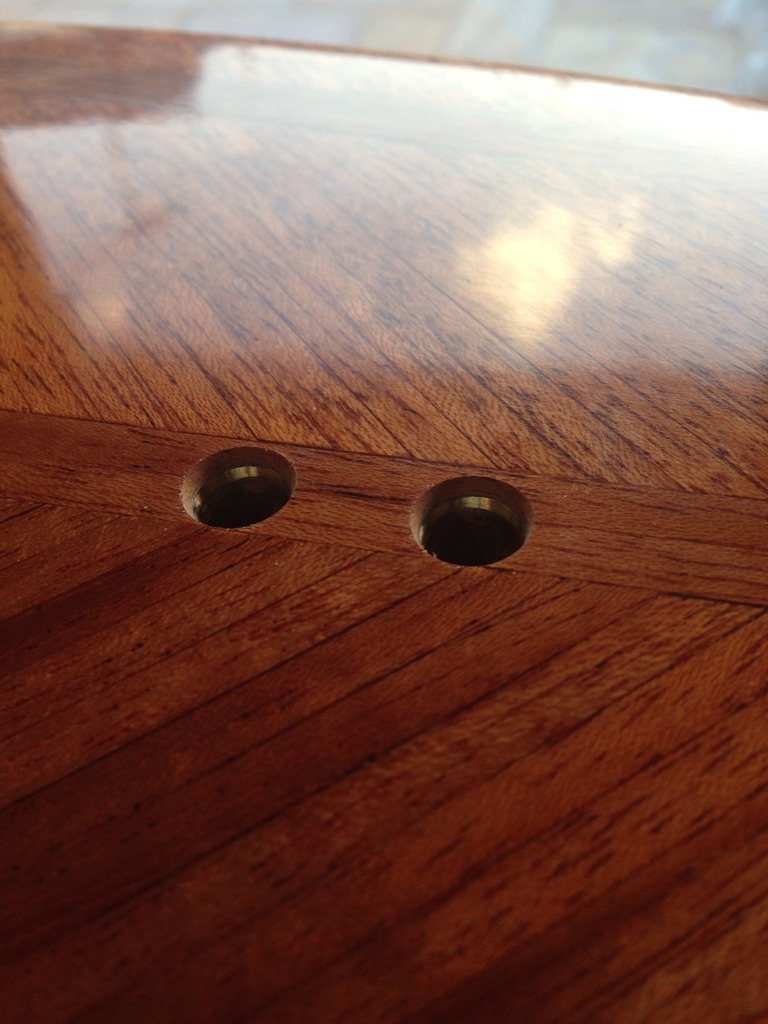 So after a couple of house messing up i have finally created 2x 8mm bras sleeves, and reamed out the holes to take the brass work, However to created the brass sleeves they had to be cut a little longer (other wise the chuck wouldn't have held the material) so they required trimming down a tad with a file, reason for this is i cant cut 2mm with out the material warping as its so thin at this stage, and the sleeve has to be 2mm as that the thickness of the deck what you don;t see easily is the brass sleeve that supports the mast and water proofs the hull. 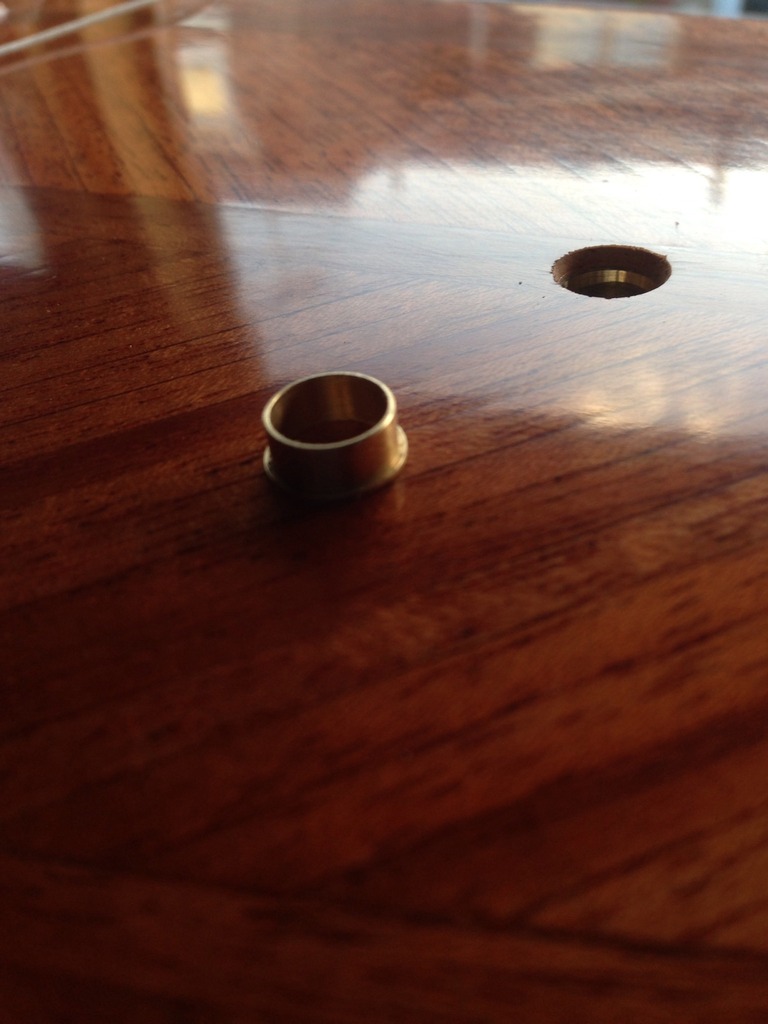 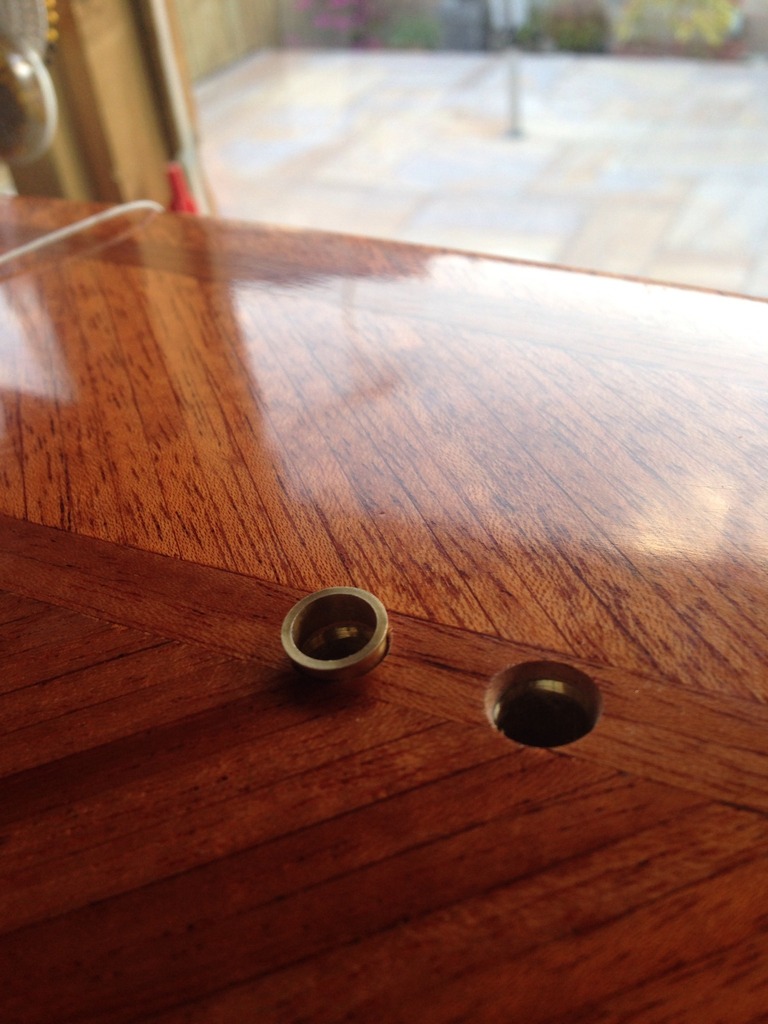  Next job after dry fitting to make sure its all correct, just epoxy them into place, not only making the area look pretty but also seals the woods edge now the varnish has been removed. 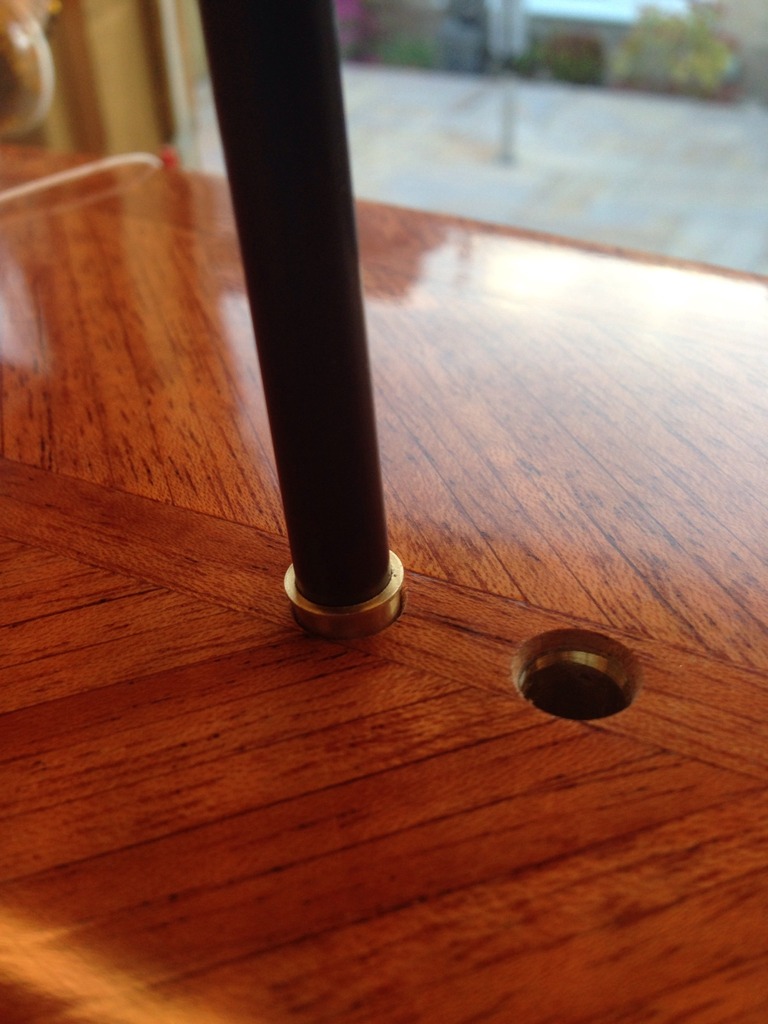 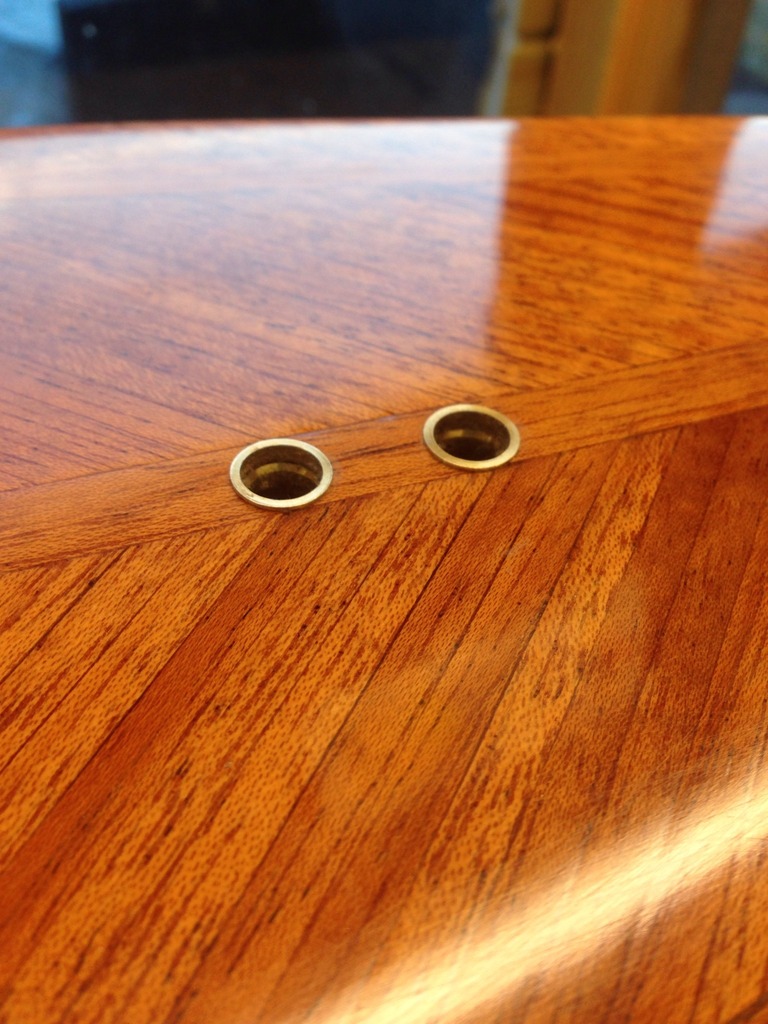
_________________
I'm Not Anti-Social, I'm Anti-Stupid.
| |
| | | | Roadrunner
Forum Overlord
Posts : 1708
Join date : 2011-06-10
| | Subject: Re: Wee Nip Build Fri May 01, 2015 8:29 pm | |
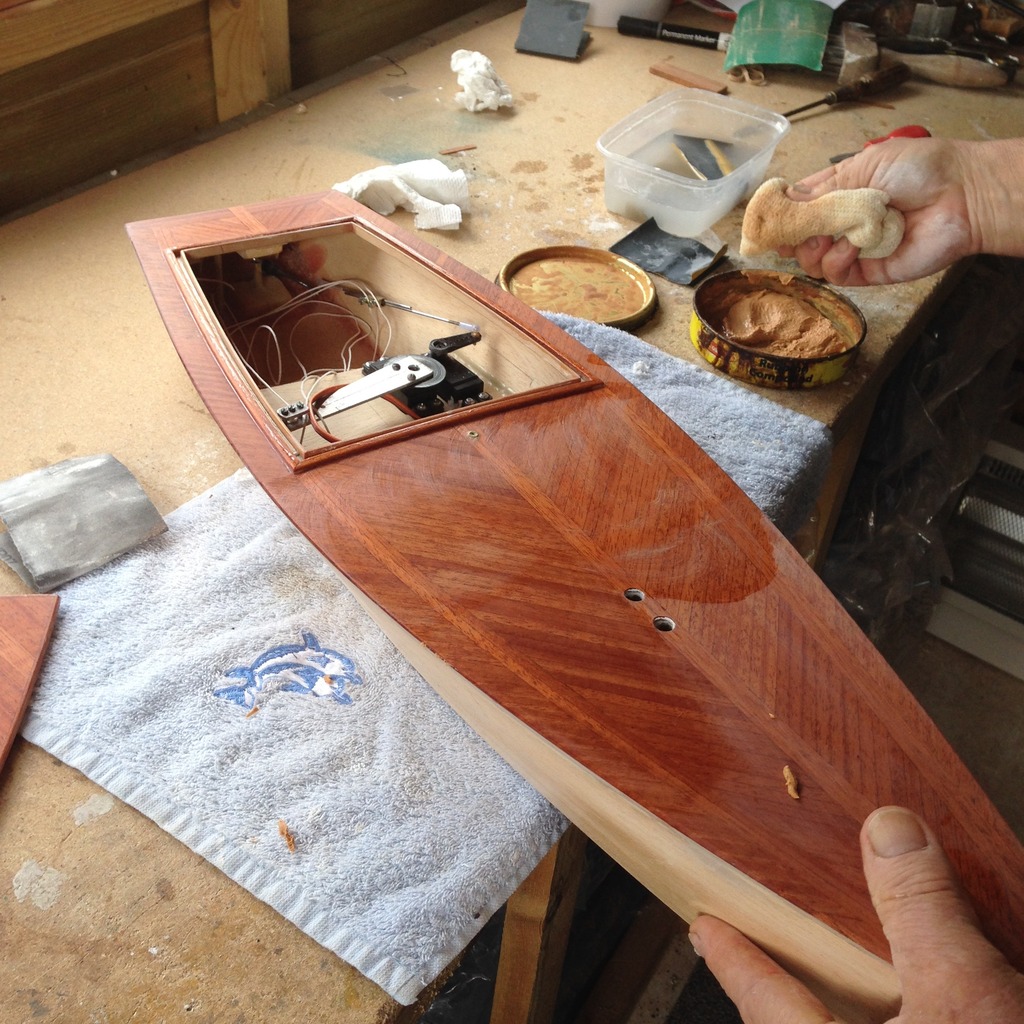
| Almost there, tomorrow I'm 100% sure it will be finished. (hopefully) Silicon bow piece is still firming up in the mould, this morning it was still a little soft this afternoon is almost rock solid, so i expect by tomorrow afternoon I'll pop it from the mould and see what we have. Today I've rigged up the boat, and set in the electrics although not neatly yet, as i still have to fix a glitch in the battery harness, but you get the rough idea where its all sitting, I've opted to run this on 27mhz rather then 2.4 simply as everyone is using 2.4 and i have so many spare transmitter sets laying around its about time i used a few, i will however swap out the crystal to a split, or use channel 0/1 black. I've photographed the internal winch/pulley system that powers the boom, hopefully this will help people who need to work out how that works should they build there own later, the way the line and servo arm, pulley is set up you get to pull the boom hard to 0 degrees (although never needed to get to 0) and the boom will go hard to 90 degrees out. so full control on the sail with very little strain on the 15kg servo. If you need to adjust the sail there are methods to which i will explain in tomorrows post as tonight I'm creating the adjustment piece to fit to the boom allowing for adjustment when using other sail hole positions, you can of course use blocks if needs be to tension the line but that will be a last ''Tuning'' resort.   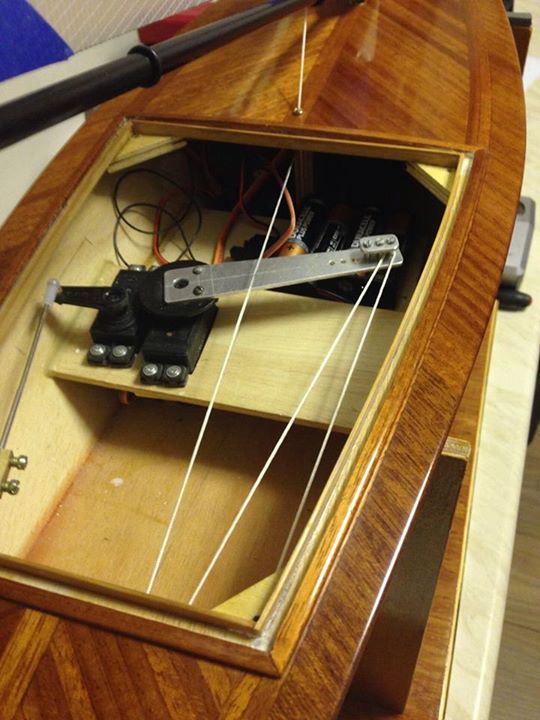 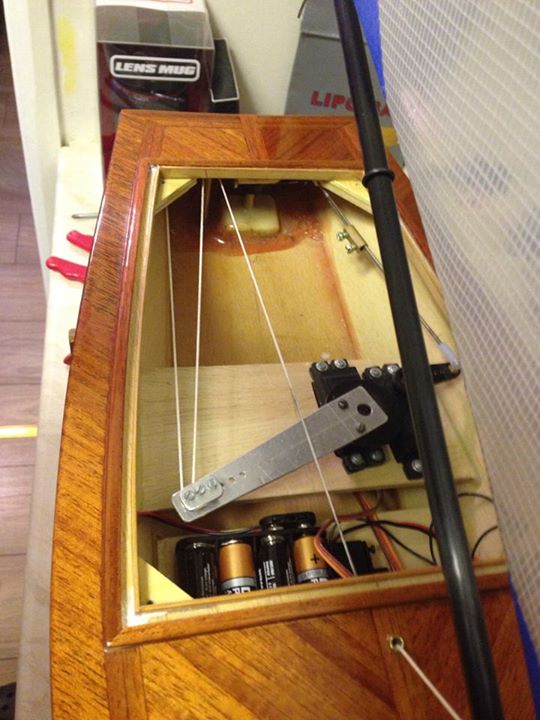 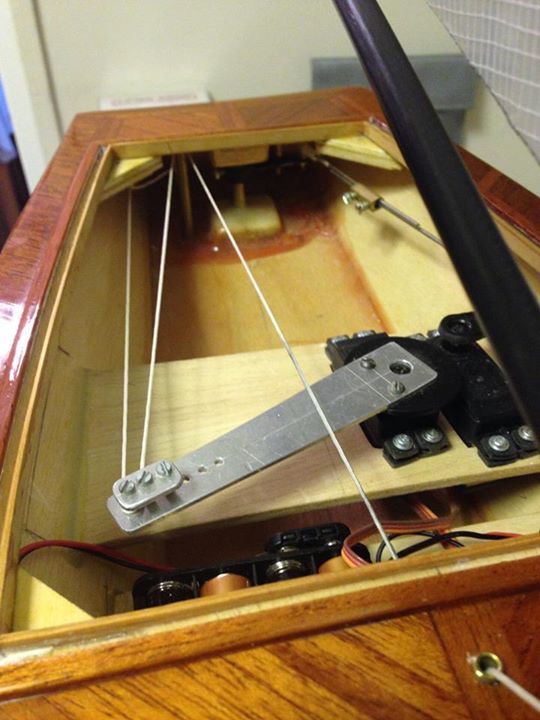
_________________
I'm Not Anti-Social, I'm Anti-Stupid.
| |
| | | | Roadrunner
Forum Overlord
Posts : 1708
Join date : 2011-06-10
| | Subject: Re: Wee Nip Build Sat May 02, 2015 3:54 pm | |
| End is here, almost the bulk to the boat is now done and ready for a sail, but there are some other adjustments i'm making to the boat, one being enforcing the hatch to stop it warping and eventually cracking the epoxy finish. this just involved making up and internal frame and expoxing it place to stiffen the hatch. nothing special. Today I popped the silicone nose out of the mould, turned out quite well and just stuck it to the bow using some flexibond super cyno.  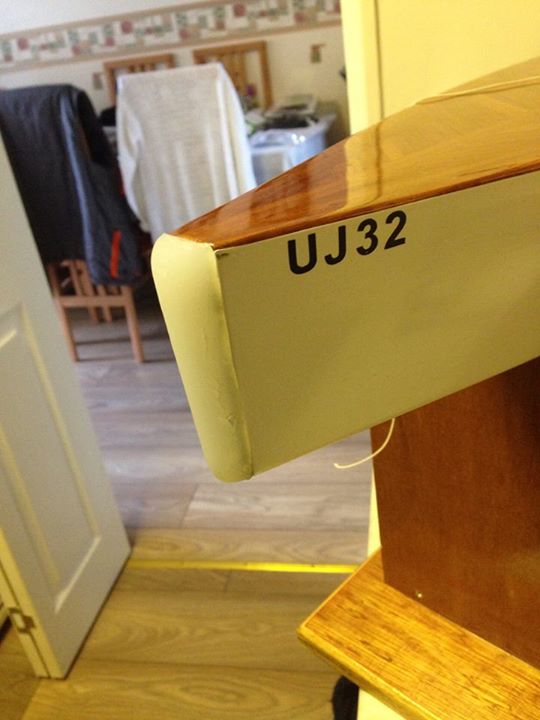 Next post is all about the rig setup its not overly complicated, however the plans do not help everyone decipher how it all works or how it should work.
_________________
I'm Not Anti-Social, I'm Anti-Stupid.
| |
| | | | Roadrunner
Forum Overlord
Posts : 1708
Join date : 2011-06-10
| | Subject: Re: Wee Nip Build Sat May 02, 2015 4:27 pm | |
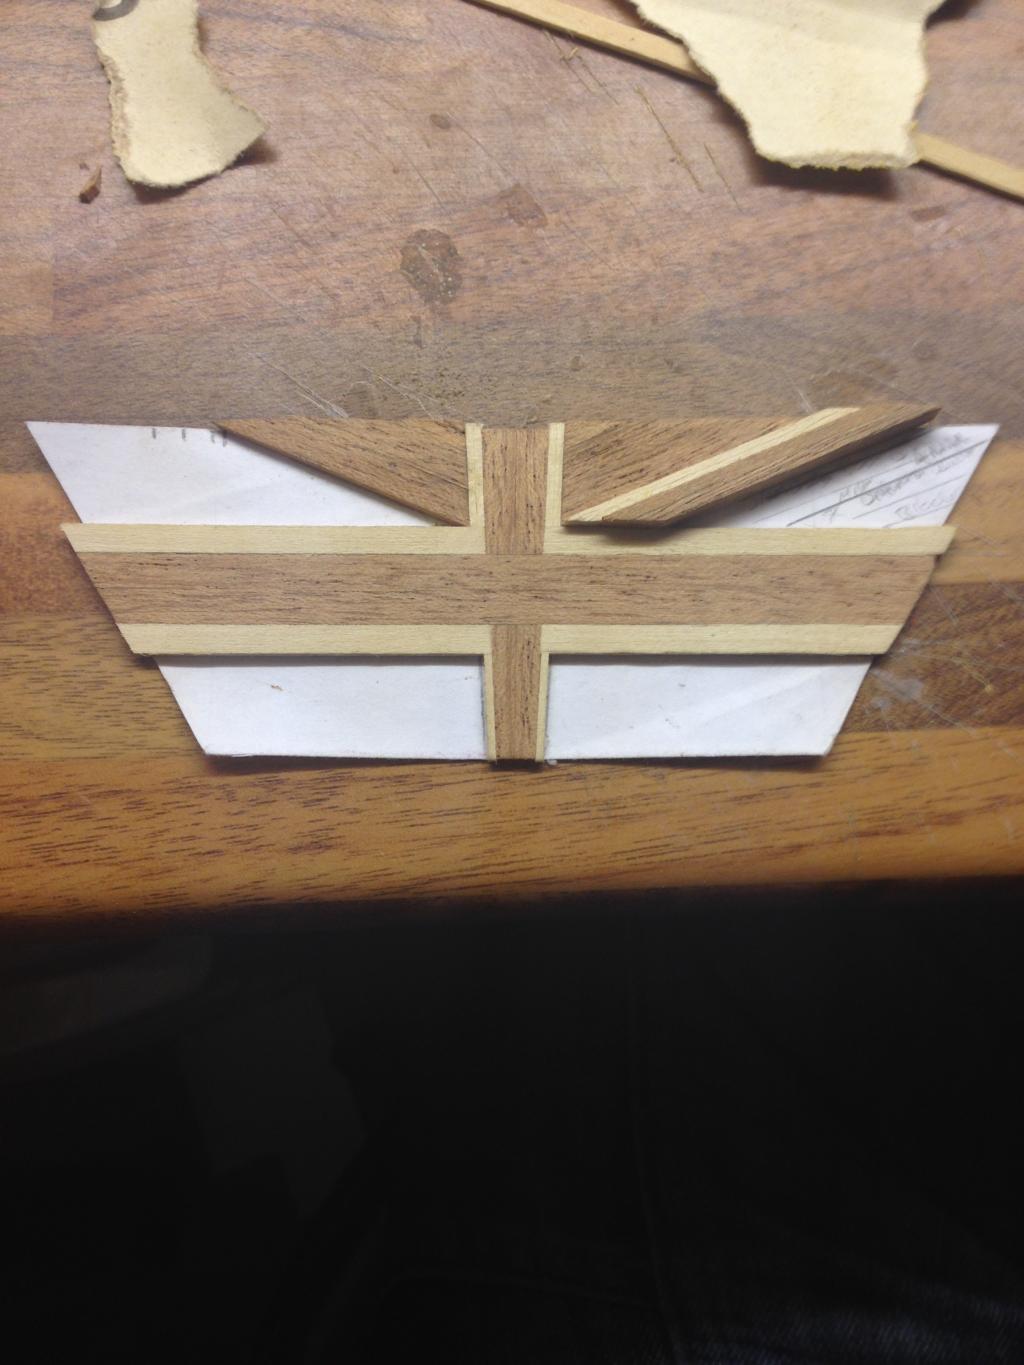
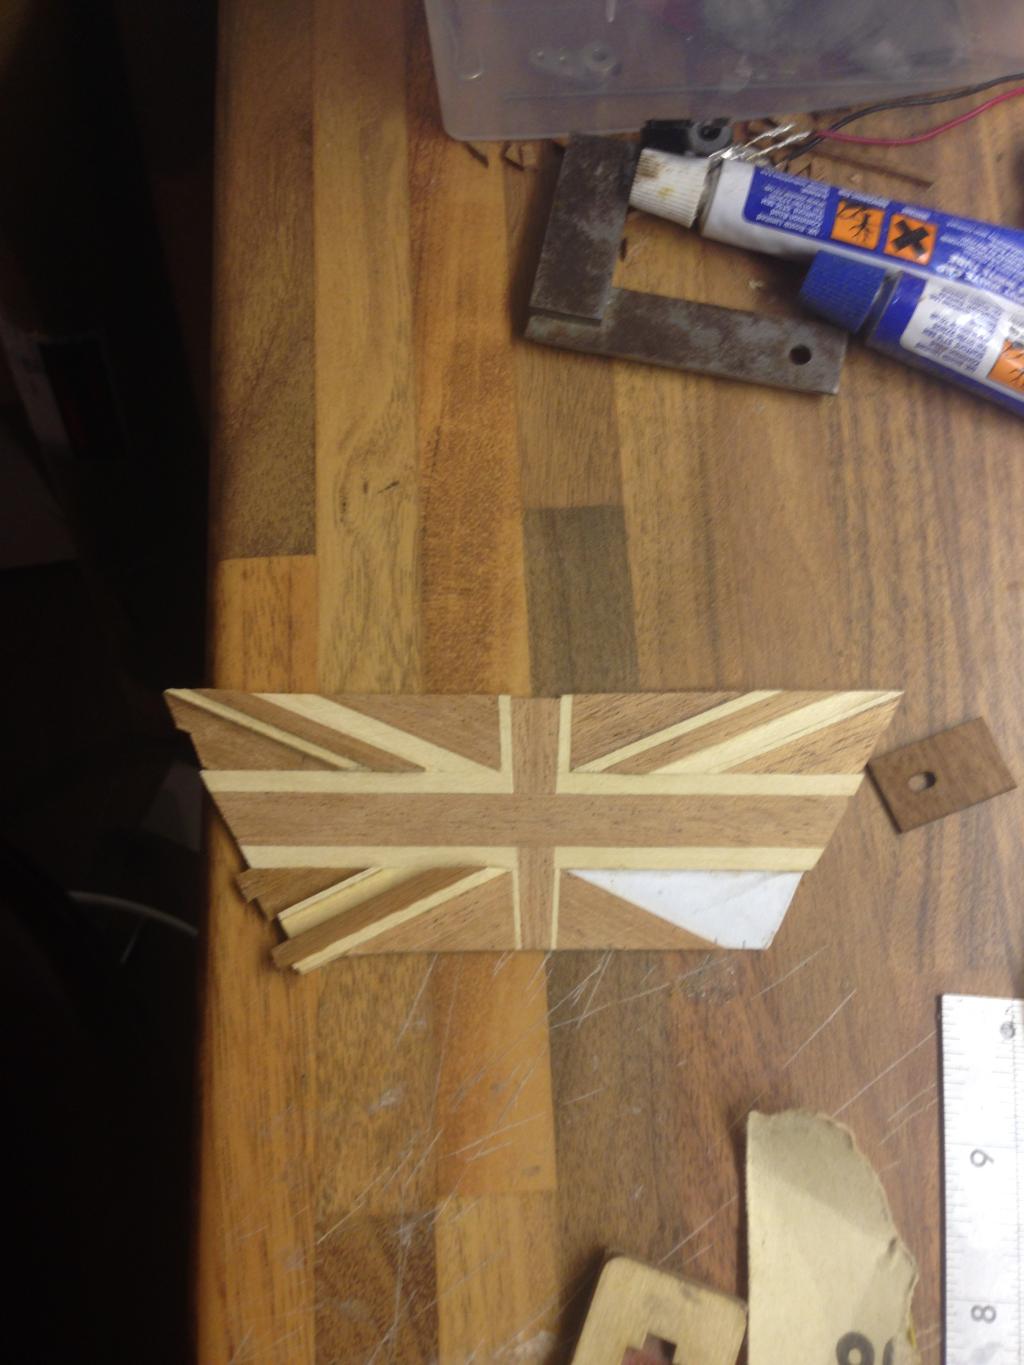
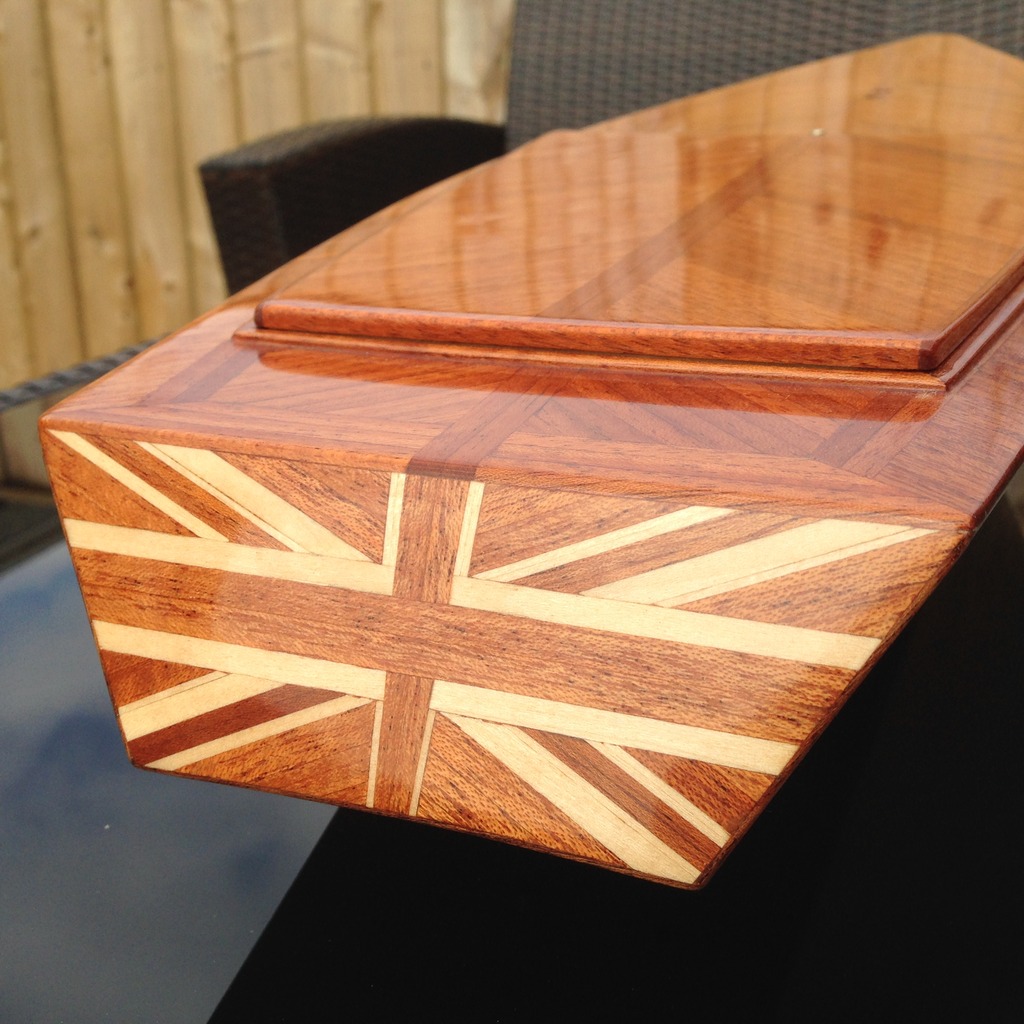
| This post is all about the rig. first up you have to create a method to attach the line to the boom. In this case i have bent a piece of 1.5mm steel into the following shape.. (the photo is of a brass one but i ended up re-making it using steel as the brass was to soft to hold the line and just flexed eventually it would snap.) 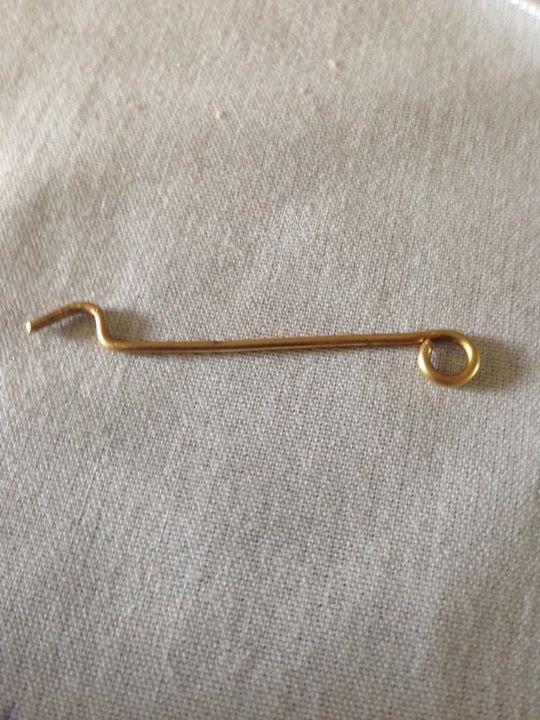 Then at the base of the boom i have drilled 3 holes to mount the metal arm into and allow forward and backward adjustment ( this is for when i move the mast to a different position in the deck) this keeps the line taught to the internal setup inside mainly but can be used for a minor adjustment to taught the line if needs be. The boom hole positions are dictated by your own servo setup, armature, pulley systems you opt to use so please don't ask for the distances from fixed points as every boat is different. The easiest way to find those hole points is using this method to secure your line is to use a cable tie and hold the line to the boom and play with your controller and see what throws you get adjust the cable tie up and down the boom until u find the correct amount of throw for the boom and then you can make up positions to make you fixed point(s). Using the hole and some rubber O rings you an secure the metal arm into place on the boom, using fishing clips you can secure the line to the boom and allow for quick release and de-rigging with literally 1 click! 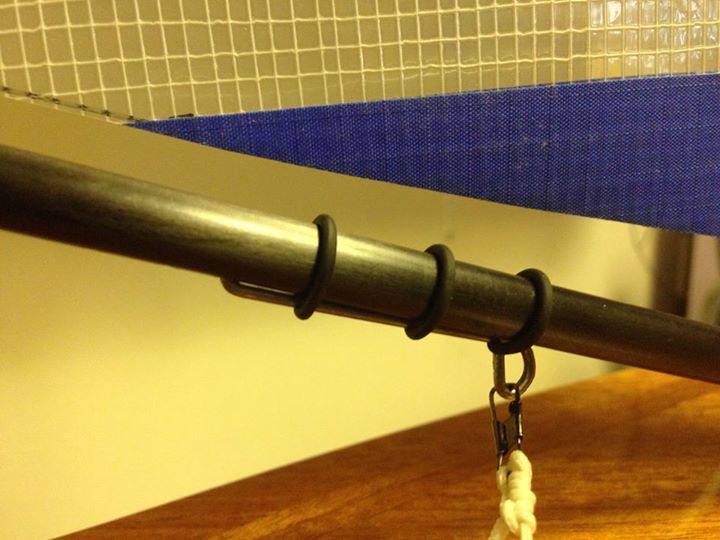 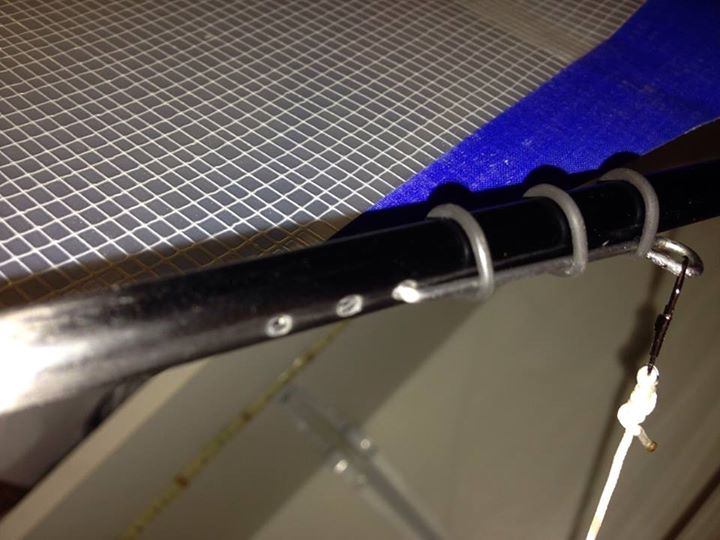 For adjusting the rig its self you need to use some form of pulley system in this case the photo explains it all and where i can made adjustments to tighten the line, although i have said use a pulley system there have been many occasions where a pulley system is not used to pull the line and direct servo pull is used. However if you intend to follow the plan then the photo below is the best way to see how it all works, but keep in mind that the line is not exact to the plans location!, all my line is kept inside the hull until the very end, the original plans shows the last length of line from the tackle block up out of the rear of the boat, across the deck to the mast and up to the boom, although this method works well, i opted to just keep the line inside the hull but at the cost of the hatch being quite flimsy as i have little room inside. Just to give you guys an example i have included (last 2 photos) my dads wee nip and his difference in rig setups, he did NOT follow the plan but ended up with similar results just lacking full adjust ability. My setup (almost as per plan) 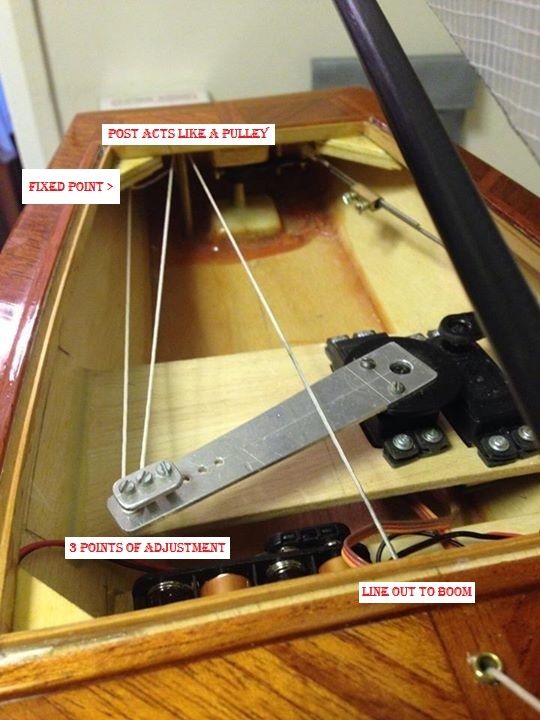 Dads Rig setup.. 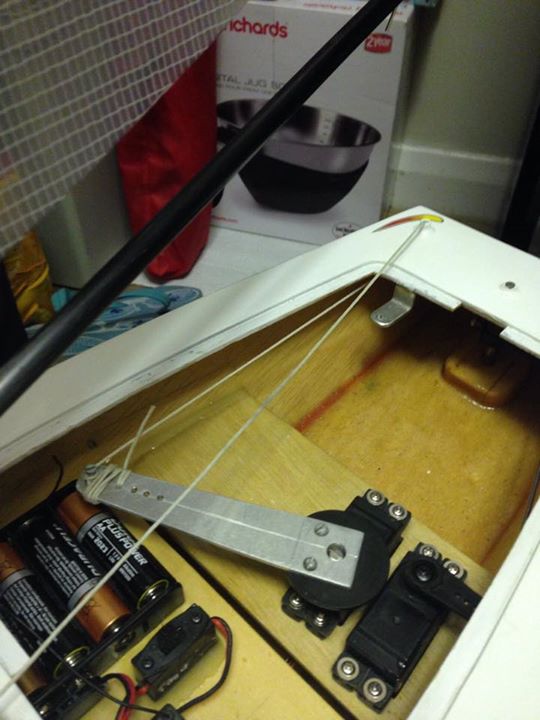 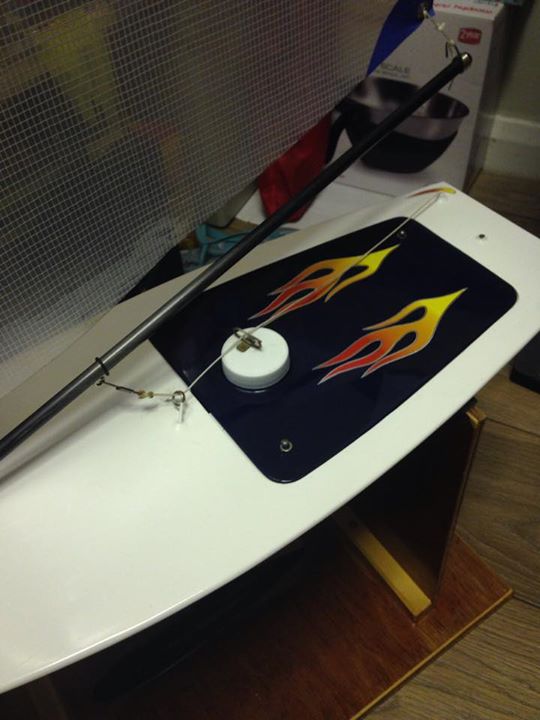 Apart from that the boats all finished, Named Sirena (after one of the water goodnesses) and her number well UJ32 is Union Jack and my club membership number lol! hope you guys enjoyed the build, any questions feel free to ask! Wish me luck for Sunday sail! and don't worry I'll post photos~! 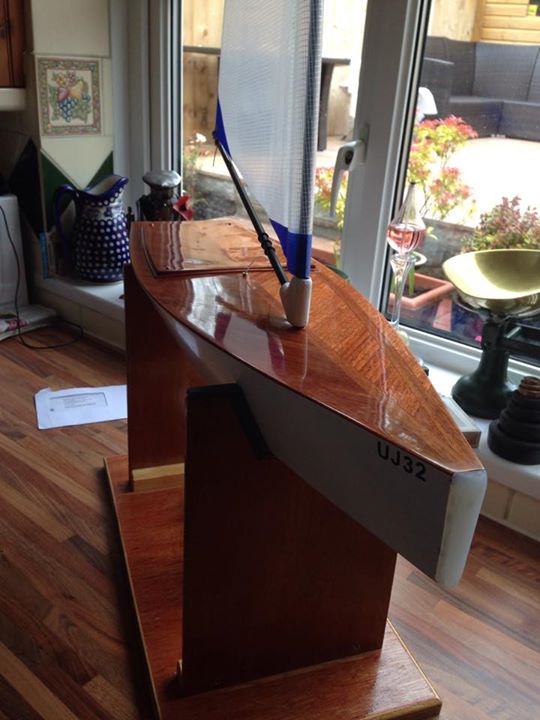 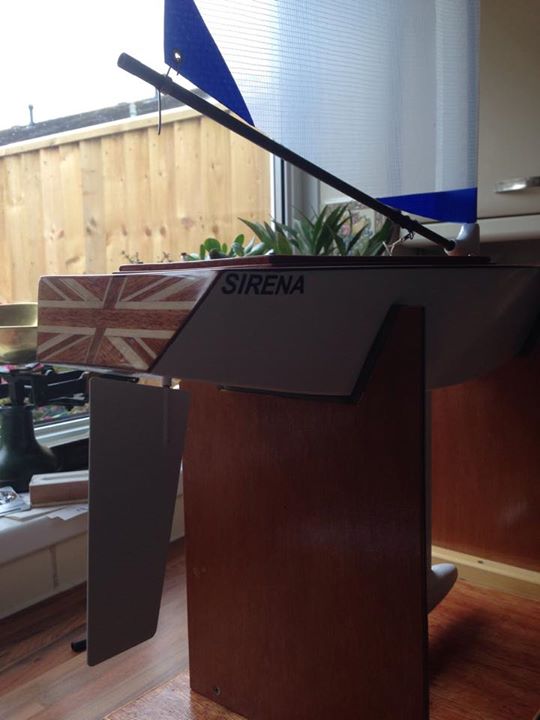 RR
_________________
I'm Not Anti-Social, I'm Anti-Stupid.
| |
| | | | Guest
Guest
| | Subject: Re: Wee Nip Build Sun May 03, 2015 9:47 am | |
| |
| | | | Roadrunner
Forum Overlord
Posts : 1708
Join date : 2011-06-10
| | Subject: Re: Wee Nip Build Sun May 03, 2015 7:13 pm | |
| And as promised one successful sail, wind was a lot stronger then recommended for these but she handled it well, no water ingress on the inside after a good 2 hours of chop. although i may need to look at the hatch coving once its dried out, i have a feeling one of the edges have swelled slightly, so a simple issue of addressing this later with some more sealer or vanish. Overall pleased with the outcome and looking forward to challenging the other club members on the course this year. 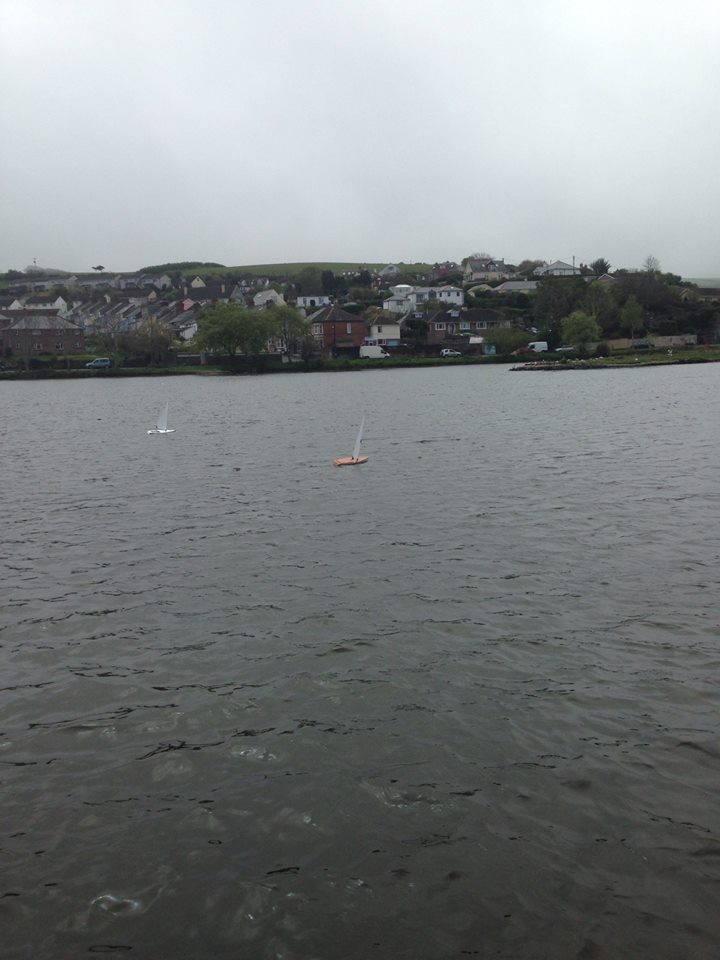 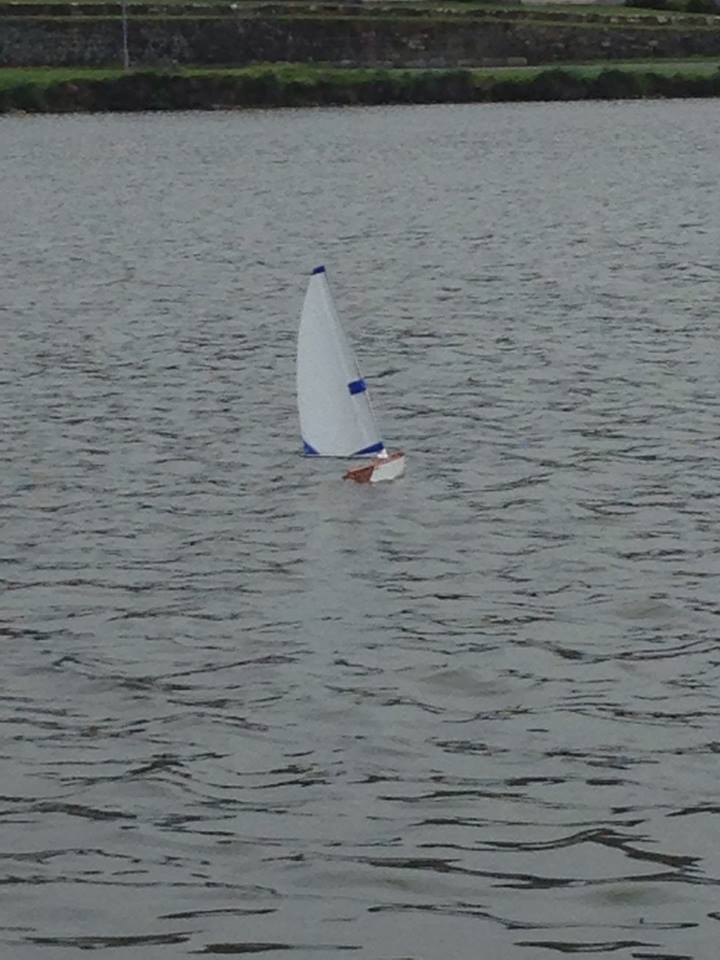 
_________________
I'm Not Anti-Social, I'm Anti-Stupid.
| |
| | | | Guest
Guest
| | Subject: Re: Wee Nip Build Tue May 05, 2015 10:45 am | |
| |
| | | | Sponsored content
| | Subject: Re: Wee Nip Build | |
| |
| | | | | | Wee Nip Build | |
|
Similar topics | |
|
| | Permissions in this forum: | You cannot reply to topics in this forum
| |
| |
| |