Posts : 2631 Join date : 2011-11-26 Age : 83 Location : Thaxted, Essex
Subject: Guardsman Wed Jan 17, 2018 9:24 am
So, onto my next project I am going to build Guardsman from Vic Smeed's plans published many years ago. As published, this is built mainly from balsa, but I am using liteply for the keel and bulkheads. I will plank it in balsa, and the bows and stern are built up from balsa. If the hull turns out a mess, then there is always a plastic (or fibreglass) hull available I had most of the material in stock, just need some more 1/2 inch balsa planks and some strips, so I was able to make a start.
I copied the bulkheads and keel using my computer scanner, cut them out and applied to the liteply - 3mm. I cut them out roughly using the jigsaw of my Unimat 1, and tidied them up using its sanding wheel. I hit a snag with the keel. The bit around the prop - the skeg I suppose - snapped when trying to sand it. This is very fragile so to strengthen it I had two ideas - one to glue some 1/8th square timber to the bottom off the keel, or two put some 0.8mm ply on each side. This is what I did - I can always add the strip later if needed.
The photo shows the current state - still some sanding to do. Off to Maldon today to buy the balsa, and I hope the propshaft will arrive from CMB.
Barrie
Guest Guest
Subject: Re: Guardsman Wed Jan 17, 2018 3:47 pm
another one I started but never finished .............it'll be nice to see your model, and I know it WILL be a lovely model to see.
bring it on barrie.
barriew Captain (moderator)
Posts : 2631 Join date : 2011-11-26 Age : 83 Location : Thaxted, Essex
Subject: Re: Guardsman Thu Jan 18, 2018 5:37 pm
Had a nice ride to Maldon in the sun Bought my balsa from the ladies at The Balsa Cabin and a ride back through some of the more picturesque parts of Essex to Braintree for lunch . My propshaft arrived from CMB so I was able to make some progress today after supermarket duty.
The two bottom pieces were cut from the 1/2 inch balsa, along with the remaining slices for the stern - I still have the bow pieces to cut. The bottom pieces have been stuck to the keel. I have secured the stern with a strap to stop more breakages until some of the slices are in place to hold it rigid. I opened out the slot for the propshaft but when the slices are in place it will need some more work.
I found a build log on the Model Boats Forum which will be a help as I don't have the original article.
Barrie
Guest Guest
Subject: Re: Guardsman Thu Jan 18, 2018 10:53 pm
what bike do you have barrie.
barriew Captain (moderator)
Posts : 2631 Join date : 2011-11-26 Age : 83 Location : Thaxted, Essex
Subject: Re: Guardsman Fri Jan 19, 2018 7:45 am
nhp651 wrote:
what bike do you have barrie.
Sorry Neil - should have said drive Never been attracted to bikes, and in the winds yesterday I suspect it wouldn't have been a pleasant ride.
Barrie
barriew Captain (moderator)
Posts : 2631 Join date : 2011-11-26 Age : 83 Location : Thaxted, Essex
Subject: Re: Guardsman Fri Jan 19, 2018 12:54 pm
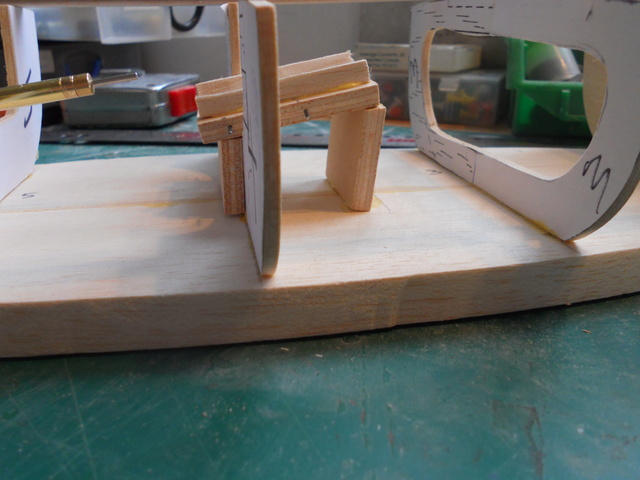
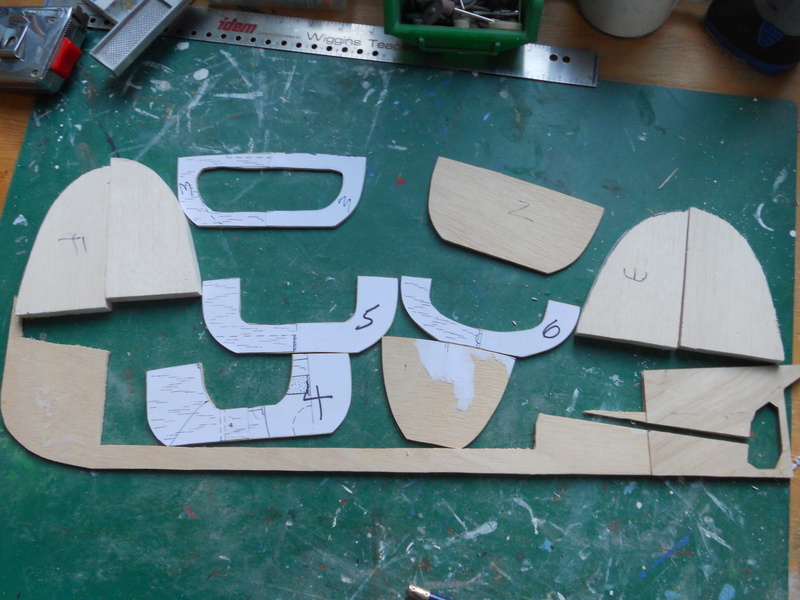
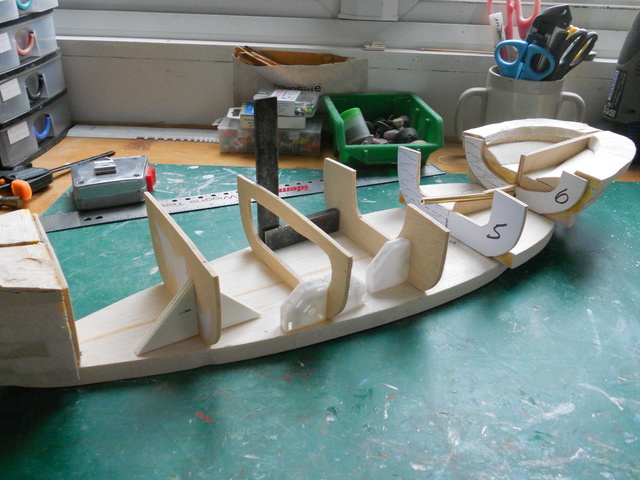
All the slices have now been cut and I have made a start on fitting them. Three bulkheads have also been fitted - these are the ones that define the location of the slices. Number 6 was interesting - it had to be fitted in two parts although that was not obvious from the plans
I will not fit the other bulkheads until I am ready to start planking as the could get broken. I am assuming that having got all the slices stuck in place I need to start shaping them - there is a lot of balsa to come off I rather think it would have been better to use 1/4 inch slices, but its too late now.
Barrie
Guest Guest
Subject: Re: Guardsman Fri Jan 19, 2018 10:57 pm
It's amazing when you think about the price of balsa just how much dust & offcuts end up in the bin
barriew Captain (moderator)
Posts : 2631 Join date : 2011-11-26 Age : 83 Location : Thaxted, Essex
Subject: Re: Guardsman Sat Jan 20, 2018 7:59 am
Yes - although I had the liteply and some Balsa, I still spent about £10 - I don't think the plastic hull costs much more. However, this takes more time to build which is the object - keep me occupied
Barrie
Guest Guest
Subject: Re: Guardsman Sat Jan 20, 2018 8:10 am
Guest Guest
Subject: Re: Guardsman Sat Jan 20, 2018 12:16 pm
barriew wrote:
nhp651 wrote:
what bike do you have barrie.
Sorry Neil - should have said drive Never been attracted to bikes, and in the winds yesterday I suspect it wouldn't have been a pleasant ride.
Barrie
aye...........always a bit of sideways drift on a bike, especially with a big fairing and on the motorway, lol....but sadly they are worse than an addictive drug........once in your bloodstream you can't get rid of the adrenalin rush when you can outdrag even a Ferrari at the lights, lol.
the rebble in me........sadly haven't had one for a few years now, last one I rode was a Harley..........and that was so agricultural, it gave me whiplash for a week, and with arthritis everywhere my daughters have put their feet down and said I can't have another
barriew Captain (moderator)
Posts : 2631 Join date : 2011-11-26 Age : 83 Location : Thaxted, Essex
Subject: Re: Guardsman Sat Jan 20, 2018 7:28 pm
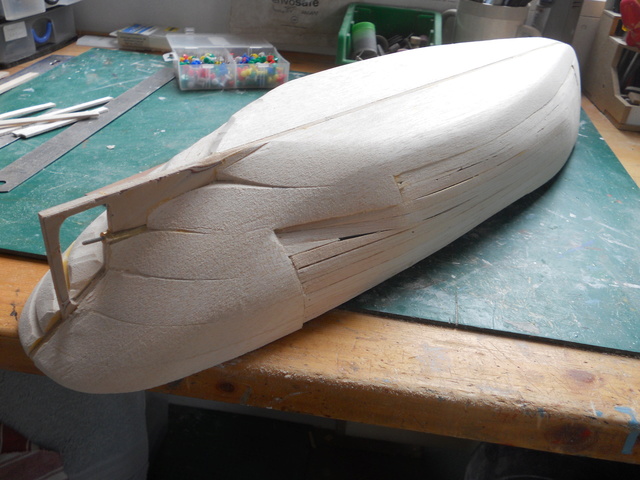
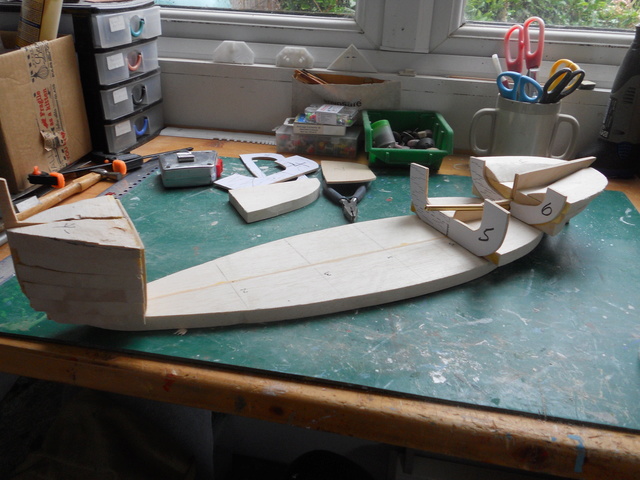
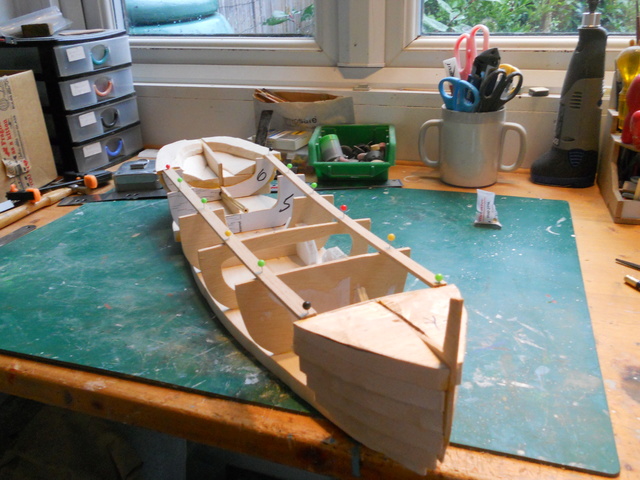
The final slices were added to the bow, with the top one being roughly shaped
The propshaft has also been inserted although not glued as yet. The last slices were added to the stern, the top again being roughly shaped. The remaining bulkheads have been fitted
and then temporary battens attached to hold them firm until the planks are added.
This design does seem to waste a lot of balsa - just look at the amount that need to come off the base plate, never mind the slices at bow and stern. I assume balsa was relatively cheaper when Vic Smeed designed it
Barrie
Guest Guest
Subject: Re: Guardsman Sat Jan 20, 2018 7:57 pm
I used to go scavenging it at the cargo terminal at Fleetwood docks as a kid, as it was used as packing between and inside crates and was just thrown out...can't estimate what it would cost now, what we scavenged............and then we'd sell on to other mates at what we thought extortionate prices, lol.
Guest Guest
Subject: Re: Guardsman Sat Jan 20, 2018 10:50 pm
barriew Captain (moderator)
Posts : 2631 Join date : 2011-11-26 Age : 83 Location : Thaxted, Essex
Subject: Re: Guardsman Sun Jan 21, 2018 1:19 pm
I had intended to start planking today, but then realised that it would be much easier to sort out a motor mount before the planks went on So that is what I did, first inserting the drive shaft - tricky as there is no access from the propeller end, and only just enough room inside - I had to push the tube through as far as it would go. The tube is now glued in and I will add some reinforcement eventually. The motor sits quite high and over a bulkhead. I thought I had a steel mount, but it was the wrong size, so the motor will be held with elastic bands
Barrie
barriew Captain (moderator)
Posts : 2631 Join date : 2011-11-26 Age : 83 Location : Thaxted, Essex
Subject: Re: Guardsman Wed Jan 24, 2018 8:40 am
With some difficulty I applied one plank to each side yesterday. As you can see on the last photos the bulkheads have quite a sharp curve where they meet the bottom plank. I left it overnight to make sure the glue was hard before removing the pins - I just hope its stuck The next plank is tricky also as it extends beyond the first right up to the next bulkhead. However, there is a height difference I either have to trim the next plank or put in a filler.
Barrie
barriew Captain (moderator)
Posts : 2631 Join date : 2011-11-26 Age : 83 Location : Thaxted, Essex
Subject: Re: Guardsman Wed Jan 24, 2018 11:23 am
Well - I tried to fit another plank today, and started to shape an infill one as well, but decided it was never going to work using the 3/8th x 1/8th planks, so removed them (not the original) and have now tried using some 3/32nd x 3/16 that I have. I have fitted one to each side. I will see how these go, bu am beginning to think that It would be better to order the vac form hull from Sarik I don't have enough of this balsa to finish the hull, and I am not confident about shaping all the blocks at bow and stern. The bow is relatively easy, but at the stern I am struggling to see how to get anything like a smooth shape.
I can see why you never completed it Neil
Barrie
barriew Captain (moderator)
Posts : 2631 Join date : 2011-11-26 Age : 83 Location : Thaxted, Essex
Subject: Re: Guardsman Fri Jan 26, 2018 12:58 pm
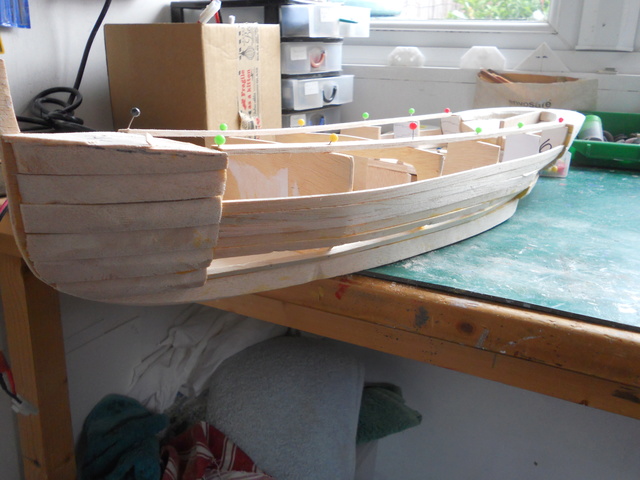
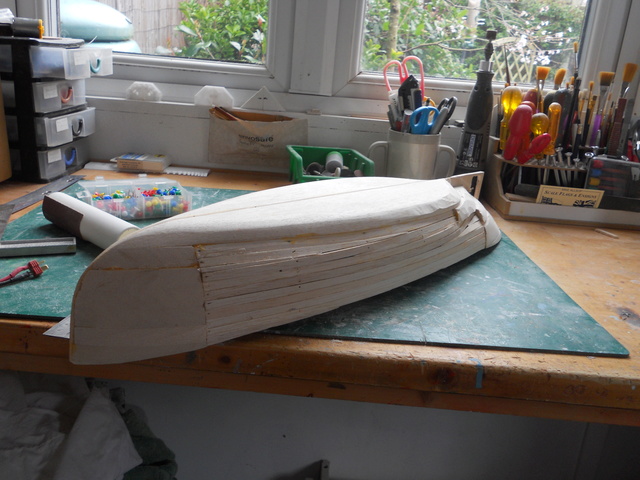
I have now fixed a few planks on each side. As you will see there are also a lot of gaps to go back and fill. I started off using aliphatic glue, but it take too long to go off, so have changed to superglue - again! I have also found a new way to bend the planks. Soaking in hot water made the planks too soft, but didn't really prevent splitting. I now use my soldering iron to heat them and this seems to be more successful. The planks retain the curve I put in, thus making it easier to fit and hold until the glue sets.
If I hadn't broken two or three planks before adopting this technique. I would have had enough wood to finish - I may still do, but will probably be about 2 lengths short
Barrie
barriew Captain (moderator)
Posts : 2631 Join date : 2011-11-26 Age : 83 Location : Thaxted, Essex
Subject: Re: Guardsman Sat Jan 27, 2018 12:54 pm
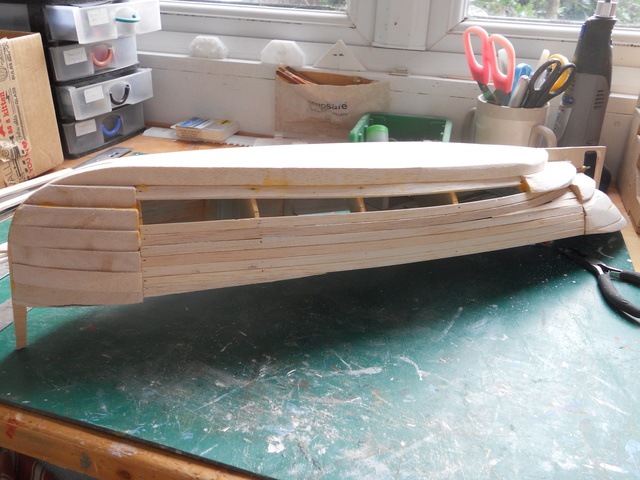
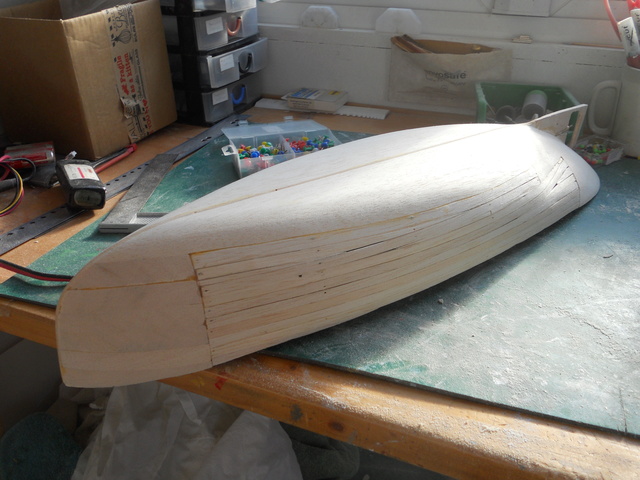
Well, the planking is finished ..
except it isn't . This is where I ran out of wood It means I will have to go to Maldon - about 40 mile round trip - just for 2 strips
I have also started sanding on the 'finished' side.
Still a long way to go, and I am still not quite sure of the required shape at the stern - maybe it will be my own design
Barrie
Guest Guest
Subject: Re: Guardsman Sat Jan 27, 2018 10:38 pm
Looking great Barrie, I envy the speed of your builds.
barriew Captain (moderator)
Posts : 2631 Join date : 2011-11-26 Age : 83 Location : Thaxted, Essex
Subject: Re: Guardsman Sun Jan 28, 2018 7:02 am
Damien
I spend up to two hours a day 5 or 6 days a week on them, particularly in winter when there isn't much else to do. It will slow down now as I cannot sand balsa for so long. The dust is terrible. I need to get a new mask as well as more balsa
Barrie
Guest Guest
Subject: Re: Guardsman Sun Jan 28, 2018 7:21 am
I find any mask leaks and foggs up my glasses tried full face paint masks, doctors and dentists masks mus have 100 of the useless things.
barriew Captain (moderator)
Posts : 2631 Join date : 2011-11-26 Age : 83 Location : Thaxted, Essex
Subject: Re: Guardsman Mon Jan 29, 2018 11:44 am
Yes Damien - I have not had much success with the simple cloth type masks, but the one I bought on Sunday seems to do the job. No leaks and no fogging of specs The only downside is its a pain to have to keep removing it when the nose keeps dripping
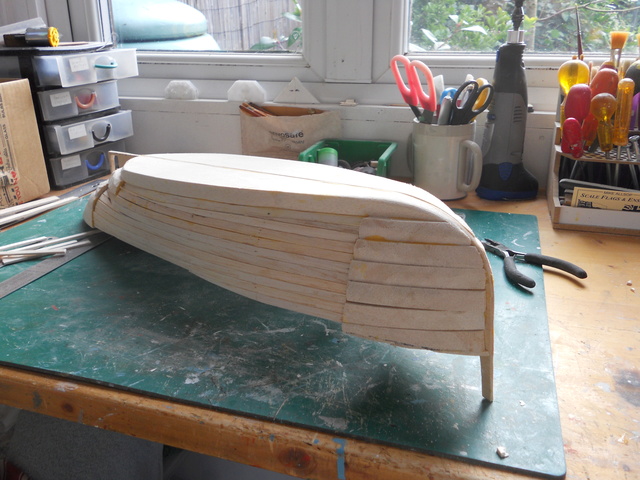
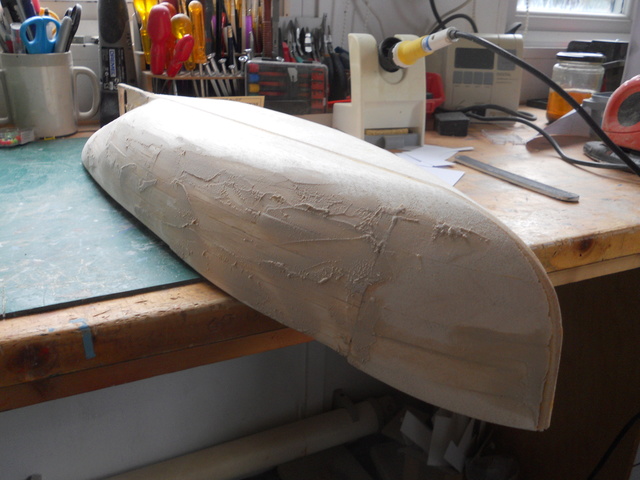
Anyway - more sanding. Side one is now somewhere near. Quite a bit of filling required but I think the shape is more or less there. Now to try and match it on the other side
The big dent is where the balsa cracked instead of curving smoothly. I think I will try to line the interior with resin and tissue of fine glass mat before I start filling.
Barrie
barriew Captain (moderator)
Posts : 2631 Join date : 2011-11-26 Age : 83 Location : Thaxted, Essex
Subject: Re: Guardsman Wed Jan 31, 2018 1:45 pm
I went to Maldon this morning for the missing balsa This has now been fitted and sanding can commence. On the other side I have applied copious amounts of P38 and when its hard will be ready for... you've guessed it, more sanding
Barrie
barriew Captain (moderator)
Posts : 2631 Join date : 2011-11-26 Age : 83 Location : Thaxted, Essex
Subject: Re: Guardsman Thu Feb 01, 2018 12:53 pm
Side 2 now sanded ready for filler. I also sanded the filler on side 1. It will require some more work, but looking quite good. The planking is a little thin in places, so I need to line the inside with tissue (or fibreglass) and resin to give it strength.
Barrie
Guest Guest
Subject: Re: Guardsman Thu Feb 01, 2018 3:13 pm
nicely done barrie........you're a bit like me.............I love filler, lol.
it has so many uses.
barriew Captain (moderator)
Posts : 2631 Join date : 2011-11-26 Age : 83 Location : Thaxted, Essex
Subject: Re: Guardsman Fri Feb 02, 2018 1:56 pm
Not sure I love it Neil, but I certainly need to make use of it when I'm planking a hull
Today I lined the inside of the hull with some fibreglass tissue and Eze Kote resin to add some stiffness and allow me to fix some loose planks. I also applied some more filler to side one, and then to side 2. More sanding ahead before I can give the outside a coat or two of resin. I bough some Z-Poxy finishing resin whilst I was at Maldon. I've never used this before but thought I would give it a try. When I've used the Fastglass from Halfords it always left a sticky surface.
I have a piece of square hardwood to eventually stick onto the hull as a mini keel. I think perhaps I should not have sanded the ply keel level to the hull bottom, but this will strengthen the skeg and also the stem post - you might notice that has vanished - which snapped off when I was sanding.
Barrie
barriew Captain (moderator)
Posts : 2631 Join date : 2011-11-26 Age : 83 Location : Thaxted, Essex
Subject: Re: Guardsman Sat Feb 03, 2018 12:20 pm
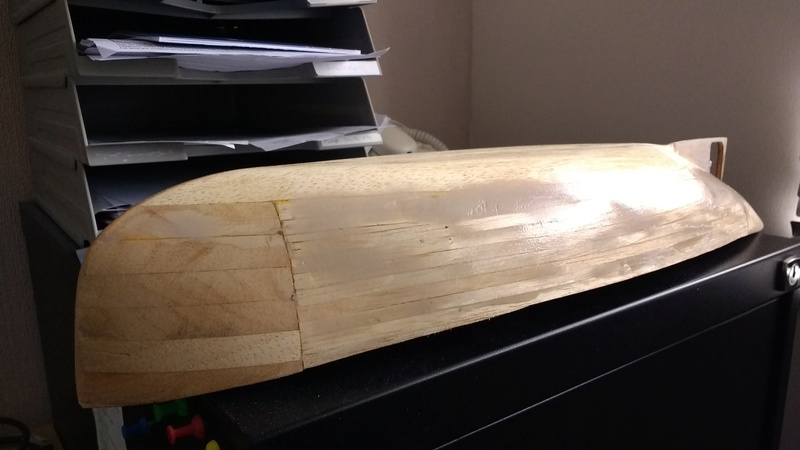
The filler has been sanded down. Until I get some paint on the hull, I can't really see what else needs filling, so I mixed up some Z-Poxy resin and applied it to the whole hull. This stuff needs quite a long time to harden, so no more work today. I brought it inside where its somewhat warmer than the workshop to speed up the hardening. It looks to be a good finish, but will need another coat I believe especially on the balsa bow and stern blocks.
Barrie
barriew Captain (moderator)
Posts : 2631 Join date : 2011-11-26 Age : 83 Location : Thaxted, Essex
Subject: Re: Guardsman Tue Feb 06, 2018 5:44 pm
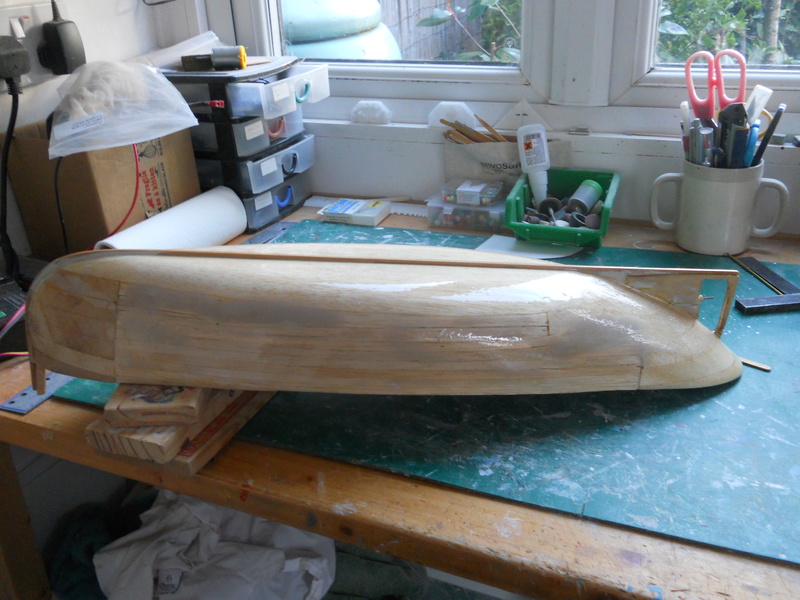
I sanded down the resin then set about bending the 4 mm square timber to make the keel. This was stuck with some epoxy glue and when dry, the resulting gaps were filled and the bow faired in to the keel. After more sanding, a final(?) coat of Z-Poxy was applied. I took the precaution of heating up the workshop and so the resin hardened quite quickly, although I still brought it indoors to get it as hard as possible. Before adding the keel I drilled a pilot hole for the rudder while I could still set the hull on its flat bottom to help getting it vertical.
If it still looks good tomorrow after a quick sand, then I will apply some primer to show up all the blemishes
After that I think I need to sort out the location of the servo, battery and electronics before I start on the deck. I have cut a card deck so I can see where the openings will be.
Barrie
Guest Guest
Subject: Re: Guardsman Tue Feb 06, 2018 6:00 pm
the hull looks almost identical to the other vic smeed boat, the Bustler tug.............that was my first motorised build at the age of 11/12.........loved it
amazingly I still have the plans, and have contemplated building it again but with a GRP hull that is available somewhere.
that's a lovely job again that you have done, barrie.
barriew Captain (moderator)
Posts : 2631 Join date : 2011-11-26 Age : 83 Location : Thaxted, Essex
Subject: Re: Guardsman Tue Feb 06, 2018 6:17 pm
If Bustler is constructed the same way then that's one that I wont be building Too much balsa to carve and sand. I think it will look OK on the water, but its not very good below the water line.
Barrie
Guest Guest
Subject: Re: Guardsman Tue Feb 06, 2018 9:16 pm
no, the bustler was built bread and butter but had the lines set of drawings to make card jigs out of for getting the shape of the hull right...........used even more balsa than yours.....remember raiding the cornflake and rice crispies boxes to make the templates out of. lol.
barriew Captain (moderator)
Posts : 2631 Join date : 2011-11-26 Age : 83 Location : Thaxted, Essex
Subject: Re: Guardsman Wed Feb 07, 2018 1:32 pm
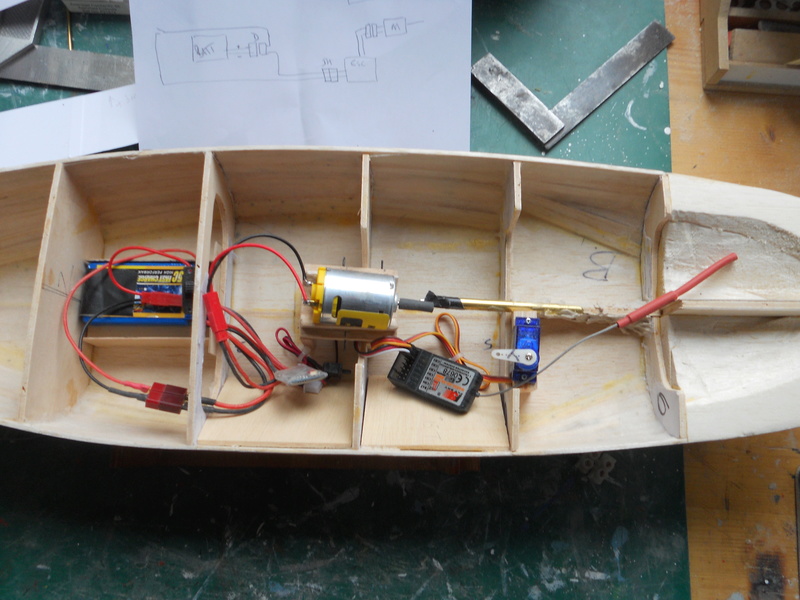
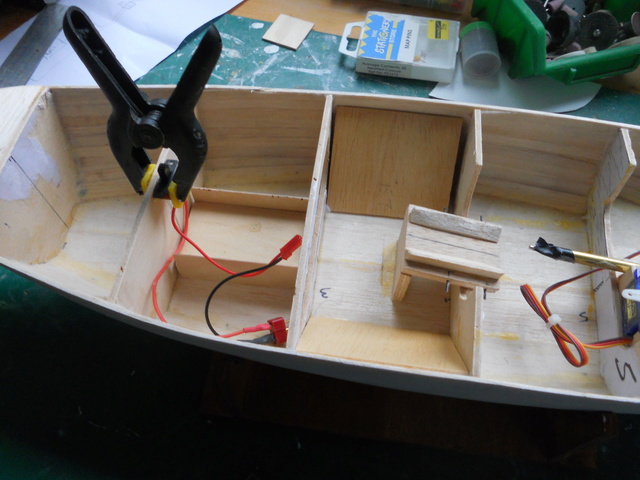
Started work on installing 'the works'. The hole for the rudder has been enlarged to take the tube. A battery box has been built and two boards inserted to take the ESC and Rx. The servo has been fitted - just need to work out the linkage. Apparently this has to emerge through the deck to operate the tiller .
After all this, I sanded the resin and then gave it a coat of primer/undercoat. Hopefully this will enable me to see the blemishes that need attention.
Barrie
Guest Guest
Subject: Re: Guardsman Wed Feb 07, 2018 2:07 pm
its looking another great finish.........you Can make a silk purse out of a sows ear Barrie, contrary to the phrase................
your adept way of making probably the worst of modelling timbers into something superb really is a master art, and seriously thinking, I think we should have a section purely on modelling in Balsa, as it is such a hard thing to master.....remember to this day how hard my bustler was to get even a fraction of the finish on it that you do.
a section like that purely for balsa built would allow all the glynn guest, vic smeed and others to be followed by those who love the stuff.
neil.
barriew Captain (moderator)
Posts : 2631 Join date : 2011-11-26 Age : 83 Location : Thaxted, Essex
Subject: Re: Guardsman Wed Feb 07, 2018 5:27 pm
Thanks Neil, as ever with my builds they look much better in a small photo than in real life. I don't think I will be building another one with as much balsa as this one. I really prefer plasticard, but there aren't many plans available as its not very suitable for round bilge hulls, although Rick Webb did manage some quite challenging designs.
Barrie
Guest Guest
Subject: Re: Guardsman Wed Feb 07, 2018 5:51 pm
never seen his stuff...........mind you i'm like an ostrich with head in the sand these days........only ever come looking for lifeboats, lol.
barriew Captain (moderator)
Posts : 2631 Join date : 2011-11-26 Age : 83 Location : Thaxted, Essex
Subject: Re: Guardsman Sat Feb 10, 2018 12:57 pm
Yesterday I sanded the primer then filled some of the more obvious blemishes - I'm not a perfectionist so there will still be more, but hopefully they wont be too obvious I also finished making a stand for the boat.
Today my connectors came so I was able to sort out the wiring. Its not fixed yet, but I now know where the bits are going, and what access I need.
After this I finished sanding the bow and stern blocks to get the correct deck level, then gave the hull another sanding to smooth out yesterday's filling prior to another primer coat. Finally I cut a suitable piece of 1.5 mm ply to make the deck, and started marking the cutouts. I think this will be suitable - I thought I had a 12 x 24 in sheet of .8 mm ply, but I didn't . If I cant get this to fit the contours of the hull it means another trip to Maldon.
Barrie
barriew Captain (moderator)
Posts : 2631 Join date : 2011-11-26 Age : 83 Location : Thaxted, Essex
Subject: Re: Guardsman Sat Feb 10, 2018 6:38 pm
So - I was intending to go for a walk this afternoon but the weather decided I wasn't, so I had another session in the workshop . Looking at my layout of the electrics I decided it was a bit of a mess, and also that I wanted the switch to be accessible without removing the whole superstructure. So I moved it forward one bulkhead and will make the companionway removable. I then moved to two mounting boards forward one bulkhead which will make a neater installation I think.
It does look as though it will be possible to make the 1.5 mm ply conform to the deck shape, so I cut out the openings in the deck and also trimmed the edges. These will require further trimming when its fixed to the hull. The plans say the deck should overlap the hull by 3 mm all round to form the rubbing strip. I can't fix the deck until I have sorted out the servo linkage as it has to come through the deck in a slot. I think that is probably my next challenge
Guest Guest
Subject: Re: Guardsman Sun Feb 11, 2018 12:14 am
Coming along nicely Barrie.
barriew Captain (moderator)
Posts : 2631 Join date : 2011-11-26 Age : 83 Location : Thaxted, Essex
Subject: Re: Guardsman Mon Feb 12, 2018 1:01 pm
I started on the steering linkage today. The rudder tube has been glued in place, and the rudder shaft glued and pinned to to blade. I made a tiller arm from a cannibalised electric fitting and brass strip, and I bent up the linkage. I am now waiting for the glue to set - I may have got the proportion of resin to hardener wrong as the twin tubes are very difficult to operate .
While waiting for it to set, I did some work on the Rx and Esc installation. These are now in place using hook and loop stick-on. The wiring will need some fixing, but it will have to come out again so no point at the moment.
Next job is to determine the track of the linkage so I can cut a slot in the deck. Once that is done I think the deck can be fixed down. I am slightly concerned that it will have to stick the the top of the hull planks - only 1.5 mm before sanding. I may decide to add some support strips.
Barrie
barriew Captain (moderator)
Posts : 2631 Join date : 2011-11-26 Age : 83 Location : Thaxted, Essex
Subject: Re: Guardsman Tue Feb 13, 2018 10:52 am
The glue did set over night The rudder has now been installed including a skeg made from brass to support the bottom of the shaft. I have been experimenting with the best arrangement for the tiller, and trying to determine where I need to cut the slot for the operating rod. I haven't finished this. Obviously the tiller can't be fixed this way as there would be no access to the fixing screw. It was designed to be the other way up, but this was just part of my testing. The operating rod needs to be below deck level until the vertical part, so the tiller has to be lower. I think I need to replace the bit of the old plug as the screw tends to foul the rod so I have just ordered some collets. At the moment the tiller arm gets very close the the edge of the deck, and will probably foul the bulwarks, so that needs changing as well. More experimenting required I also fixed some strips to the top of the hull between the bulkheads to give a bigger surface for gluing the deck.
Barrie
Fred 1948 Forum Sponsor
Posts : 239 Join date : 2017-04-14 Age : 75 Location : East Sussex
Subject: Guardsman Wed Feb 14, 2018 2:57 pm
Hi Barrie
Have you given any thought to using a aircraft flexible snake? it just may help sort out problem.
Fred
barriew Captain (moderator)
Posts : 2631 Join date : 2011-11-26 Age : 83 Location : Thaxted, Essex
Subject: Re: Guardsman Wed Feb 14, 2018 6:19 pm
Fred
Funny you should mention that It is exactly what I was experimenting with this morning I think that this is probably the answer, coupled with re-location and possibly re-orienting the servo. I also need to re-make the tiller arm. The hole in the boss is too big and this allows the arm to twist. I gave up this morning because I was waiting for the collets I ordered to arrive. My next session will see the servo on its side, a new tiller arm and a snake linking them. I may need also to put a twist into the tiller arm to improve the angle for the snake.
Watch this space
Barrie
Roadrunner Forum Overlord
Posts : 1714 Join date : 2011-06-10
Subject: Re: Guardsman Wed Feb 14, 2018 8:44 pm
Just a suggestion on this rudder linkage, although this suggestion is not designed for this particular boat it can however be addapted, if you think in similar terms to old style tug boats that have same shape rear ( tig tugs or drifters in particular) they use a quadrent connected to the rudder post and then chain linkages to pull it round.
In your case a similar mechanism can work nicely, and even use a fixed pull linkage, the whole assembly can be covered with grating as per a normal boat using this system.
That may relive some of your issues as well as giving a maybe more period look.
Aron
_________________ I'm Not Anti-Social, I'm Anti-Stupid.
barriew Captain (moderator)
Posts : 2631 Join date : 2011-11-26 Age : 83 Location : Thaxted, Essex
Subject: Re: Guardsman Thu Feb 15, 2018 6:56 am
Aron
Yes - I was also considering that system if the snake doesn't work. The area will be covered with a grating so that is not an issue. The rudder post is very near the edge of the deck which doesn't help. I hope to try the new snake and tiller later today - after supermarket duties
Barrie
Roadrunner Forum Overlord
Posts : 1714 Join date : 2011-06-10
Subject: Re: Guardsman Thu Feb 15, 2018 2:23 pm
I would personally just gone for the quadrant rather then messing with snake lines, less things to go wrong or bind. Not that I hope the snake fails I just prefer the look of a quadrent.
_________________ I'm Not Anti-Social, I'm Anti-Stupid.
barriew Captain (moderator)
Posts : 2631 Join date : 2011-11-26 Age : 83 Location : Thaxted, Essex
Subject: Re: Guardsman Thu Feb 15, 2018 7:19 pm
Aron - no work today! I haven't ruled out the quadrant and will look at that option when I start again. I have two issues - is there enough space behind the rudder post and can I get the servo central. The propshaft comes up where I would ideally like to put the servo.
Barrie
Roadrunner Forum Overlord
Posts : 1714 Join date : 2011-06-10
Subject: Re: Guardsman Fri Feb 16, 2018 8:35 am
I’m not sure where the superstructure starts and ends on this model my only suggestion would be to mount the servo Just above deck level with the servo arm going through a tiny slot in any combing u may install, this may give you a central servo position along with possibly clearing the prop shaft. It’a similar to a boat I built years ago where the servo was located inside what was supposed to be the rear crew quarters in the form of a rectangle on deck standing 10mm in height.
Other options would be to side mount the servo, or even Possibly look at how rear pullys work for quadrent use, push pull on the servo using a chain or fixed rod each side of the quadrent running through some brass tubing on deck level, this option my farther did recently on this tig tug giving him real scale steering and that also gave him huge scope on servo location being able to put it almost anywhere at deck level on that center line.
Just some suggestions to feed the brain.
_________________ I'm Not Anti-Social, I'm Anti-Stupid.
barriew Captain (moderator)
Posts : 2631 Join date : 2011-11-26 Age : 83 Location : Thaxted, Essex
Subject: Re: Guardsman Sat Feb 17, 2018 2:04 pm
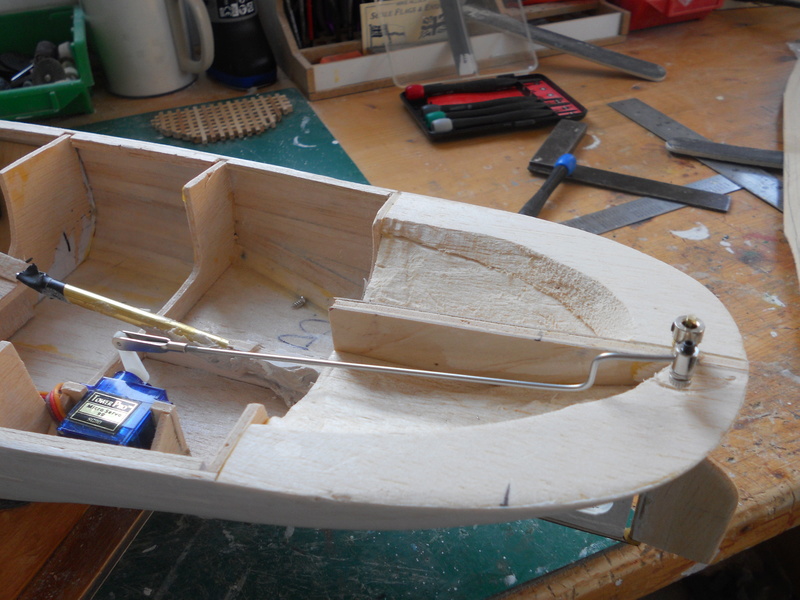
After two days I have this sorted - I think. I fiddled around yesterday trying to find a way of mounting the servo to allow me to use a push-pull arrangement. In the end I reverted to plan b which was to mount the servo on its side. I then tried various linkages before settling on the one you see here. It still needs some adjustment to get the vertical closer to the tiller, but I've left it for now as I have some ball and socket type connectors on order which may allow a better angle for the connecting rod. If not this can be adjusted and will work
This is now on hold until the connectors arrive as the next step is to glue down the deck, and I don't want to do that until I know the linkage is OK.
Barrie
barriew Captain (moderator)
Posts : 2631 Join date : 2011-11-26 Age : 83 Location : Thaxted, Essex
Subject: Re: Guardsman Tue Feb 20, 2018 1:06 pm
Still waiting for my ball joints I have given the deck a coat of sanding sealer and marked some planks on it. I was going to plank it but I don't have enough material. I have also given the below the water line one coat of paint. I have also opened a hole in bulkhead 2 as I suspect I am going to need to get some ballast in there - there's not much of this hull above water
Barrie
Roadrunner Forum Overlord
Posts : 1714 Join date : 2011-06-10
Subject: Re: Guardsman Tue Feb 20, 2018 7:14 pm
Good result
_________________ I'm Not Anti-Social, I'm Anti-Stupid.


")
 Bought my balsa from the ladies at The Balsa Cabin and a ride back through some of the more picturesque parts of Essex to Braintree for lunch
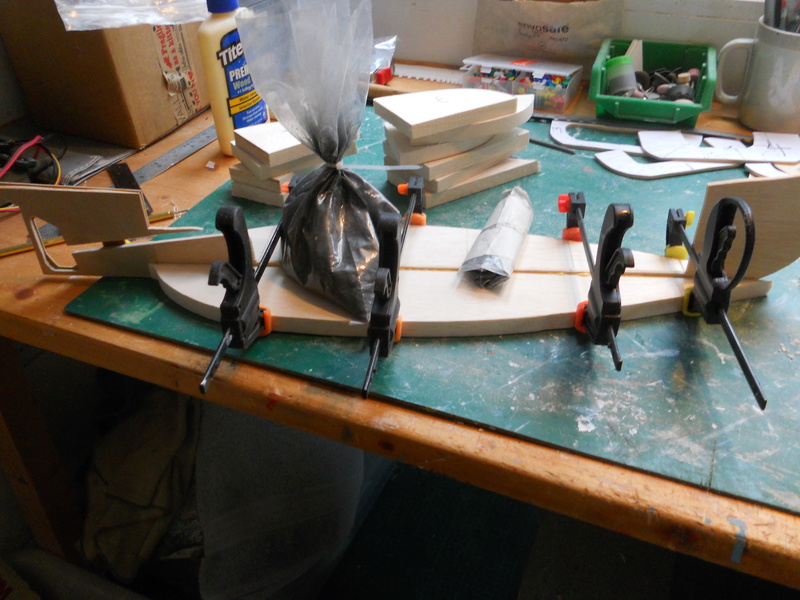
 Never been attracted to bikes, and in the winds yesterday I suspect it wouldn't have been a pleasant ride.
 So that is what I did, first inserting the drive shaft - tricky as there is no access from the propeller end, and only just enough room inside - I had to push the tube through as far as it would go. The tube is now glued in and I will add some reinforcement eventually.