TheRcModelBoatForum.com
Please login using your username and password to use the forum.

If you do not have an account please register to participate, it’s free!
TheRcModelBoatForum.com
Would you like to react to this message? Create an account in a few clicks or log in to continue.


https://www.thercmodelboatforum.com/
 
HomeHome  PortalPortal  Latest imagesLatest images  RegisterRegister  Log inLog in  


 Rope Work Part 1 Simple Grafting

Go down 
3 posters
AuthorMessage
Roadrunner
Forum Overlord
Forum Overlord
Roadrunner


Posts : 1708
Join date : 2011-06-10

bell rope - Rope Work Part 1 Simple Grafting Empty
PostSubject: Rope Work Part 1 Simple Grafting   bell rope - Rope Work Part 1 Simple Grafting EmptyWed Mar 06, 2013 9:28 pm

Evening Gent's

This is part one of a series of posts on decorative rope work that you can use either at full size or scaled down.

This post follows a previous post i wrote some time ago. Which you can view here

Tonight's little incite into rope work will be Simple Grafting, This is the basic grafting method, there is however a more complex version, but this one is great for beginners, so we'll start here.

This version of grafting is a wrap around anything cylindrical, oar looms, mast work, hand rails etc.
This is a labor incentive bit of work so full concentration is needed, however it is very simple to achieve and no skill is needed to achieve something that looks the part.
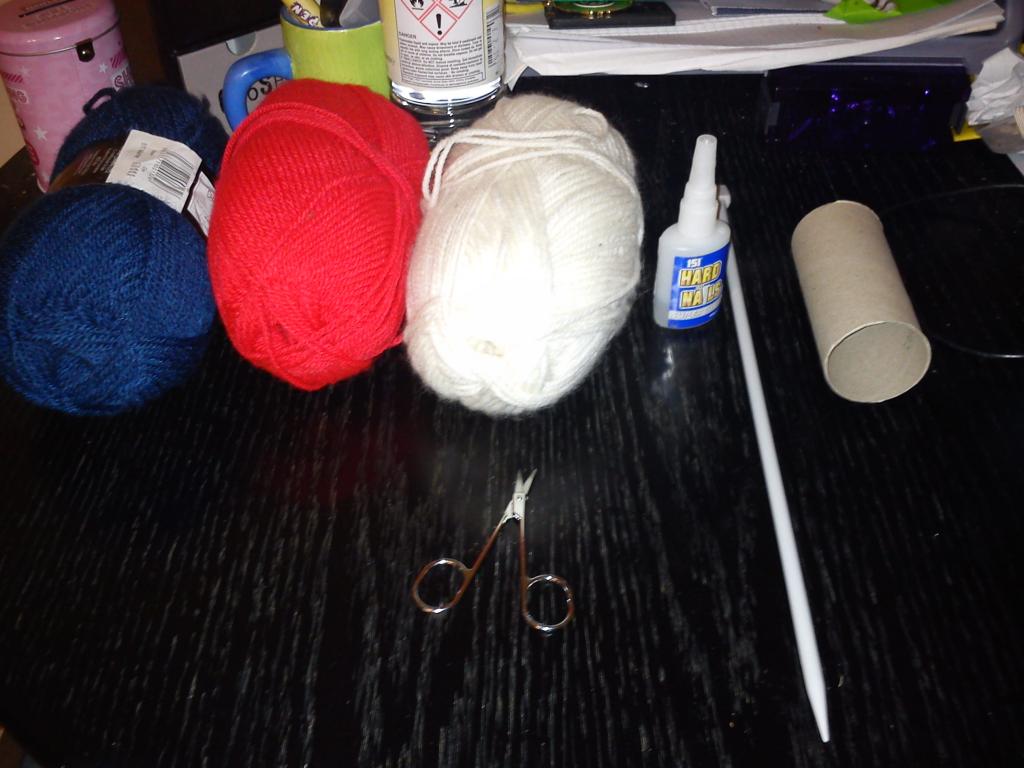
What you need:-

*Cylindrical Object to 'wrap'
*2 thicknesses of Rope/cord, this can be nylon,cotton or even wool, The Wefts should be the thickest line and the Warp should be the thinnest (for an example if using wefts of 5mm, use a 2mm Warp line)
*A pointy object for pulling the warp line in tight (a larger knitting needle works well)
*Superglue or hairband/rubber band (for those who need a short cut)
*cup of tea (trust me)

bell rope - Rope Work Part 1 Simple Grafting IMG_20130306_190419_zps517fe9b1

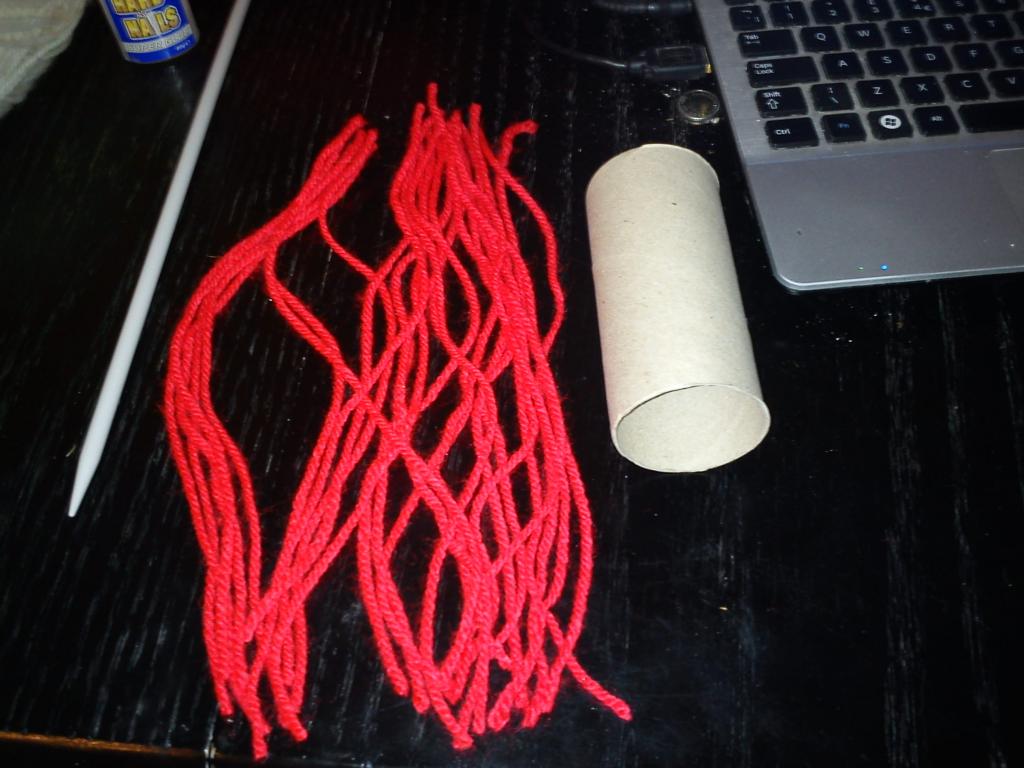
For this Example of demonstration I'm going to show you via colour coding using wool, as this is a demonstration it will be a little clearer to see what is happening.

''The Weft''s are the lengths that trail the piece to be covered length ways, there should be an UNEVEN number of them and there should be enough to cover the piece of work tightly but not overlap or bulge at the start, for this process to work.

Should you have an even amount of Wefts covering the work you will end up with a double overlap at the start/end point the entire length of the work, this is really unattractive and in fact can cause issues during the grafting process so be sure to count your wefts and ensure they are an UNEVEN amount.

Step One.

Cut weft's (red wool) they should be the full length of the piece of work to cover and have on avg 3" over hang at the end per foot, this allows for the 'bumpy effect' or shrinkage caused by the Warp line.
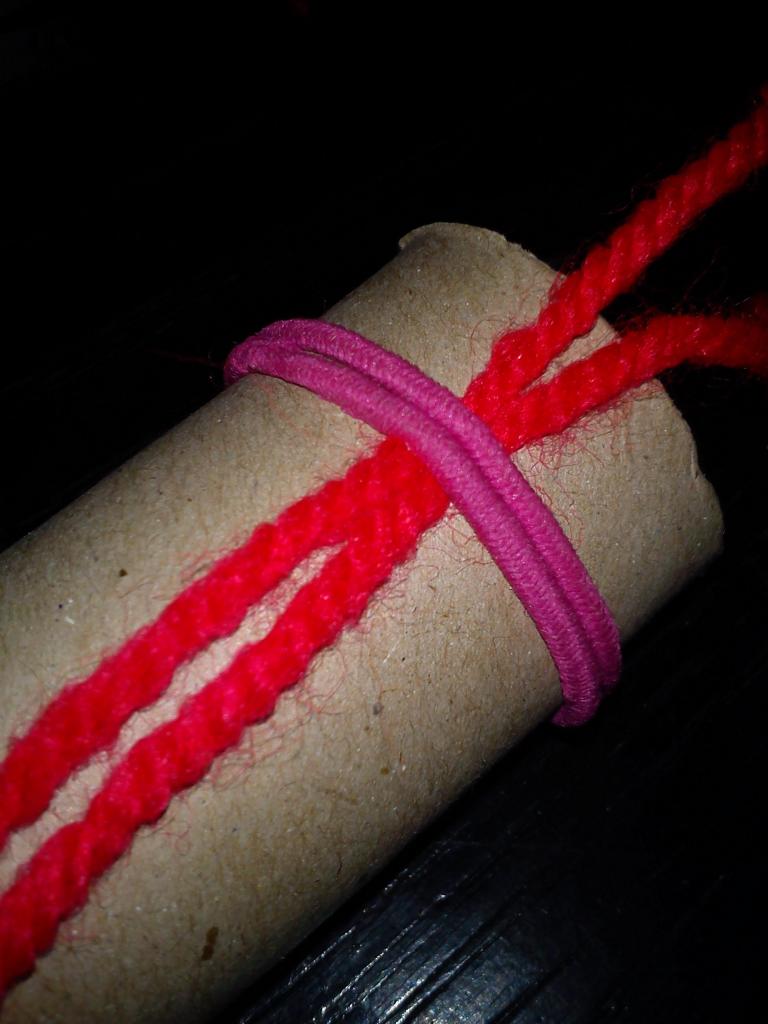
bell rope - Rope Work Part 1 Simple Grafting IMG_20130306_193244_zps7a193022

Step Two.

Glue the wefts at the very top around the piece of work or use a hair band to secure in place and using the Warp line tie a half hitch knott , however a drop of glue is the best way to secure the wefts so not to pull out during grafting.
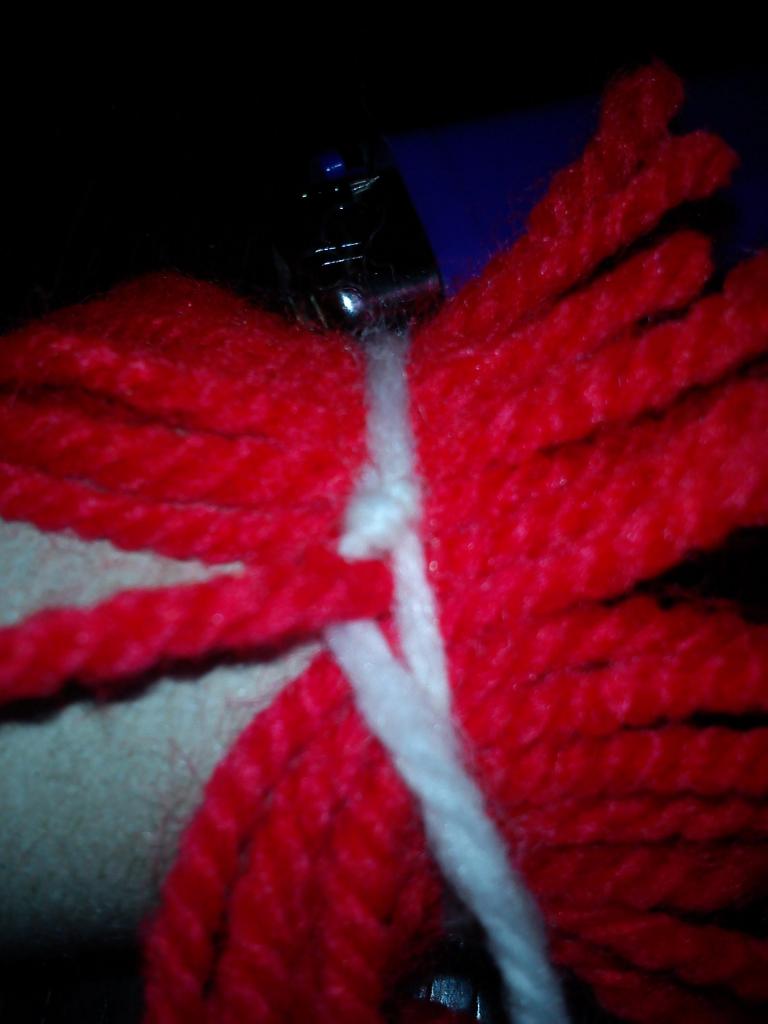
bell rope - Rope Work Part 1 Simple Grafting IMG_20130306_195725_zps181926a6
bell rope - Rope Work Part 1 Simple Grafting IMG_20130306_200548_zps871c332e

Step Three.

Now take the Warp line, this is the smaller thickness line, and wrap around the top of the wefts to start with and secure with a half hitch, for this demonstration, it will be the white woolen line. this line you do not cut until the end, you should be grafting off the spool until the finish.

bell rope - Rope Work Part 1 Simple Grafting IMG_20130306_201114_zps47273808

This is the start of grafting from here on in, its very simple to do, take 1 of the wefts and lift it up, slide the Warp line under it.

bell rope - Rope Work Part 1 Simple Grafting IMG_20130306_201330_zps3f0b7266

The warp line now hops over the next weft line.

bell rope - Rope Work Part 1 Simple Grafting IMG_20130306_201401_zps4822144c

Lift the next Weft line and slide the warp line under.

bell rope - Rope Work Part 1 Simple Grafting IMG_20130306_201610_zps076674f6

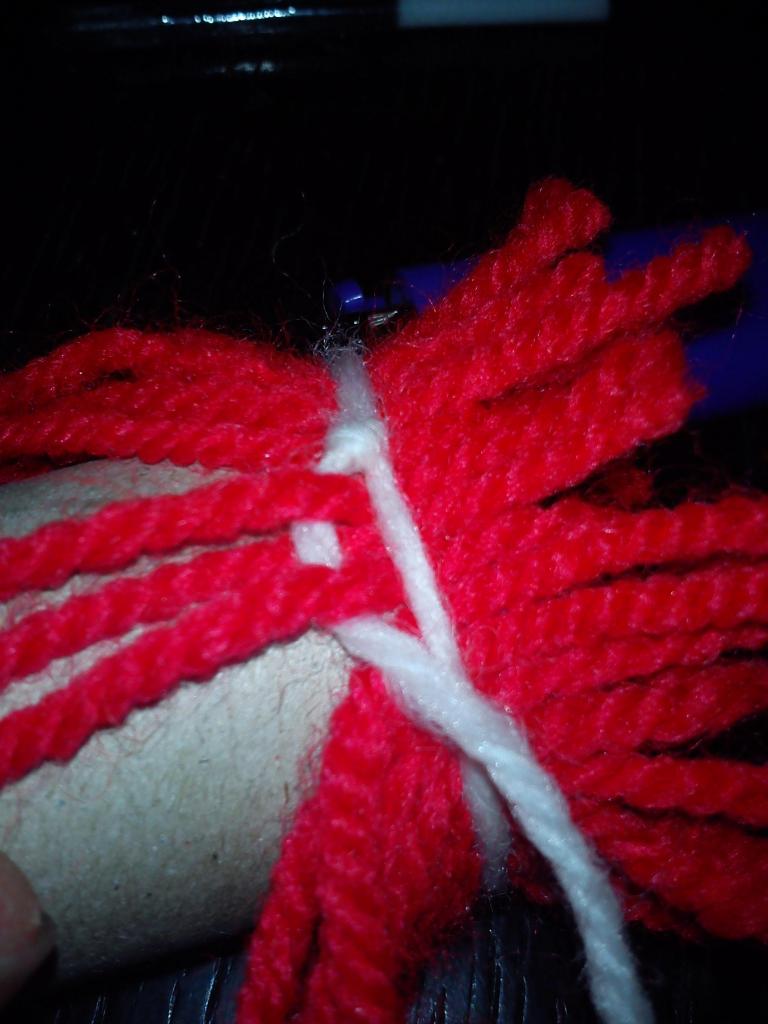
Repeat under and over under and over for 1 full rotation...

Step Four.

After each full rotation pull the line tight and using your pointy object (knitting needle in this case) push the Warp line upwards as you pull it tight, this keeps the wefts from moving and tidy, this process of tweeking the wefts and warp line you will have to do every full rotation as well as between lifts and drops as the work progresses you have to use your judgement..

bell rope - Rope Work Part 1 Simple Grafting IMG_20130306_202426_zps8df106fc

Now keep going over and under until you cover the piece...
It should end up looking something like this...

bell rope - Rope Work Part 1 Simple Grafting IMG_20130306_202753_zpsb4fce23e

Keep in mind that this example bit of work the warp line wasn't pulled taught ( simply because it will snap very easy, if your using cotton or nylon then you wont have this issue and the grafts will look much tighter.

You can finish off the ends with ''Turks head'' or other decorative knots which i will do as a separate post over the coming weeks


RR

_________________
I'm  Not  Anti-Social,  I'm  Anti-Stupid.


Last edited by Roadrunner on Wed Mar 06, 2013 10:05 pm; edited 1 time in total
Back to top Go down
https://www.thercmodelboatforum.com
Guest
Guest


bell rope - Rope Work Part 1 Simple Grafting Empty
PostSubject: Re: Rope Work Part 1 Simple Grafting   bell rope - Rope Work Part 1 Simple Grafting EmptyWed Mar 06, 2013 9:48 pm

absolutely amazing RR...............quite incredible..................a great posting..............will look forward to more of this.

neil.

How are you . haven't spoken for ages,

neil.
Back to top Go down
Roadrunner
Forum Overlord
Forum Overlord
Roadrunner


Posts : 1708
Join date : 2011-06-10

bell rope - Rope Work Part 1 Simple Grafting Empty
PostSubject: Re: Rope Work Part 1 Simple Grafting   bell rope - Rope Work Part 1 Simple Grafting EmptyWed Mar 06, 2013 9:56 pm

I'm great matie, had a few issues of late with the house move costing more then i budgeted so everything hobby wise got put on hold until i could sort that, wife and kids still driving me potty nothing changes to much, but now alls back on track and i'm back working on the dolphin when the weather takes a turn for the better and currently doing a restoration of a beam trawler and building the wife's canal boats, which will be blogged over the next few days.

I see your new project.. you never go do small huh Neil Very Happy I've been reading with great interest.. so keep up the good work lol!

_________________
I'm  Not  Anti-Social,  I'm  Anti-Stupid.
Back to top Go down
https://www.thercmodelboatforum.com
Footski
Master
Master
Footski


Posts : 548
Join date : 2011-06-11
Age : 66
Location : Malaga, Spain

bell rope - Rope Work Part 1 Simple Grafting Empty
PostSubject: Re: Rope Work Part 1 Simple Grafting   bell rope - Rope Work Part 1 Simple Grafting EmptyThu Mar 07, 2013 8:11 am

That looks really brilliant, but can I ask a stupid question? What applications do you use it for?
Back to top Go down
Guest
Guest


bell rope - Rope Work Part 1 Simple Grafting Empty
PostSubject: Re: Rope Work Part 1 Simple Grafting   bell rope - Rope Work Part 1 Simple Grafting EmptyThu Mar 07, 2013 9:05 am

Barrie............I could, and have seen that sort of ropework wrapped around the tiller arms on narrow boats, and other decorative areas of boats.........sets them off a treat.

neil.
Back to top Go down
Roadrunner
Forum Overlord
Forum Overlord
Roadrunner


Posts : 1708
Join date : 2011-06-10

bell rope - Rope Work Part 1 Simple Grafting Empty
PostSubject: Re: Rope Work Part 1 Simple Grafting   bell rope - Rope Work Part 1 Simple Grafting EmptyThu Mar 07, 2013 4:48 pm

There are many places you can use this at full size or scaled down, this is a decorative wrap so quite rightly as Neil stated, around the tiller of a narrow boat, hand rail, the grips for oars, base of a mast (makes the base a little more wear resistant to knocks etc) and in the first example i did in construction of ornaments such as bell ropes, grips for hand tools etc etc the possibilities are only limited by your imagination.

The main use for this graft is generally hand rails, as the graft itself becomes very bumpy, this aids grip when in use rather then holding onto a nice shiny smooth rail, you can even use it to cover chains (with a little bit of skill) to cover the ugliness of them as well as stopping trapped fingers between links, this method can also be used to create bumpers (although not the right knot for that job)

_________________
I'm  Not  Anti-Social,  I'm  Anti-Stupid.
Back to top Go down
https://www.thercmodelboatforum.com
Footski
Master
Master
Footski


Posts : 548
Join date : 2011-06-11
Age : 66
Location : Malaga, Spain

bell rope - Rope Work Part 1 Simple Grafting Empty
PostSubject: Re: Rope Work Part 1 Simple Grafting   bell rope - Rope Work Part 1 Simple Grafting EmptyThu Mar 07, 2013 5:47 pm

Thanks guys. Now you have set my imagination off! cheers
Back to top Go down
troutrunner
Master
Master
troutrunner


Posts : 573
Join date : 2014-01-23
Location : Lincolnshire UK

bell rope - Rope Work Part 1 Simple Grafting Empty
PostSubject: Re: Rope Work Part 1 Simple Grafting   bell rope - Rope Work Part 1 Simple Grafting EmptyWed Oct 28, 2015 10:04 am

Hi RR, just read through this post, very inspiring, when is "Part 2" coming out please  2thumbsup
Back to top Go down
Roadrunner
Forum Overlord
Forum Overlord
Roadrunner


Posts : 1708
Join date : 2011-06-10

bell rope - Rope Work Part 1 Simple Grafting Empty
PostSubject: Re: Rope Work Part 1 Simple Grafting   bell rope - Rope Work Part 1 Simple Grafting EmptyThu Apr 21, 2016 2:18 pm

You can tell if I don't always pick up posts... I will do rope work part 2 at some point, I expect Turks heads and other knotts, right now I do a lot of paracord work, belts and such but more commonly I'm still doing full sized bell ropes. 

If anyone has an interest in particular knots or patterns let me know and I'll do tutorials on those persificially. There are literally 1000 of rope patterns I know. My brother is a master at even more advanced thing s such as photo frames and even full weaved shoulder bags and animals.( what else do you do when your bored in a naval kitchen?) 

Probably the best reason for not doing g a part 2 earlier is simply when it comes to models scaling knot work comes very difficult, you end up using cotton or nylon threads and it isn't suited to many to commit to doing that much work and In such tiny scale. Normal boat rigging tend to just be lines unless doing some form of gallon, the. It becomes a labour of love to do such work and most of those builders know more then me!

So any one wants to know something in particular post it here and I'll do a part 2

_________________
I'm  Not  Anti-Social,  I'm  Anti-Stupid.
Back to top Go down
https://www.thercmodelboatforum.com
Sponsored content


bell rope - Rope Work Part 1 Simple Grafting Empty
PostSubject: Re: Rope Work Part 1 Simple Grafting   bell rope - Rope Work Part 1 Simple Grafting Empty

Back to top Go down
 
Rope Work Part 1 Simple Grafting
Back to top 
Page 1 of 1
 Similar topics
-
» Moving House Sucks... So lets try some Rope Work
» Simple Radar Moter.
» How to dye rope
» Building my Sailboat Carina from scratch
» Dorset RCMBC 'Navy Day' part 1

Permissions in this forum:You cannot reply to topics in this forum
TheRcModelBoatForum.com :: Technical Pages :: Tips & Tricks!-
Jump to: