| | Sea Road Lady |  |
|
|
|
| Author | Message |
|---|
Guest
Guest
| | Subject: Sea Road Lady Sat Jul 20, 2013 10:38 pm | |
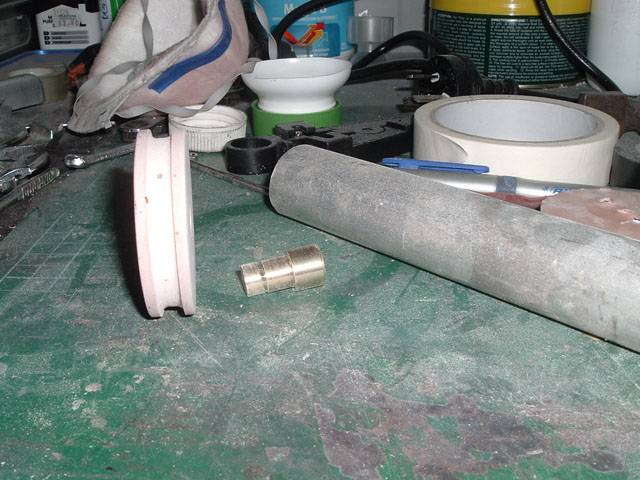
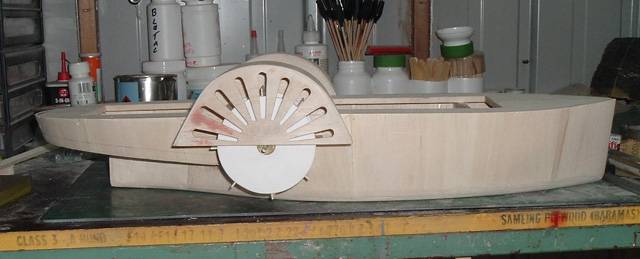
| My name for a side wheel version of the Model Boats free plan Ogdensburg by Glynn Guest "June 2013". Warning this will be long build as said elsewhere I have 4 other models to complete I always source or make what I call the hard bits first " If I can't make it or buy it I don't build the model." The plan has been modified placing the forward ramps 30mm further forward to allow placement of modified version of the Wrigley Stern wheels and only slight fill needed where the prop should be. Needed list made. Brass ferrules turn on lathe. 8mm dowel ebay from UK 60mm "V" drive pulley cast in f/glass or Auto bog then machined on lathe (I have a Magnesium vitamin bottle 62mm OD close enough to cast the mix in) and a brass centre spindle approx 10mm dia. 20mm motor drive pulley to suit a 540 motor. 2 - 9mm x100mm x 900mm balsa 3 - 6mm x 100mm x 900mm balsa 2 - 6mm x 9mm x 900 hardwood (pine or spruce Glynn says pine will do) 2 - 6mm sq x 900 4 x 1/43rd cars already bought from UK & France Being a early model Renault enthusiast I bought a 4CV, Dauphine, '64 R8 Gordini and an Alpine A110 This Pic shows the plan mod's  |
|
| | |
davidjt
Forum Sponsor


Posts : 534
Join date : 2013-01-08
Age : 71
Location : n wales coast
| | Subject: Re: Sea Road Lady Sat Jul 20, 2013 11:26 pm | |
| hi Damien,
should look great with paddle wheels, look forward to your build blog when you begin.
david | |
|
| | |
Guest
Guest
| |
| | |
Guest
Guest
| | Subject: Re: Sea Road Lady Fri Aug 16, 2013 11:46 pm | |
| The centre was epoxied into the filler pulley and a aluminium motor pulley was made.  Next was to turn 4 12mm x 35mm brass bolts into centres fo the paddle wheels.  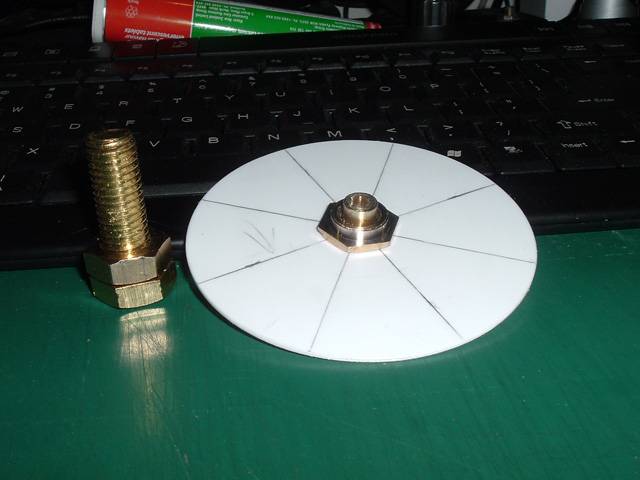 These were also drilled and tapped for 3mm grub screws.
Last edited by Damien on Fri Aug 16, 2013 11:49 pm; edited 2 times in total (Reason for editing : additions) |
|
| | |
Footski
Master

Posts : 548
Join date : 2011-06-11
Age : 66
Location : Malaga, Spain
| | Subject: Re: Sea Road Lady Sat Aug 17, 2013 12:00 pm | |
| A clever idea for the mold Damien. I am going to enjoy this... | |
|
| | |
Guest
Guest
| | Subject: Re: Sea Road Lady Sat Aug 17, 2013 12:15 pm | |
| Thanks Barry I wish I knew why I enjoy working outside the box never building without modifying the plan perhaps I'm a repressed engineer lol
And I have 4 unfinished models. |
|
| | |
davidjt
Forum Sponsor
Posts : 534
Join date : 2013-01-08
Age : 71
Location : n wales coast
| | Subject: Re: Sea Road Lady Sat Aug 17, 2013 2:10 pm | |
| hi Damien,
brilliant idea with the method of making pullys from body filler, will try that myself, is there a patent out yet lol, our am I safe to use | |
|
| | |
Guest
Guest
| | Subject: Re: Sea Road Lady Sun Aug 18, 2013 12:39 am | |
|  You're safe David. |
|
| | |
Guest
Guest
| | Subject: Re: Sea Road Lady Sun Aug 18, 2013 12:33 pm | |
| All the bulkheads, hull bottom, deck , cabin etc, have been traced from the plan and the needed balsa ordered.
Tomorrow I'll laminate some Venetian blind slats for the hardwood strips I'll need for this build.
And hopefully get some more done on the paddle wheels. |
|
| | |
Guest
Guest
| | Subject: Re: Sea Road Lady Wed Aug 21, 2013 1:50 am | |
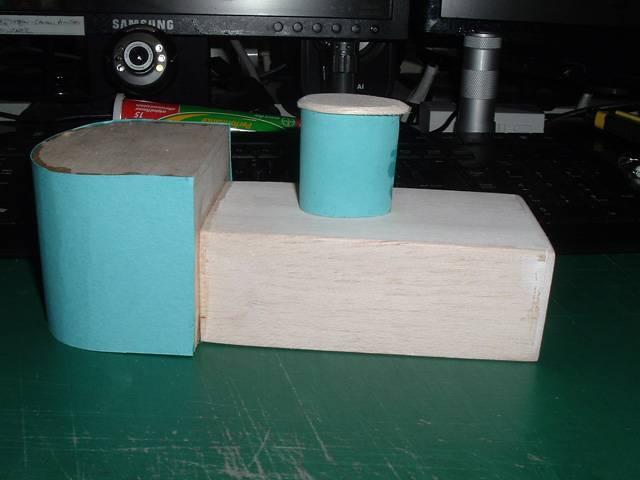
| Bridge, cabin and funnel cut out of scrap, whilst waiting for balsa order to arrive I used some 7mm brass rod to machine the deck ferules I don't have any of the servo mount ferules suggested by Glynn in his build text. Mine are to fit a 5mm hole with hole to fit a 3mm carbon fiber pin. 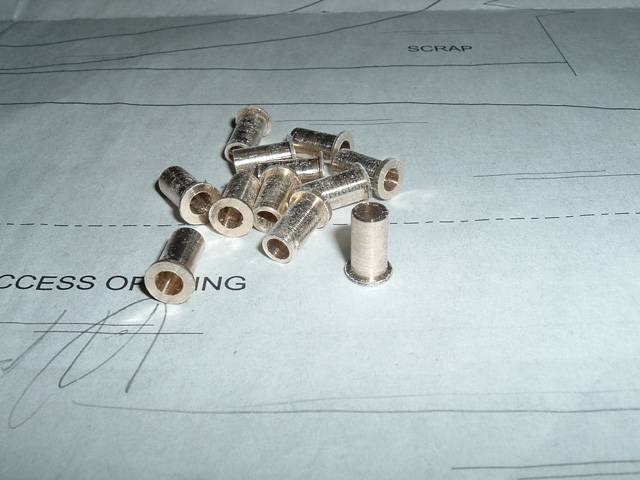
Last edited by Damien on Mon Feb 02, 2015 5:34 am; edited 1 time in total |
|
| | |
Guest
Guest
| | Subject: Re: Sea Road Lady Tue Aug 27, 2013 4:28 am | |
| Ooop's old age creeping in I bought 3mm carbon fibre rods to fit the ferules in the last pic and drilled a 4mm hole in the ferules perhaps I can use these ferules in the future.
I'll start new ones tomorrow |
|
| | |
Guest
Guest
| | Subject: Re: Sea Road Lady Thu Aug 29, 2013 3:09 am | |
| Continuing my build from the top down, cabin was first.  Then bridge.  The 2 life boats were started from scrap 12mm balsa laminated with profile taken from the plan a few minutes on my disc sander and the rough form appears.  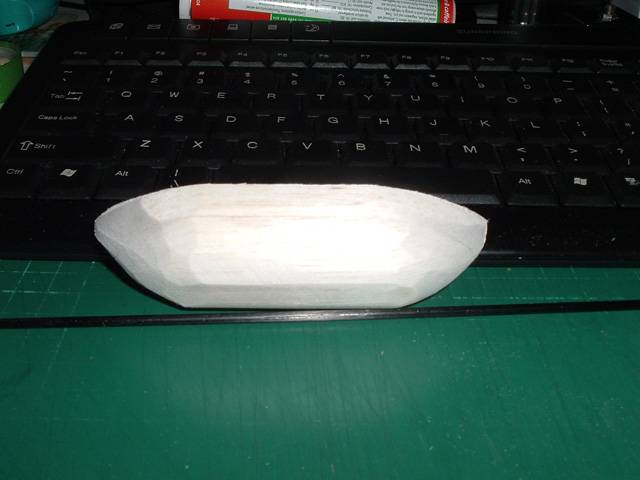 and while I was in a cutting mood the paddle wheel covers were cut from .8mm ply 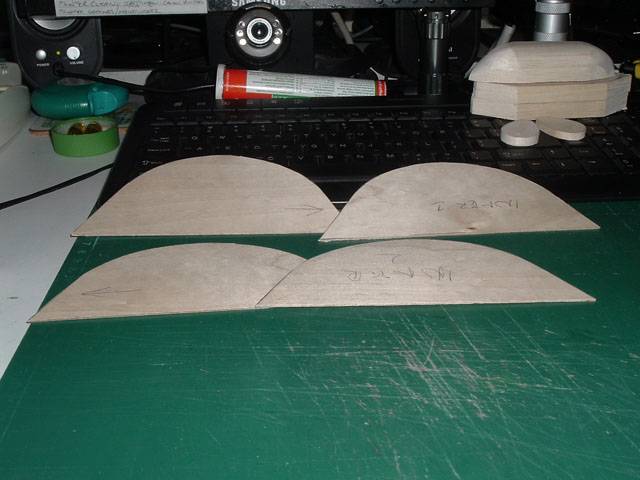 A satisfactory few days, Spring has arrived early were looking at 18c today into 20c's for the weekend more build time in shed.
Last edited by Damien on Tue Oct 22, 2013 5:15 am; edited 1 time in total |
|
| | |
Footski
Master
Posts : 548
Join date : 2011-06-11
Age : 66
Location : Malaga, Spain
| | Subject: Re: Sea Road Lady Thu Aug 29, 2013 7:53 am | |
| Spring Damien? Autumn is thinking of kicking in here in the deep south of Europe. Just had the first rains of the summer.
Coming along nicely. | |
|
| | |
Guest
Guest
| | Subject: Re: Sea Road Lady Thu Aug 29, 2013 1:38 pm | |
| Thanks Barry, 12 new ferules machined.  And a rudder formed around 4mm silver steel shaft with epoxy I still have to make an outer shaft with bearings about 15mm longer than the one in the pic. 
Last edited by Damien on Fri Mar 21, 2014 3:33 am; edited 1 time in total |
|
| | |
Guest
Guest
| | Subject: Re: Sea Road Lady Sat Aug 31, 2013 11:21 am | |
| Busy spring day 18c 4hrs in shed. Both paddle wheels built. Pic 1 was first. 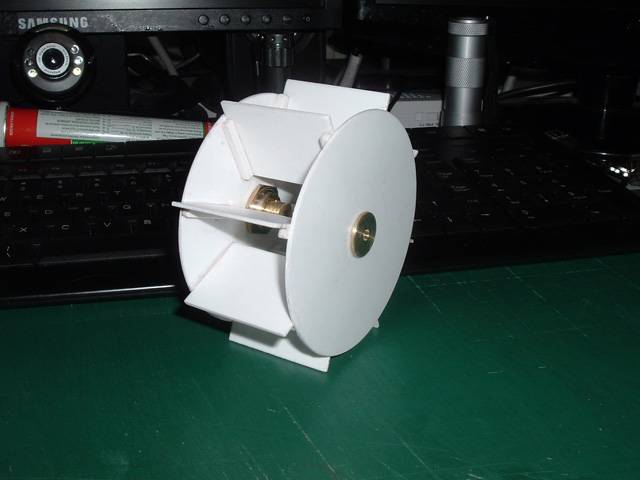 Pic2 second sitting on the alignment jig. 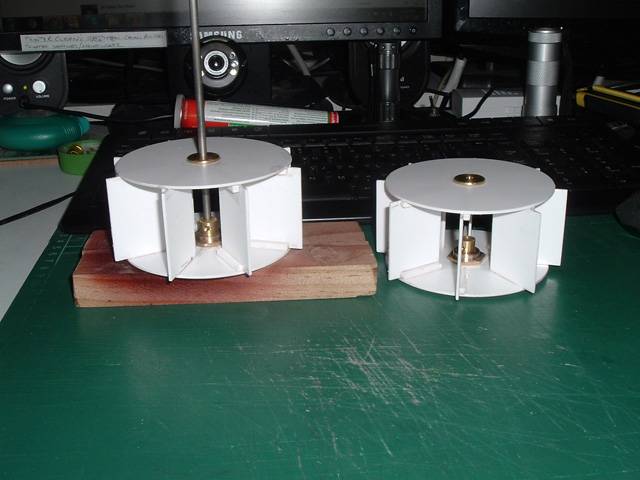 the next 2 pic's whith a wheel in the appropriate position on the plan. 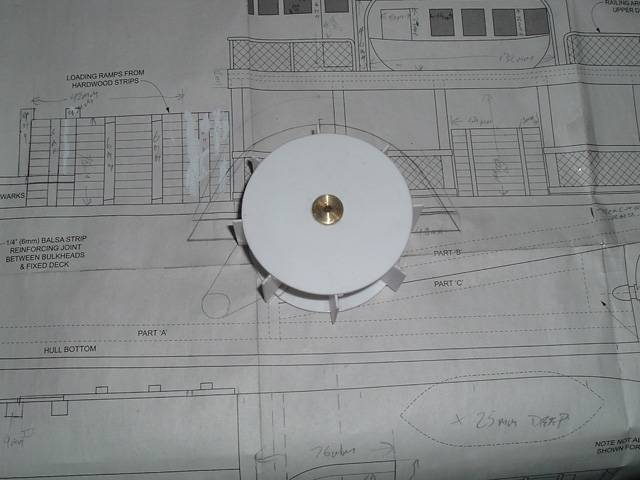 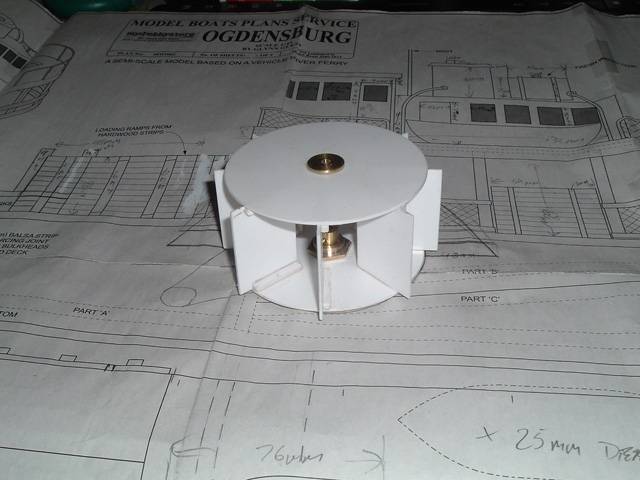
Last edited by Damien on Fri Mar 21, 2014 3:32 am; edited 1 time in total |
|
| | |
Guest
Guest
| | Subject: Re: Sea Road Lady Sun Sep 01, 2013 9:34 am | |
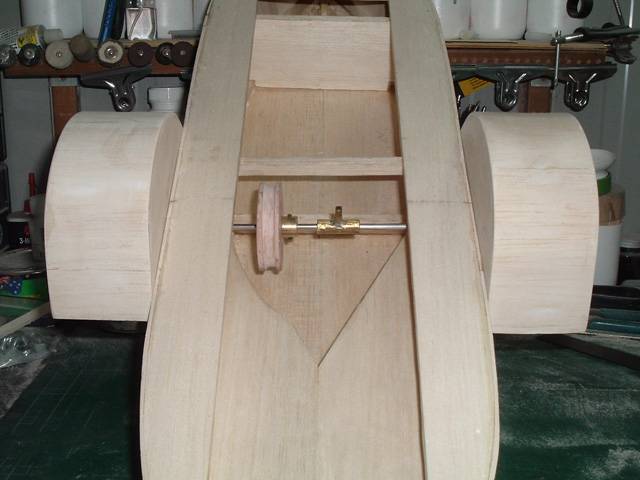
| Made the rudder bearing today the old one is at the top for comparison. 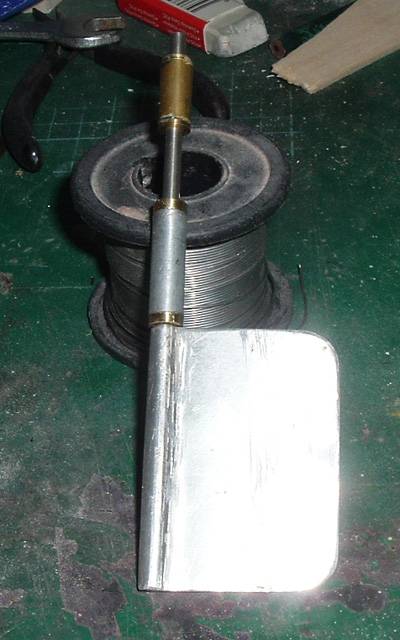 also made a centre bearing for the paddle shaft to combat flex from the drive pulley pressure and 2 through the hull bearings seen in this pic. 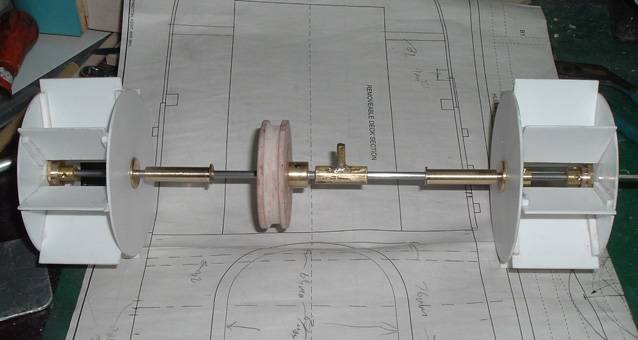
Last edited by Damien on Fri Mar 21, 2014 3:35 am; edited 2 times in total |
|
| | |
Guest
Guest
| |
| | |
Tug--Kenny
Lost But Never Forgotten R.I.P
Posts : 284
Join date : 2011-06-11
Age : 82
Location : Newport, South Wales,UK
| | Subject: Re: Sea Road Lady Mon Sep 02, 2013 8:14 pm | |
| Hi Damien,
Are you going to vent the sides of the paddle wheels ? You may find a pressure wave being built up inside them.
Cheers
Ken | |
|
| | |
Guest
Guest
| | Subject: Re: Sea Road Lady Mon Sep 02, 2013 11:32 pm | |
| Thanks Ken.
I had no idea of such a thing I guess that's why Glynn Guest had one side open on the Wrigley 121 paddles that I'd built before and copied the only reason I left them closed this time was for ease of building as there is no fixed centre tube as each side of the wheels clamp separately to the drive spindle.
I'll do a few mod's to the wheels. |
|
| | |
Tug--Kenny
Lost But Never Forgotten R.I.P
Posts : 284
Join date : 2011-06-11
Age : 82
Location : Newport, South Wales,UK
| | Subject: Re: Sea Road Lady Tue Sep 03, 2013 10:08 am | |
| Hi Damien,
Glad to help.
Have a look on Paddleducks site to see more about paddle wheels. When looking at your design, I should imagine the best thing to do was drill a hole in each side between the blades and 'fettle' out a cavity of your choosing. This would produce a mechanical link between the centre and the blades and also look quite decorative and smart.
let us know how you get on.
Cheers
ken | |
|
| | |
Guest
Guest
| | Subject: Re: Sea Road Lady Tue Sep 03, 2013 11:40 am | |
| Wheels marked for drilling. 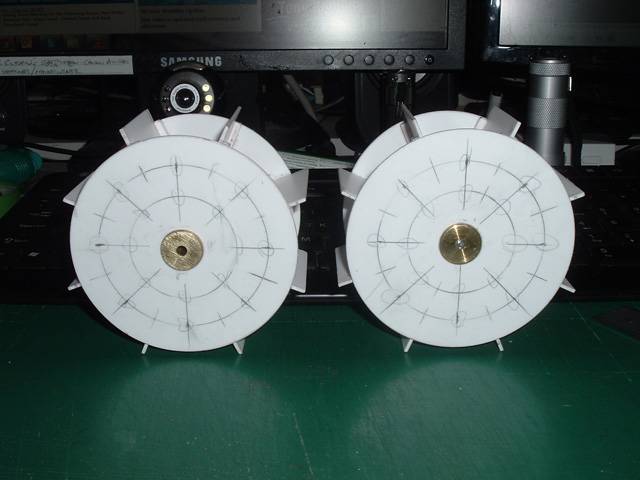 and Job done. 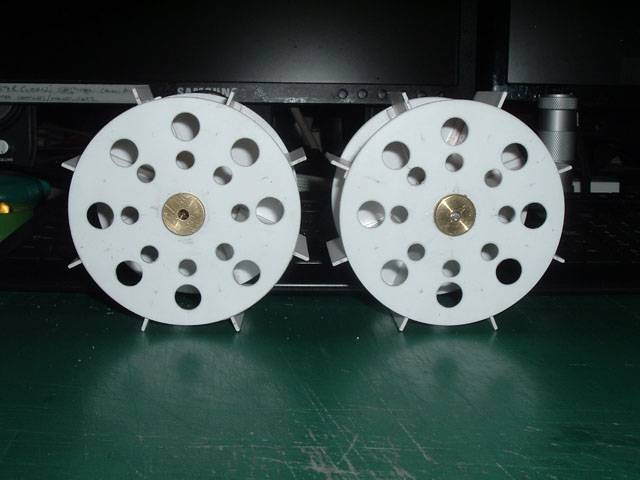 Ken am I right in assuming the paddle covers will need similar venting? |
|
| | |
Tug--Kenny
Lost But Never Forgotten R.I.P
Posts : 284
Join date : 2011-06-11
Age : 82
Location : Newport, South Wales,UK
| | Subject: Re: Sea Road Lady Tue Sep 03, 2013 8:07 pm | |
| Smashing job so far. I would tend to 'Dremmel' between the two circles to form an elongated pear shape. Narrower slots could then be duplicated onto the paddle box sides and it would look quite attractive.  Hope this helps Ken | |
|
| | |
Guest
Guest
| | Subject: Re: Sea Road Lady Tue Sep 03, 2013 10:57 pm | |
| I love watching your builds Damien.........whereas I make every easy task look so b**** hard...........you make everything look so easy to make.....those paddle wheels are superb.
I don't comment much, but I do enjoy watching your work grow.
neil. |
|
| | |
Guest
Guest
| | Subject: Re: Sea Road Lady Wed Sep 04, 2013 4:55 am | |
| Thanks Ken, I'll put a dremel cutting wheel to work on them and when I find the 3 missing wheel cover sides I'll attack them as well. I liked paddleducks so I joined.
Thanks for the kind words Neil but you don't hear the bad words I call myself when things go wrong or the brain crunching of ideas before deciding to build and throughout the build as ideas pop up.
Had a big ooooop's yesterday the model needs 12 upper deck support posts I decided on 8mm dia. and only had enough for 10 so I turned 2 more from 12mm dowel drilled them all for the 3mm pins and pilot holes for the deck screws super glued the pins in and brushed mahogany dye on only to find this morning 6 of the carbon fibre pins a crooked so I ordered 8mm dowel from UK, and 3mm brass rod from USA on ebay.
Although it may look easy mate it ain't necessarily so as Normie Rowe would sing lol
Last edited by Damien on Mon Feb 02, 2015 5:47 am; edited 1 time in total |
|
| | |
Guest
Guest
| | Subject: Re: Sea Road Lady Wed Sep 04, 2013 11:22 am | |
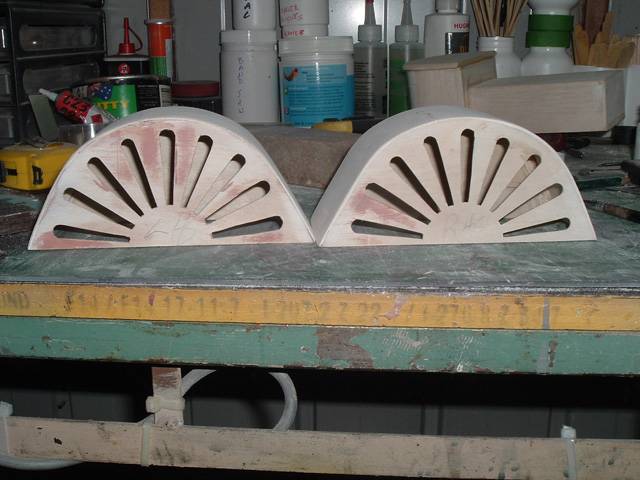
| Here we go the cut outs don't look too bad!!! a slight fluff first on bottom left but I'm NOT making another wheel. I cut to within 1mm of the line and trimmed with a scalpel got a bit over enthusiastic on one lol. 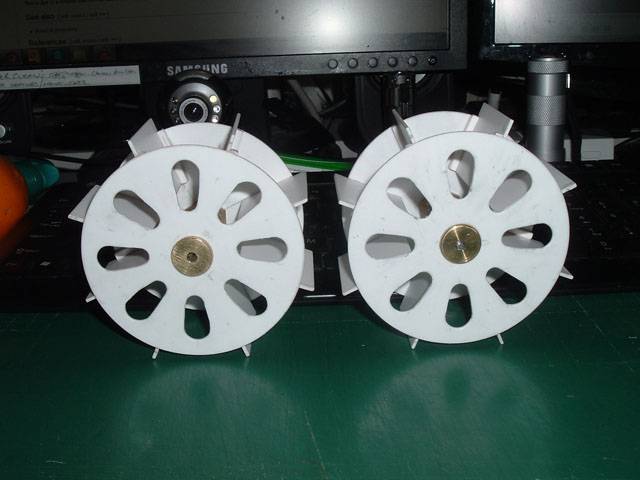 next I sat in front of computer with compass and protractor and designed the wheel cover cutouts. The shaded cut outs are at 20 deg centres. 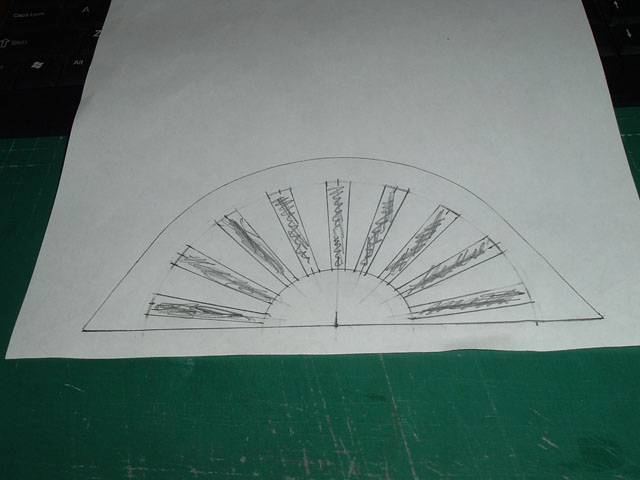 Any feedback on this design gladly accepted. Damien. |
|
| | |
Tug--Kenny
Lost But Never Forgotten R.I.P
Posts : 284
Join date : 2011-06-11
Age : 82
Location : Newport, South Wales,UK
| | Subject: Re: Sea Road Lady Wed Sep 04, 2013 7:56 pm | |
| | |
|
| | |
Guest
Guest
| | Subject: Re: Sea Road Lady Thu Sep 05, 2013 1:20 pm | |
| I made a stencil and drew the outline on the ply covers I'll drill 1mm holes in each corner of the vanes to be removed to ensure I get nice corners. It should be ready for the no 10 scalpel tomorrow.  |
|
| | |
davidjt
Forum Sponsor
Posts : 534
Join date : 2013-01-08
Age : 71
Location : n wales coast
| | Subject: Re: Sea Road Lady Thu Sep 05, 2013 4:30 pm | |
| hi damiem,
bit late in seeing this, but i think they would look better with rounded ends rather than square ends and would match up to paddle wheels, just my feeling. comeing on great now.
david | |
|
| | |
Guest
Guest
| | Subject: Re: Sea Road Lady Fri Sep 06, 2013 10:31 am | |
| How about this?  |
|
| | |
davidjt
Forum Sponsor
Posts : 534
Join date : 2013-01-08
Age : 71
Location : n wales coast
| | Subject: Re: Sea Road Lady Fri Sep 06, 2013 5:52 pm | |
| hi Damien, as pop larkin would say (darling buds of may series) PERFICK david | |
|
| | |
Guest
Guest
| | Subject: Re: Sea Road Lady Fri Sep 06, 2013 9:36 pm | |
| |
|
| | |
Guest
Guest
| | Subject: Re: Sea Road Lady Fri Sep 06, 2013 10:29 pm | |
| |
|
| | |
barriew
Captain (moderator)
Posts : 2627
Join date : 2011-11-26
Age : 83
Location : Thaxted, Essex
| | Subject: Re: Sea Road Lady Mon Sep 09, 2013 6:23 pm | |
| Hi Damien
I always thought I built pretty quickly, bu it is amazing how this has come on in the 2 weeks I have been away:D
Looking very good.
Barrie | |
|
| | |
Guest
Guest
| | Subject: Re: Sea Road Lady Tue Sep 10, 2013 12:50 am | |
| Using a 7.5mm drill for the top of each flute and a 20mm dia saw in my dremel to cut the straight bits and a scalpel for the thin ends I've got a start on the first one. I've ordered 20mm sanding discs for trimming as the ply ruins an emery boards in a few strokes. 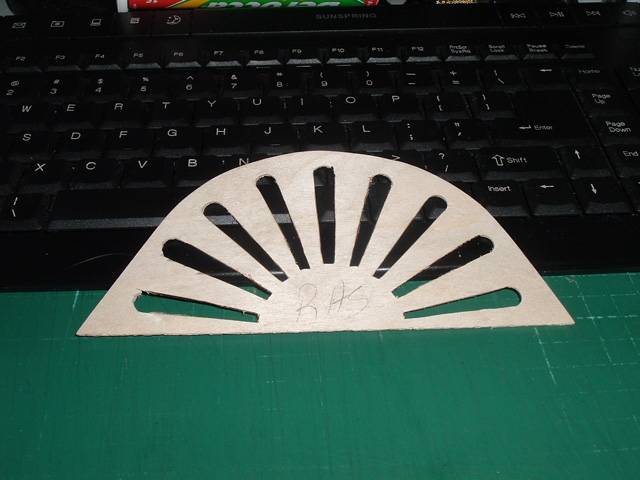 |
|
| | |
davidjt
Forum Sponsor
Posts : 534
Join date : 2013-01-08
Age : 71
Location : n wales coast
| | Subject: Re: Sea Road Lady Tue Sep 10, 2013 12:22 pm | |
| brilliant damien.
i have just put on a cheap way to make your own emery boards, you can make them any shape you want. any bit of scrap timber will do
david | |
|
| | |
Guest
Guest
| | Subject: Re: Sea Road Lady Wed Sep 11, 2013 10:15 am | |
| Both outer covers ready for assembly.  I wasn't happy with the blue card on the bridge house so I peeled it off and clad it with 3/32 balsa. 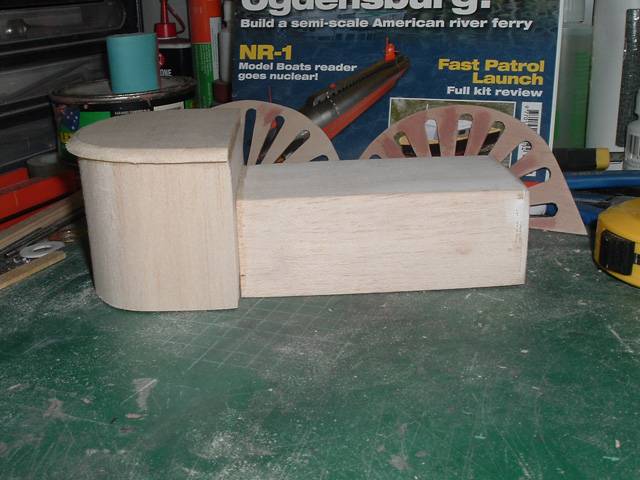 |
|
| | |
Guest
Guest
| | Subject: Re: Sea Road Lady Thu Sep 12, 2013 10:22 am | |
| One assembled trimming needed though, I'm still deciding whether to put another lamination on the roof or not. 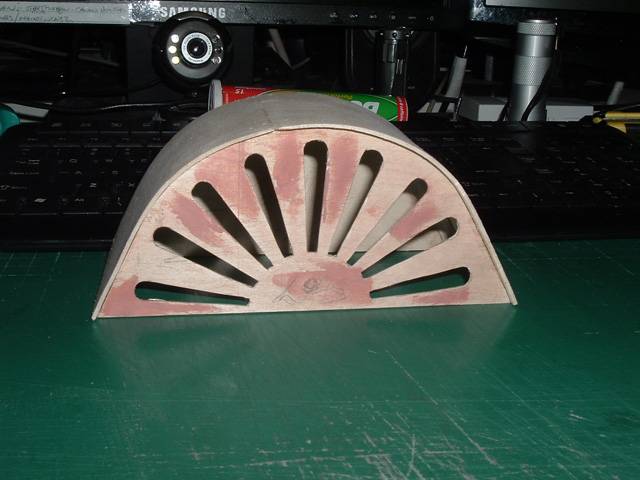 |
|
| | |
Tug--Kenny
Lost But Never Forgotten R.I.P
Posts : 284
Join date : 2011-06-11
Age : 82
Location : Newport, South Wales,UK
| | Subject: Re: Sea Road Lady Thu Sep 12, 2013 10:25 am | |
| That's fine. i wouldn't add to it because of the extra weight hanging over the edge of the ship.
Cheers
ken | |
|
| | |
Guest
Guest
| | Subject: Re: Sea Road Lady Thu Sep 12, 2013 10:32 am | |
| Thanks Ken, I'll coat with dope prior to paint. |
|
| | |
Guest
Guest
| | Subject: Re: Sea Road Lady Fri Sep 13, 2013 10:07 am | |
| T second wheel box sides with the top supports cut from 6mm balsa and roughly made triangle shaped with a dremel tube sander. 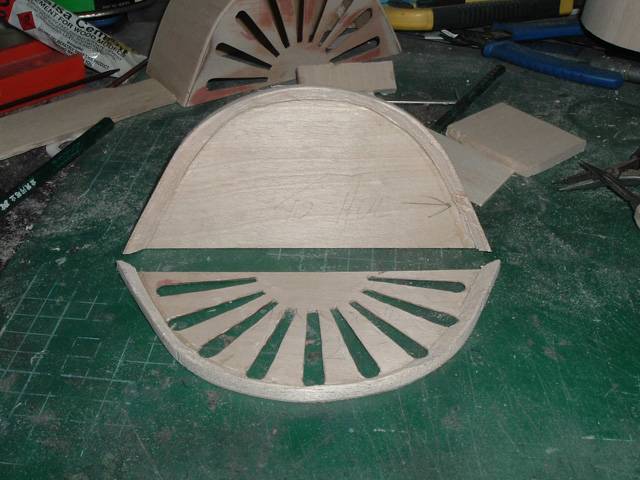 4 braces held everything square and were sacrificed after the top was dried. 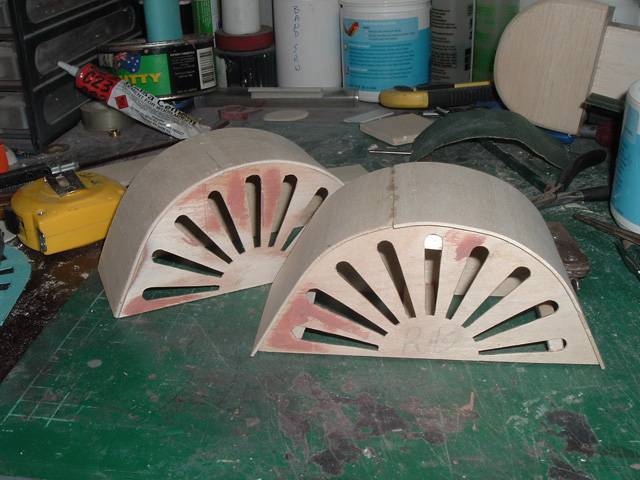 The first was trimmed and the 2nd is in foreground. I had a good stint in the shed today also got the hull bottom and deck marked and ready for the band saw.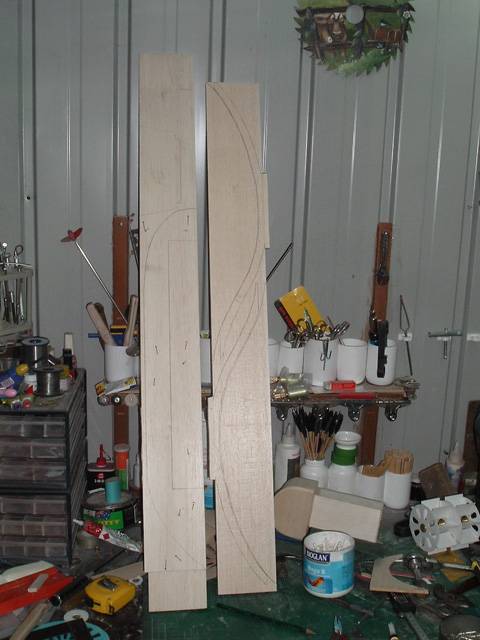 As you'll notice the hull bottom pieces requires a little more than 100mm 2 small pieces of scrap fixed it. As you'll notice the hull bottom pieces requires a little more than 100mm 2 small pieces of scrap fixed it. |
|
| | |
Guest
Guest
| | Subject: Re: Sea Road Lady Fri Sep 13, 2013 11:29 pm | |
| those sponsons are looking superb Damien.
neil. |
|
| | |
Guest
Guest
| | Subject: Re: Sea Road Lady Sat Sep 14, 2013 12:35 am | |
| Here's the pic of the braces. brain fade yesterday.  |
|
| | |
Guest
Guest
| |
| | |
Guest
Guest
| | Subject: Re: Sea Road Lady Sun Sep 15, 2013 7:39 am | |
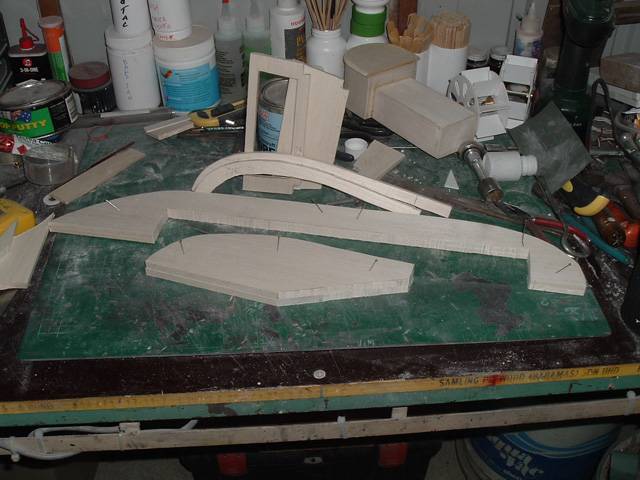
| Put the dope on the outside of the wheel boxes and doped the bridge/cabin assembly. Finished the band saw work and started putting the hull together. 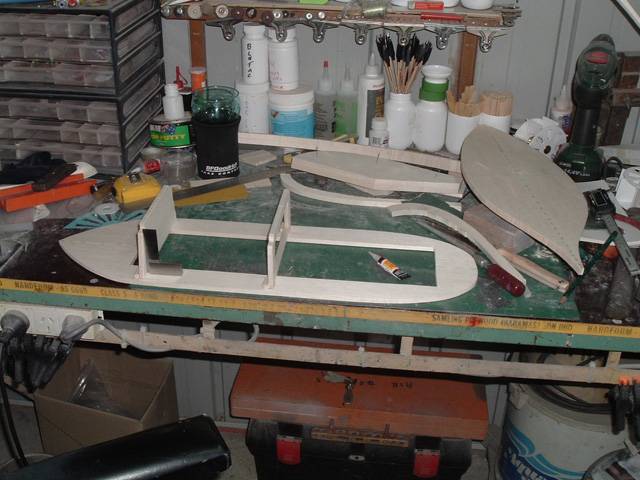 Although traced directly from the plan the deck and hull bottom were correct the rest of the hull structure pieces were wrong and will need filler pieces or removal of some balsa.   |
|
| | |
Guest
Guest
| | Subject: Re: Sea Road Lady Tue Sep 17, 2013 12:27 pm | |
| Life boats ready for sealer. 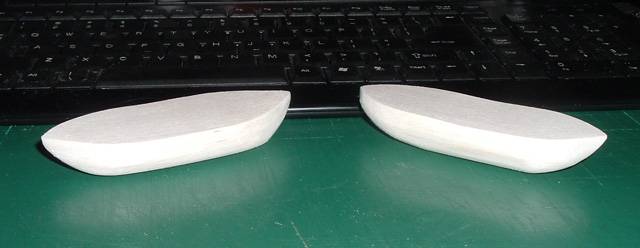 |
|
| | |
Guest
Guest
| | Subject: Re: Sea Road Lady Sat Sep 21, 2013 1:27 pm | |
| The hull profile angles sanded She's ready for clothes (outer skin)  Quite a bit of the skin panels applied.  As my first attempt at upper deck support pillars ended with the locate dowels as weird angles I very carefully drilled the location pin holes and the deck attachment screw holes in my lathe, after drilling the 3mm pin hole I counter bored a 7.5mm hole so that it sat over the ferule hiding them from view on the finished model. With the 9mm dowel still chucked in the lathe I put the 3mm brass pin in the tailstock chuck put a drop of super glue on the end and forced it home & waited 1min for the glue to lock it in ensuring a well located pin. 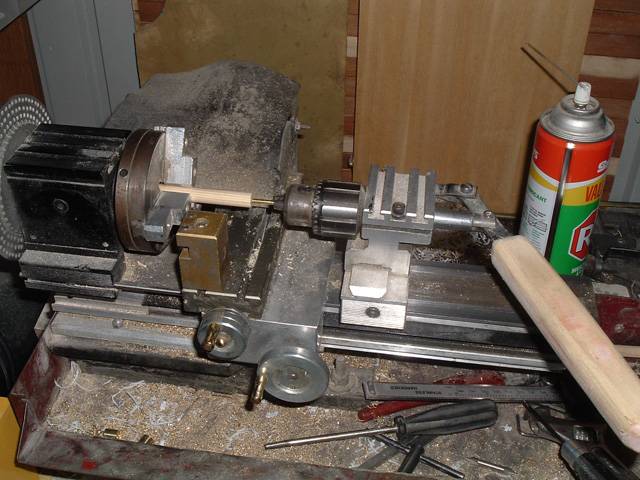 Ready for staining. 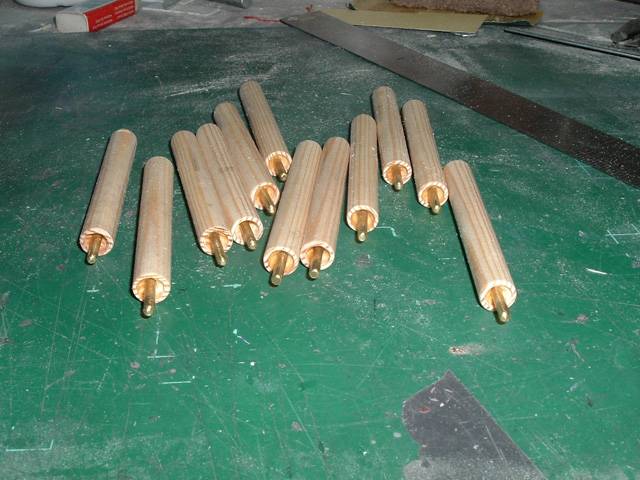 |
|
| | |
Guest
Guest
| | Subject: Re: Sea Road Lady Mon Sep 23, 2013 9:45 am | |
| Skin finished, trimmed and sanded. 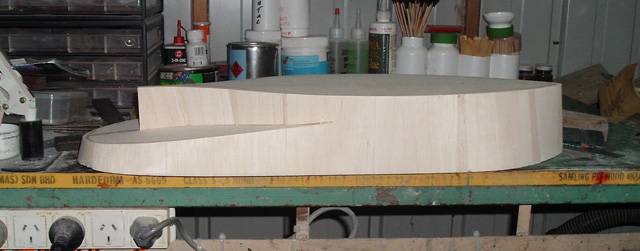 Triangle fillet added to sten hull bottom. 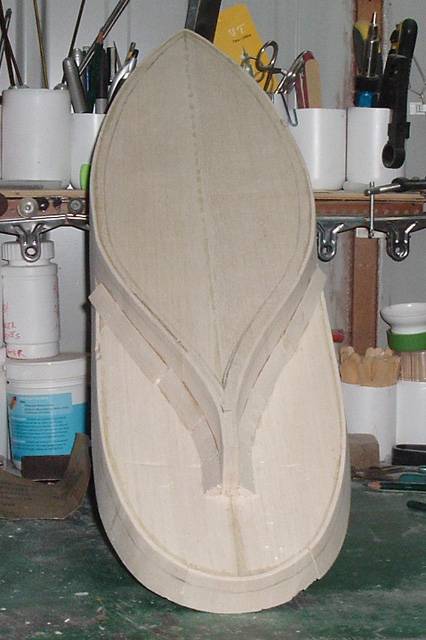 Rough shaping with a 12mm drum sander in the Dremel.  Some of the 3mm balsa sheeting was a bit soft and the sand paper broke pieces out of it nothing spak filler won't fix though. |
|
| | |
Guest
Guest
| | Subject: Re: Sea Road Lady Mon Sep 23, 2013 1:04 pm | |
| A problem arose how to sand the triangle fillets to a hull curve when I saw upon my bench a fairly soft plastic tube with lid I almost filled it with water and super glued the lid on giving a firm tube of just tghe right diameter. I cut a 20mm strip of 100 grit sand paper and glued the paper to the tube. 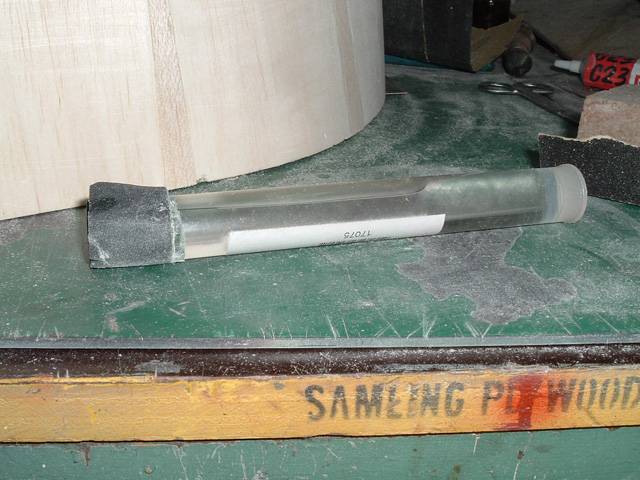 Hull curves almost done and ready for filler. 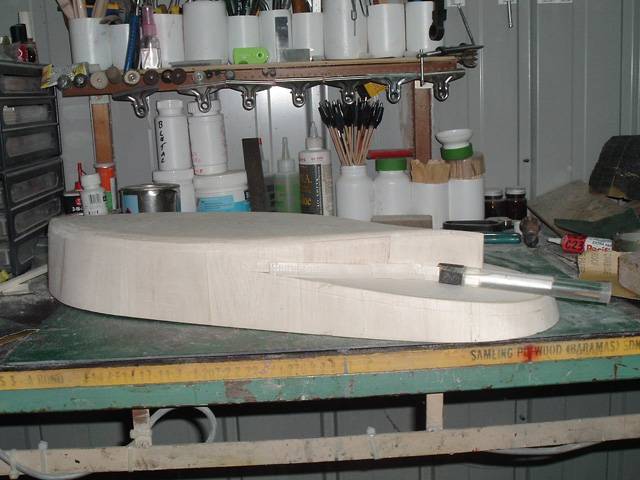 |
|
| | |
Guest
Guest
| | Subject: Re: Sea Road Lady Tue Sep 24, 2013 9:21 am | |
| |
|
| | |
barriew
Captain (moderator)
Posts : 2627
Join date : 2011-11-26
Age : 83
Location : Thaxted, Essex
| | Subject: Re: Sea Road Lady Tue Sep 24, 2013 5:04 pm | |
| Hi Damien, That's an interesting hull shape. I wonder if you will get enough effect from the rudder as you don't have individual control of the paddles. If you noticed the photo I posted of the old paddler in Germany it had an enormous rudder. Looking forward to seeing one or other (or better yet both  ) paddlers on the water. Barrie | |
|
| | |
Sponsored content
| | Subject: Re: Sea Road Lady | |
| |
|
| | |
| | Sea Road Lady | |
|