| | Sea Road Lady |  |
|
|
|
| Author | Message |
|---|
davidjt
Forum Sponsor


Posts : 534
Join date : 2013-01-08
Age : 71
Location : n wales coast
| | Subject: Re: Sea Road Lady Sun Oct 20, 2013 11:56 am | |
| damien's lesson for the day AMEN  he is watching over you.  david | |
|
| | |
Guest
Guest
| | Subject: Re: Sea Road Lady Mon Oct 21, 2013 12:33 am | |
| |
|
| | |
Guest
Guest
| |
| | |
Guest
Guest
| | Subject: Re: Sea Road Lady Wed Oct 23, 2013 10:10 am | |
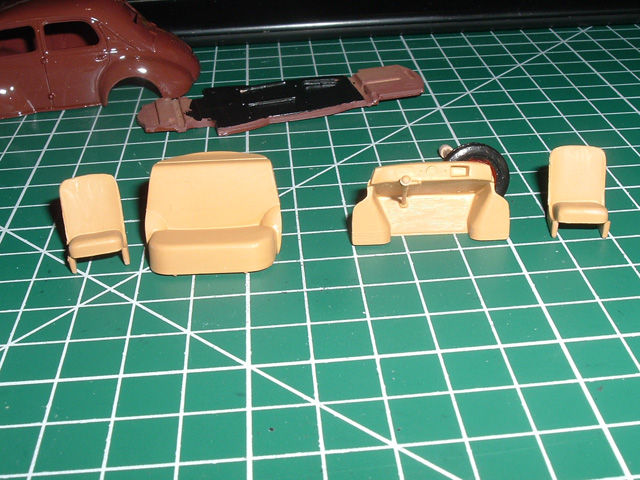
| Thinking on what David said about the name I only had 5mm to play with on the outer face of the paddle boxes so I did a mock up of a board on the top of the boxes after several hours on publisher trying for a curved sign I gave up and settled on this one just sitting in place.  Back to the shed and made these.   When the painting is complete I'll print the name on decal paper and spray gloss over the top. |
|
| | |
davidjt
Forum Sponsor
Posts : 534
Join date : 2013-01-08
Age : 71
Location : n wales coast
| | Subject: Re: Sea Road Lady Wed Oct 23, 2013 2:26 pm | |
| hi Damien, that looks ok to me   david | |
|
| | |
Guest
Guest
| | Subject: Re: Sea Road Lady Sat Oct 26, 2013 12:56 pm | |
| Cold weather has kept me from the shed got half an hour today and made a 34mm x 28mm water tank still need the bands and tap. A Berocca vitamin can has a diameter of 25mm so I wrapped a 34mm strip of 1.5mm balsa around it then cut 3 circles from 3mm balsa for the ends.  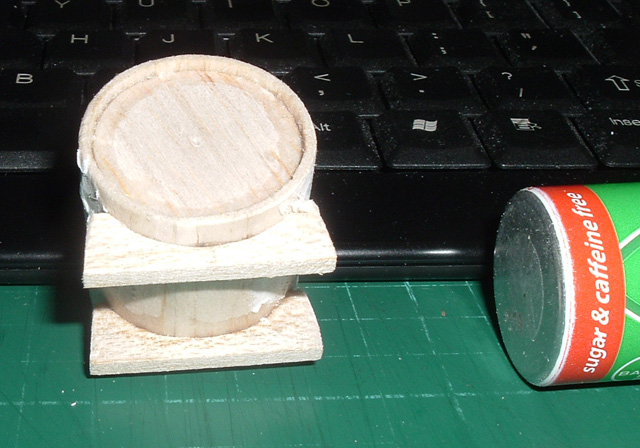
Last edited by Damien on Fri Mar 21, 2014 7:19 am; edited 1 time in total |
|
| | |
Guest
Guest
| | Subject: Re: Sea Road Lady Sat Oct 26, 2013 5:19 pm | |
| they really come alive when that first coat of primer goes on and it becomes a ship, and not some bits and pieces of plastic, wood and metal........always like that stage.
neil. |
|
| | |
davidjt
Forum Sponsor
Posts : 534
Join date : 2013-01-08
Age : 71
Location : n wales coast
| | Subject: Re: Sea Road Lady Sat Oct 26, 2013 6:49 pm | |
| hi Damien when does the warm weather start down under. we seem to be having a indian summer so far quite mild. looking good like neil said. what colour are you doing the lettering( look good in green) 
whats next
david | |
|
| | |
Guest
Guest
| | Subject: Re: Sea Road Lady Sun Oct 27, 2013 12:18 am | |
| We're having a cold spring only had 2 days above 20c
warming in the next week but cold nights continue.
http://www.weatherzone.com.au/vic/central/ballarat
I'll use that green it's the only green my printer produces I'll try printing 2 or 3 times to make it look more solid prior to spraying Auto acrylic clear over it.
Last edited by Damien on Sun Oct 27, 2013 11:58 pm; edited 1 time in total |
|
| | |
Guest
Guest
| | Subject: Re: Sea Road Lady Sun Oct 27, 2013 6:24 pm | |
| that's a warm summer to us matey, lol |
|
| | |
Guest
Guest
| | Subject: Re: Sea Road Lady Tue Nov 05, 2013 12:31 am | |
| Stairs with the primer on I like the colour I think some shoe scuff marks and a coat of satin clear will finish them off.  I think my hull problem was me pressing to hard whilst sanding back the primer and cracking the surface I blame soft balsa skin moving under pressure of a single finger on this tight curve. The plaster mixed with high build auto primer worked well. 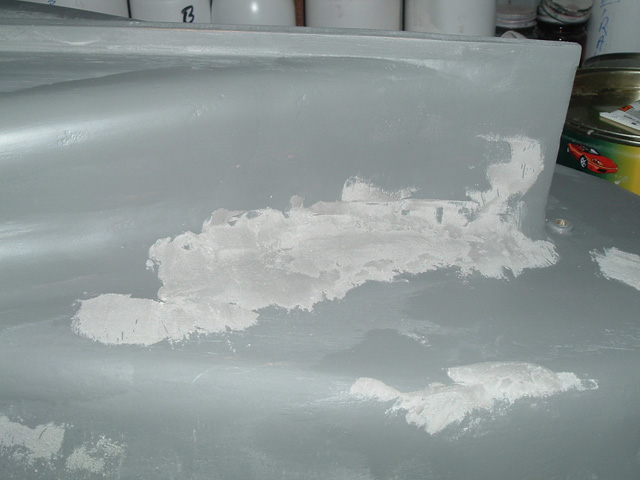 Left it several hours and started sanding back as the dark line shows it wasn't fully dry but sanded well and clogged w/dry paper quickly 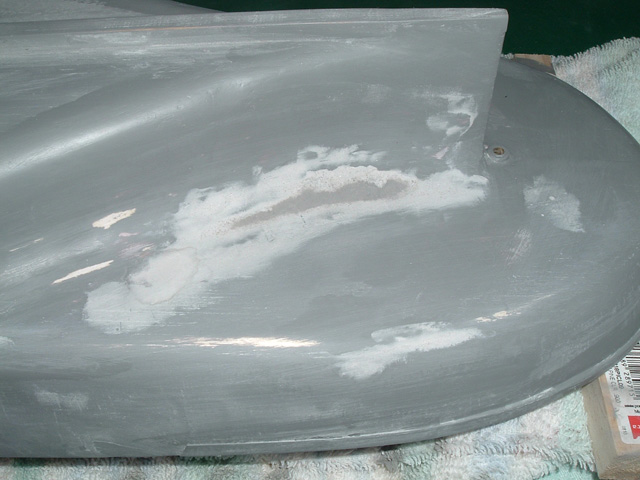 |
|
| | |
Guest
Guest
| | Subject: Re: Sea Road Lady Tue Nov 05, 2013 2:18 pm | |
| it'll be alright in the end, Damien...............I gave up on balsa wood years ago because I was too heavy handed but admire those of you who can work it the way you do. takes concentration and patience..........something I haven't got when things go wrong. lol |
|
| | |
Guest
Guest
| | Subject: Re: Sea Road Lady Tue Nov 05, 2013 11:16 pm | |
| Ooooh I considered hammer surgery!!!!!!!! then thought of the cash spent on this project and my pockets won. |
|
| | |
Guest
Guest
| | Subject: Re: Sea Road Lady Fri Nov 08, 2013 9:17 am | |
| Paint on below water line. 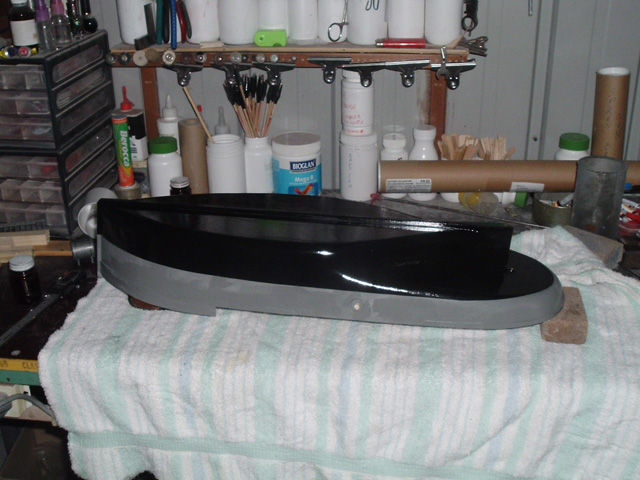 I painted the water tank yesterday, today I added the brass wire bands. 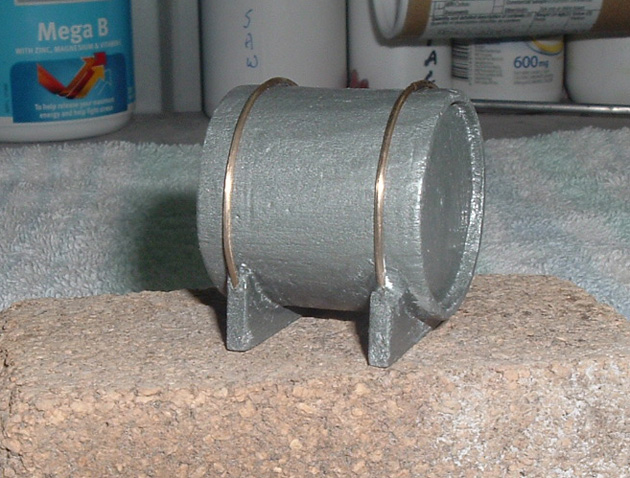 I got a coat of paint on the inside and outer walls of the paddle boxes it's a pale yellow called Ivory and looks good. 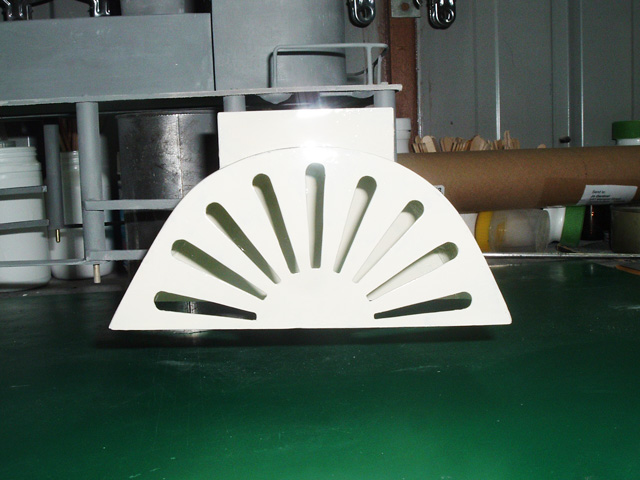 and tuther side. 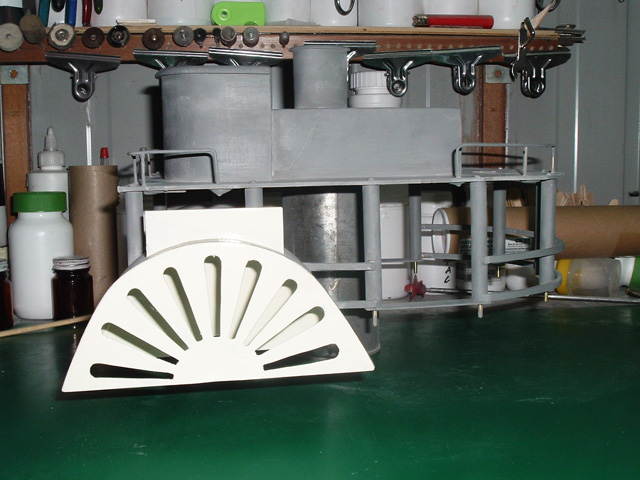 |
|
| | |
Guest
Guest
| | Subject: Re: Sea Road Lady Wed Nov 20, 2013 12:01 am | |
| I Have the hull hassles sorted had a warm day yesterday and got primer and colour on the paddle wheels. 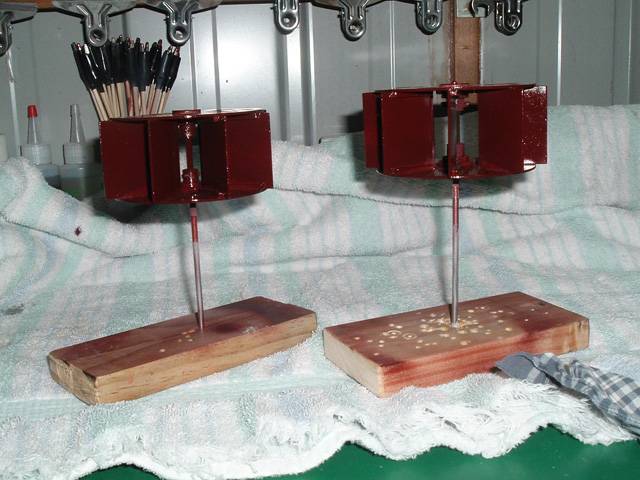 After the problems with mask tape peeling patches of first coat off I lashed out and bought some Fine line low tac mask in 3mm, 6mm and 12mm hopefully it won't happen again. Masked and brushed the green on the wheel boxes. 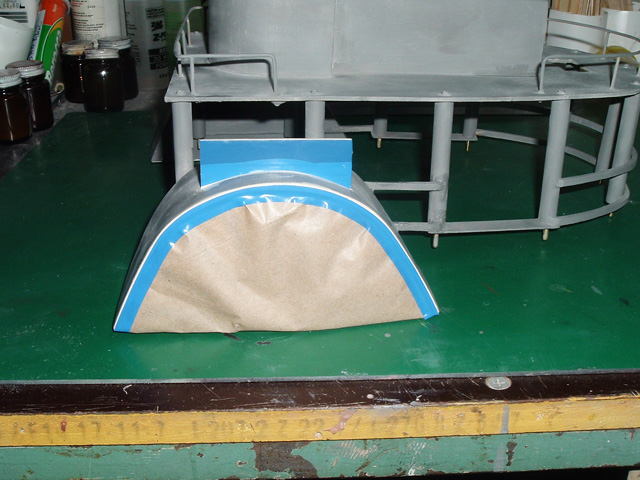 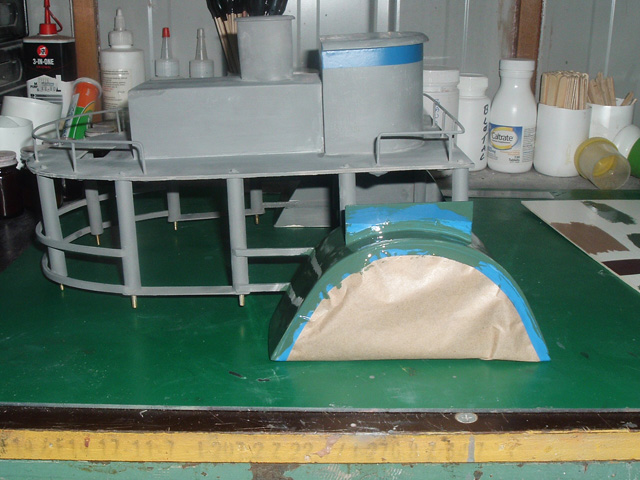 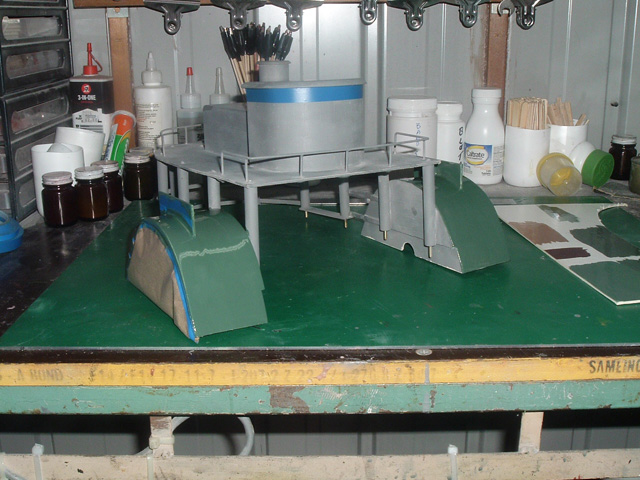 |
|
| | |
Guest
Guest
| | Subject: Re: Sea Road Lady Wed Nov 20, 2013 5:53 pm | |
| looking amazing Damien............I like it more and more every time you post some. neil. |
|
| | |
Guest
Guest
| | Subject: Re: Sea Road Lady Thu Nov 21, 2013 9:08 am | |
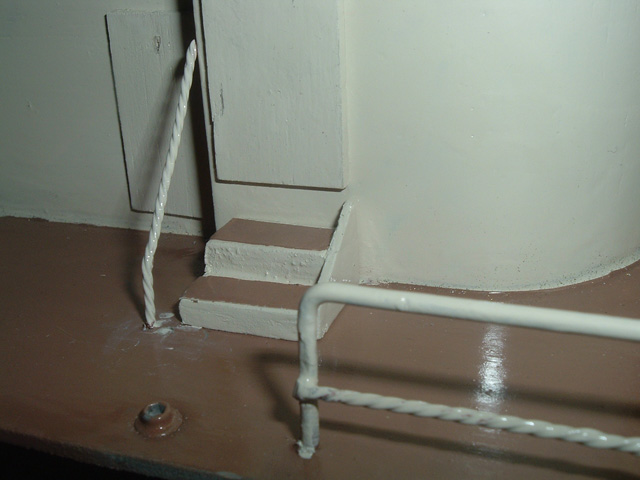
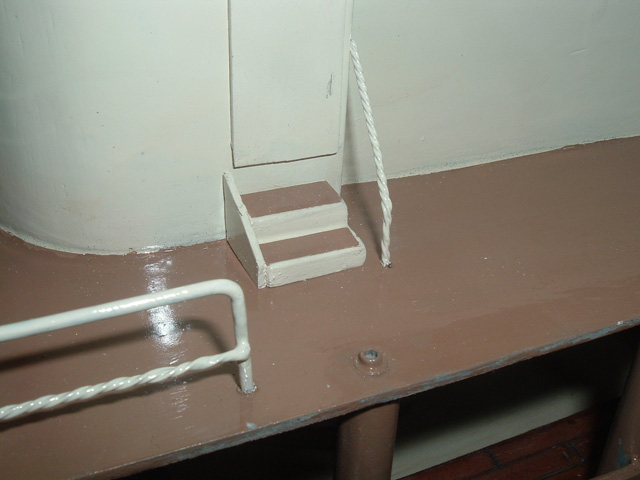
| Paint on the cabin sides I decided it was easier this way rather than mask the deck around the bridge.  and made a start on the rails for the stairwell. 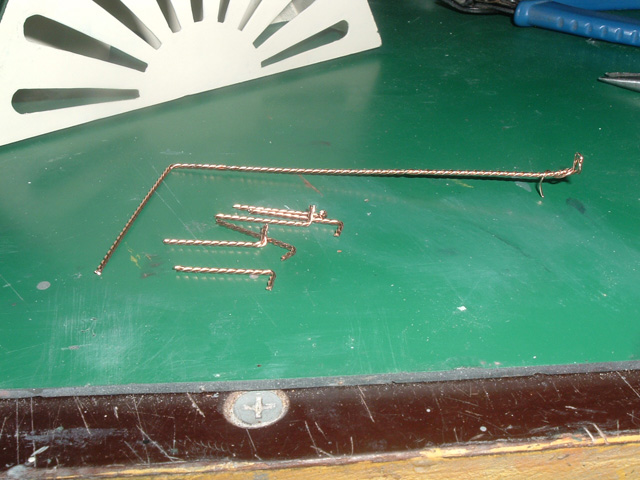 |
|
| | |
Guest
Guest
| | Subject: Re: Sea Road Lady Sun Nov 24, 2013 11:02 am | |
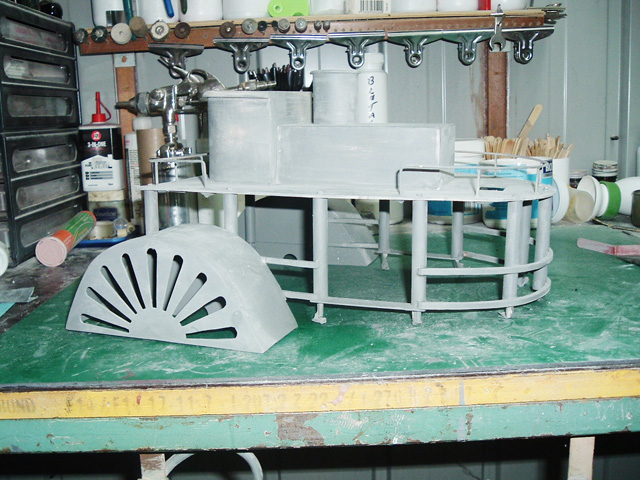
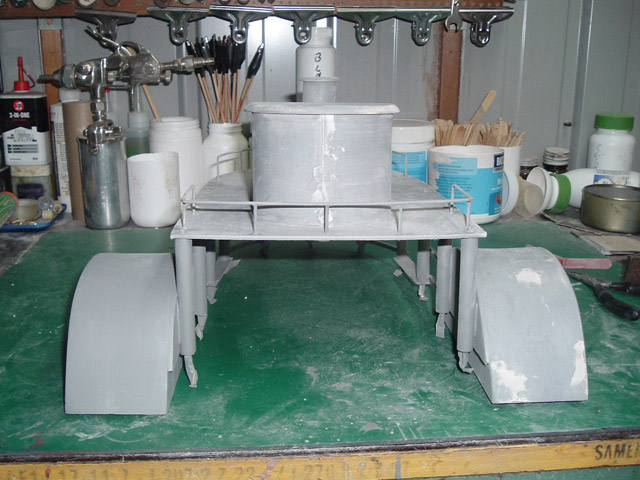
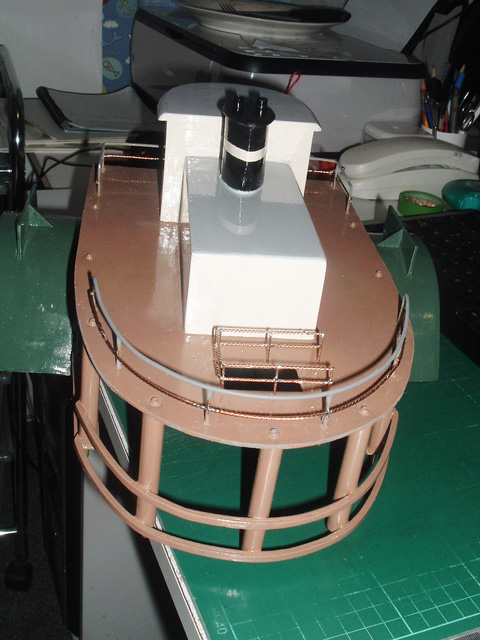
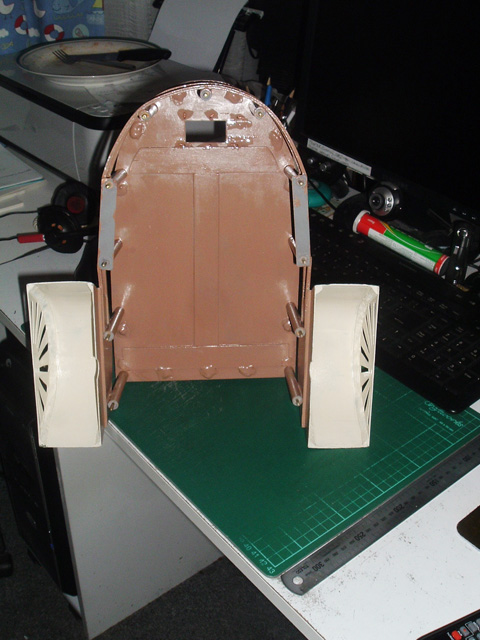
| Got the brown on the uprights and under the bridge deck.  And added the exhaust stacks and a band of ivory paint on the funnel waiting on a band of 3mm mask tape for the ivory stripe after painting the funnel black. Shown in the first of these 3 pics  |
|
| | |
Guest
Guest
| |
| | |
Guest
Guest
| | Subject: Re: Sea Road Lady Sun Dec 01, 2013 4:03 am | |
| Some progress this morning ahead of a 30c max it will be to hot in shed later. Green on hull is dry time to put upper deck in place to appraise the colour mix can say I'm happy with it. 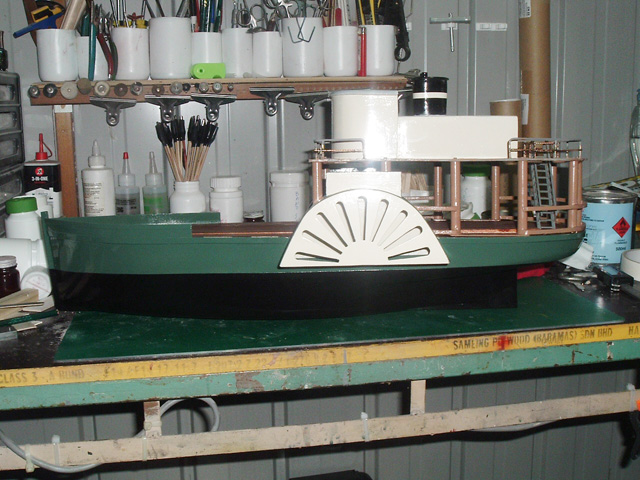 Time to add the ramp pulley posts with the car ramps sitting in place as a guide.  Posts secure with super glue I'll put epoxy inside later.  
Last edited by Damien on Wed Jan 01, 2014 7:25 am; edited 1 time in total |
|
| | |
barriew
Captain (moderator)
Posts : 2627
Join date : 2011-11-26
Age : 83
Location : Thaxted, Essex
| | Subject: Re: Sea Road Lady Sun Dec 01, 2013 7:30 am | |
| Looking good Damien. I like the colour scheme. Barrie | |
|
| | |
Guest
Guest
| | Subject: Re: Sea Road Lady Tue Dec 03, 2013 9:05 pm | |
| I agree...........superb.
neil |
|
| | |
Guest
Guest
| | Subject: Re: Sea Road Lady Wed Dec 04, 2013 10:08 am | |
| Steps to bridge in place will make hand rails tomorrow The u/deck safety rails painted a very fiddly job for stiff fingers. 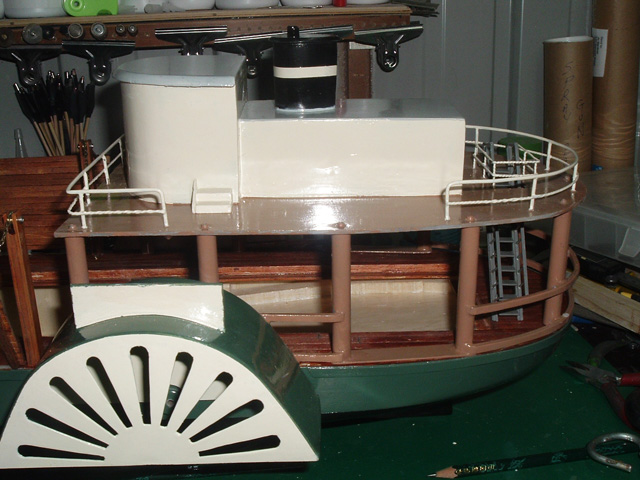 Fitted the deck chain ferrules for the car ramps and fitted the chains to aluminium attachment barwith fishing swivels at outer edge of the ramps.  Chains held with blutac until I epoxy the from inside the hull. 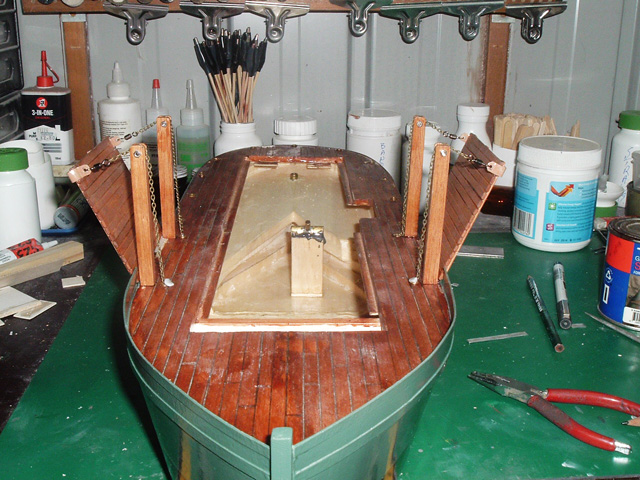 |
|
| | |
Guest
Guest
| |
| | |
Guest
Guest
| | Subject: Re: Sea Road Lady Sun Dec 08, 2013 5:35 pm | |
| |
|
| | |
Guest
Guest
| | Subject: Re: Sea Road Lady Thu Dec 12, 2013 11:58 am | |
| |
|
| | |
Guest
Guest
| | Subject: Re: Sea Road Lady Sun Dec 15, 2013 6:20 pm | |
| looking really superb, Damien. I wish more would post their builds...there are ( I think) only 3.4 of you posting builds at the mo.......what are people afraid of.????? |
|
| | |
Guest
Guest
| | Subject: Re: Sea Road Lady Sun Dec 15, 2013 10:42 pm | |
| My video card is working at present so I'll post pics before it over heats.  Cut out life boat covers from thin kid leather and glued with pva.   And found I'd made the guard rails too short and had to add about 30mm. 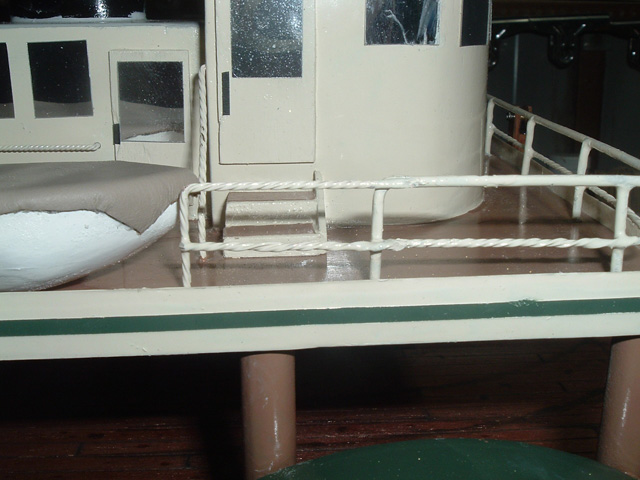 |
|
| | |
Guest
Guest
| | Subject: Re: Sea Road Lady Sun Dec 22, 2013 8:29 am | |
| Spent more time in the shed while my computer was broken. The life boat davits were rather fiddly with the arms finger bent to the plan the fittings each end were turned on my micro lathe several extras were needed as they became airborne whilst parting them off. 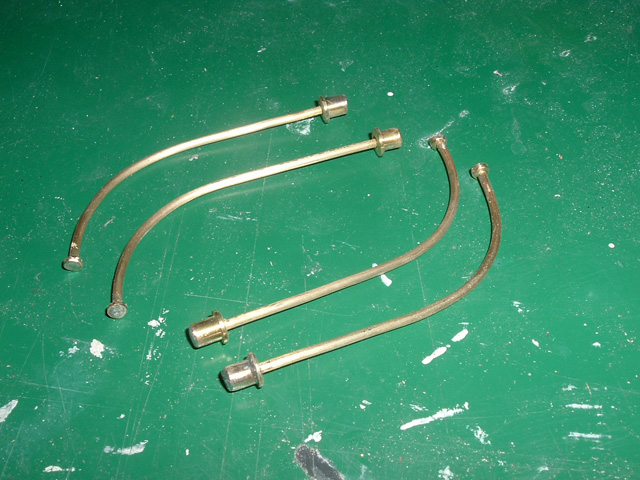 After painting. 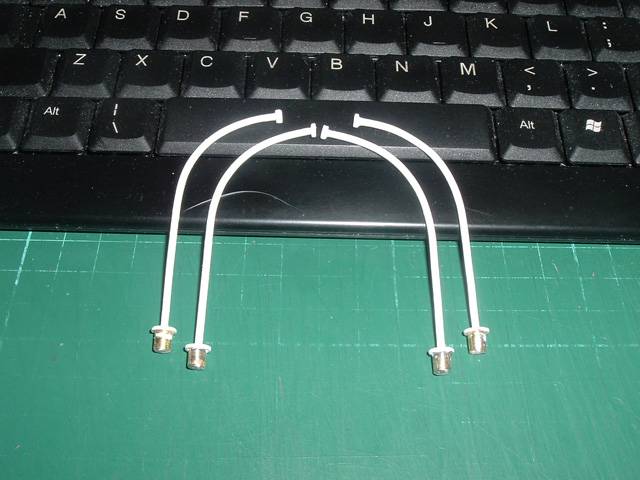 Next came the siren also fiddly given it's size.  This next item I have no idea what it is. Glynn Guest put one on the bridge roof of his Ogdensburg ferry it was not on the plan but was in the pictures so I did my best to replicate it. 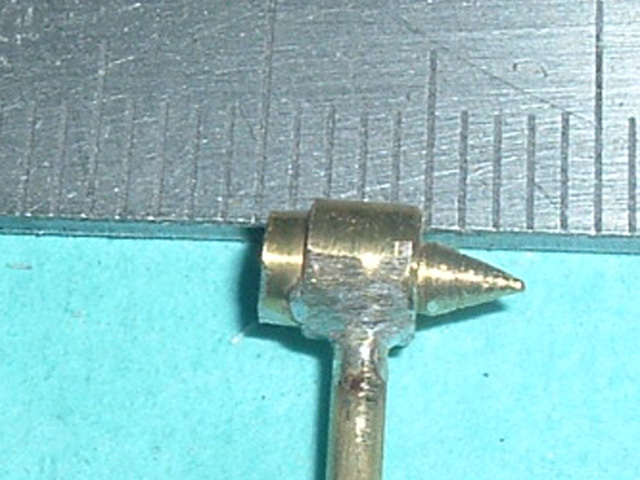 Next was mooring post's and cabin roof vents in the MB's article Glynn used nails for these so I did the same with plasterers clouts, for the vents I mixed some auto filler and applied it to the tops when cured I chucked the nails in my drill and formed the shape with sand paper on the spinning nail. 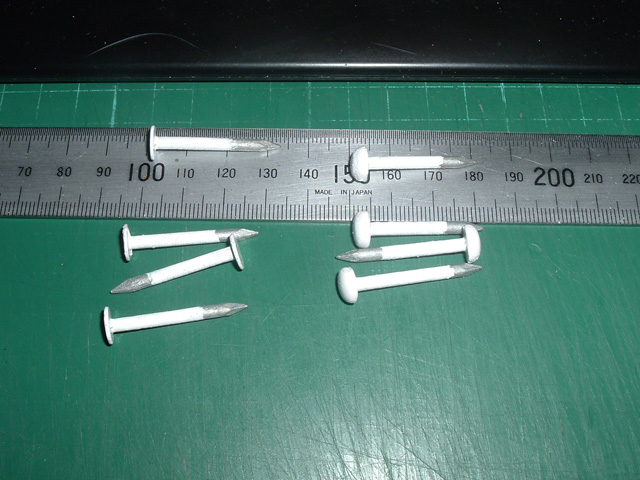 |
|
| | |
barriew
Captain (moderator)
Posts : 2627
Join date : 2011-11-26
Age : 83
Location : Thaxted, Essex
| | Subject: Re: Sea Road Lady Sun Dec 22, 2013 8:53 am | |
| Very clever Damien - great attention to detail. Barrie | |
|
| | |
Guest
Guest
| | Subject: Re: Sea Road Lady Mon Dec 23, 2013 12:14 am | |
| Thanks Barrie. |
|
| | |
Guest
Guest
| | Subject: Re: Sea Road Lady Mon Dec 23, 2013 11:38 am | |
| For want of a name I call this a thingy, it looks better cleaned up and painted. I lost 4 that were thrown across the shed while parting off on the lathe. This one I parted to 1mm of brass left and finished with a hacksaw.  |
|
| | |
Guest
Guest
| | Subject: Re: Sea Road Lady Thu Dec 26, 2013 4:43 am | |
| The mast made with 1.5mm polystyrene and some scrap I also made brass ferrule for it to sit in so it can be removed for transport. 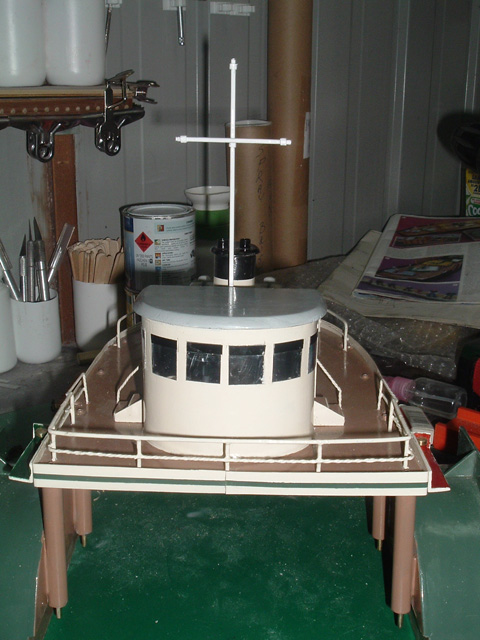 I also got the lifeboat davits fitted. 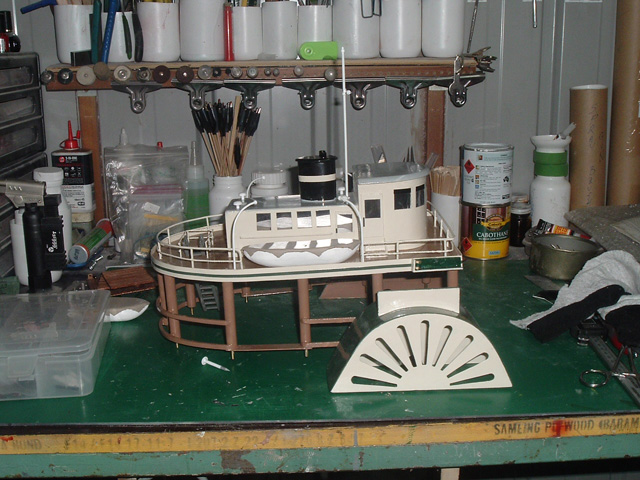
Last edited by Damien on Fri Mar 21, 2014 7:45 am; edited 1 time in total |
|
| | |
Guest
Guest
| | Subject: Re: Sea Road Lady Fri Dec 27, 2013 10:25 am | |
| Coming together started on and finished mounting the motor mount assembly today also cut and joined the drive belt I was surprised after heat joining the 2mm dia synthetic belting and trimming after cooling I couldn't break it I guess that's why the say it's for watchmakers lathe drive. Any how after fooling with it I thought I'd put the upper deck in place to see what it's looking like. Must say I'm very pleased with her. 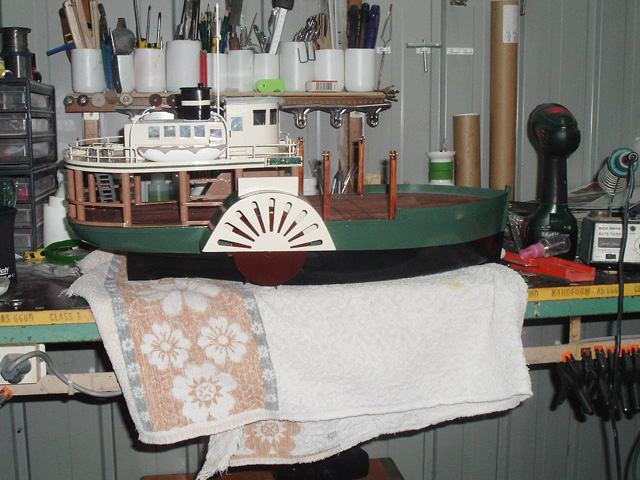 I printed the Sea road lady name on decal paper trimmed it a put them in soapy water when I pulled the first I realised I forgot a major step I hadn't put a clear sealer coat on to stop the ink from running ohh well another senior moment. |
|
| | |
Guest
Guest
| | Subject: Re: Sea Road Lady Sun Dec 29, 2013 12:21 pm | |
| The name looks good.  |
|
| | |
davidjt
Forum Sponsor
Posts : 534
Join date : 2013-01-08
Age : 71
Location : n wales coast
| | Subject: Re: Sea Road Lady Sun Dec 29, 2013 2:12 pm | |
| hi Damien, looks good with name on . are you ready for the big launch now. david | |
|
| | |
Guest
Guest
| | Subject: Re: Sea Road Lady Sun Dec 29, 2013 10:18 pm | |
| Not finished yet still have final coat of satin clear on the hull and upper deck to do with the airbrush the lower deck I brushed as after the oil and tread marks a bit of rough painting wasn't going to matter.
I'm still awaiting a hull weathering set from Hongkong, And I, not relishing the thought of getting on my knees beside the bath for the float test and balancing this model is 50mm too wide for my test tank.
And have yet to workout placement an attachment of the cars.
Last edited by Damien on Mon Dec 30, 2013 3:52 am; edited 3 times in total |
|
| | |
Guest
Guest
| | Subject: Re: Sea Road Lady Sun Dec 29, 2013 11:46 pm | |
| at least it'll be sunny when you get to sail her Damien..........just come back from taking my two kids to Scotland for the weekend.................it rained heavily all the way up on Friday,......took them to Oban on the Saturday and the Lochs were flooding onto the roads with the torrentioalm rain, and the only sunshine was on the way home today..........botr got some good shots of the ship that I am modelling at the mo, the Eigg, so that hopefully will progress shortly.
neil. |
|
| | |
Guest
Guest
| | Subject: Re: Sea Road Lady Tue Dec 31, 2013 8:06 am | |
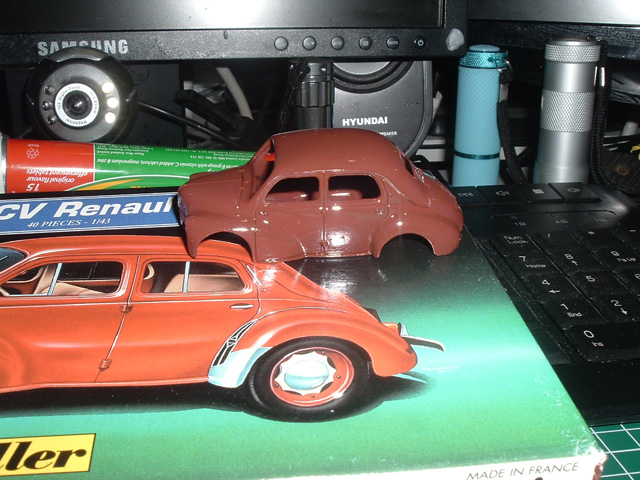
| It took some grueling brain work and a profile gizmo to come up with correct profile shapes for the stand taking into account the 9mm foam the hull sits upon. 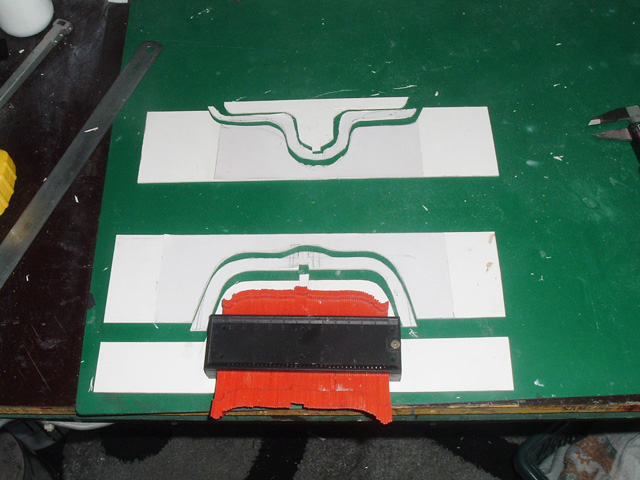 And some surgery on the six little Renault's for permanent fixture to the deck. The 1916 truck will have the pin epoxied close to the bow forward of the deck hatch if need be it can be unscrewed from the pin. The R5 turbo and the R8 Gordini will be weathered with rally muck . 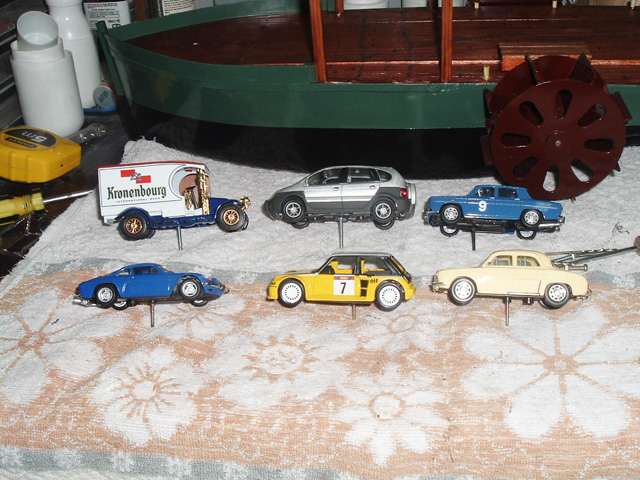 |
|
| | |
Guest
Guest
| | Subject: Re: Sea Road Lady Tue Dec 31, 2013 8:01 pm | |
| you're a man after my own heart Damien.........just snapped up an untouched kit of Mountfleet models sealight puffer on ebay for half price, and next step was to buy a pedal cycle kit to adorn the deck amongst other things, lol
also bought some little diecast cars at 1;35 and 1;43 for my two ferries being..........well, will be built. lol |
|
| | |
Guest
Guest
| | Subject: Re: Sea Road Lady Wed Jan 01, 2014 3:02 am | |
| |
|
| | |
Guest
Guest
| | Subject: Re: Sea Road Lady Wed Jan 01, 2014 7:49 am | |
| - nhp651 wrote:
- looking really superb, Damien. I wish more would post their builds...there are ( I think) only 3.4 of you posting builds at the mo.......what are people afraid of.?????
No idea Neil, there's the edit function if you make a mistake (which I use frequently) and it's certainly not hard to do even I can do it Perhaps photo posting is a deterrent although quite a few members post on other forums. I also post on paddleducks as well as Airbrush, lathe and others. Perhaps its a confidence thing not wanting to show mistakes or not happy with their workmanship but those of us who post show our muck up's it's part of modelling and a way we learn from the mistakes. Perhaps I'll start a thread asking that very question asking for comments. |
|
| | |
Guest
Guest
| | Subject: Re: Sea Road Lady Wed Jan 01, 2014 8:02 am | |
| So much for the grueling brain work yesterday as I laid them out I discovered the lhs of one was 3mm taller on one and the rhs of other was also 3mm taller than the lhs. I'll blame it on the bug I picked up at christmas lunch. Can you spot the faults? |
|
| | |
Guest
Guest
| | Subject: Re: Sea Road Lady Wed Jan 01, 2014 11:26 pm | |
| |
|
| | |
Guest
Guest
| | Subject: Re: Sea Road Lady Thu Jan 02, 2014 2:34 am | |
| Fair enough you really have to look carefully to spot it. |
|
| | |
Guest
Guest
| | Subject: Re: Sea Road Lady Sat Jan 04, 2014 5:18 am | |
| I Remembered the first rule measure 4 times then drill or cut, I now have another check if anything obstructs depth of cut.Decided to fit the mooring posts measured carefully and marked the spot first went well 2nd I discovered why this new rule applies the hull curved inwards a this location and after giving a push through hard balsa managed to drill through the%$#@&* hull, didn't need heating in the shed my language was enough heating for the neighborhood. 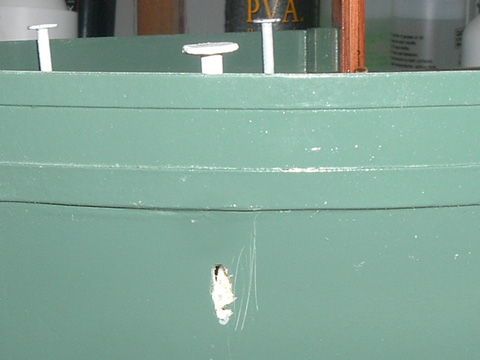 A little filler now primer tomorrow and some brushed on top coat and it may add to weathering as a patch.  |
|
| | |
Tug--Kenny
Lost But Never Forgotten R.I.P

Posts : 284
Join date : 2011-06-11
Age : 82
Location : Newport, South Wales,UK
| | Subject: Re: Sea Road Lady Sat Jan 04, 2014 11:15 am | |
| Argh !!! the joys of modeling.  No problem covering it up though. It will come out alright. Happy new year Ken | |
|
| | |
Guest
Guest
| | Subject: Re: Sea Road Lady Tue Jan 21, 2014 11:59 pm | |
| Well the severely hot weather has passed for now but discovered my power cable to the shed draped over the hot water service all the cable saddles i'd glued to the wall with liquid nails had succumbed to the ravages of UV. It seems i'm not as fit as I was 3yrs ago when I put them up. I got 5 saddles up yesterday using 5min UV stabilized epoxy and another 5 to day before my knees gave out only 10 to go then I start cable tying the cable into them all may need new knees before I'm finished at least I picked up a sturdy but cheap 6ft step ladder for $48 or 29quid $60 cheaper the their rival store. |
|
| | |
Guest
Guest
| | Subject: Re: Sea Road Lady Thu Jan 23, 2014 10:46 am | |
| Finally got a display stand made from 3mm MDF and 9mm dual rate foam from a camp mattress left over from when I lined the roof of my shed to combat condensation.  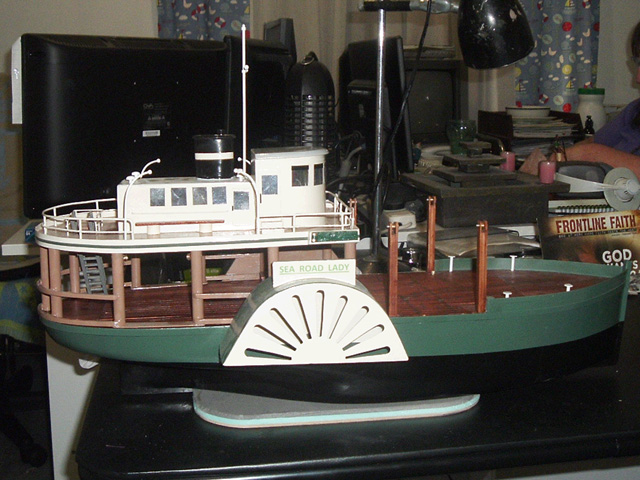 Just awaiting some chrome paint for the bumpers and hubcaps now.
Last edited by Damien on Thu Feb 13, 2014 11:25 pm; edited 1 time in total |
|
| | |
Guest
Guest
| |
| | |
Sponsored content
| | Subject: Re: Sea Road Lady | |
| |
|
| | |
| | Sea Road Lady | |
|