| | | A lifeboat build blog...........How a kit is made! |  |
|
+10tattooed Tug--Kenny scalloway41 phil winks pugwash AlanP HS93 intrepid75 Windy Footski 14 posters | |
| Author | Message |
|---|
Guest
Guest
| | Subject: A lifeboat build blog...........How a kit is made! Mon Dec 12, 2011 10:07 pm | |
| It has always puzzled and sometimes perplexed me as to what people want and expect from a model kit. Is it value for money, accuracy, built down to a price, top of the range perfectness, or do some just want something for nothing? I worry when people moan at the price of a kit ( not the quality, but the price) knowing what that kit contains, and the pound for pound cost per hour of enjoyment and yes, frustration that they might have to overcome when they buy a model kit and wend their way through the build process to end with a finely built model that they can be proud of. Few people actually out there who build kits (other than those who are involved in the design and development of a model kit) really know of the time and lengths that manufacturers go to, to bring that product to the modelling public, nor the time and costs involved. And so, in this build blog of three classic lifeboats, I hope to enlighten those who think that a model can be produced on a whim, that there is a little more to it than that. I first got into the game of designing kits when I worked preliminarily with the late great Frank Hinchliffe on his two original models for Mountfleet models, the Active Tug and the drifter Danny Boy. Frank taught me the art of centrifugal casting in white metals, for which I am eternally greatful. However, my other skills for producing "kits".i.e. Grp moulding and plans drawing, and instructions writing, come from the profession that I had a career in for 22 years....as a teacher and eventually head of department in CDT ( craft, design and Technology where chronological and discriptive written reports and the art of technical drawing were paramount in that field. After Frank and I went our separate ways in the mid 1990's I set to designing my first kit to go on sale, and that was the model lifeboat kit "Anne Letitia Russell" which is now marketed by Metcalf Mouldings. Since then I have worked on other projects for both full kits and semi kits, and the three that will be the back bone of this build log will also eventually become full kits. So, what does it take to design a kit from the ground up.......well, stick around, and hopefully I'll be able to show you the process...........a slow one but an enjoyable and rewarding one. Firstly, you have to chose a subject that will not only inspire you to keep up the enthusiasm, but also one that might inspire others to want to buy the available kit once it has been released onto the market. I think that the 3 that I have chosen to build here will both inspire and enthuse people to join our merry band and get involved in model boating. So!! Bring it on!. The three models that I have chosen, and had chosen some years ago were a continuation on a theme...three lifeboats (how did I guess, many will ask), and these have been worked on in small amounts for some six years now, between working on other projects for comissions, charity and some mayhem members!!, and have always had to take a back seat when a build has come along. However as I am now in the final stage of the charity build, 9just waiting for the graphics to arrive ) I can see no more reasons to be interrupted by outside influences and so can get on with the builds with a clear mind. The three subjects that I have chosen, 3 lifeboats are, in order of photographs ( and all built at 1:12 scale ), 1) RNLB Mary Stanford (of Ballycotton station,) a 51' Barnett, "Stromness" class lifeboat, 2) RNLB H F Bailey (of Cromer station) a 46' Watson class lifeboat 3) RNLB Field Marshal and Mrs Smuts ( of Beaumarris station) a 46' Watson class, and first boat in the RNLI to have central steering. Pictures of the first two and sister boat to the third, shown below. So, where does one start? Plans of the boats were obtained either from the original station house that the lifeboat served at or from the National Maritime Museum at Greenwich. What were needed were both G.A. (general arrangement) and line drawings for all the sections, profiles and plans. And finally before I stop for the night, I'll just fast forward 6 years and put some pics up of the three models as they are in their present state, dusty, timbers curling from being stored in a damp out shed and cobwebbed.....much remedial work will be needed on the timbers but this is all part of the learning curve of modelling and life, lol 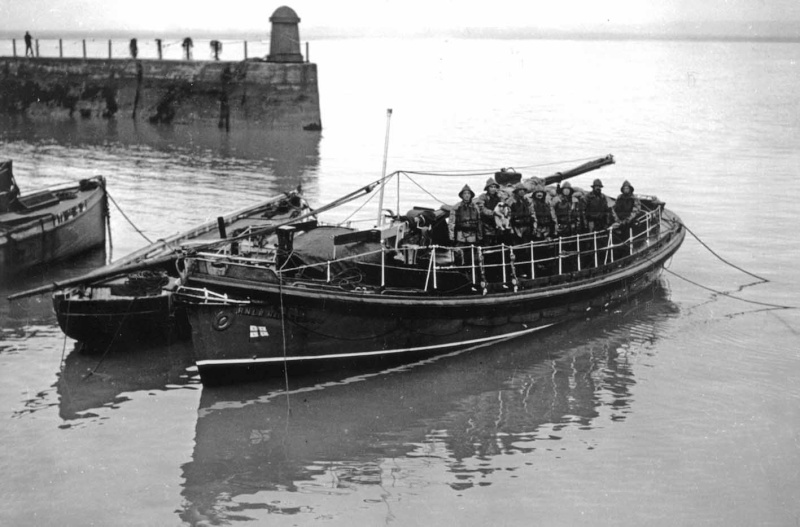 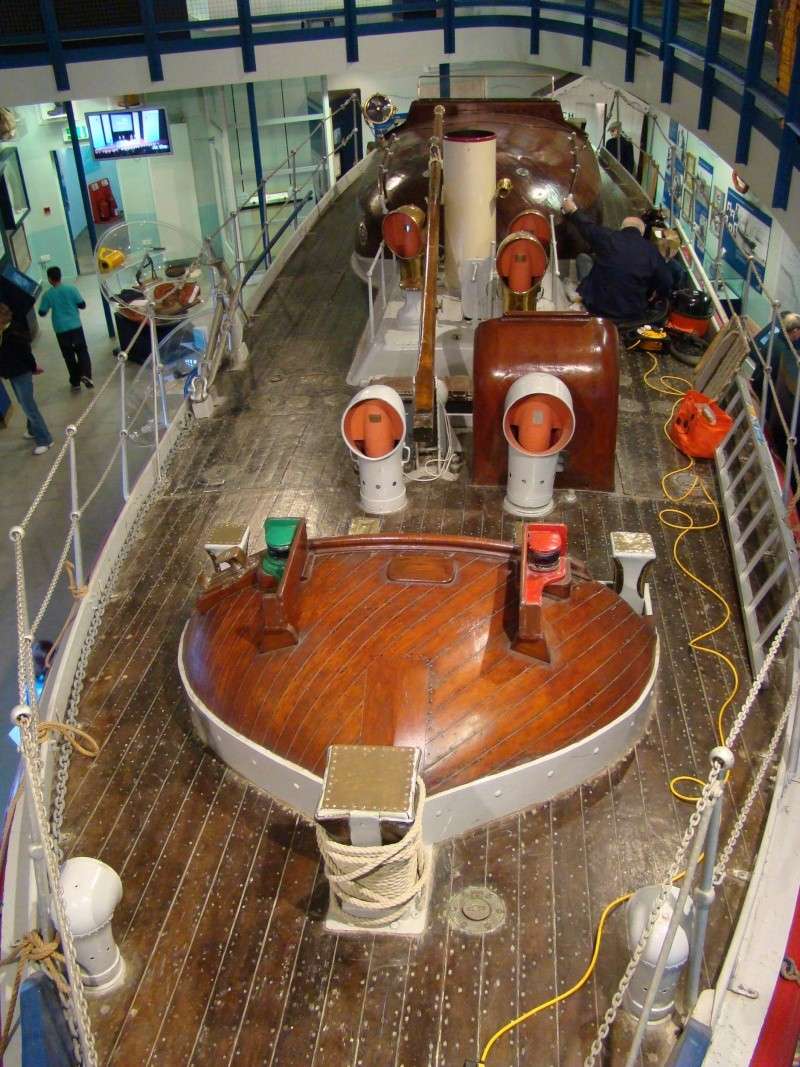  now skip forward 6 years and this is the story so far. On the table left hand boat is Mary Stanford, right hand boat is Field Marshal and Mrs Smuts/Henry Blogg, and on the bench far right is the H F Bailey. Once I have sorted all the timbers, I can begin the build of all three together in ernest. 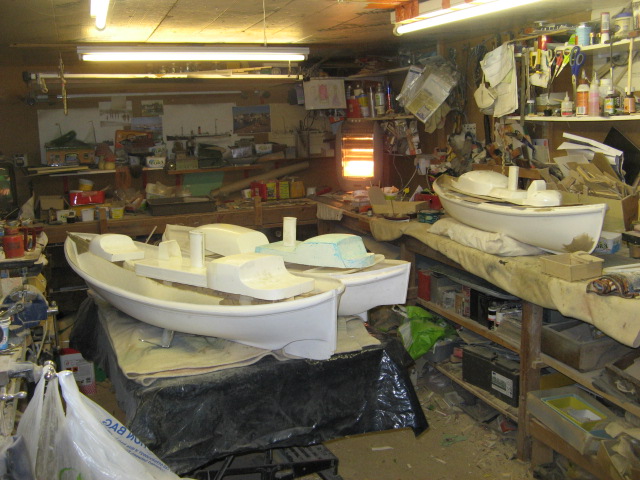 |
| | | | Footski
Master


Posts : 548
Join date : 2011-06-11
Age : 66
Location : Malaga, Spain
| | Subject: Re: A lifeboat build blog...........How a kit is made! Tue Dec 13, 2011 6:39 am | |
| Wow, Neil, this is going to be good..
I had the pleasure of meeting Frank on several occasions when he still had Caldercraft and used to run the Northern Militaire Exhibition, at which I exhibited my HMS Victory. He was one of the greats... | |
| | | | Guest
Guest
| | Subject: Re: A lifeboat build blog...........How a kit is made! Tue Dec 13, 2011 7:46 am | |
| he certainly was, barry, but very stuborn in his outlook to his ways at times..mind you that stood him in good stead for some of the customers you meet, lol |
| | | | Guest
Guest
| | Subject: Re: A lifeboat build blog...........How a kit is made! Tue Dec 13, 2011 12:14 pm | |
| So what does it take to be able to set up even the basics of a cottage industry in order to build a kit for public market. A very very tollerant and understanding supportative wife or partner for a start, and then s goodly amount of capital, even for a small start. I had luckily just had to retire on ill health grounds form my teaching career and had been paid a lump sum and a pension......it was a start. The old asbestos garage was taken down and a new concrete garage, 12' x 22' was built in it's place in 1994.It was lined with timber battens, fibre glass insulation between walls and insulation boarding and the ceiling treated with the same. It was professionally wired with trip boxes, emergency stop switches and countless plug sockets, and once all done, the perimeter benches were all made by yours truly. £2800 was spent on the bare workshop before tools. Then came the expenditure of tools, A Myford laithe, second hand, £750, a band saw, £450, pillar drill, scroll saw and sander/linisher ..£250 and the coupe' de gras was a visit to Alex Tiranti in Reading where I blew 1500 quid on a centifugal caster and all the plates rings and ancilliaries. Then the multiple hand power tools added another £500 before I even started building a model boat..........it's amazing what few tools you use when building on a kitchen or bedroom table before you realise that you need them for ease.. It didn't stop there........I needed a large drawing board so bought a "Double Elephant" sized piece of block board ( so that it wouldn't warp in the cold atmosphere when I shut shop down in an evening) and then bought a parallel slide "square" plus french curves, set squares, Rotring pens and draughting paper ( the none rip kind.......).....another 400 quid blown. Then it was time to start planning the build.......I would need large boxes, small boxes, materials and oh of course screen prints for the printed wooden matter...those alone cost me £300 to have made by a professional. All the above materials would have to be bought in bulk........a hundred boxes at a time, 400 quid, thin and thicker ply woods in bulk ( 30 sheets minimum of each thickness and there were 3 thicknesses on the Ann Letitia Russell, brass tubing by 50' a time when the boat used about 6" altogether, chain and white metal for casting......dowels by the 100' to get decent prices, obeche block wood for bits and pieces and plugs, and then as I thought at the time not capable of producing an industrial strength set of moulding( which I found when I was forced to work on a remould) after the "professional" moulds started falling apart and they cost me 400quid to have made for the original mouldings, it added up to another £1000.00.........and this was all before I had even started building a model let alone sell it. Even after selling the original masters to Metcalf Mouldings and what little I recouped from the few that I originally sold, minus costs including a donation from each sale to the RNLI for them allowing me to use their charity number and logo on my boxes, I reckopn that to this day, I am still no where near ever recouping anywhere near the amount initially laid out, but that is the chance you take. This also does not take into a ccount the hundreds and hundreds of hours taken in developing the model, writing the instructions as you go, having them proof read and then re typed, plus the initial drawings, draughts and re draws pefore you feel that the plans are suitable for puplication, and finally the costs of photocopying amultiple sets of plans and anything up to 40+ pages of instructions and binding them.......all of which costs money. I still keep the reciepts just to show what a folley it can be and So it isn't for the faint hearted. That is why I defend to the hilt almost anyone who tries to do the same, against those who think that it is a piece of cake putting a model kit together as though it's a snap decision, lol....they make me cry rather than angry, as those just don't have a clue. I haven't bothered to add the total up as it would frighten me, but just imagine the outlay that such as Model Slipway and Metcalf Mouldings have to set just to keep their prices as low as they can....it is frightening, and I was doing it on a shoe string. the garage conversion and shed for storage 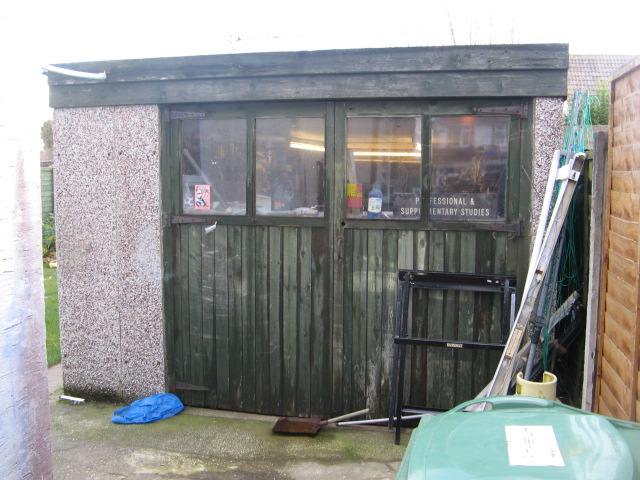  My band saw and other main tools  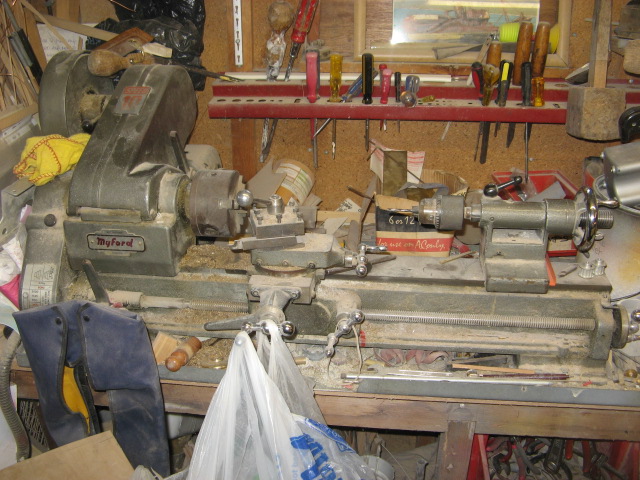 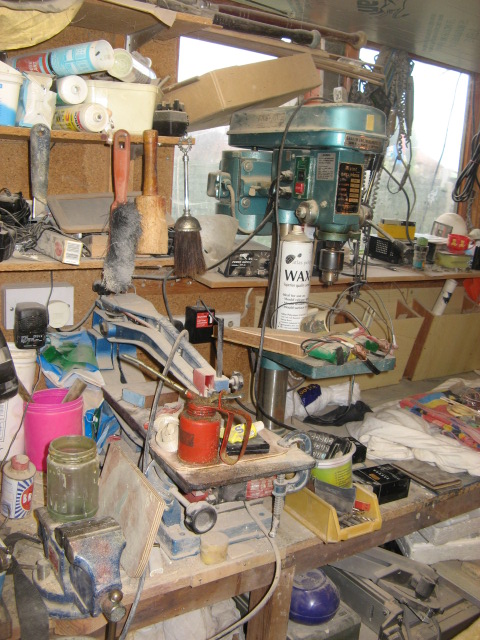  Now you see it,  now you don't..the drawing board is hinged and folds up to the ceiling when not in use, giving extra very usefull space behind.  and finally the most important part of my workshop..my tv and digi box, lol  And now I've got that age old gripe off my chest and displayed to those none believers that kit suppliers are some how ripping off the public with high prices.....please think again. I can now get on with the build process. thanks |
| | | | Windy
Gunner

Posts : 132
Join date : 2011-12-11
Age : 57
Location : Always at work...
| | Subject: Re: A lifeboat build blog...........How a kit is made! Tue Dec 13, 2011 6:59 pm | |
| I agree with you completely Neil!!!!!!!! By the way, you have a nice pink 'man purse' on your bandsaw  W. | |
| | | | intrepid75
Master

Posts : 271
Join date : 2011-06-11
Age : 67
Location : Bristol, West country
| | Subject: Re: A lifeboat build blog...........How a kit is made! Tue Dec 13, 2011 7:14 pm | |
| Every once in a while I get an overwhelming feeling wash over me of 'We're not worthy'!! Totally in awe reading this thread. | |
| | | | HS93
Lost But Never Forgotten R.I.P

Posts : 69
Join date : 2011-06-11
Location : merseyside
| | Subject: Re: A lifeboat build blog...........How a kit is made! Tue Dec 13, 2011 7:45 pm | |
| I see the maid is having a day off, nice Ml10 there same as mine, a bit of polish and it could look like mine, I would hate to deal with the public if I was making kits you only have to go on some of the sites around the world and seethe type of people you would deal with, there petty complaints, I was reading one the other day and someone complained the wooden shell would not fit the hull, most people look at the kit so should know that there is a lot of building required, someone bought an old aerokits patrol boat recently of flea bay paid a lot for it then complained that the notches for the stringers where not big enough and that they had not been shaped to fit. I think kits should have a rating , not for beginner not for gob S***s any offers Peter 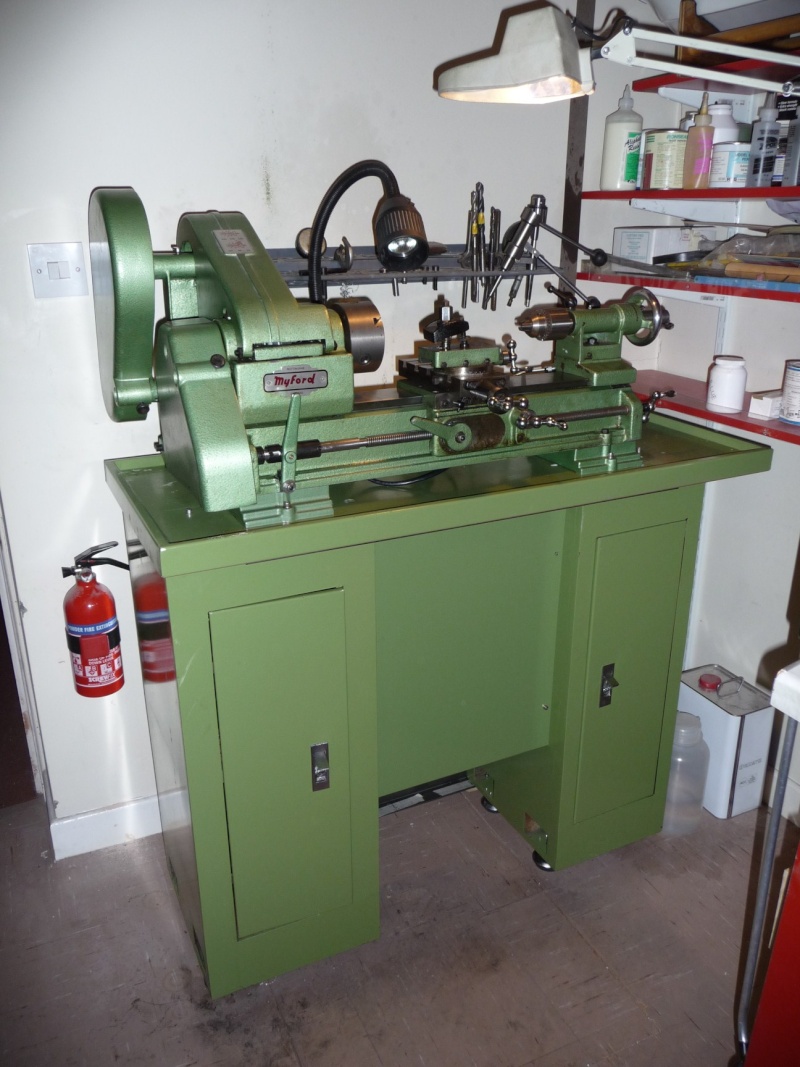 | |
| | | | AlanP
Master

Posts : 278
Join date : 2011-06-11
Age : 79
Location : South Cumbria
| | Subject: Re: A lifeboat build blog...........How a kit is made! Tue Dec 13, 2011 7:55 pm | |
| That was very enlightening Neil, it's only over the last couple of years that I have relised what has gone into producing a kit, so the above was a good read. Looking forward to the rest of this thread, as I would like to build a life boat after the Shrimper and finishing the Maggie M, but I will talk to you before making any decisions. Thought my workshop was mucky, but yours beats it hands down Alan | |
| | | | AlanP
Master
Posts : 278
Join date : 2011-06-11
Age : 79
Location : South Cumbria
| | Subject: Re: A lifeboat build blog...........How a kit is made! Tue Dec 13, 2011 7:58 pm | |
| I keep my lathe clean Peter, but I don't think it was that clean when it was new Alan | |
| | | | HS93
Lost But Never Forgotten R.I.P
Posts : 69
Join date : 2011-06-11
Location : merseyside
| | Subject: Re: A lifeboat build blog...........How a kit is made! Tue Dec 13, 2011 8:29 pm | |
| that is a 1980s lath bought it this year of a forum,all greased up, they are a magic bit of kit sold the old one got very litle for it should have sold it as spares, wouldent be without one now, I have always wanted this model and to get an un used one I was very lucky came less stand, thats just a warco .
anyway sorry Neil for getting off Topic.
Peter | |
| | | | Guest
Guest
| | Subject: Re: A lifeboat build blog...........How a kit is made! Tue Dec 13, 2011 9:07 pm | |
| - HS93 wrote:
- that is a 1980s lath bought it this year of a forum,all greased up, they are a magic bit of kit sold the old one got very litle for it should have sold it as spares, wouldent be without one now, I have always wanted this model and to get an un used one I was very lucky came less stand, thats just a warco .
anyway sorry Neil for getting off Topic.
Peter I don't mind going off topic Peter....I hate boring build logs that just stay straight on topic without discussion.talk about owt, thats me.....by the way.that green machine ain't a laithe it's a b***** work of art.I don't get the paintwork on my boats that good, lol, never mind the tools I use...............yer too good peter. as for some customers....I once had a chap phone me at half past midnight once soon after I'd released my lifeboat kit....complaining that I'd sent him one fire extinguisher too many as he could only see two on the model plans......I persuaded him to look on the plan view and he would see the third one's possition....huh he said, no apology for phoning and getting me out of bed......just a "well make it clearer on you plans in future"......to which I told him to go travelling whilst fornicating. no pleaseing some folks..........  |
| | | | Guest
Guest
| | Subject: Re: A lifeboat build blog...........How a kit is made! Tue Dec 13, 2011 9:11 pm | |
| |
| | | | Footski
Master
Posts : 548
Join date : 2011-06-11
Age : 66
Location : Malaga, Spain
| | Subject: Re: A lifeboat build blog...........How a kit is made! Wed Dec 14, 2011 8:02 am | |
| The best thread I have read in a long time on any forum......  | |
| | | | Guest
Guest
| | Subject: Re: A lifeboat build blog...........How a kit is made! Wed Dec 14, 2011 1:08 pm | |
| Thanks Barry. Well,............... So now I'll begin the build. I'll be using photos of generic models to display my techniques, as I hadn't 6-7 years ago when I started building these moulds even heard of Model forums never mind joined them and so never took step by step builds of my models, and so will be using pics from different builds to illustrate what I mean.......please don't let me confuse you and if you need to ask questions then do ask. Also I am always open to suggestions in order to improve my own techniques and knowledge. My way isn't the only way, but just the way I find easiest for my own buiding methods.so shout out loudly if you know a better way. My intentions were when I designed my first lifeboat kit, was to bring a model to the public that even someone with limited experience and tools could actually built. I never expected someone to be able to diagonally plank a hull with complicated tunnels to line, or belting to construct on the bulwark edges of a classic lifeboat, nor did I expect someone to "plank" the cockpits of a classic lifeboat with thin strips of teak or mahogany to simulate those beautiful cabins, and so set about thinking how to make it easy for the modeller. I also desided from the outset that the plans would be full exact size AND the instructions would be written by a modeller ( with the gift of the gab) for the modeller, in modelling terms.............and those concepts have remained with me to this day.......a boat easy to build with plans and instructions easy to read and understand. I hope that those concepts have born fruit, as I believe the Anne Letitia Russell (ALR as affectionally known ) is the highest selling model lifeboat on the market.....probably others will contradict, but hey ho.........I'm proud of her, and that is something that can't be taken from me. So what did I decide about construction methods............I was going to make the hard bits from GRP and the rest of the build from good stout ply timbers and obeche'. I had to begin somewhere and the first job was to construct a working plug of both the hull and the cabins out of some sort of material. There have been numerous threads on forums as to what materials to use for a plug and believe me, I have probably tried all of them in my time, and will list, just for interest a couple of pro's and cons for each that I have used, but always remember that the finish you obtain on the plug, is the normally finished result on the master mould and the mouldings that go for sale to the public, and therefore if you want repetition of excellence you have to put in the time on the plug to attain this.just see here for what I mean....just astounding, but many many hours of hard work have paid off here. http://www.modelboatmayhem.co.uk/forum/index.php?topic=31944.msg340701#new 1) keel and sections filled with polistyrene and skimmed with plaster of paris.........it's a quick initial method and a shape can be obtained easily, but it's messy, and I have never been able to get rid of the "ghosting" lines of the sections on the plugs and then an awfull lot of rubbing down on the master mould still leaves ghosting lines. My Interceptor 42' Pilot boat was made in this manner and the very faint lines could still be seen evenb after further work on the moulding that I took off for myself........I wouldn't use this method again. 2) solid bread and butter constructional carved hull in a timber such as obeche, samba or jelutong (balsa is far too soft a hardwood for this method in my opinion) has been used, and the finish you can get on these timbers as a plug is second to none.Modern pattern makers use these timbers now that Yellow pine ( the traditional timber for such) is virtually none existant at any reasonalbe price....last checked and it was twice the price of English Oak.I love this method on smaller hulls and the cabins, but on larger ones it becomes very unwealdy and heavy to turn around. However it is a method where the hull "stays where it is" .it doesn't twist in the process nor warp or bend and you get no distortion whilst building or carving.the only downside is that these wood's smell like old fish boxes when cut and carved....but living by the sea, that's an added bonus for me, lol. his can also be an expensive method of building 3) hollow bread and butter constructional carved hull, reasons are exactly the same as before, but less expensive if you jiggle the planks arround to get the greatest cuts from a board. Also the hull is far less heavy.heavy carving as with the method above also are tiring on the arms unless you use electric power carvers and planes to take off the vast amount of spare timber. But those two methods I strongly recomend. 4) there is a third method of this andd that is to set out on a building board the keel and frames, and then bread and butter each section, but this is a slow laborious method that I tried once, and to be honest it was a pain in the bum, and not to be recomended if you value your sanity. 5) use of MDF as a bread and butter "timber".yes, I have tried this method as well, and although some say that the dust caused can be a killer, ( literally as there are some who claim it is carsonagenic) it is the finish that is hard to achieve....No matter how many coats of varnish and sealant you put on MDF, as soon as you try to get a mirror like finish with wet and dry, used wet, the MDF soaks up the water you are using to lubricate the carborundum paper, and I found this method a pain also, and wouldn't recomend that either. 6) Every one's favorite method......POF or Plank on Frame with plenty of polyester filler to fill in the gaps.It is relatively quick and easy and I normally use obeche end blocks for the bow and stern, and this method is the one I used for the three boats I am going to build here.Because the plug isn'rt going anywhere other than the skip once you have produced the master mould from it, the planking can to some extents and purposes be as rough or as good as you want to make it, as long as you have plenty of filler to hand.It is a method that is light and easy to handle and also doesn't cost much to produce, unlike those B & B methods with Obeche and such, and for reasonable sized plugs, sop long as every thing is bolted down to a strong building board when construction is taking place to stop twisting, it is a good quick method., and usually gets my vote. So on to the build itself. First job is to get hold of a set of plans for the boat you want to build, including G A (general arrangement ) and line plans for the sections and keel, from which photocopies of the frame sections can then be cut and glued onto the ply wood boarding , and in this case 6mm birch faced ply. Once cut these are mounted onto a base board to hold firm whilst planking. ( sorry but here are some generic models showing the sections and planking).  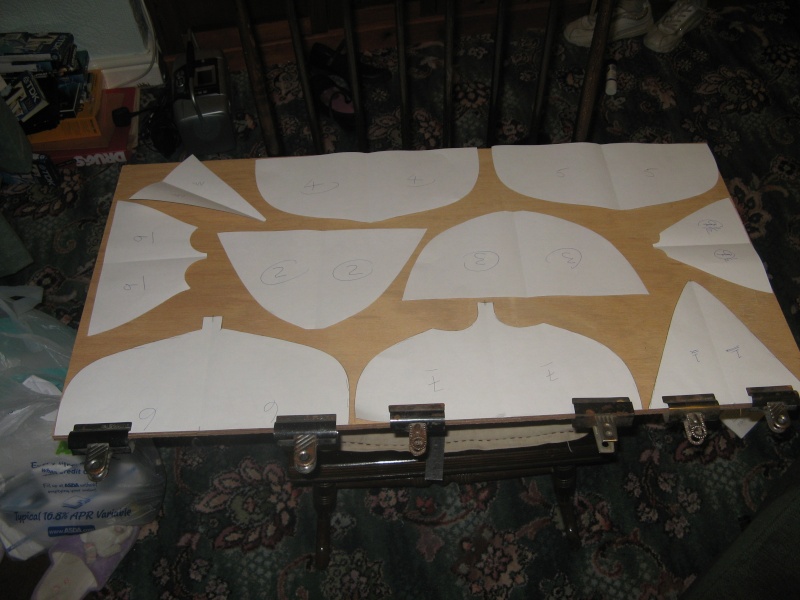  the ribs are to hold the sections from moving and twisting. 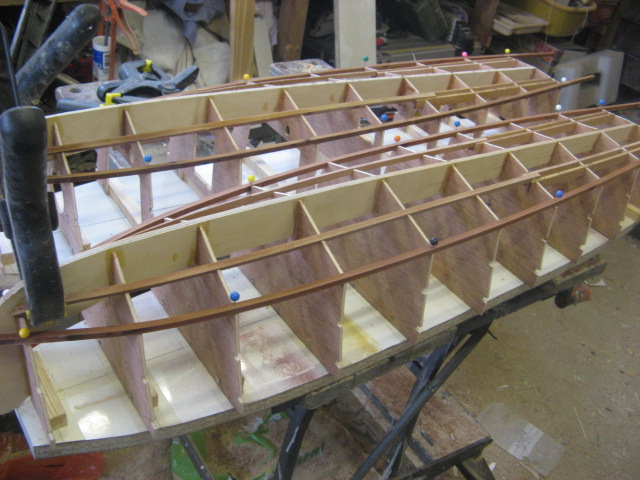 the hull of the lifeboat has now been planked and filled 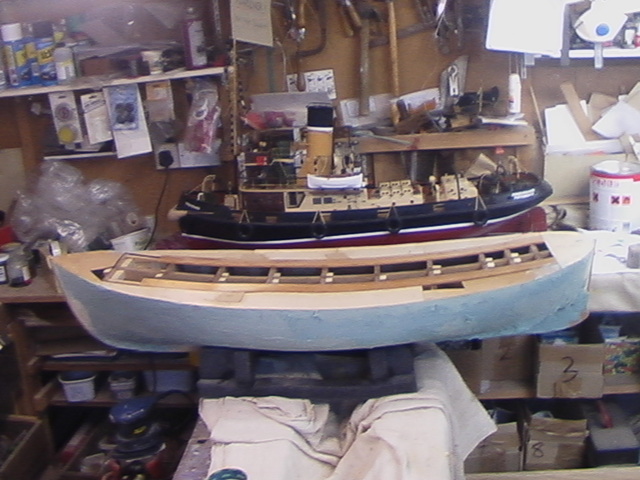 and now sanded, before any detailing that needs to show up on the plug and mouldings has been added..However there is a long way to go yet. 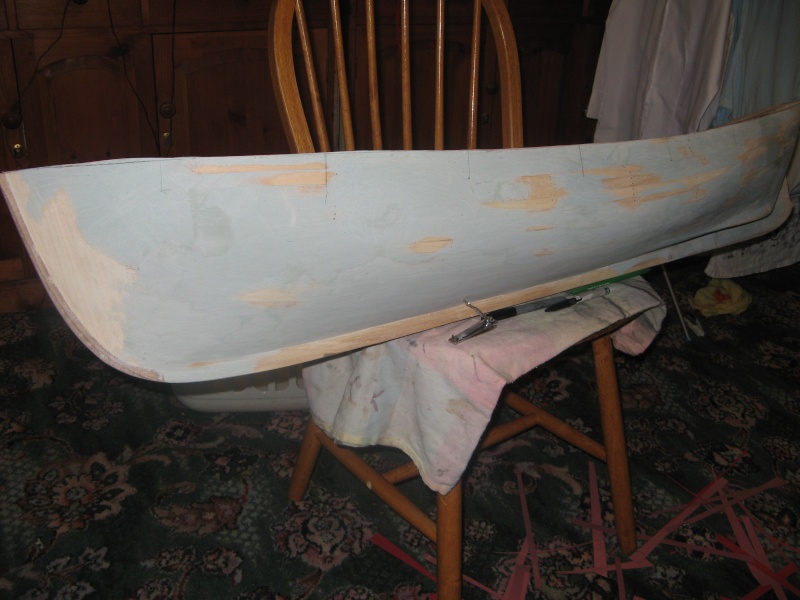 . Next step will be the detailing of the hull. . |
| | | | Guest
Guest
| | Subject: Re: A lifeboat build blog...........How a kit is made! Wed Dec 14, 2011 2:05 pm | |
| Progressing on, the next part of the build is to detail the plug. One of the most striking parts of the hull of an old classic lifeboat is the defence belting around the bulwark edge of the hull. This was placed around the boat to protect against coming along side a casualty ( read any old book on RNLI rescue and you will realise that even with these well built wooden boats this belting always took a pounding) and was built in layers, as is the belting on the model. It has to be cut semi through to take up the different curves of the hull shear line plus curviture of bow and stern. Also placed on the hull at this stage are the markings for the "A" bracket positions, the Prop tube openings in the tunnels and the bilge keels.    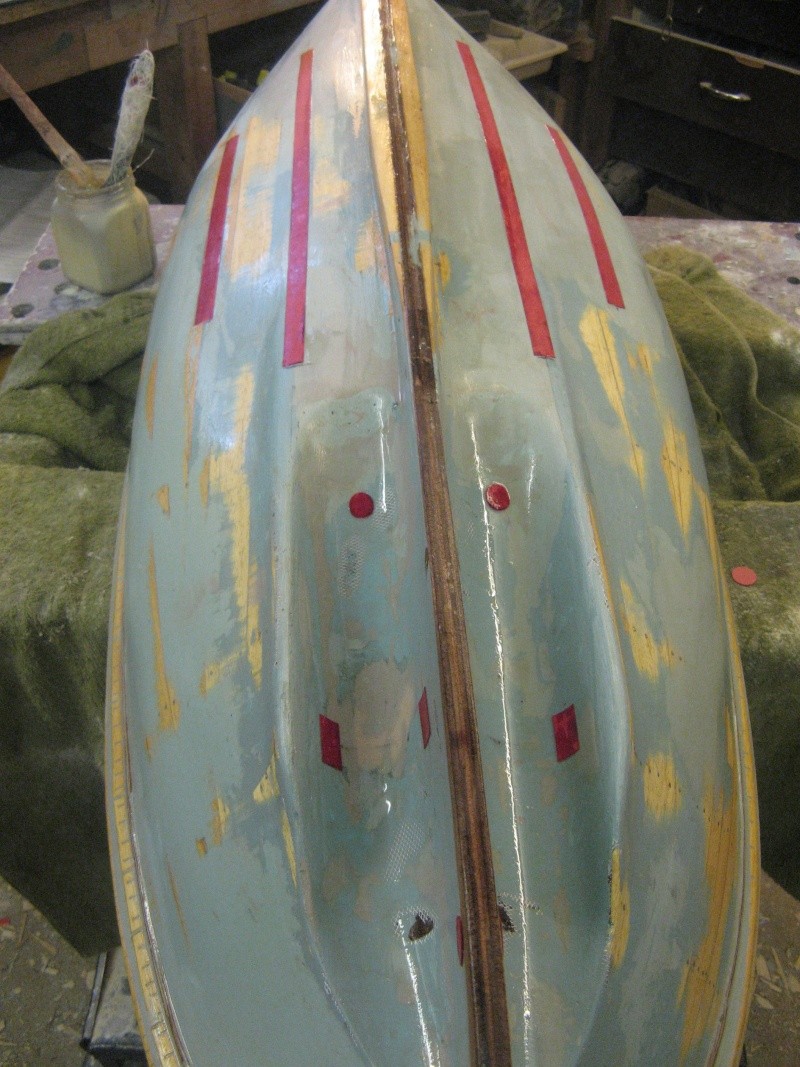 |
| | | | Guest
Guest
| | Subject: Re: A lifeboat build blog...........How a kit is made! Wed Dec 14, 2011 2:30 pm | |
| You'll see on the next to last picture that the height deck of the boat has been raised by about 6mm with a piece of MDF. this goes all around the hull raising it. The reason being that when moulding the extension will give a mould a little higher than needed, and this is to give an edge to the mould that is full of resin, and not whispy or feathery as they can be when approaching the edge of a mould.
Some people do, when moulding lay a full plate onto the top of the boat at deck level which allows you to mould onto it to form a flange from which you can trim the top of the hull.
Unfortunately with this mould, (as you will see later when I show pics of the moulds) you will see the reason why I can't do it on this 4 piece split mould.
Last edited by nhp651 on Wed Dec 14, 2011 8:23 pm; edited 1 time in total |
| | | | Footski
Master
Posts : 548
Join date : 2011-06-11
Age : 66
Location : Malaga, Spain
| | Subject: Re: A lifeboat build blog...........How a kit is made! Wed Dec 14, 2011 4:43 pm | |
| 'Barry, are you going to get off that damned computer and get in the shower? We are out in half an hour!!!' shouted she who must be obeyed.......Getting me in trouble Neil, but what the hell, it is worth it.. | |
| | | | Guest
Guest
| | Subject: Re: A lifeboat build blog...........How a kit is made! Wed Dec 14, 2011 8:19 pm | |
| wooops..............sorreeeee.
Last edited by nhp651 on Wed Dec 14, 2011 8:22 pm; edited 1 time in total |
| | | | intrepid75
Master
Posts : 271
Join date : 2011-06-11
Age : 67
Location : Bristol, West country
| | Subject: Re: A lifeboat build blog...........How a kit is made! Wed Dec 14, 2011 9:41 pm | |
| This is compulsory reading for me from now on. Absolutely transfixed. | |
| | | | Guest
Guest
| | Subject: Re: A lifeboat build blog...........How a kit is made! Thu Dec 15, 2011 10:35 am | |
| You guys are so kind with your encouragement. I put the Flying christine build on an American site and but for about half a dozen stalwarts making comments and asking questions the build was totally ignored.makes you wonder whether our building methods are totally alien to theirs, as they just don't seam to be interested, and yet I would have thought that building a boat is universal?? Never mind. Well onto the next bit. The cabins............I try to work in time and motion mode and do the same sort of jobs all at the same time, and then if it's a nice job I enjoy it all and if it's a monotonous work then I get the monotony over in one fell swoop. As I'm working on the belting and filling it to get the shape as shown on the profile from the plans, I sstart working also on the timber work for the plugs for the cabins. All my cabins are made from bread and butter solid timber.obeche by preference, and I buy this from a local timber merchant......it seams that these days I am the only person in the area to buy the obeche from them, and although there is enough stock to last me my lifetime they haven't bought any now for more than 8 years.....it's well seasoned, and the best part about it is...they still charge me the price that it was when they bought it in 8 years ago......now that's a bargain, lol..and it's about half the price of a relative piece of every day soft builders pine wood. Brilliant!!! I cut the profile and plan of the timber for the shape of the cabins from a spare set of plans that I always copy to cut to pieces, I glue the cut boards for the cabins together using G cramps and spring clamps, but I never plane the surfaces of the timber when I sandwich them together for gluing, just sand them lightly on the linisher.....I find no point as they will be filled anyway once set, and once the timber has been cut roughly to over size by a couple of mm all round to facilitate sanding, I set too with chisels, gouges and my favorite tool, my trusty spokeshaves....I have two sorts, a flat and a curved sole spokeshave, and wouldn't be without them for finer carving. I must point out here that I make the bottom thickness of the cabin overr sized in deapth to allow for moulding and also to allow shaping the bottom of the cabin to the sheer shape of the deck once fitted. Once down to the good basic chape, any undulations or gaps in the timber is filled with polyester filler, and more sanding takes place with both power palm sander and hand held sheet , beginning with 40 grade grit, working down to a finer 120 grade. Once the final shape is achieved I seal it with cellulose sealer, using many coats. This also goes for the hull which will have reached this stage also by now. Once the timber has been sealed, I give it multiple coats of filler spray and then grey undercoat from a spray can. You can then see any minuter scratches left by the sanding and this can be filled with cellulose surface putty which is a scratch filler used by moror repair shops and avaiable at halfords and such places. A tip here..you don't use a great deal when using on a model and it tends to gom hard in the tin once opened to air. after using it and putting it away for a while, I pour into the tin a thin layer of cellulose thinners. It keeps it nice and useable. This is all now wet and dried down starting with 240 grade working up to 800 - 1000 grade carburundum paper, used wet to give a mirror finish to the plug. Finally it is given a couple of coats of polyurethane varnish which is again wet and dried down to give a good finish for moulding.......It all takes time but remember........... the finish that you get on your plug is the finish you have on the master mould, and is only as good as that plug with all the hard work. Moulds can be titivated up after wards, but there is no substitute for hard work. Estimated time to build a plug and cabins is around 140 hours from start to finish.the last shot shows the finish I try to aim for.  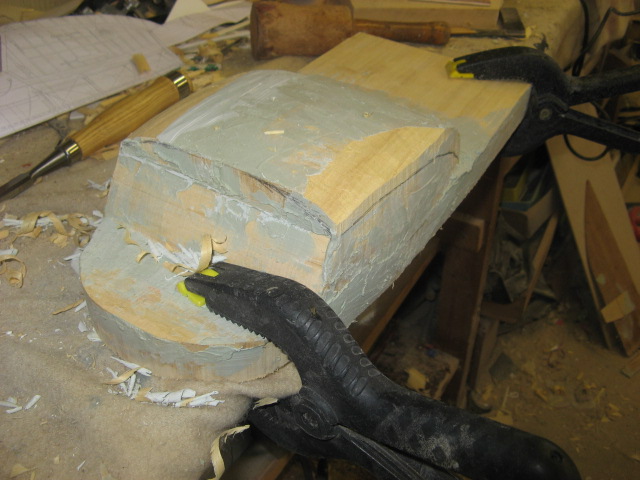 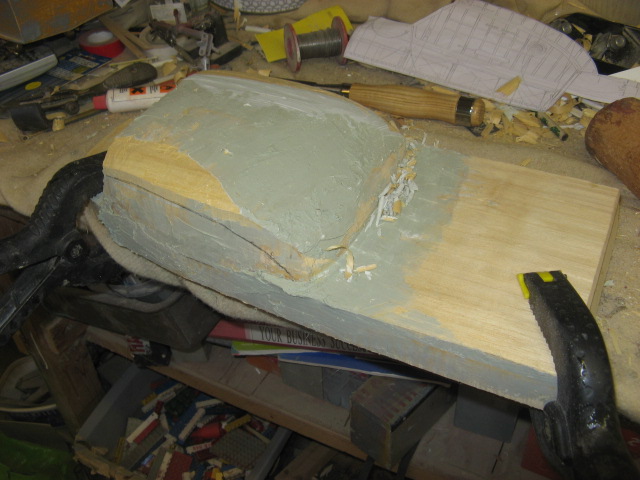  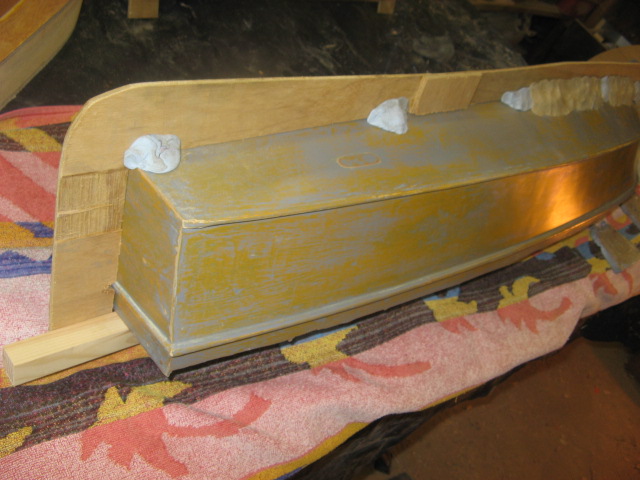 |
| | | | AlanP
Master
Posts : 278
Join date : 2011-06-11
Age : 79
Location : South Cumbria
| | Subject: Re: A lifeboat build blog...........How a kit is made! Thu Dec 15, 2011 3:03 pm | |
| Enjoying Neil, keep it coming.
Alan | |
| | | | intrepid75
Master
Posts : 271
Join date : 2011-06-11
Age : 67
Location : Bristol, West country
| | Subject: Re: A lifeboat build blog...........How a kit is made! Thu Dec 15, 2011 7:46 pm | |
| Rivetting reading! You work is just superb to watch and read about. | |
| | | | Footski
Master
Posts : 548
Join date : 2011-06-11
Age : 66
Location : Malaga, Spain
| | Subject: Re: A lifeboat build blog...........How a kit is made! Fri Dec 16, 2011 7:58 am | |
| | |
| | | | Guest
Guest
| | Subject: Re: A lifeboat build blog...........How a kit is made! Fri Dec 16, 2011 8:30 am | |
| oooppss.....sorreeeee!!.was really busy yesterday doing mundane things like taking a heater back to the shop that had broken, picking kids up from school.you know..just little day to day jobs like thqat, lol.......... as my school reports said Must try harder, lol.....next installment coming up later today........didn't even get time to go into the workshop yesterday........but pleased to report, the heaters and lights are already on this morning, so firing on almost all cylinders, lol.........never do quite make it on all V8's these days though. |
| | | | Guest
Guest
| | Subject: Re: A lifeboat build blog...........How a kit is made! Fri Dec 16, 2011 9:34 am | |
| After much work preparing the plugs for taking GRP it is now down to the preparation of making a mould capable AND SUITABLE of producing multiple mouldings before needing replacement. It is imperative that on any plug, there is a good build up of a protective layer between the plug itself and the layers of GRP/polyester resin that go to make up the mould. Polyester resin will eat into any surface unless there is a barrier to stop it doing so and this process has to be halted when mould making or everything will just become one mass. To stop this a first barrier is obtained by waxing the surface of the plug. this is done in subsequent layers of a release agent wax........not just any wax, as most use silicons in their make up, and this will react with the polyester resins and form a breakup of the surface layers that come into contact with a silicon based wax and this results usually in a rippling or orange peel effect. NO!, the release wax to be used is a special none silicon based product, and I buy mine (as all my supples from Glasplies in Southport: http://www.glasplies.co.uk/ ) Release agent wax: 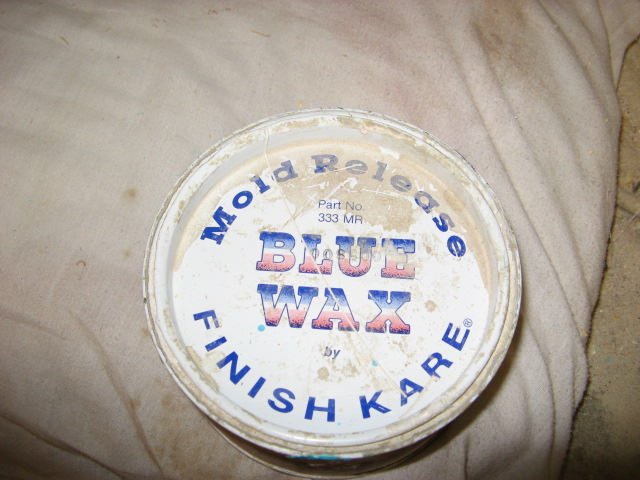  I will usually give my plugs a minimum of 6 - 8 layers of this wax, polishing off thoroughly between each layer to build up a beautiful and resilient shine and coating on the plug. Next job is to prepare my working area, and put my most important item in good clear view, for self explanetory reasons, as any distraction can cause mayhem, lol 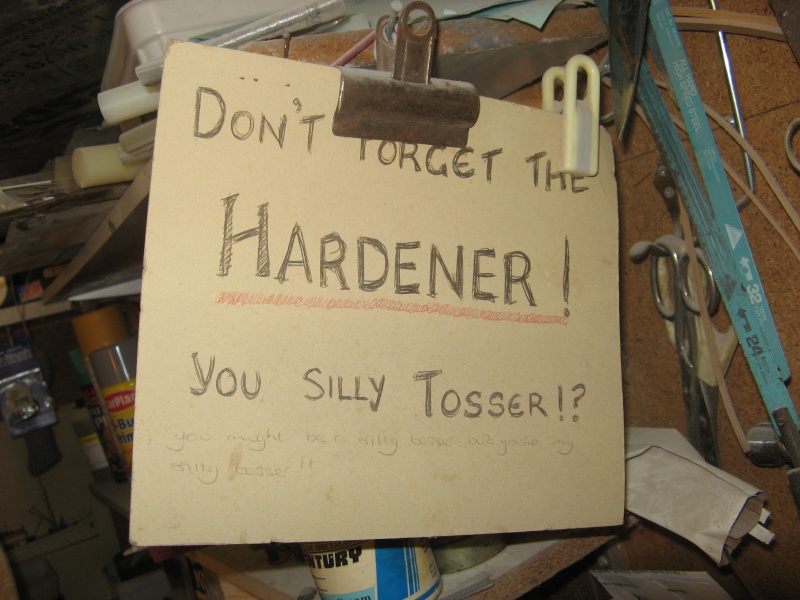 I then arange a good clear working space with plent of access all round the plug and arrange my "tools of the trade".....my containers for resin, measuring bottle for catylist, weigh scales for resin , my stippling brushes, and my scissors for cutting the matting when needed. Some people use metal ridged rollers for rolling in the resin into matting, and although I have used them for larger projects in the past( 16' canoes) I tend to find that on a 51" mould they are more trouble than they are worth and so don't use them for close in work. However I do use a variety of thicknesses and sizes of brushes to get into tight little corners and gaps. 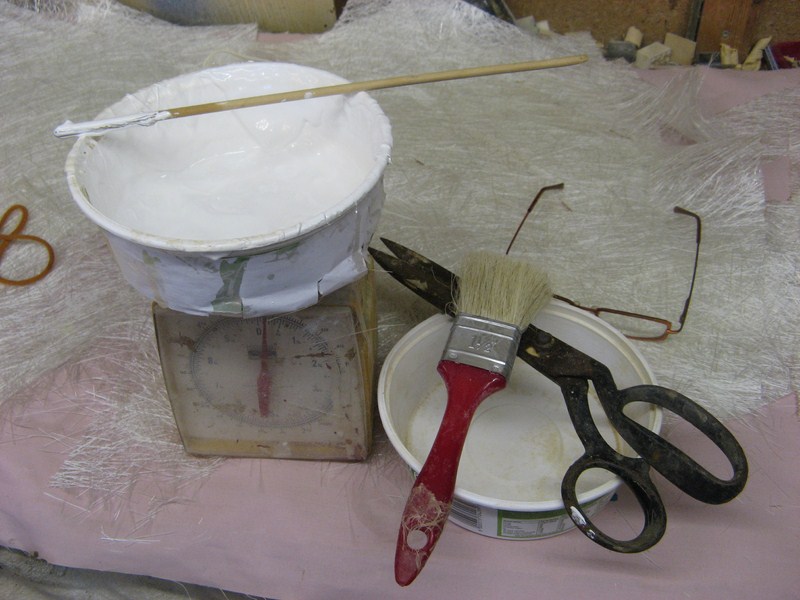 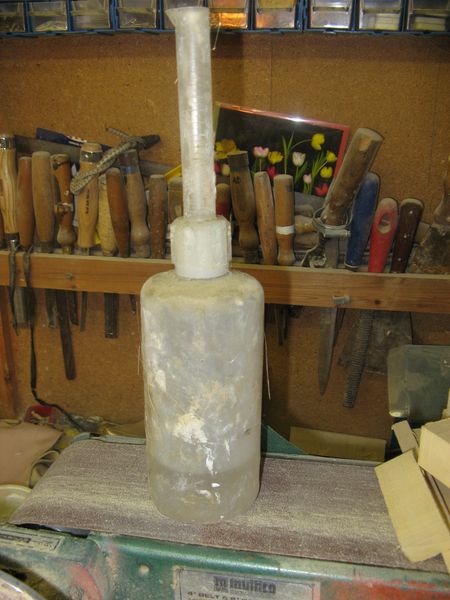 And finally the chart for calculating the amount of catylist per resin needed for each mix. 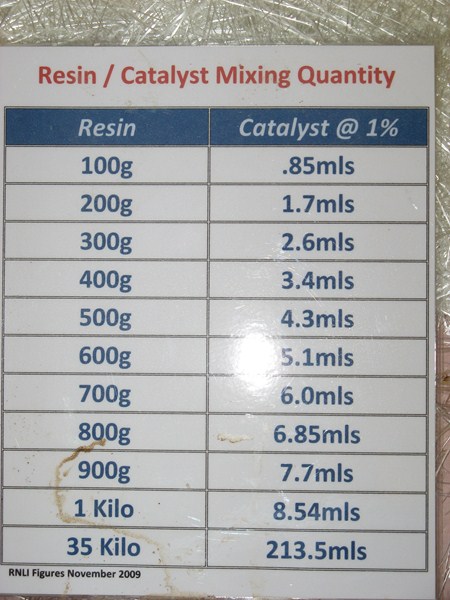 The table for catylist to hardener is set at recommended ratio fro working in an ambient temperature of 60 degrees farenhiet.......if working ina temperature lower than that then this can be increased by upto 15% with no ill effects to the moulding proceedure, but no more really as it will make the curing process "artificial" and a brittle cure can happen to the mould. Next it will be on to preparation of the plug for actual moulding. |
| | | | Guest
Guest
| | Subject: Re: A lifeboat build blog...........How a kit is made! Fri Dec 16, 2011 10:07 am | |
| Oh yes, forgot to talk about the other important part of any mould.......the glass fibre matting. Although woven matting is a lovely and neet way of making a mould with superb finish quality I myself have found it hard to work on smaller moulds...dificulties in getting round almost right angle edges and into sharp areas such as the bow and stern of a boat have caused me to dispense with this type of material and I tend to go for chopped strand matting, and use a 1 1/2 oz weight for my moulding purposes. Even this I find a little thick for moulding round edges already mentioned, and what I do is (rather than buy the 1oz weight for the same cost)is to cut my matting into smaller manageable pieces that fit into the mould in places with odd shapes, and then split the matting to actually get two layers out of one. It gives me better inpregnation of resin into the matting and less chance of air bubbles and "dry spots" in the mould. This can make for a heavier mould as a little more resin is used, but personally I don't feel that to be a bad move at all. 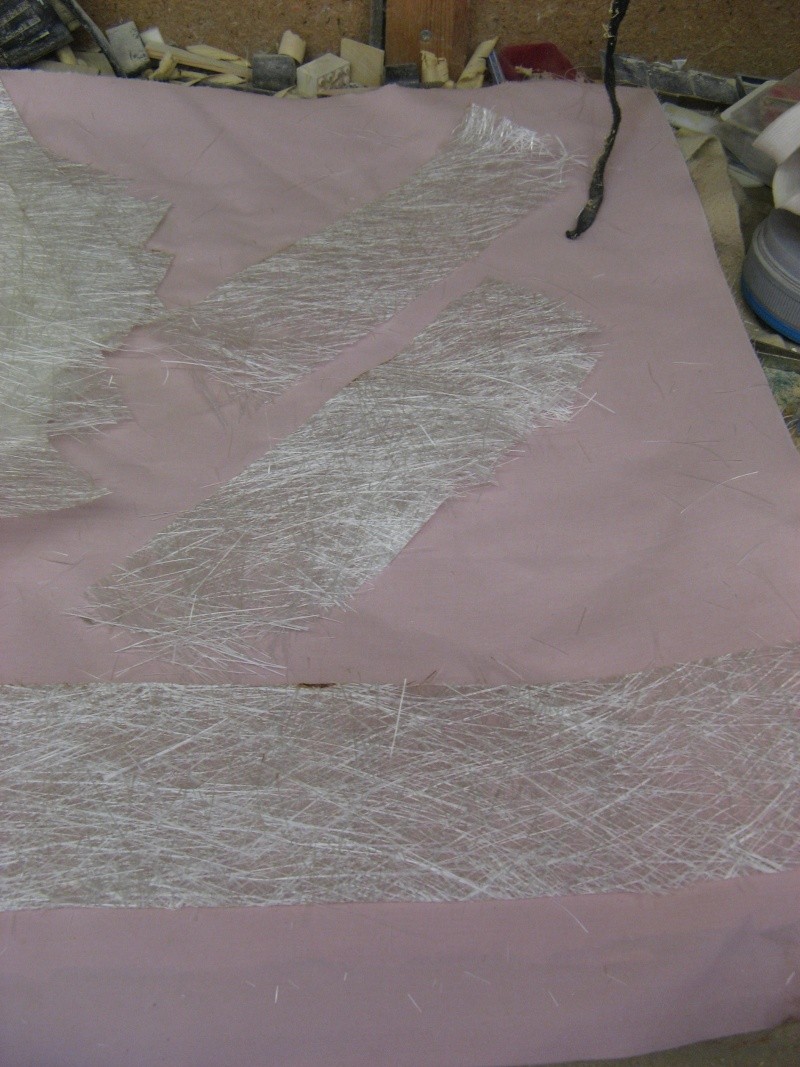 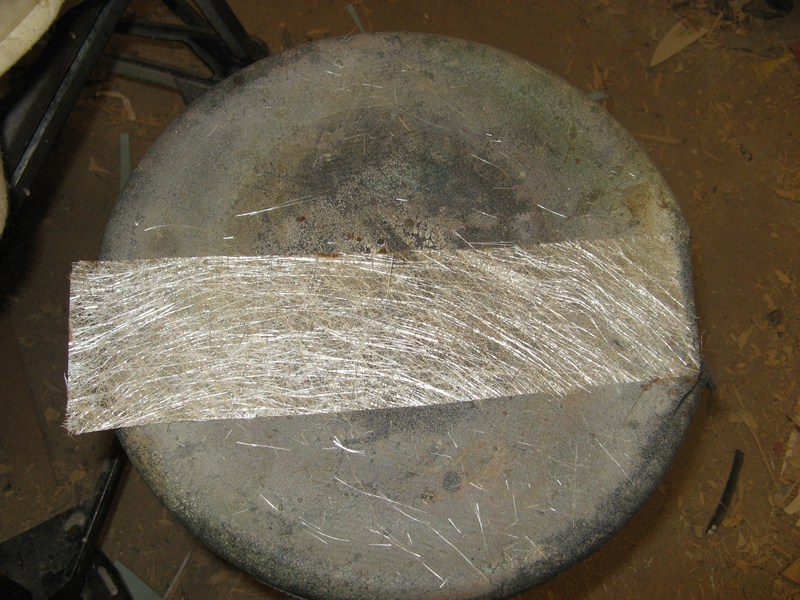 and splitting the matting. 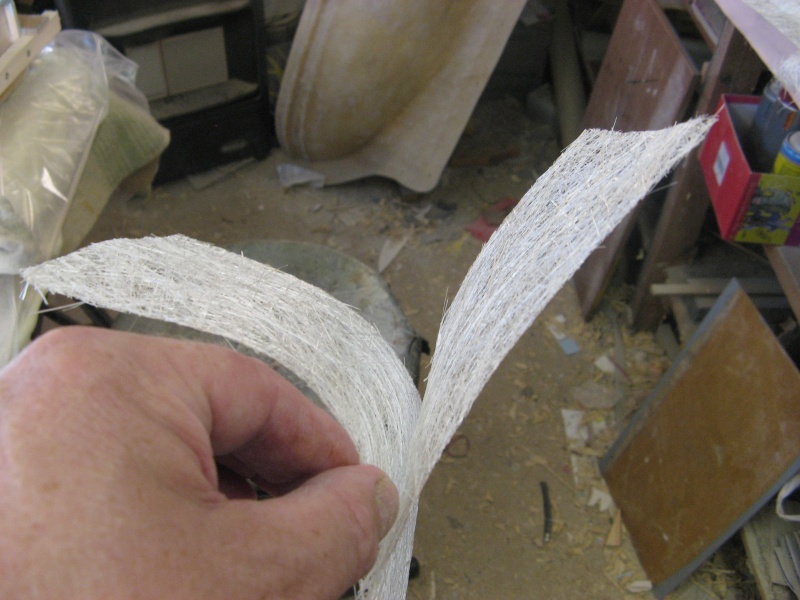 Now that this matter has been clarrified it's on to the preparation of the mould. |
| | | | Windy
Gunner
Posts : 132
Join date : 2011-12-11
Age : 57
Location : Always at work...
| | Subject: Re: A lifeboat build blog...........How a kit is made! Fri Dec 16, 2011 10:49 am | |
| Great blog Neil....  I use this ( http://www.cfsnet.co.uk/acatalog/CFS_Catalogue__Chopped_Strands_399.html ) 6mm chopped strand really useful for getting into tight corners and for building up a radius on sharp external corners so the mat will lay properly.... W. | |
| | | | Guest
Guest
| | Subject: Re: A lifeboat build blog...........How a kit is made! Fri Dec 16, 2011 11:30 am | |
| Now that's something I've been after for ages, Windy...thanks......Glasplies just don't seam to stock it when I need it.
thanks again.
neil. |
| | | | Guest
Guest
| | Subject: Re: A lifeboat build blog...........How a kit is made! Sun Dec 18, 2011 12:59 pm | |
| MOULD BUILDING
The most important and most critical part of any mould making is to be able to remove the moulding from the mould as easy as possible. No matter how well prepared the moulds are with release wax and agent and no matter how smooth the mould is, the nature of the material that you are working with, poyester resin has a propensity and urge to stick to the "item" that it is laid up against, and if you are laying polyester resin against polyester resin then it will try to stick to it with gusto. And so you have to try to eliviate that problem as much as possible. Professional mouldwers of high volume and large mouldings have the added luxuty of being able to separate mouldings from moulds by building into their moulds, pressure outlets that they can connect either warm water jets or compressed air in order to separate mould from mouldings.sadly the modeller doesn't have these luxuries and also tends to put onto his plug as much detailing as possible, which also hinders mould separation. As such the modeller has to use guile and some brute force, and unless a little physics is employed, he/she can ruin a mould first time he pulls a moulding out of the mould. To this, we tend to use "split moulds", i.e. the mould is made in more than one part and then held together using bolts before laying up the moulding. When I designed my first lifeboat for moulding I had built into the plug the keel skegs ( later left off wioth subsequent models and added later in the build) and this posed a problem in that if I made the mould as just a two part split like most other model moulds, I wouldn't be able to extract the moulding because the tunnels, the bilge skegs AND the protective belting would all act against each other and prohibit removal without either breaking the mould or breaking the bilge skegs off whilst removing the moulding from the mould. carefull thought decided that the moulds would have to be, ( instead of a singler split down the centre) a three part split, giving a four part mould, and the second and third split would have to be along the centre line of the belting for to aft. The diagram below shows the splits in the mould flanges and the black arrows show the direction of pull of the parts of the mould. All my subsequent lifeboat hulls have since been built this way, and they "pop" out perfectly. 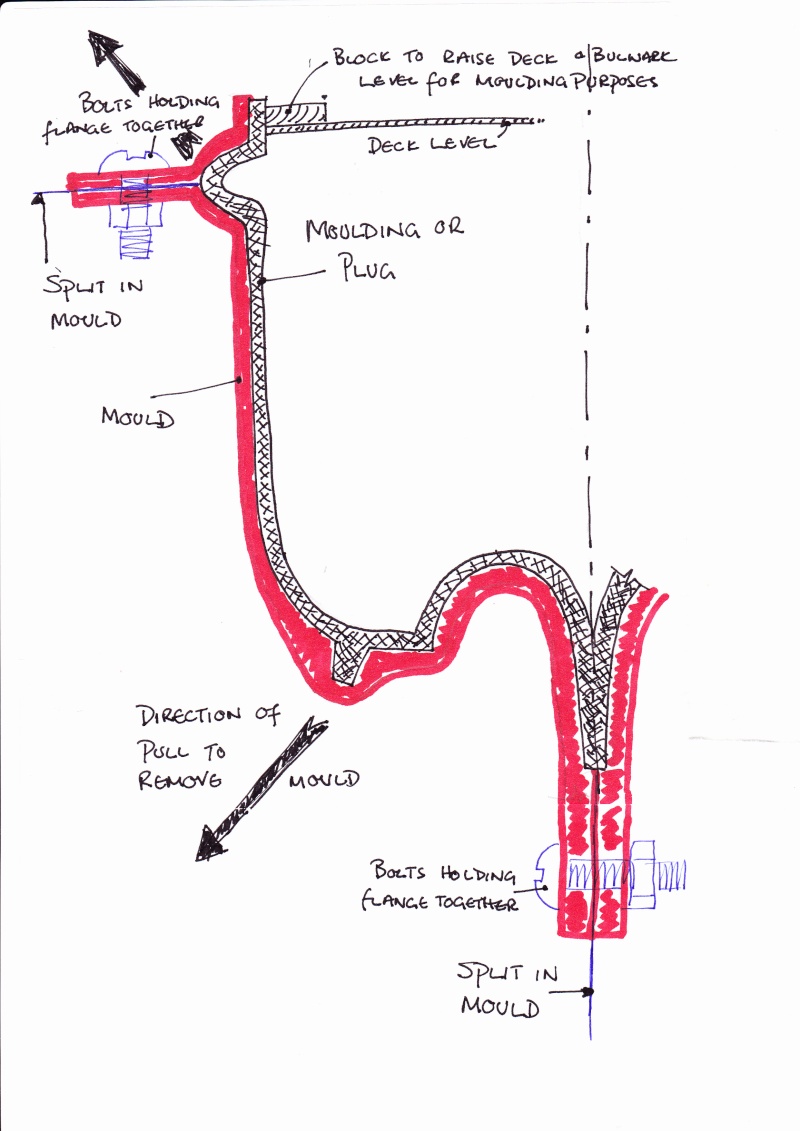 |
| | | | Guest
Guest
| | Subject: Re: A lifeboat build blog...........How a kit is made! Sun Dec 18, 2011 1:26 pm | |
| Now, those "flanges" that form the splits to the moulds have to be moulded in to the moulds at the time of moulding and therefore something removeable has to be placed onto the plug in order to mould upto to form the flange. The process is to make ( with such a four part mould) one quarter of the mould, usually the largest part ( and in this place the bottom half) and once it is set then take the removeable flange away and then mould up to the (by now) set and cured grp flange. The temporary flange is held onto the plug by foul means and fair. on such a long one as the Mary Stanford, I usually set up wooden battens at deck level to screw the ply or hardboard flange too and hold steady with a central support as in the photo. I back fill any gaps between the flange and the plug with moulders plastecine, and secure the flange to the plug with blue tack. see all photos for this set up. the photos also show the flanges for the cabins, but because of their simplicity these are made just in a single split mould giving two halves. 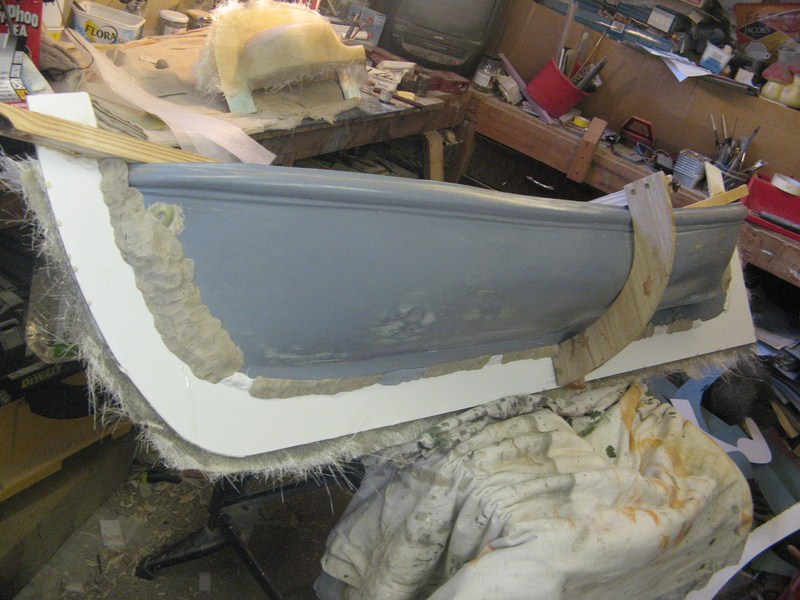 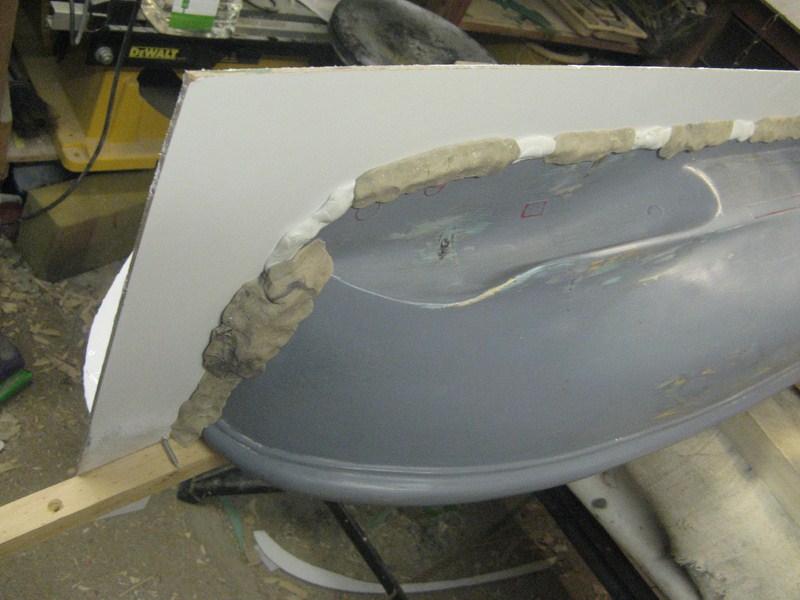 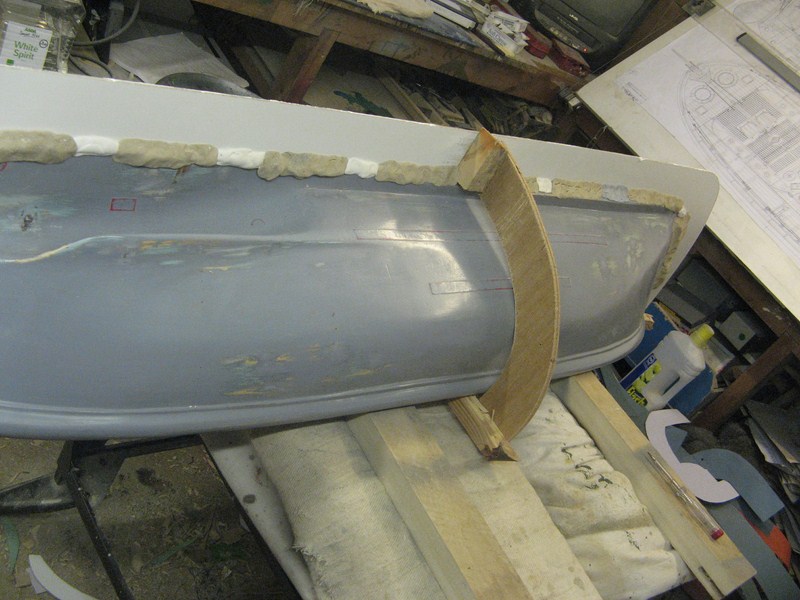 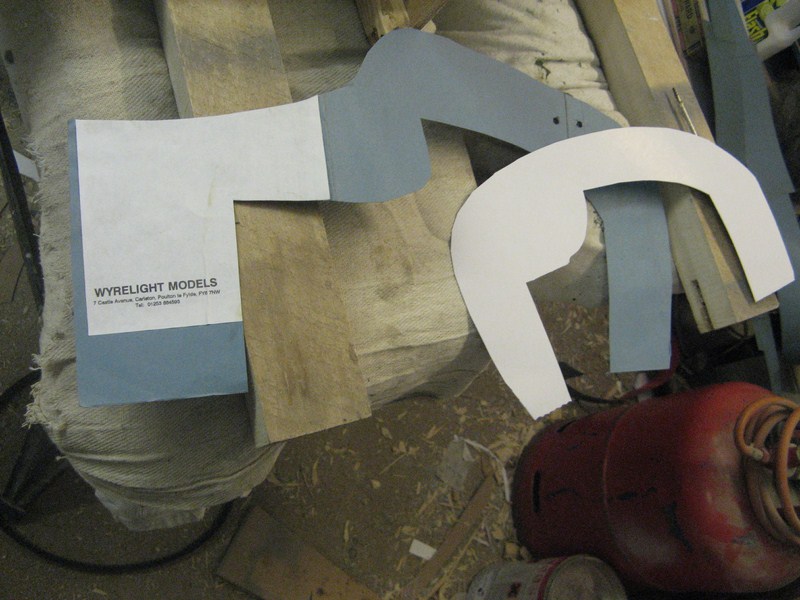 This is the finish between flange and plug that you are aiming for, to give a smooth edge to the mould to plug fitting. 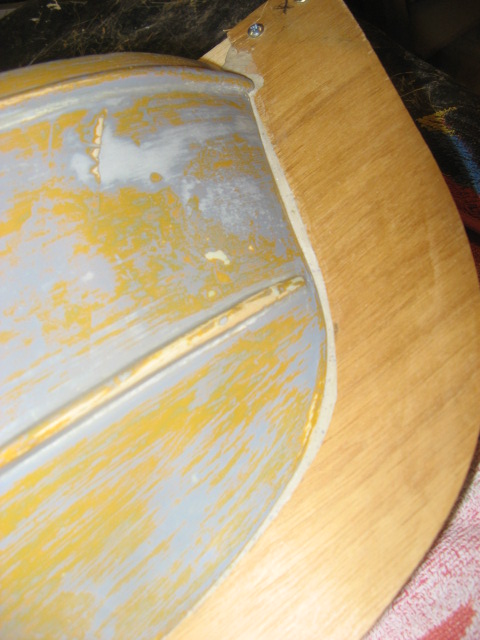 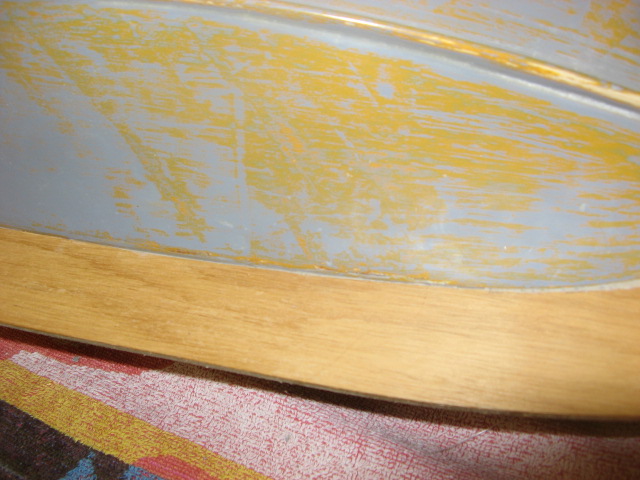 |
| | | | Guest
Guest
| | Subject: Re: A lifeboat build blog...........How a kit is made! Sun Dec 18, 2011 1:47 pm | |
| Now comes the actual messy work of Laying up a mould. 1) the plug, which has been pre waxed as mentioned before, has now to take a layer of PVA release agent......similar to a pva glue but much thinner, I tend to put some into a margarine dish and apply with a soft sponge giving an even layer. You will find that it bubbles and runs because of the wax, but with continued light rubbing with the sponge as the agent dries you will find that it will "wipe out" eventually and go on in an even coat. This is water soluable and the residue can be removed from the mould later with warm water. Allow this to dry thoroughly or it will react with the first coat of the moulding process giving a rippled orange peel effect. 2) A gelcoat has to be laid as the first layer and I personally like to colour it with a white pigment.really should colour it with a different colour to the actual white mouldings, but just my preference. This is the hard and protective outer/inner coating to the moulding/mould respectively, and must be covered by the layers of polyester resin/chopped strand mattings (as usually recomended by the manufacturers of the resins used) within 24 hours AT THE LATEST or de lamination might take place, as the resins bond to the gelcoat and make a good attachment. 3) I usually lay up my first layers of chopped strand matting to the gell coat within a couple of hours of the gel coat layer "going off" I have my chopped strand matting cut to small usable pieces, split in to two layers, and mix about a pound - 2 pounds of resin at a time, and even in a warm workshop of about 18 - 20c I have time to use all that resin without it going off, giving a good working time. Subsequent layers of matting/resin can be coloured with resin colouring pigment should the desire be there to do it...sometimes I do, sometimes I don't. Stippling hard and none stop , working the matting into corners you aim for a good airtight and bubble free finish. Picture below shows woring on the first half of the cabin up to the flange. 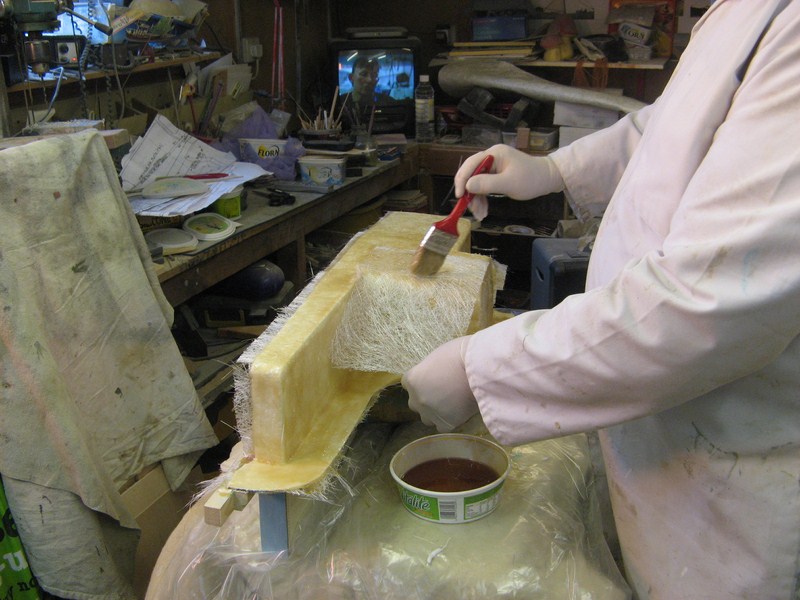 .
Last edited by nhp651 on Sun Dec 18, 2011 4:55 pm; edited 2 times in total |
| | | | Footski
Master
Posts : 548
Join date : 2011-06-11
Age : 66
Location : Malaga, Spain
| | Subject: Re: A lifeboat build blog...........How a kit is made! Sun Dec 18, 2011 3:30 pm | |
| Not sure if I have said it before, but simply superb...  | |
| | | | Guest
Guest
| | Subject: Re: A lifeboat build blog...........How a kit is made! Sun Dec 18, 2011 6:59 pm | |
| thanks barry.....I do my best, matey.
neil. |
| | | | Guest
Guest
| | Subject: Re: A lifeboat build blog...........How a kit is made! Sun Dec 18, 2011 7:43 pm | |
| this shot shows the longitudinal flange running along the length of the keel and the flange running around the centre line of the protective belting, with the gelcoat added for the first quarter mould. 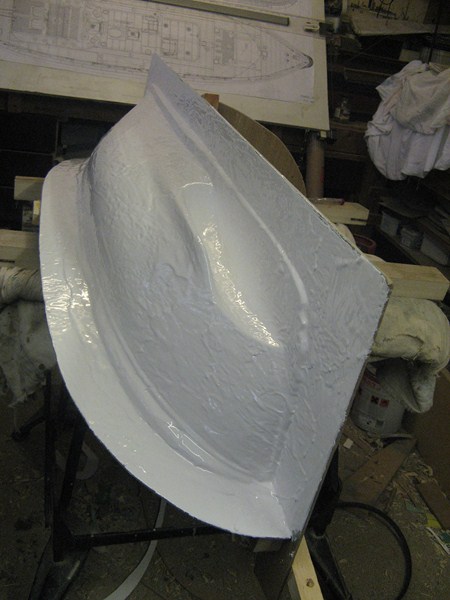 Once the gelcoat had "gone off" and the matting and resin has been added, which I normally build up to around 4 -5 layers all over for a production mould(not a moulding which would be considerably lighter and thinner) it is left to cure for around 48 hours, and then the flange running around the belting ONLY is removed and the second quarter of the mould...the small part above the belting to the deck level, on the same side is moulded in exactly the same way as before. This is why the deck has been extended upwards to give a little higher edge to the mould, and hopefully because it has been extended in the laying up process, will be well knitted together without any air bubbles on the edging, when trimmed back to the correct hight for trimming off the mouldings inside. You will now also see that to put a flat flange over all the deck to mould up to would be impracticalwith such a mould as this. 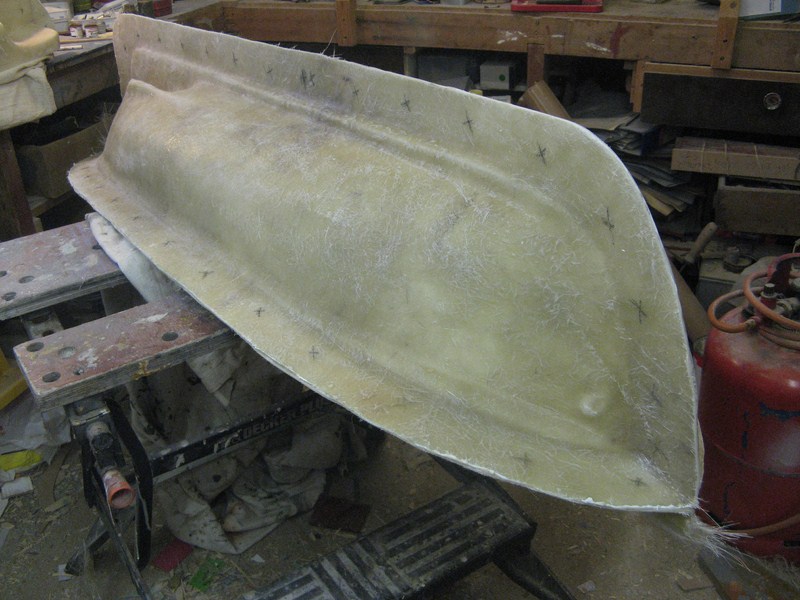 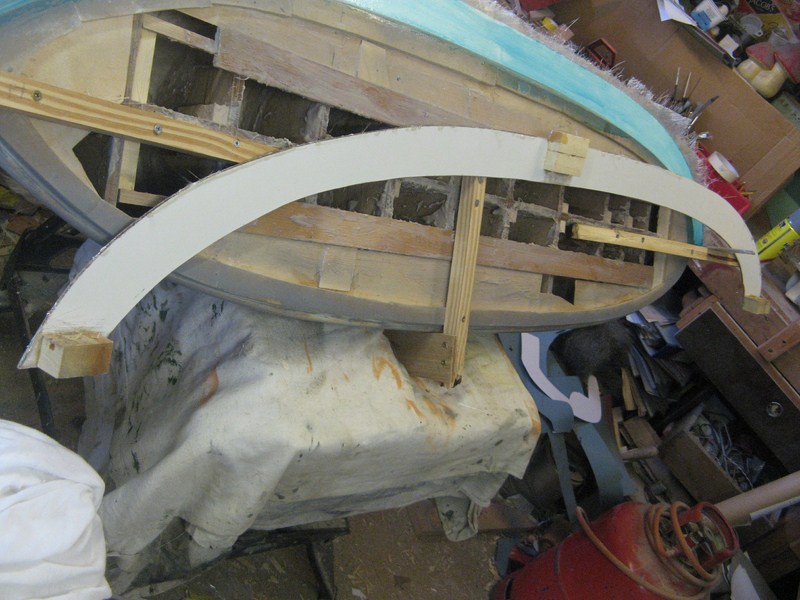 In these shots you can see the battening that holds the main flange to the plug running down the keel. it is screwed on so that it can be easily removed when the laying up process is done to one side of the boat plug. 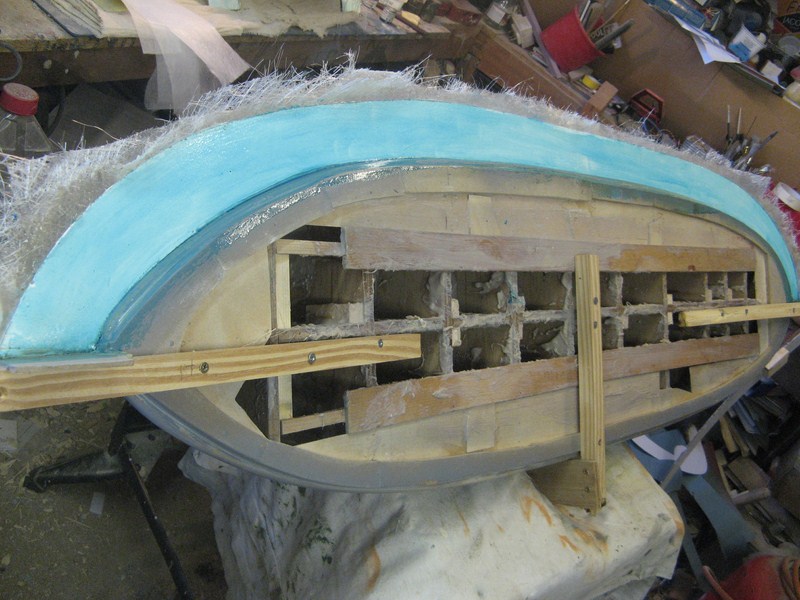 However before this, the now new and exposed grp flange from the first quarter moulding is treated to the same preparation as the plug...5 - 6 layers of wax, rubbed down and then PVA release agent applied. This release agent can be seen in the next shot of the cabin both to be moulded and after the first half of the mould has been laid up.  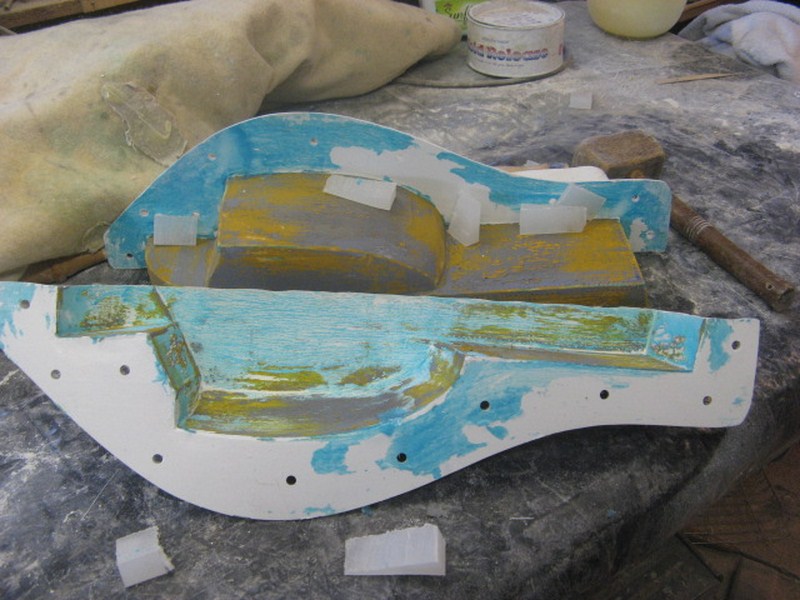 |
| | | | Guest
Guest
| | Subject: Re: A lifeboat build blog...........How a kit is made! Mon Dec 19, 2011 10:44 pm | |
| the first quarter has now cured and the flange around the protective belting has been removed (but not the flange running the length of the keel). Now the grp matting and resin is laid up to the upper part of the belting and alloud to cure.With this small area I tend to use shortish strips of matting around 6 - 12 inches in length and around 3" width to build up the layers, one length of the boat at a time so that a good even level of layers is achieved. this is then allowed to cure again for 24 - 48 hours.   Once the second quarter has cured, the whole process begind again with the other side of the boat, by firstly removing the flange from the full length of the keel. The exposed grp flange must again be fully polished up and release agent added before any gell coat and resin/matting is applied, and the flange for the belting is again added to make the third split in the mould. It is a long and methodical process to produce the mould, but if time is taken to lay the matting up slowly, carefully and with passion, you can avoid air bubbles in the mould and should end up with a "tool" that will give you a good number of mouldings from the same mould before it has to be replaced. below is a number of shots of the finished mould in four parts and trimmed up. However at this point the mould will still be "green" and needs to be stored correctly with the plug still in place for 48 -72 hours to allow it to cure well, or any subsequent moulding taken from the mould may come out twisted, warped or even hollow bilged...............i.e, you lay the boat on it's keel and a hollow can be seen where the keel doesn't run flat.........although this can also be caused by taking the moulding from the mould in a "green" and uncured state......so!!!, take your time and have patience.  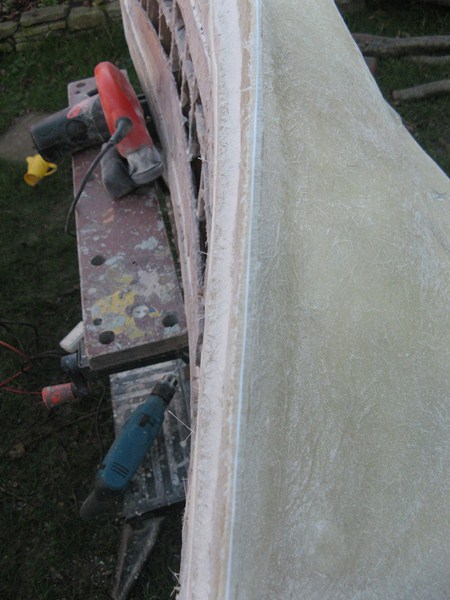 |
| | | | AlanP
Master
Posts : 278
Join date : 2011-06-11
Age : 79
Location : South Cumbria
| | Subject: Re: A lifeboat build blog...........How a kit is made! Mon Dec 19, 2011 11:02 pm | |
| We would prefere the posts in a morning Neil, saves waiting with bated breath all day How many hulls would a chap expect to get from a mould before it is past it's best Neil? | |
| | | | Guest
Guest
| | Subject: Re: A lifeboat build blog...........How a kit is made! Mon Dec 19, 2011 11:17 pm | |
| One of the worst things about GRP are the very nasty splinters that you can pick up in your hands if the mould isn't cleaned up properly...they hurt, they get infectec quickly and they are a real nuisance, so before anything else is done, the whole mould must be trimmed up......I tend to use a power file to trim down toa smooth edge once I have trimmed the edges of the flanges with a jig saw using a diamond tipped blade. The Flanges then need to be marked for drilling, and drilled with a 6mm hole to take 6mm roofing bolts 30mm in length. Spaced at intervals of around 4" apart, and about half way between the edge of the mould flange and the inner plug the holes are drilled and cleaned up. Finally the mould is ready for splitting. I start with the Protective belting flanges first, and, using either wooden or nylon V shaped wedges ( NEVER EVER USE CHISELS, SCREWDRIVERS OR ANY STEEL WEDGES)you can generally, with a few taps from a wooden mallet, find a starting point to drive in your first wedge.Just use a little brute force and some physics to drive in wedges along the length of the flange, and as you get towards the middle of the flange, you should hear a lovely satisfying "crack" as the release agent does it's job and the mould parts company from the plug, and you let out a sigh of relief that all the preparation that you have done to the plug has worked it's charm. It really is a great feeling, as the unknown becomes the reality and you find that you have a great mould. Just repeating the process with the second belting flange, progress is now made to split the main parts of the hull. All goes well, and an inspection of the new mould shows that a good moulding can now be taken from the mould.....approximate time to lay up a four piece mould including preparation of the flanges and lay up time .........about 40 hours. 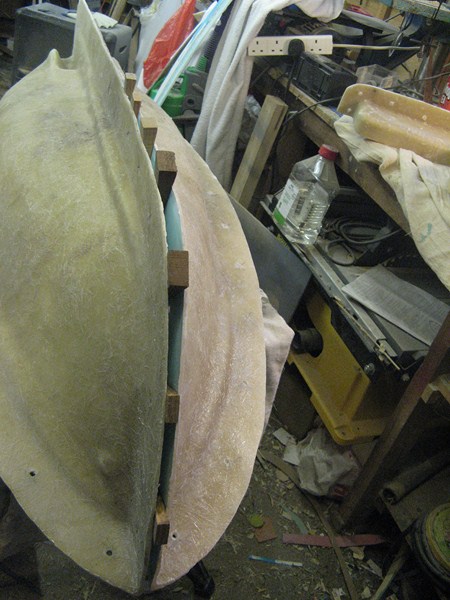  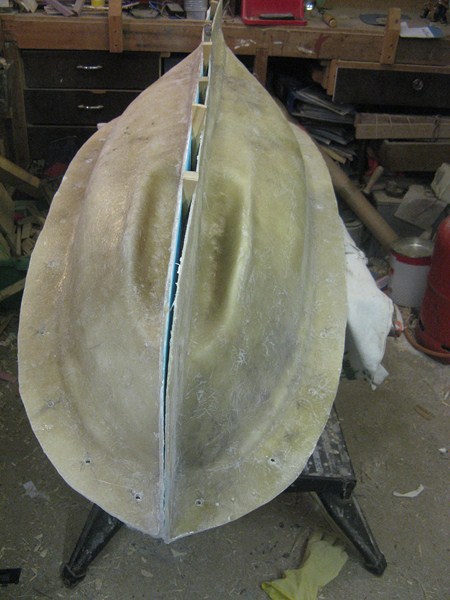  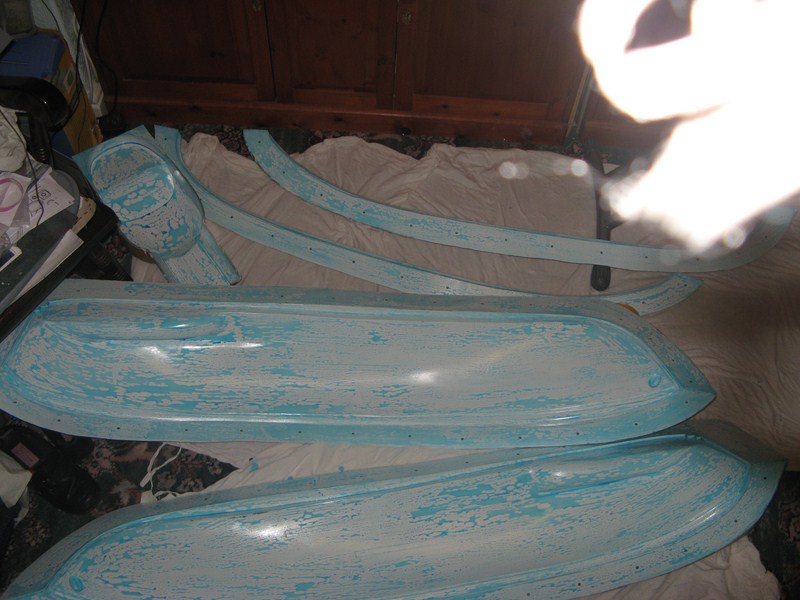  |
| | | | Footski
Master
Posts : 548
Join date : 2011-06-11
Age : 66
Location : Malaga, Spain
| | Subject: Re: A lifeboat build blog...........How a kit is made! Tue Dec 20, 2011 8:11 am | |
| Brilliant. I am really beginning to appreciate the effort that goes into making a kit hull now and to think these moulds only do so many hulls before you have to start again......Is it a good idea to have an apprentice????
Last edited by Footski on Tue Dec 20, 2011 10:46 am; edited 1 time in total | |
| | | | Guest
Guest
| | Subject: Re: A lifeboat build blog...........How a kit is made! Tue Dec 20, 2011 9:20 am | |
| it would be a good idea indeed.
Mark of Marks model bits took on Andy for just that purpose and he (andy looks to be doing well) and of course if you can reliy on someone else then the work is halved at least and more development work can be done to enhance the range.
Dave Metcalf, as I was , is just a one man band, and if you are working to fulfill orders, you can't be developing.you run yourselves into an early grave.
And making the moulds is, believe me, the easy bit.
neil. |
| | | | intrepid75
Master
Posts : 271
Join date : 2011-06-11
Age : 67
Location : Bristol, West country
| | Subject: Re: A lifeboat build blog...........How a kit is made! Tue Dec 20, 2011 7:40 pm | |
| Well I knew it was a lot of time and effort in producing a decent hull but the sheer amount of work you put into this is much more than I expected it to be. | |
| | | | Guest
Guest
| | Subject: Re: A lifeboat build blog...........How a kit is made! Tue Dec 20, 2011 7:45 pm | |
| This is the easy bit mate.
I'll post some more tonight.
spent all afternoon just making patterns for two rudders and their skegs and then transfering the info to drawings, lol
neil |
| | | | Guest
Guest
| | Subject: Re: A lifeboat build blog...........How a kit is made! Tue Dec 20, 2011 8:36 pm | |
| Now that the mould has been split and the plug removed the former can now be cleaned up and washed down of all the release agent. they now need to be looked at and any problems sorted. this can be anything fromsmall indentations or pinnacled left by an uneven plug to full blown repair of air bubbled in inaccesible corners where they formed on lay up. you can usually hear them rather than see them and if you go around the mould with a pencil, tapping the mould you'll get a hollow thud if there is an air bubble behind the gell coat. to remedy this, a sharp craft knife under the gellcoat will pick the surface coating away to leave the matting underneath. It's a simple job to mix a small amount of resin with a similar amount of gellcoat and pour into the hole left. Once it has set, simply wet and dry down to the level of the mould, but don't forget the hardener. Don't be tempted to fill the hole with polyester car body filler...it won't "gell" with it's surrounding grp and will probably pop out of the hole the first time you try taking a moulding from the mould. I usually spend a couple of hours wet and drying the moulds down with 400 and then 800 grade wet and dry, used wet, with a little fairy liquid in the warm water to stop clogging. Once the moulds have been cleaned off, it's ready to start again...with 5 - 6 coats of wax, and then a release agent. Finally, it's a case of bolting the 4 pieces of the mould together and then onto the making of the mouldings for the cabin and the hull, and now it is made in one piece. I won't go into the process of making a moulding other than to say, it's exactly as making the mould...gelcoat first into the mould, and then covered once gone off with layers of matting cut to shapes easily to fit the spaces and shapes of the hull. |The only thing to watch with the making of the moulding inside the mould is that if you get the matting too wet towards the top of the bulwarks they will fall in on themselves. here it is best to do one side of the mould at a time with the mould laid down so that the one side you are working on is at the bottom and laying horizontal. The bulwarks of such a mould as the lifeboat with the large indentation as the protective belting can weigh heavy when full of resin, and as such far easier to do one side at a time. And finally after all that work, out pops a nice set of mouldings. However in the next post, I'll show you what can go wrong if you forget something.....even big heads like me, make a balls up of it now and then. neil 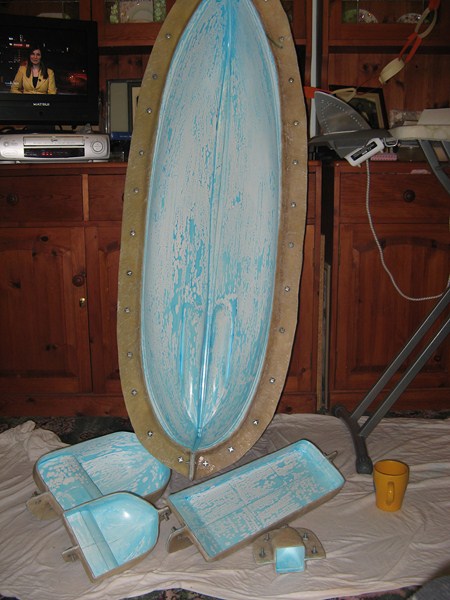   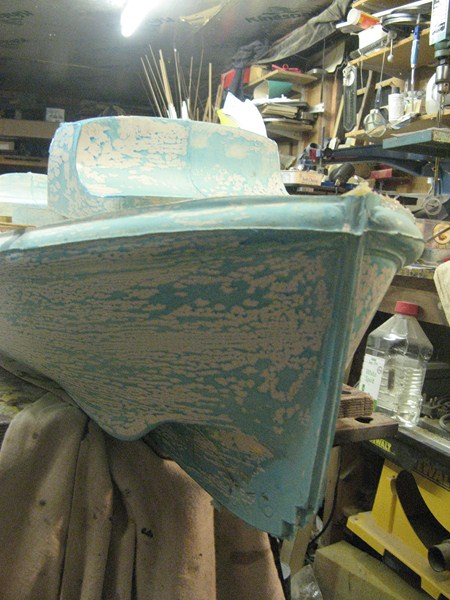   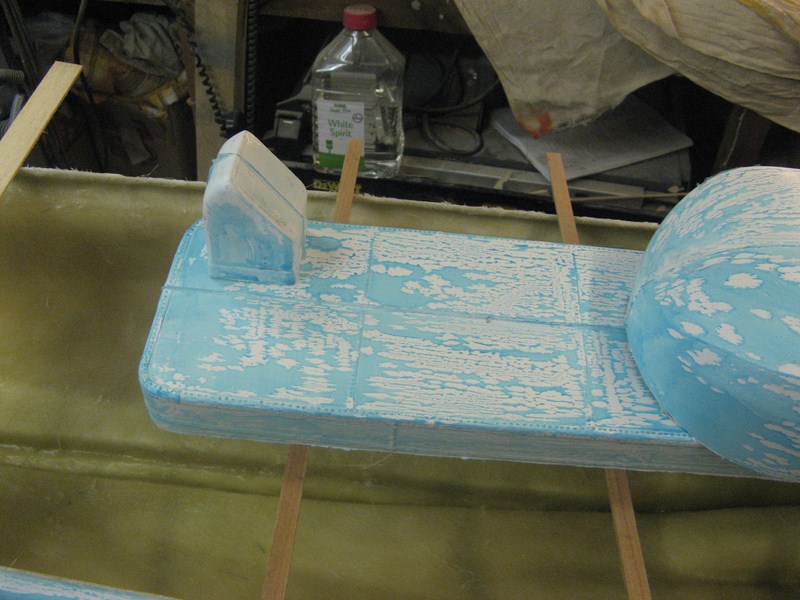 |
| | | | Guest
Guest
| | Subject: Re: A lifeboat build blog...........How a kit is made! Tue Dec 20, 2011 8:40 pm | |
| The following two shots are what can happen if you forget to put the catylist hardener into the first mix of resin which goes straight onto the gelcoat...instead of hardening the mix just carried on burning and eating into the gellcoat, and if not removed quickly would have also eaten into the mould and ruined that too. this happened on the first moulding of the Clyde lifeboat I made last year, when at the criticle moment of pouring the resin, I got as telephone call inside the house. when I had finally finished talking 5 minutes later,( not criticla in the tme lapse of the resin.but very criticle to my memory lapse........I forgot to put the catylist in the resin mix, and laid up a full coating of resin and matting without hardener......and this it what happens. Luckily it wasn't during the laying up stage of the actual mould. Of course the moulding was useles, but I had to continu laying it up with subsequent layer of matting and resin laced with hardener so that I could get it out of the mould........... even then it was a very messy job clearing the unhardened resin from the mould........very messy indeed.   |
| | | | Guest
Guest
| | Subject: Re: A lifeboat build blog...........How a kit is made! Tue Dec 20, 2011 8:48 pm | |
| Any way, that is the EASY BIT out of the way....
The thinking cap goes on now, and all the development work comes to the for...solving the problems, that hopefully won't be tranfered on to the customer to sort out, and give them a model that should, if instructions are followed, be plain sailing.
neil. |
| | | | Guest
Guest
| | Subject: Re: A lifeboat build blog...........How a kit is made! Tue Dec 20, 2011 9:03 pm | |
| |
| | | | pugwash
Midshipman

Posts : 60
Join date : 2011-06-19
Age : 77
Location : amble Northumberland coast
| | Subject: Re: A lifeboat build blog...........How a kit is made! Wed Dec 21, 2011 1:01 am | |
| Neil an extremely interesting thread - I was thinking of having a go at a mould - now I know why
I make my hulls in wood covered in matting or buy a professional one - there is no way I could
make what you are doing - I won't be on the earth long enough (well not above ground anyway)
Geoff | |
| | | | Footski
Master
Posts : 548
Join date : 2011-06-11
Age : 66
Location : Malaga, Spain
| | Subject: Re: A lifeboat build blog...........How a kit is made! Wed Dec 21, 2011 9:06 am | |
| I'm with you Pugwash. No way I am going to tackle that. I will stick to the wooden plug covered in matting and resin.....and I thought that was difficult!!  | |
| | | | Guest
Guest
| | Subject: Re: A lifeboat build blog...........How a kit is made! Wed Dec 21, 2011 10:22 am | |
| you guys have done the hard work when you make the plugs as good as you have....the moulding is the easy thing, honestly.
neil. |
| | | | Guest
Guest
| | Subject: Re: A lifeboat build blog...........How a kit is made! Thu Dec 22, 2011 12:29 pm | |
| It is now the planning stage of the build. It's ok building one for yourself, because any mistake that you make can be covered up in the build of your own boat, but if you make a mistake when planning this, then the mistake will be manifested into as many models as are sold in kit form, and each mistake will maifest in complaints to the manufacturer, complaints onto forums such as Mayhem......(we've all seen them, and at times I have been guilty myself of pointing mistakes out to manufacturers)......and as such have tried my best to overcome ANY and ALL mistakes before they got into production. This is not now a case of building a model and just describing how you did it and overcame problems.....the idea is to overcome those problems for the customer, so here goes. Sketches and hours and hours of just looking at a model hull and cabins takes place whilst I formulate my ideas as to how the cabins will be supported on a deck and how the deck itself will be supported, in order to get easy access to internals, and even things such as replacing a servo should one go wrong and stop functioning so that all aspects are covered. How to you make a solid deck to support and yet give space for the well decks that occur on most lifeboats of this kind. Each set of cabins for each lifeboat I am building is a completely different shape to one another so each set of deck supports will be different, in shape and position but ALL will be constructed in the same way. You can see below in order how different the cabins are and therefore how differently the deck beam layout will be...no two class of lifeboats will be the same. 1) H F Bailey, 2) Field Marshal and Mrs Smuts 3) Mary Stanford. 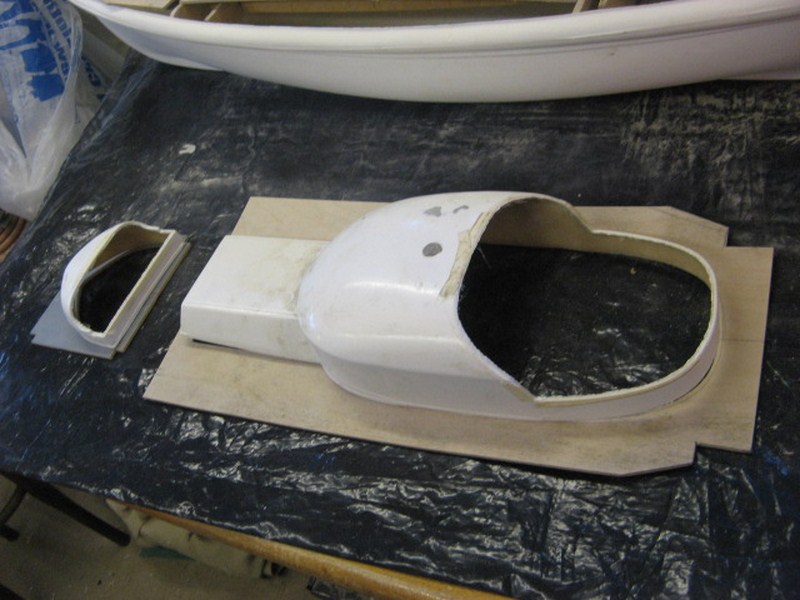 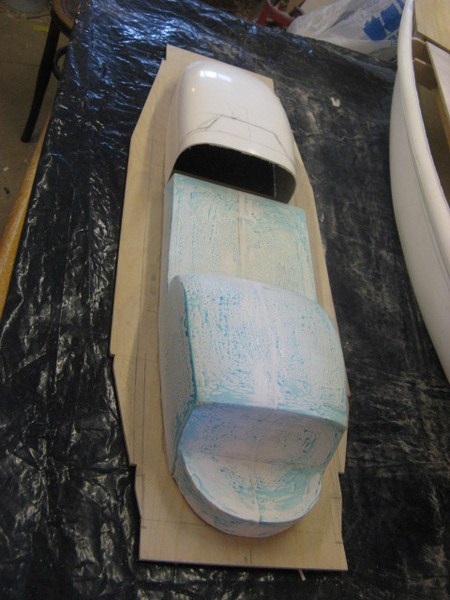  NOTE WELL:.......the bases that the cabins are sat upon are not made until the last process, and are only being shown here to high light the different shapes of the layouts. |
| | | | Guest
Guest
| | Subject: Re: A lifeboat build blog...........How a kit is made! Thu Dec 22, 2011 12:56 pm | |
| So, what's the first stage. Take the plans, and from them trace a centre backbone following the sheer of the boat and the inside shape of the bow and stern piece onto some stiff paper and cut out. Tape some cereal boxsides together the length of the sheet of paper and cut the same shape out..........then try to fit into the hull..hopefully it will, probably it won't, lol however, make sure that the sheer line of the boat does exactly follow the sheer line of the card cut out by placeing a 600 mm steel rule or similar straight edge across the boat hull, whilst the hull is supported squarely on the bench. If it fits correctly and looks level, you can transfer this template onto a sheet of 6mm birch faced ply, making sure that the outer grain of the wood is longitudinal to the backbone, and not cross grained( as that would weaken the structure. Cut out the longitudinal beam and then fit to the boat. Note at this point there will be ABSOLUTELY NO notches slots or any other recess cut into it (as shown on the photo..this beam was cut some time ago before I ever thought of doing a build log). and the picture below these two of the main back bone shows the approximate position of the cabins to the hull. 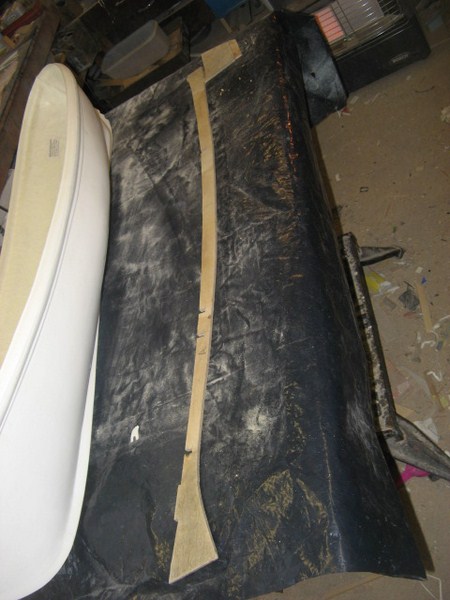  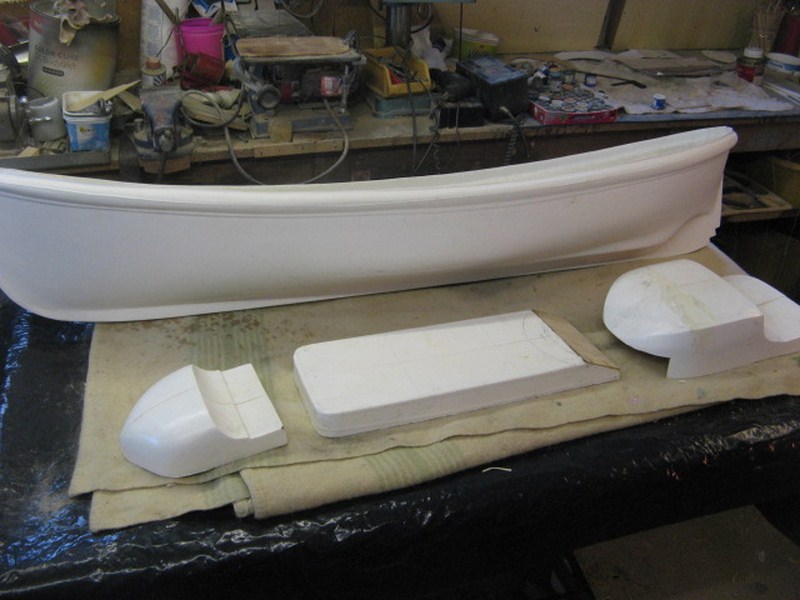 |
| | | | Sponsored content
| | Subject: Re: A lifeboat build blog...........How a kit is made! | |
| |
| | | | | | A lifeboat build blog...........How a kit is made! | |
|
Similar topics | |
|
| | Permissions in this forum: | You cannot reply to topics in this forum
| |
| |
| |
